|
 Basic
Key Movement Along an Isometric Plane
Basic
Key Movement Along an Isometric Plane
by senocular
First things first, draw a plane... but NOT on
the main timeline. Make one in a new movie clip. This will keep the plane
contained and easy to manipulate once complete. In drawing, use the grid and
grid snapping to help you create your lines. I have my grid snapping at 10 px.
Its good to know what yours are set at if you don't already. They determine the
size of your grid as you're drawing it. If you want, you can use some
checkerboard coloring to help distinguish the squares - like those I've been
using in the examples above.
Once complete, exit the movie clip and make a new
movie clip for the moving object. This is the object which will travel about on
the grid. For testing purposes, it can just as well be a circle. You can always
go back and change the imagery, though I'll refer to the object in question as
"ball" from here on out. When done, exit that clip, and with both clips on the
stage, arrange them so that the ball is above the grid and centered on a square.
At this point nothing happens if you test the movie - obviously. To change that
we're going to add some script. What script? The script that causes "Basic Key
Movement Along an Isometric Plane" of course! The script will be triggered by a
keypress and can be put directly on the ball as a clipEvent - the keyPress
clipEvent to be exact. In doing so we're going to have to know the size of each
grid on the screen, or at least some numerical reference from which to base our
calculations on. If you know, or figured out, your grid spacing and to what
dimensions you drew your grid, then this shouldn't be a problem at all, though a
lot of measurements can come out of that grid:
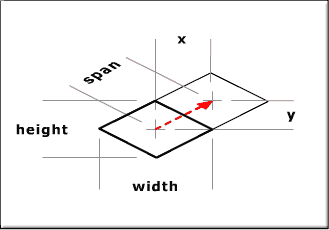
With the way this was drawn (using 2:1), all of
these measurements fit together nicely. Well all except the span, which is the
'actual' distance traveled and can be attained through trig, but that's actually
not important at all at this point so it can be completely ignored. What IS
important are the x and y spans. These are the spans we need to move in order to
make it to that other square the red arrow is pointing to.
Assuming each one of my grid spaces were drawn
with a width of 40 and a height of 20, my x and y values would be 20 and 10
respectively; 20 being 2 times the value of 10. So to move to the new square, a
movie clip. would have to move 20 spaces to the right (_x += 20) and 10 spaces
up (_y -= 10). In doing this we will have moved, in isometric grid terms, plus
one y space. With that in mind, we can figure out what it takes to move in the
other directions and assign them to the proper keys in our keyPress clipEvent,
like so:
When this is put on the ball clip,
the ball properly traverses the grid in the appropriate manner when using the
arrow keys! Be careful though. Hitting up too many times will take the ball
right off the screen! There are no protections to prevent this, but we will
implement some later.
A Quick Calculation
This past example was a simple example, and the rest will go faster and with
less step by step instruction in the assumption you know what's going on, but
there is an important concept to be understood here. That is the relation
between _x and _y placement on the screen and x and y placement within the
isometric grid. This example begins to embrace the very concept which all other
isometric placement is based and from that two equations are developed for each
_x and _y placement:
_x = spacing * (x + y);
_y = spacing/2 * (x - y);
Where _x and _y are the objects
on-screen coordinates, x and y are the isometric grid coordinates and spacing is
the height or x distance of your grid measurement (20 in the key movement
example).
So how was this derived? To come to this equation, lets think back to the
previous example and start our ball at the isometric point (0,0) though, at the
same time, this point should ALSO be be our _x and _y (0,0). Here's where
putting the grid in the movie clip. comes into play. With the grid in the movie
clip., you can easily set your grid to be at (0,0) and arrange the grid movie
clip properly on the main timeline not to be thrown in the upper left hand
corner of the screen.
Anyway, now, at isometric (0,0) our
screen position is also (0,0) which is good because it starts us off with a
conformity. This is very important though, because it will be consistent for
all future examples here. In moving up to isometric (0,1) - up one grid
space along the y, we move the ball to screen position (spacing, -spacing/2). So
without moving along the x at all, both the _x and _y values changed. If we
moved from (0,0) to grid position (1,0) - right one along the x then the new
screen position would be (spacing, spacing/2). Again, both the _x and _y changed
with only the x of the isometric spacing changing. so for every isometric x
movement, _x increases by spacing and _y increases by spacing/2 while for every
y movement, _x increases by spacing and _y increases by -spacing/2. Putting that
into a formula, we get:
_x = x * spacing + y *
spacing;
_y = x *-spacing/2 + y * spacing/2;
Which reduces to:
_x = spacing * (x + y);
_y = spacing/2 * (x - y);
Which are the original functions
mentioned above - the functions used to calculate any given _x or _y given an
isometric x and y in a grid with the given spacing. This will be used as a
foundation for positioning in a future example, but first, lets look at a
different way to handle isometric positioning with Flash in the next tutorial.
|


