Animation in Flash revolves around the timeline. In your timeline, you can specify a starting point and an ending point for a particular event. I use the word point as opposed to time, for the concept of time in Flash is different than in the real world. In the real world, you measure the time it takes to do something in seconds or minutes or hours. In Flash, the primary measure of time revolves around frames, and the seconds/minutes of an animation are dependent on your frame rate.
So, where does motion tweening fit into all this? When you create a simple animation in Flash, you always specify a starting frame and an ending frame. For example, you could specify a ball to be at the left end of your stage at Frame 1:

[ your ball on the left side of the stage ]
You then create a keyframe, for example, on Frame 20 and move the same ball to the right end of your stage:

[ your ball on the right side of the stage ]
If you preview your animation, you will see your ball start at the left end of your stage and suddenly, when you reach Frame 20, appear at the right. There is no smooth transition between the beginning and starting positions of the ball. Here is where motion tweening comes in.
Motion tweening creates a transition between your ball at Frame 1 and Frame 20. Flash automatically calculates where your ball's position would be between Frames 2 and 19, so that when you preview your animation, your ball gradually moves from its initial left position to its right position. All you do is specify the beginning and end frames. Flash takes care of the rest!
In this tutorial, I will try to explain tweening by helping you create a simple tween with a few twists. The following animation is an example of what one of your animations could look like from following this tutorial:
[ a quick motion tween animation ]
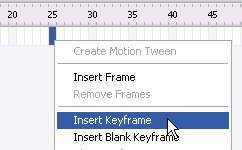
[ insert keyframe on Frame 25 ]
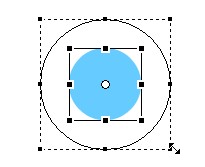
[ scale your circle larger ]
Hopefully the above example helps you visualize what a motion tween is doing. You are simply defining two different states for an object and letting Flash smoothly animate the space in between them.
In the example you created, the circle grew in size and shrunk in size at a linear rate. For the most part, in real life, very few things increase and suddenly decrease linearly. As an example, when you apply the brakes on a moving vehicle, you do not slow down at a steady rate. You initially slow down quickly before slowing down gradually as time progresses.
The natural way of gradually slowing down or speeding up is known as easing in geek terminology. In Flash, easing refers to the rate at which you move between keyframes during a tween. The speed at which you move through Frames in Flash is specified by your frame rate. In our example, the frame rate is set to 25 frames per second.
With easing applied, it will feel as though your frame rate is adjusted lower or higher than the limit you provided, for your object may accelerate or decelerate its transition from one state to another depending on which type of easing you chose.
I emphasize the word feel in the above paragraph because Flash does not really accelerate or decelerate your movie's frame rate. Doing so would cause jerky movement as opposed to the smooth movement you would expect with an ease. I 'felt' that it would be the best word to use to describe the situation :)
Speaking of types of easing, let's get into the two types of easing you will use:
Let's go back to our animation. As you can tell, we animated the circle to grow and then shrink back to its original size. Let's add some easing to our circle animation by easing it into its expanded size and easing back out to its normal size:
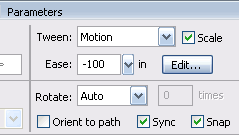
[ enter a value of -100 in the Ease text-field ]
Did you notice that I did not have you select all of the frames between any two keyframes to apply the effect? I simply requested you to click on any frame between the first two or last two keyframes. Any changes you make to your tween are always applied between two keyframes.
Selecting frames, for example, between 10 and 15 and adjusting the ease will not adjust the ease for those 5 frames. It will apply them to all the frames between the two keyframes at Frame 1 and Frame 25.
In Flash 8, you have more control over your easing beyond simply entering a value in the Ease text field. If you press the Edit button, found to the right of the Ease text field, you have greater control over your Ease as well as which property (position, rotation, scale, color, filters) of your animation will be affected by your custom ease. Addressing this topic requires a tutorial of its own, so I will hold off on explaining the intricacies of the custom easing feature until a later tutorial.
Thanks to TheCanadian for reminding me.
Motion tweening seems pretty easy, and for the most part, it really is the easiest way to animate a couple of objects. When I was starting out with Flash a long time ago, I often ran into problems creating anything beyond a simple motion tween.
The following is a list of tips based on mistakes I made when using tweens, and hopefully by confessing my mistakes, you will be less inclined to make them yourself:
There are more tips that can be found in the following thread: Motion Tweening tips thread.
I have provided the source file for the animation you have been working on. You can download it below:
Just a final word before we wrap up. What you've seen here is freshly baked content without added preservatives, artificial intelligence, ads, and algorithm-driven doodads. A huge thank you to all of you who buy kirupa's books, became a paid subscriber, watch the videos, and/or interact on the forums.
Your support keeps this site going! 😇


:: Copyright KIRUPA 2026 //--