 Tutorials
Books
Videos
Forums
Tutorials
Books
Videos
Forums


Welcome to my Third Tutorial! Anyone who had frequented the Game / AI Programming Forum in the Kirupaforum might have seen a very popular topic: The basics of an RPG, started by denacioust, where he did a decent job of creating a basic, and preliminary Tutorial for an RPG. However, the thread soon began to fill up with posts from n00bs, who kept asking the same questions repeatedly, without reading any other posts... and some seemed to be asking for someone to do a lot of the work for them - one of my biggest Pet Peeves. So, in response to the overwhelming number of repeated posts in the thread, I decided to take upon the task of writing a comprehensive Tutorial to get everyone started in creating one of the more involved types of games: The Role Playing Game, or RPG.
As I said before, denacioust started this whole thing with his own tutorial, which - to my knowledge - he never finished. I do not intend to use any of his examples, since I have no right to. In fact, I'm going to start all the way from the beginning, using my own examples, and such to walk through the process. I also want to make clarify that the end result from this tutorial will not necessarily be the best or most well-written sample of code - in fact, by most standards it will probably look pretty shoddy, but it should give you the benefit of a starting point, to get you going in the right direction - and should put an end to those repeated "How-can-I-get-my-guy-to-not-walk-through-walls" Questions.
What will be Covered:
First, I'll cover what an RPG is, and the different types there are. This will ensure that we're all on the same page.
Next, I want to cover planning, and coming up with the ideas behind your game. I want to stress that this is a crucial step, so you probably won't want to skip it.
If this looks daunting, don't worry - it is - but, we'll work through this the best we can.
So, what makes a Role Playing Game? This is one of the most difficult genres of game to identify, since sometimes the lines blur between what makes a RPG, as opposed to an adventure game, or something else. I want to try to make sure that you are actually making an RPG, and not just thinking you are. So first - a bit of history.
One of the first RPGs ever created, and in fact the one that has been the inspiration for many RPGs would have to be a simple pen & paper game called Dungeons & Dragons. With the invention of this game, you could get a group of friends together, and slaughter monsters by the dozen, and rescue scantily clad princesses - all in the comfort of your parent's basement. And the best part - in case that wasn't enough - instead of traditional games which - after reaching the finish line - you just packed everything up until next time, you could keep using your character, and they would grow - learning new skills, and special abilities.
Over the years the genre has evolved a bit, especially thanks to the introduction of video game RPGs, but the features that make them RPGs have stayed pretty much the same. Even D&D has changed over time, but you can still go to a hobby shop, pick up a book, and then spend countless Friday nights camped out in someone's basement, with empty cans of Mountain Dew littering the floor while hurtling fireballs at ogres. But here I want to point out those important features of an RPG, and discuss them a little bit. Now I know that Marz started some tutorials, and one of them does cover something similar to this, but I feel our opinions differ enough for me to bring in my own list. I'm not saying his is wrong, or anything, but for our purposes I would like to outline those things that I focus on. So here we go:
RPG Necessities:
So there you have my list, next up we'll discuss the different types of RPGs, and how to tell them apart. There really aren't that many varieties, but you'll want to know ahead of time which one you want to make, or else you'll be in trouble. There are only three different types that I can think of, Okay, so here we go:
Each type of RPG has its own Pros and Cons, but for this tutorial, I would like to work with the Classic RPG, for many reasons. After this tutorial, if you really wanted to, I feel confident that you can make your own RPGs of the other types, if you really wanted to.
Now we come to the first step of the development process - planning. You cannot hope to actually complete a game with any degree of complexity without planning. It can't be done. A lot of n00bs make the mistake of just grabbing pieces of code, and trying to make something cool, but ending up with a piece of worthless crap. Unfortunately, I can't do much in this department for you. I can only suggest that you spend plenty of time writing down everything you want to have in your game, as well as plans on how you're going to implement them. For RPGs having good story writing skills will also come in handy. For the story, read my other tutorial which I linked to on the last page.
As far as the rest of the planning, you should come up with everything that you might possibly want. Lets start making our example here - I don't really think we need an elaborate story, but I'll come up with something quick and simple here. The following is a very simplified list of things you need to come up with, and I'll also include what I've decided to use for our example game:
Well, it took you 4 pages, but now you can finally open up Flash. Happy?
Okay, so now we're going to get to the fun stuff. The first thing you should do, once you have Flash open, is to create a new Movie Clip. I named it "Guy". Next, you want to draw a representation of your main character, or avatar, or PC. You don't have to be elaborate at this step. After you draw this wonderful piece of art, make another Movie Clip, and drag an instance of this into it. Then, give it's instance a name, like "guy_mc", and drag an instance of the second movie out onto the stage. I find nesting things in this way can make the overall code easier, but you may come up with your own system.
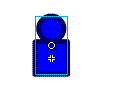
[ Our Guy ]
So now you have the stage, with a Movie Clip which contains another Movie Clip, named "guy_mc", which has our Guy's Graphic. In case you were wondering, in my image the head and body are on different layers to make animation easier.
Alright, next, go to the stage, and double click on the Movie Clip there. You can name the original layer something like "Graphic" if you like. Select the "guy_mc" clip, and type this code in the ActionScript Panel:
onClipEvent
							(load)
							{

								walkSpeed
								=
								5;

							}
It is almost always a good idea to place some type of "constant" variable at the start of your code, so that id you decide you want to make a change, it only involves changing one number. What we've just done is tell the program that walkSpeed is equal to 5, nothing new there. This number will represent the number of pixels that our guy will move whenever he walks. For now, lets keep this number at 5, and move on.
Here's the next code:
onClipEvent
							(enterFrame)
							{

								if
								(Key.isDown(Key.UP))
								{

									_y-=
									walkSpeed;

								}

							}
If you test the movie at this point, and press the up arrow, your guy will move up. Wow. Let me explain some of this code so far, for the n00bs. This simply states that every time the MovieClip enters this Frame, it will check to see if the "UP" key is being pressed, and if it is, will move the "guy_mc" MovieClip up by the number of pixels indicated in the first bit of code. Make sense?
In Flash (and in fact most programming languages) Y increases the further down you go on the screen, and X increases the further right you go. [ Example of X,Y Grid ] This means that by decreasing the value of Y, you move up, increasing Y moves you down.
With that said, we'll make the Guy move down now, by adding the appropriate code, until your whole thing looks like this:
onClipEvent
							(load)
							{

								walkSpeed
								=
								5;

							}

							onClipEvent
							(enterFrame)
							{

								if
								(Key.isDown(Key.UP))
								{

									_y-=
									walkSpeed;

								}

								if
								(Key.isDown(key.RIGHT))
								{

									_x+=
									walkSpeed;

								}

								if
								(Key.isDown(key.LEFT))
								{

									_x-=
									walkSpeed;

								}

								if
								(Key.isDown(key.DOWN))
								{

									_y+=
									walkSpeed;

								}

							}
When you test out the program, you can move your guy in 8 directions, but he's always facing the same way. We'll remedy this with a simple "_rotatation" command. "_rotation = x" simply tells Flash to rotate our MC by X Degrees. The finished segment of code should read:
onClipEvent
							(enterFrame)
							{

								if
								(Key.isDown(Key.UP))
								{

									_rotation
									=
									0;

									_y-=
									walkSpeed;

								}

								if
								(Key.isDown(key.RIGHT))
								{

									_rotation
									=
									90;

									_x+=
									walkSpeed;

								}

								if
								(Key.isDown(key.LEFT))
								{

									_rotation
									=
									270;

									_x-=
									walkSpeed;

								}

								if
								(Key.isDown(key.DOWN))
								{

									_rotation
									=
									180;

									_y+=
									walkSpeed;

								}

							}
If you test it now, you'll see Mr Guy moving around, and facing the way he's moving - but he's such a stiff walker. You can easily add some code to make him swagger a bit in his walk. From the stage, double-click on the first MC, and then from inside that, Double-click on the inner-MC to open up the MC you created first. I named this one "Guy".
The reason I nested the MCs like this, is to allow for quick modifications to the "Guy" MC, without having to re-do any code in the other MC. This comes in handy later, and is a good habit to pick up. [ make sure you have your MCs nested - the animation graphic inside the MC with all the code ]
Now, my Guy is simply a box on one layer, and a circle on an other. To make my animation of him walking, I just make a quick Motion Tween on the Head layer, and then have it move left and right a couple of frames. Nothing too long, or complicated or it will obviously appear to be a loop.
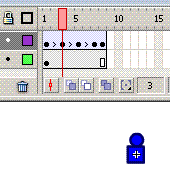
[ very simple 'head bouncing' animation ]
Your next step is to go back to our Movement MC, and modify the code a bit. First, in the "onClipEvent (load)" function, place the "stop();" command. This will tell our Guy not to start bobbing as soon as the Movie is loaded. Next, inside every "if (Key.isDown()) {" blocks, insert the "play();" command. As you can probably guess, this will make him animate whenever a key is pressed. If you try it out now, you'll see that Guy is stationary until you press one of the arrow keys, after which he starts bobbing, or whatever - non stop. To get him to calm down, after taking away his caffeine, we need to make an If statement that simply says: "If none of the arrow keys are pressed, then stop the clip." It looks something like this:
if
							(!Key.isDown(key.UP)
							& !Key.isDown(key.DOWN)
							& !Key.isDown(key.LEFT)
							& !Key.isDown(key.RIGHT))
							{

								stop();

							}
Place this snippet just before the very last } in the "onClipEvent (EnterFrame)" block.
In case you were wondering, the " ! " doesn't mean to get all excited - when dealing with comparisons, like If/Then statements in most languages, " ! " means: "NOT". So, the statement above basically says: "IF This Key is NOT Down". Make sense?
So there you have it! Hopefully at this stage you have a working movie, with a guy who can walk around, and looks lively when he does it. If you have any problems at this step, recheck all your code, and/or download the source file for what we've done so far to compare. Please make sure you are able to get your own code to work properly before moving on - don't just download the source, and then keep going...
Moving right along... It would be a very boring game indeed (if you could even call it a game) if your Guy could not interact with anything. So, we need to come up with some hitTests. For this simple sample game, I'm going to make some small items that the player can walk over and pick up. Nothing elaborate. First, using the same .Fla from earlier, you'll want to make a new MC, and lets name it "money". Inside, make a simple, and not to big icon for some money.

[ simple money mc ]
Now, drag an instance of this MC out to the stage, and name it "money_mc". Open up the ActionScript Pane, and enter this code:
onClipEvent
							(enterFrame)
							{

								if
								(_root.move_mc.hitTest
								(this))
								{

									_root.money++;

									this._x
									=
									-50;

									this._y
									=
									-50;

								}

							}
Essentially, what this code will do is this: Every time the Clip comes to this frame (which is always), it will check the "move_mc" movie clip against itself, and if the two touch or overlap at all, it will perform the following 3 steps: It will increase the value of "money", a variable we will be adding to "_root" by 1, then it will move this clip to the coordinates (-50,-50) - basically off the playing field so that Guy can't grab the same coin again.
When we get further along, we'll be creating items with the "duplicateMovieClip()" function, so we can later use "removeMovieClip()" to get rid of them instead of "cheating" by moving them off the screen.
We still need to do two more things before this works perfectly. First, create a new layer (you can name it ActionScript, or something if you like), select the first frame, and open up the ActionScript Panel. Enter this single line of code to create the "money" variable, with an initial value of "0":
money
							=
							0;
Next, go back to our other Layer, and create a new TextBox, any size or color you want, and make it Dynamic. Where it says "Var:" type: "_root.money", then save and test the movie.

[ the settings for the textBox ]
While HitTesting is a wonderful thing, it can be a little finicky in practice sometimes, as you'll see with practice. Not only that, it tends to be difficult to use when making maps, as we're going to do with this RPG. Almost all classic-style RPGs use tiles, at the very least for background use. As you'll see, using tiles can be very useful. Start out by opening up your favorite painting program, Photoshop will work just as good as MS Paint. First up, you want to determine the base size for all your tiles. I made them 64 X 64, but you can pick whatever you like. Then, draw away! I simply made 3 tiles: One for basic grass, one for Water, and one for a rock wall. Save them, and then open up Flash. Make a new MovieClip, named "TileSet1", and on frame one import your first tile, frame 2 the second, and frame 3 the third. Align them all to the top-left of the Stage, like this:

[ placement of the tiles ]
I would make the tile you plan to use the most as the first frame, but its up to you. Now, once you've done this, put "stop();" into the ActionScript of each frame. This is just a precaution. Make a new layer on the main stage, below everything else. Next, right-click on the MovieClip in the library, and choose "Linkage". Check the first check-box, where it says: "Export for ActionScript", and hit "Okay"..
Next, set the height and width of your movie to something divisible by the height and width of your tiles. In this case, 576 is my height, and width.
Now, get ready for some more advanced ActionScripting...Fun. Basically, what we need to do is tell Flash which Tile is which, and what those tiles are allowed to do. We do this by using some prototypes, and OOP, and other fun things which I really don't feel like trying to explain in great detail. For those who care, you can find some great tutorials on those subjects right here on Kirupa - written by people who know a whole lot more than I do on the subject. Anyway - this is pretty simple though.
Make a new Movie Clip, name it "blank", and click on "Advanced". Check where it says "Export for ActionScript". Keep this MovieClip blank, and then go back to the Main Timeline. Copy the following code to frame 1 of the main timeline:
mvWdth
							=
							576;

							mvHght
							=
							576;

							tileWdth
							=
							64;

							tileHght
							=
							64;

							tile0
							=
							function ()
							{};

							tile0.prototype.pos
							=
							1;

							tile0.prototype.barrier
							=
							false;

							tile1
							=
							function ()
							{};

							tile1.prototype.pos
							=
							2;

							tile1.prototype.barrier
							=
							true;

							tile2
							=
							function ()
							{};

							tile2.prototype.pos
							=
							3;

							tile2.prototype.barrier
							=
							true;

							map1
							=
							[[2,2,2,2,2,2,2,2,2],

							[2,2,2,0,0,0,0,0,2],

							[2,2,1,0,0,0,0,0,2],

							[2,1,1,1,0,0,0,0,1],

							[1,1,1,1,0,0,0,0,1],

							[1,1,1,1,0,0,0,0,2],

							[1,1,1,0,0,0,1,1,2],

							[1,1,0,0,0,0,0,1,2],

							[1,1,1,1,2,2,2,2,2]];
Now, let me try to explain what this all means... First, I simply told Flash how big our stuff is:
mvWdth
							=
							576;

							mvHght
							=
							576;

							tileWdth
							=
							64;

							tileHght
							=
							64;
Then, I defined our 3 tile prototypes:
tile0
							=
							function ()
							{};
							// Tell Flash that there will
							be a Tile1

							tile0.prototype.pos
							=
							1; // this is the
							number of the frame that the image is in

							tile0.prototype.barrier
							=
							false; //since the
							first tile is grass, its not a barrier

							tile1
							=
							function ()
							{};

							tile1.prototype.pos
							=
							2;

							tile1.prototype.barrier
							=
							true; // the water is a
							barrier, since you can't walk through it.

							tile2
							=
							function ()
							{};

							tile2.prototype.pos
							=
							3;

							tile2.prototype.barrier
							=
							true;
Next, I defined our first Map. Now, this map is essentially a 2-Level Array, also known as a Matrix. So, when someone asks you: "What is the Matrix?" you can say: "Its a 2-Level Array". Moving right along, Neo, if you can tell, our Map Matrix is made up of numbers from 0 to 2, and in seemingly random order. What we're going to do, is go through the numbers, one at a time, and place a copy of the "currentTileSet" clip on the stage, in the order that the map shows. This is how we do it:
function
							MapMaker
							(map)
							{

								_root.attachMovie("blank",
								"tiler",
								d++);

								var
								mapWdth
								=
								map[0].length;

								var
								mapHght
								=
								map.length;

								for
								(var
								i
								=
								0;
								i
								<
								mapHght;
								i++)
								{

									for
									(var
									j
									=
									0;
									j
									<
									mapWdth;
									j++)
									{

									var
									name
									=
									"tile_"+j+"_"+i;

									_root[name]
									=
									new
									_root["tile"+map[i][j]];

									_root.tiler.attachMovie("TileSet1",
									name,
									i*100+j*2);

									_root.tiler[name]._x
									=
									(j*_root.tileWdth);

									_root.tiler[name]._y
									=
									(i*_root.tileHght);

									_root.tiler[name].gotoAndStop(_root[name].pos);

									}

									}

								}

								MapMaker(map1);
What this does, is create a new instance of the "blank" mc on the stage, which will hold all our tiles. Then, it goes one-by-one through our Map Matrix, and checks the number to see which tile it wants, and it makes a new tile on the stage, changing the frame to match what our tile prototype says. And finally, it moves the tile to the point of the stage that it should go. Simple, huh? The last line of code: "MapMaker(map1);", is how we call the function to do all the work. The reason this is in a function, is so that you can change maps, which we will do later.
When you run the movie, you'll see a map, based on what your map matrix looked like But what happened to our guy? Well, he was buried under the tiles. Sucks to be him. We can easily fix this by making our Guy get placed on the screen after the tiles. So, go ahead and delete our Guy MC from the main stage, as well as the coins and whatever else you may have dragged there. (I recommend saving the file under a new name at this point, to keep from having losing anything...)
Next, we want to go to our library, and right-click on the Mc the contains the Guy graphic. In this case, I named it: "moving_mc". Choose "Linkage", and set it to "Export for ActionScript", I named mine "guy_mc", but you can name it whatever you like as long as you know what part of the next few lines of code to change.... Next, make a new Matrix in the first Frame of the main timeline, which will look like this:
itemMap1
							=
							[[0,0,0,0,0,0,0,0,0],

							[0,0,0,0,0,0,0,0,0],

							[0,0,0,0,0,0,0,0,0],

							[0,0,0,0,0,1,0,0,0],

							[0,0,0,0,0,0,0,0,0],

							[0,0,0,0,0,0,0,0,0],

							[0,0,0,0,0,0,0,0,0],

							[0,0,0,0,0,0,0,0,0],

							[0,0,0,0,0,0,0,0,0]]
Essentially, we're going to have 2 layers on the screen. The first one will be the map, and all the background stuff, and the top one will be the Player, and all interactable items. Simple enough, right? This new matrix should be the same size as the map matrix - there's no reason why this should be otherwise. Next, create the function to place all the items on the screen:
function
							placeItems
							(map)
							{

								_root.attachMovie("blank",
								"items",
								this.getNextHighestDepth());

								var
								mapWdth
								=
								map[0].length;

								var
								mapHght
								=
								map.length;

								for
								(var
								i
								=
								0;
								i
								<
								mapHght;
								i++)
								{

									for
									(var
									j
									=
									0;
									j
									<
									mapWdth;
									j++)
									{

										switch
										(map[i][j]){

											case
											1
											:

											_root.items.attachMovie("Guy","guy_mc",
											d++);

											_root.items.guy_mc._x
											=
											(_root.tileWdth
											*
											j);

											_root.items.guy_mc._y
											=
											(_root.tileHght
											*
											i);

										}

									}

								}

							}
And call it with:
placeItems(itemMap1);Now, if you test the movie, Guy should appear wherever the "1" is in the matrix. Make sure the 1 is always on a space which corresponds to a non-barrier tile. You can move him around, but he is in no way hindered by the tiles - yet.
The next phase is fairly complicated. In order to make this work the best, we need to determine where Guy is going to be before he moves. And then check his X, Y coordinates to see if he will hit a wall or not. This means we almost have to completely re-write our movement code. First, lets start with a new function, which will go just above all the movement code we've already made, and inside the "onClipEvent(EnterFrame)" block:
onClipEvent
							(enterFrame)
							{

								function
								checkCoords(x,y,direct){

									guyTL
									=
									_root["tile_"+Math.floor((x-(_parent._width/2)+1)/_root.tileWdth)+"_"+Math.floor((y-(_parent._height/2)+1)/_root.tileHght)].barrier;

									guyTR
									=
									_root["tile_"+Math.floor((x+(_parent._width/2)-1)/_root.tileWdth)+"_"+Math.floor((y-(_parent._height/2)+1)/_root.tileHght)].barrier;

									guyBR
									=
									_root["tile_"+Math.floor((x+(_parent._width/2)-1)/_root.tileWdth)+"_"+Math.floor((y+(_parent._height/2)-1)/_root.tileHght)].barrier;

									guyBL
									=
									_root["tile_"+Math.floor((x-(_parent._width/2)+1)/_root.tileWdth)+"_"+Math.floor((y+(_parent._height/2)-1)/_root.tileHght)].barrier;

									switch(direct)
									{

										case
										0:

										if
										(guyTL
										||
										guyTR)
										{

											return
											false;

										}

										case
										1:

										if
										(guyBR
										||
										guyBL)
										{

											return
											false;

										}

										case
										2:

										if
										(guyTR
										||
										guyBR)
										{

											return
											false;

										}

										case
										3:

										if
										(guyTL
										||
										guyBL)
										{

											return
											false;

										}

									}

									return
									true;

								}
Okay, let me try to explain what this function is going to do when we use it. First, it takes 3 variables: x, y, and direct. X and Y will be the theoretical coordinates of Guy, if he were allowed to move where he wants. direct is the direction he is moving. Next, we find Guy's corners: guyTL, Guy's Top Left Corner, will be either true or false depending on what tile that corner is on, and so on. So if Guy is standing on grass, and is moving to grass all four of those should be false, meaning none of his corners are on top of a Barrier space.
Okay... next, we adjust our movement code - instead of simply moving if a key is down, we should only move after checking our coordinates with our new function, and if the function says its okay by returning true. Here's the entire modified movement code:
if
							(Key.isDown(Key.UP))
							{

								play();

								_rotation
								=
								0;

								if
								(checkCoords(_parent._x,
								_parent._y
								-
								walkSpeed,0)){

									_parent._y-=
									walkSpeed;

							}}

							if
							(Key.isDown(key.RIGHT))
							{

								play();

								_rotation
								=
								90;

								if
								(checkCoords(_parent._x
								+
								walkSpeed,
								_parent._y,2)){

									_parent._x+=
									walkSpeed;

								}

							}

							if
							(Key.isDown(key.LEFT))
							{

								play();

								_rotation
								=
								270;

								if
								(checkCoords(_parent._x
								-
								walkSpeed,
								_parent._y,3)){

									_parent._x-=
									walkSpeed;

							}}

							if
							(Key.isDown(key.DOWN))
							{

								play();

								_rotation
								=
								180;

								if
								(checkCoords(_parent._x,
								_parent._y
								+
								walkSpeed,1)){

									_parent._y+=
									walkSpeed;

								}

							}

							if
							(!Key.isDown(key.UP)
							& !Key.isDown(key.DOWN)
							& !Key.isDown(key.LEFT)
							& !Key.isDown(key.RIGHT))
							{

								stop();

							}

							}
Well, this should be pretty self-explanatory. If you notice, we're not sending the current x, y coordinates of Guy, we're sending what they would be if he moved. Also, in case you were wondering, when we send the direct value, 0 = UP, 1 = DOWN, 2 = RIGHT, and 3 = LEFT. Test out the Movie, and you have a walking Guy, who cannot walk through walls, or over water. Yay! Play with this a little bit, and experiment. See if you can make bigger maps, or change the maps around. If its not working, compare my source code to yours... but try to get at least some understanding before the next section, where I will show you how to make a simple Map editor, so that you can make maps much easier.
Being able to visually edit maps is a huge benefit to game developers. So, we're going to create a simple Map Editing Program to do this for us. First, make sure you've saved your Movie, and then create a whole new one. Make it at least a little wider than the game movie, and just as tall. For my file, I made it 676 X 576. Save it, and switch back to the game code, and copy/paste the this from your original file into the first frame of your new movie:
mvWdth
							=
							576;

							mvHght
							=
							576;

							tileWdth
							=
							64;

							tileHght
							=64;

							tile0
							=
							function ()
							{};

							tile0.prototype.pos
							=
							1;

							tile0.prototype.barrier
							=
							false;

							tile1
							=
							function ()
							{};

							tile1.prototype.pos
							=
							2;

							tile1.prototype.barrier
							=
							true;

							tile2
							=
							function ()
							{};

							tile2.prototype.pos
							=
							3;

							tile2.prototype.barrier
							=
							true;

							map1
							=
							[[0,0,0,0,0,0,0,0,0],

							[0,0,0,0,0,0,0,0,0],

							[0,0,0,0,0,0,0,0,0],

							[0,0,0,0,0,0,0,0,0],

							[0,0,0,0,0,0,0,0,0],

							[0,0,0,0,0,0,0,0,0],

							[0,0,0,0,0,0,0,0,0],

							[0,0,0,0,0,0,0,0,0],

							[0,0,0,0,0,0,0,0,0]];

							function
							MapMaker
							(map)
							{

								_root.attachMovie("blank",
								"tiler",
								d++);

								var
								mapWdth
								=
								map[0].length;

								var
								mapHght
								=
								map.length;

								for
								(var
								i
								=
								0;
								i
								<
								mapHght;
								i++)
								{

									for
									(var
									j
									=
									0;
									j
									<
									mapWdth;
									j++)
									{

										var
										name
										=
										"tile_"+j+"_"+i;

										_root[name]
										=
										new
										_root["tile"+map[i][j]];

										_root.tiler.attachMovie("TileSet1",
										name,
										i*100+j*2);

										_root.tiler[name]._x
										=
										(j*_root.tileWdth);

										_root.tiler[name]._y
										=
										(i*_root.tileHght);

										_root.tiler[name].gotoAndStop(_root[name].pos);

									}

								}

							}

							MapMaker(map1);
Next, go ahead and copy both your TileSet MC, and your blank MC to the library of the new movie. All your tiles should come with them. If you test the Movie, it should make the map like in the other Movie. So far so good.
Now, we need to add a variable to the _root, so put this line of code at the very top of the ActionScript panel for frame 1:
selectedTile
							=
							0;
Next, make a button for each tile you have, and drag an instance of the tile image into all 4 frames of the button. Next, open up the TileSet MC, and make a new layer on top of all the others. Create a new button, which has nothing in it, except for a box on the "Hit" frame, which is the exact same size as your tile. Place this button in the layer above your tiles, and align it to cover your tiles.
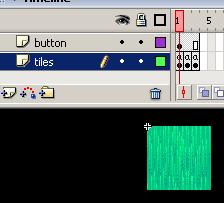
[ button placement ]
Select the button, and add this ActionScript:
on
							(release)
							{

								this.gotoAndStop(_root.selectedTile
								+
								1);

							}
Go back to the Main Timeline, and drag an instance of the "TileSet" MC to the stage, somewhere to the right, away from your other buttons. Name it "selector", and put a TextBox near it that says: "current tile". Now, select the button which shows your first tile, and enter this code:
on
							(release)
							{

								_root.selectedTile
								=
								0;

								_root.selector.gotoAndStop(1);

							}
Copy and paste the same code into your other buttons, incrementing each number by one, so that the second button would look like this:
on
							(release)
							{

								_root.selectedTile
								=
								1;

								_root.selector.gotoAndStop(2);

							}
And so on. If you test it out at this point, you should be able to click on a tile button, and then change the map accordingly. All we did was make a button in the TileSet which, when clicked, changes the Tile displayed to whatever "_root.selectedTile" is set to. Simple enough, right? Now, we need to find a way to save, or export these maps into a matrix. Unfortunately, according to Macromedia, Flash is not allowed to write to an external Text file directly... In order to do this, you have to use ASP, JavaScript, or some other Server-Side Scripting... I don't feel like even trying to do this for such a quick and simple tool... if you feel you absolutely have to have such features, you're on your own. However, we can do something simpler: Have Flash create a the matrix for us, and display it on the screen for us to copy/paste, and do whatever we want. This is good enough for my purposes, so here we go:
First, make a new MovieClip, and name it: "mapBox". In this MC create a TextBox, set it to Dynamic, and name it: "mapTxt". I would make some kind of background for this textbox, so that you can read it above the map. Also, make a small "close" button, and place it in this MC. Right-click the mapBox in the library, choose linkage, and set it to "Export for ActionScript". Use the same name. The code for the close button should look like this:
on
							(release)
							{

								_root.Clicked
								=
								false;

								_parent.removeMovieClip();

							}
Now, you'll want to make a button on the main timeline, which will have this code:
on
							(release)
							{

								if
								(!_root.Clicked)
								{

									_root.Clicked
									=
									true;

									_root.attachMovie("blank",
									"map",
									this.getNextHighestDepth())

									_root.map.attachMovie("mapBox",
									"mapBox",
									this.getNextHighestDepth());

									_root.map.mapBox._x
									=
									300;

									_root.map.mapBox._y
									=
									200;

									_root.mapString
									=
									"[";

									var
									mapWdth
									=
									_root.map1[0].length;

									var
									mapHght
									=
									_root.map1.length;

									for
									(var
									r
									=
									0;
									r
									<
									mapHght;
									r++)
									{

										_root.mapString.concat("[");

										for
										(var
										n
										=
										0;
										n
										<
										mapWdth;
										n++)
										{

											var
											name
											=
											"tile_"+n+"_"+r;

											_root.mapString+=
											String(_root.tiler[name]._currentframe
											-
											1);

											if
											(n
											<
											mapWdth
											-
											1)
											{

												_root.mapString+=
												",";

											}
											else
											{

												_root.mapString+="]";

											}

										}

										if
										(r
										<
										mapHght
										-
										1)
										{

											_root.mapString+=",\r";

										}

									}

									_root.mapString+=
									"]";

									_root.map.mapBox.mapTxt.text
									=
									_root.mapString;

								}

							}
All this does it look at the map on the screen, and create a string, which will look like the matrix that we want to create, then it creates an instance of the mapBox on the screen, and fills the mapText with the string.
And that's it! Try it out, and see how it works! Hopefully this editor is easy for you to modify to your own needs. You should have no problem creating one of your own for your own game later on. Next, we'll discuss how to put maps together, so that our Guy can move from place to place.
Wait - this tutorial isn't over! There is more that needs to be written, and the rest of this tutorial will appear right here shortly. Until then, I hope this helped.
Just a final word before we wrap up. What you've seen here is freshly baked content without added preservatives, artificial intelligence, ads, and algorithm-driven doodads. A huge thank you to all of you who buy kirupa's books, became a paid subscriber, watch the videos, and/or interact on the forums.
Your support keeps this site going!
- SeiferTim

:: Copyright KIRUPA 2026 //--
