


Before writing this tutorial, I asked around in the forums if there was any general interest in animation principles. A large part of the kirupa community is made up of developers and designers, so I wasn't sure how many people would benefit from this knowledge. Then I realized that what I wanted to share can be useful to just about everyone who uses Flash to add more life to a project.
Back in the halcyon days of Disney, the animators there began dissecting really great character animation to figure out what made it great. After years of study, they came up with a list of twelve principles that all great animation uses:
In this tutorial, I'm going to focus on two of them: Timing and Squash and Stretch. The plan is to apply both ideas to a simple bouncing ball animation and use that as a practical way to see how these principles add life.
To get started, take a look at this intentionally bad example:
[ a simple animation created quickly in Flash 8 ]
See how the ball seems really affected by gravity and really squashes and stretches as it falls and bounces? Yeah, neither do I. Everything is happening at the same slow speed, and the ball is not responding to the action. This is bad animation, yet I see it all the time on websites the world over.
Remember, these are principles that carry over into every aspect of animation. As you go through this tutorial, try applying them to whatever project you're working on right now. Let's start creating the illusion of life.
Start by opening Flash and creating a new document. You can use whatever stage size you're comfortable with, but make sure the frames per second is set to 24. This is film timing, and it's a good default habit to get into when dealing with character animation:
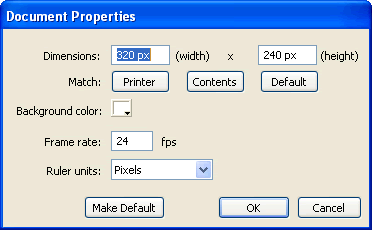
[ set your frames per second (fps) to 24 ]
Create a ground plane. Using the line tool, hold Shift and drag the line across the bottom of the stage. This gives us a plane of reference for our ball.
Make it a graphic symbol by selecting the line and pressing F8. Choose Graphic and name it ground. It should look something like this:

[ create a line and convert it into a graphic ]
Create a layer above the ground layer and name it ball. Using the Ellipse Tool, hold Shift and drag to create a decent-sized ball. Place the ball on top of the line so it looks supported by the ground. Select it, press F8, and make it a graphic symbol.

[ draw a ball near your line ]
Timing is, in essence, how long a given action lasts. It is represented by how many frames an animator assigns to that action. A big problem with a lot of student animation is that everything moves at the same pace. In real life, this rarely happens.
So we ask ourselves: how long do we want this ball falling animation to last? This is something I usually visualize in my head. I close my eyes, see the action taking place, and imagine how many seconds or half-seconds it might take. This is a knack and requires lots of practice.
It is extremely helpful, if not necessary, to have a stopwatch with you and actually act out the action you are preparing to animate. That way you have at least some sort of guideline to shoot for. In this case, let's suppose we want it to last one second. Since there are 24 frames in a second, we'll need 24 frames for a one-second animation.
Go to your timeline and select frame 24 for both layers, then hit F5 to make the keyframes extend to that frame. We are creating a framework, boundaries if you will, for our animation to take place in. This keeps us from being overly ambitious while keeping us focused on the purpose of our goal: creating a lively ball bounce.
Time to make it move. Go to frame 1 of your timeline and select the ball. Let's make something that resembles this:
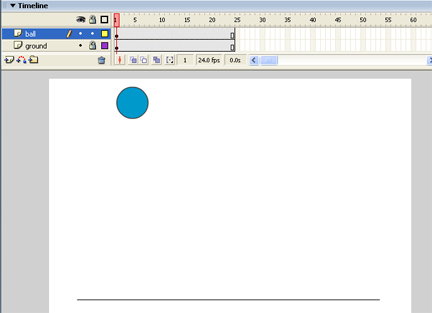
[ place the ball towards the top ]
Now, in traditional animation, the drawings play back at 24 frames per second, which could possibly mean 24 drawings per second, but not necessarily. Through years of experimenting, animators found out that you can create a nice illusion of life by only using 12 drawings per second. Needless to say, that was a lot easier on the animators.
Instead of having each drawing play for just one frame, they held the drawing for two frames. This began to be referred to as shooting on 2s. You can shoot on 1s, 2s, 3s, 4s, 5s, and more. Holding for 6 or more frames creates the feel of a hold to the viewer. Still, according to Richard Williams, quoting an even older animator, "Everything looks better on ones!"
In this case, we're going to shoot on 2s for this lesson. That means every other frame will be a keyframe. Go to your timeline and, on the ball layer, create a keyframe for every other frame by selecting the desired frame and pressing F6.
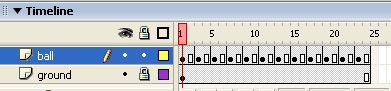
[ notice the gaps in our timeline ]
Some of you may be wondering, "Why not just use motion tweening? After all, it's a lot faster, isn't it?" Faster, yes. But for really great character animation, or for maximum control, keyframing is the way to go.
So how do we know where and when to place our ball? On frame 1 the ball is up, and if we want to make a cycle, we would place the down position in the middle and then end where we began. Halfway between 24 is 12, but there isn't a keyframe on frame 12. Frame 12 is still part of keyframe 11, so let's put it on frame 13 and roll with it.
Go to frame 13, select the ball, and use the arrow keys while holding Shift to bring the ball down to the ground plane. We want the ball touching the ground, so don't be afraid to zoom way in.
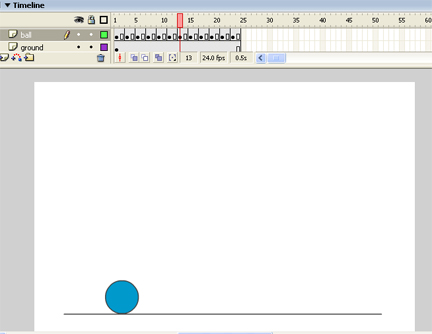
[ on frame 13, ensure the ball hits the line ]
Now we connect the dots. We go back and forth between frame 1 and frame 13 and figure out where to put the five drawings that will give us the best feel. Gravity and the ground are affecting the ball. As the ball drops, it is going to pick up speed. That means our drawings are going to be spaced differently in relation to one another.
As the ball is just beginning to drop, place the drawings closer together so the action happens slower. As the ball begins to get pulled down by gravity, place the drawings further apart. This creates the illusion that the ball is moving faster. Spacing is a somewhat complicated concept to grasp and requires a significant amount of contemplation to really understand, so think carefully about the differences between timing and spacing.
Select frame 3, your second keyframe. To view the spacing of your keyframes, use the onionskin option. This can be turned on by clicking the small button on the bottom of your timeline that looks like two overlapping squares. Drag the left handlebar all the way to the left and make sure the right handlebar is directly over your current frame.
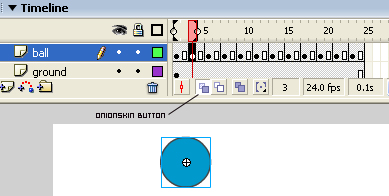
[ the onionskin button ]
If you select the ball and begin moving it around, you'll notice that you can see not only its present location but a ghosted image of the previous drawing. That's what onionskinning does for us. Use the arrow keys to begin nudging the second keyframe downward.

[ viewing frames with onionskin enabled ]
For the third keyframe, move the ball significantly further from its starting point. When you select your third keyframe, re-drag the left onionskin handle so that it covers the first keyframe. This allows you to see the first and second drawings along with the third.
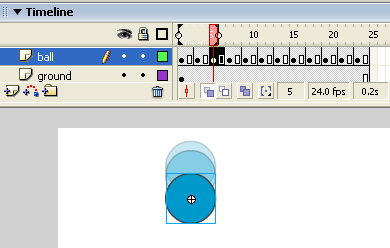
[ notice the three keyframes of positions visible ]
Continue in this fashion with the next three keyframes, gradually increasing the spacing as gravity takes hold of the ball. By frame 11, this is what I have:
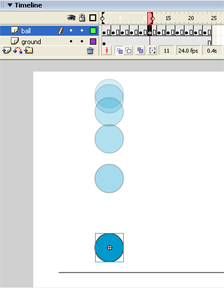
[ a static preview of your animation ]
The next keyframe is the point of contact for the ball and the ground. For the most part, our sequence is complete. To make it a cycle, we need only to work backwards. Copy the first set of keyframes in reverse: on frame 15 paste frame 11, on frame 17 paste frame 9, on frame 19 paste frame 7, on frame 21 paste frame 5, and on frame 23 paste frame 3. Once the playhead reaches that last keyframe, it loops back to frame 1 to complete the cycle. It's kind of like a yo-yo.
This is what your animation should look like when you're done so far:
[ our ball moves up and down more naturally ]
Squash and stretch is pretty much exactly what it sounds like. It is squashing and stretching an object to show how it reacts to an outside force. You'll be surprised at how much life this can add to animation. The trick is knowing when to use it and knowing to what degree to use it.
Go back to your second keyframe. As gravity begins to pull our ball down, we can exaggerate that idea by slightly stretching the ball. Select the ball, hit Q to get the transform tool, zoom in a little, and on the y-axis stretch the ball slightly. Mine looks like this:
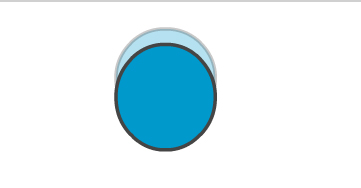
[ stretch your ball slightly towards the top ]
You can barely even tell, but when it's finally animated, your eye will subconsciously see it. Continue in the same fashion. On the third keyframe, stretch it a little bit more. Keep onionskinning on at all times so you can see how your current drawing relates to the previous ones. By keyframe 11, we've stretched the ball out quite a bit:
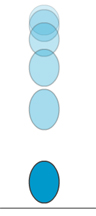
[ a long-range view of the stretching ]
As you're stretching the ball, you may wish to squeeze it a little on the x-axis in order to keep the volume looking consistent. One thing that can ruin squash and stretch is squashing or stretching too much and, in doing so, making the volume of your object inconsistent.
By frame 13, we're ready to squash this thing because it is hitting the ground. Select the ball on frame 13, hit Q for the transform tool, and move your pivot point so it is resting right on top of the ground plane. This will force the ball to squash where we want it to. Once you reposition the pivot, squash the ball down on the y-axis and stretch it a bit on the x-axis.
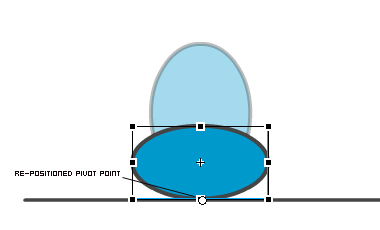
[ stretch the ball horizontally to signify the collision ]
To give the animation one last tweak, let the squashed drawing last three frames instead of just two. That way the viewer really gets the feeling that the ball is hitting the ground and squashing down. Go to the timeline, select all the keyframes after this one, and drag them all one frame to the right. Your timeline should look like this when you're done:

[ extend the squashed drawing by one frame ]
The only thing left to do is to go back and finish the last half of the cycle by replacing the old frames with the newly stretched ones, just like you did earlier in the animating-the-ball section.
Your finished animation, now with a lot more life and energy, should look like this:
Just a final word before we wrap up. What you've seen here is freshly baked content without added preservatives, artificial intelligence, ads, and algorithm-driven doodads. A huge thank you to all of you who buy kirupa's books, became a paid subscriber, watch the videos, and/or interact on the forums.
Your support keeps this site going! 😇

:: Copyright KIRUPA 2026 //--
