 Tutorials
Books
Videos
Forums
Tutorials
Books
Videos
Forums


A popular feature of my site (kirupa.com) has been the scrolling circles, emoticons, squares, etc. that can be found on my homepage and in my forum footer. People often ask me how I created that animation, and, needless to say, they walked away after I gave a long, winding explanation. Therefore, I decided I will create a tutorial that walks the user through the steps easily instead of confusing them through "flashnetized" babble.
The following animation is what I am referring to, and, yes, you will create something similar by the time you reach the end of this tutorial:
[ movement by programming at only 856 bytes! ]
The above animation is what you will learn how to create. I will guide you through creating the movie, customizing the movie, and hopefully helping you understand the code and why it works the way it does. While this tutorial is geared for Flash MX, you should be able to make this effect work in Flash 5.
Creating Continuous Movement:
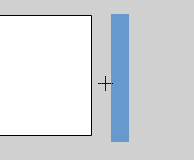
[ the rectangle has been drawn beyond the right edge of the stage ]
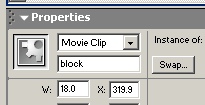
[ give the rectangle the instance name 'block' ]
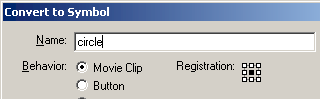
[ the convert to symbol dialog box ]
onClipEvent (enterFrame) {

	//generating movement

	location = this._x;

	var i;

	i = 1+_root._xmouse/5;

	if (this, hitTest(_root.block)) {

		this._x = -1000;

	} else {

		this._x = location+i++;

	}

	//clips are scaled according to y-mouse;

	this._xscale = 40+_root._ymouse;

	this._yscale = 40+_root._ymouse;

}
[ copy and paste the above code into your movie clip's actions dialog box ]
[ NOTE ]Make sure you do not forget the select the movie clip, press F8, and select the Movie Clip option from the Symbol Dialog box as mentioned in Step 4.
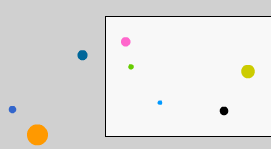
[ randomly arrange your circles in different colors/locations ]
Customizing the AnimationUnless you plan on having your animation be 300 pixels by 120 pixels (width x height) always, you may need to know how to modify some data to custom-tailor the effect for your own animation.
Find the line of code that you pasted that contains the number -1000. That number represents the number of pixels back the circles will "respawn" after hitting their right buffer (the rectangle). If your animation is wider than 300 pixels, make sure you increase the number -1000 to something greater (less actually) such as -1200.Increasing that number ensures that you will not have circles that sporadically spawn in the middle of the animation instead of beyond the left edge. There is no factor that you can multiply the width of your movie by to get the magical number. The location of the re-spawn depends on how you scaled the movie; if you scaled down, the chances of your movie clip spawning in the middle of your animation are greater. Flash takes into account the scaling of your movie clip and adjusts the movie clip's movement accordingly. This is kind of confusing, so experiment with the value! Only by trial and error will you find out what you intend to do.
You are officially done with this tutorial. While I cannot force you to read beyond this, you will gain some valuable ActionScript knowledge so you can tweak the code to your own liking.
You can download the FLA I used in writing this tutorial so you can compare my animation with that of yours:
ActionScript ExplanationYou pasted a big chunk of ActionScript into a movie clip a few instructions ago. If you are like me, you probably did not pay much attention to what the code contained. You are probably, also, confused at the explanations in the customization section I wrote. That is why I have provided in the next few sections a detailed walkthrough of why/how the code works the way it works.
Click the Next Page link to learn the nitty-gritty secrets of why the animation behaves the way it does.
Let us continue what we began in the first page, shall we? First, let me paste the entire chunk code in here for easy viewing:
onClipEvent (enterFrame) { //generating movement location = this._x; var i; i = 1+_root._xmouse/5; if (this, hitTest(_root.block)) { this._x = -1000; } else { this._x = location+i++; } //clips are scaled according to y-mouse; this._xscale = 40+_root._ymouse; this._yscale = 40+_root._ymouse;}
In the next few sections, I will take each line (section) of code and explain the rationale behind it. Most of it will be mundane material you may already know, but some of the explanation might be new. If you want, you may simply skip ahead to the lines where you may have questions on.
onClipEvent (enterFrame) {
The above line signifies one of the most common code-openers for a movie clip. The statement is known as an On event handler because "on" an event, something should happen. In this case, on the event of entering the frame, the code found below the on would be executed. Unlike other events, enterFrame continuously executes the code under it without requiring some preconditioned statement or user action.
location = this._x;
I am assigning a value this._x to the variable location. Notice that I did not declare (forgot is the more proper word) the variable location before use. No worry! Unlike other programming languages, ActionScript is not very picky on details like this. The words this._x refer the the X position value of the current movie clip. The statement this takes the place of a conventional movie clip instance name. Because our movie clip is actually a circle that will get copied and pasted numerous times, singling one name would have proven impractical for this animation. An example would be to call a group of kids "children" instead of calling each one by name. Similar to how a child knows to respond to "children", the movie clip knows to respond when it sees "this".
To sum it all, the variable location gets the current X position value of the movie clip.
var i;i = 1+_root._xmouse/5;
Ok, it is not one line (or section) of code, but I digress from my original writings a bit. In the first line I declare the variable i in Flash. Of course, I do not have to declare the variable i before using it, but I just thought you would like to know how variables are declared.
In the second line, I am assigning the variable i the value of one added on to the X position of the mouse (_xmouse) divided by five. Why would I add one to the statement? After all, does "one" actually make a difference when we are dealing with numbers that go into the hundreds and thousands?
I add a 1 to the final result of the xmouse divided by 5 because I do not want the answer to ever be zero. The variable i is going to eventually become the value for the speed. If the speed happens to become zero, the circles would simply stop moving - which I do not want! The minimum speed of the circles will always be 1, and I started the co-ordinate plain at the x and y location: 0, 0. So _xmouse will never have a negative value.
if (this, hitTest(_root.block)) { this._x = -1000;} else { this._x = location+i++;}
Let's take a look at the dark colored portions of code first. The first line introduces the if statement. I am basically telling Flash, "If the movie clip (this) hits the block (the rectangle on the right) do what is contained above the else statement; if not, do what is contained under the else statement". That is basically it! You can learn more about if/else statements by clicking here.
The blue and green portions of code are the receivers of the if statement. If the the condition set forth by the if statement is true, the first blue colored statement executes. I am telling Flash to take the current movie clip's x value and subtract 1000 from it. You may remember in the Customizing section of this tutorial, I told you to edit the value of -1000 depending on your movie's width. Now you know when that happens - when the circles come into contact (hit) the rectangular block.
If the condition (hitting the block) is not met, the second blue colored line of code will execute. I am telling Flash to make the current X position of the movie to equal the current value (location) plus the value of i (the speed). This is called an "incrementer" because it increments the value of this._x.
Throughout the movie, the green portion of code will be likely to be executed the most. Why? Throughout the movie the circles will not be in contact with the rectangular "block". Only when the circles come into contact with the "block" does the if condition become true, and the code in blue executes.
this._xscale = 40+_root._ymouse;this._yscale = 40+_root._ymouse;
The above two lines scale the movie according the vertical position of the mouse pointer (_ymouse). To make the scaling uniform in both the x and y directions, I use the same code for both _xscale and _yscale. Because I did not want the size of the movie clips to fall to go beyond a certain minimum, I add 40 to the final result; regardless of where the mouse pointer is, the scaling will be greater than 40. Of course, I used a standard geometric plane that has its origins at 0, 0. Therefore a negative value for _ymouse is not possible.
 Factoid:
In the code
above, you will notice that I preceded anything
having to do with the mouse pointer (_ymouse,
_xmouse)
with
_root. Why would I do that?
Factoid:
In the code
above, you will notice that I preceded anything
having to do with the mouse pointer (_ymouse,
_xmouse)
with
_root. Why would I do that?The reason is simple; Flash does everything relative to where the object containing the code is. _root tells Flash to start from the main timeline. If I did not specify _root, Flash would, relatively speaking, generate the mouse values in relation to the movie clip the code is on. Because the movie clips were randomly placed in various locations, the origin of the x and y values will not be a the standard 0, 0. To complicate matters, the movie clips are moving from left to right. Therefore, the mouse values will also change automatically with relation to the movie clips' movement.
Because I am going to the main timeline where the stage begins at 0, 0, the mouse values will never go below 0, 0 and into the negatives. Also, the stage is not going to move like a movie clip! Therefore, if I did not use _root, for some movie clips, even the slightest deviation of the mouse pointer might force the code to start working on the negatives and creating a host of problems in positioning and size.
A great many issues are solved by simply adding _root! Can you imagine subtracting 1000 from an already negative number? I always use _root when referring to the mouse pointer or something related to an absolute value for a relatively changing object. Now, are you not glad you learned that?
ConclusionI hope the tutorial helped you to learn how to create continuous movement. More importantly, I hope you understand why the code works so you can create cooler effects and share it with others someday. This effect is really my favorite and the animation you saw in the previous page was only 856 bytes in size including the GIF image.
For a nice, compact effect, nothing really comes close to dethroning the magnetism of the continuously moving circle (or whatever you decide to use). One can spend a good deal of time simply moving the mouse pointer around the animation and watching the circles appear, disappear, grow, shrink, etc. If you are interested in the source code, click the Previous Page link and download both the MX and Flash 5 versions.
Just a final word before we wrap up. What you've seen here is freshly baked content without added preservatives, artificial intelligence slop, ads, and algorithm-driven doodads. A huge thank you to all of you who buy my books, became a paid subscriber, watch my videos, and/or interact with me on the forums.
Your support keeps this site going! 😇

Just a final word before we wrap up. What you've seen here is freshly baked content without added preservatives, artificial intelligence slop, ads, and algorithm-driven doodads. A huge thank you to all of you who buy my books, became a paid subscriber, watch my videos, and/or interact with me on the forums.
Your support keeps this site going! 😇

:: Copyright KIRUPA 2026 //--