 Tutorials
Books
Videos
Forums
Tutorials
Books
Videos
Forums


When you have a large collection of unsorted items, your choice of sort algorithms can greatly impact how long it takes to sort your items properly. There are numerous sort algorithms, but in this tutorial, I will focus on one of the fastest sort algorithms, quicksort. On average, quicksort works in n * log(n) time which is ideal for most uses.
Quicksort is known as a divide-and-conquer algorithm. What this means is, given an input, it divides the input into smaller parts before performing an operation on those parts as opposed to working on the entire input at once. One way of looking at it is that it is easier to eat food in smaller bite-size pieces as opposed to the whole thing at once.
Flash's built-in Array.sort() method is a variation of quicksort, and since it is coded at a lower level, it is also much faster. This tutorial aims to explain how quicksort works, and this will allow you to sort data that may be more varied than the limited set of inputs allowed by built-in sort methods such as Array.sort().
With that in mind, first let me provide you with the code you will need to implement quicksort in Flash:
function quickSort(arrayInput:Array, left:Number, right:Number):Void {
  var i:Number = left;
  var j:Number = right;
  var pivotPoint:Number = arrayInput[Math.round((left + right) * .5)];

  while (i <= j) {
    while (arrayInput[i] < pivotPoint) {
      i++;
    }

    while (arrayInput[j] > pivotPoint) {
      j--;
    }

    if (i <= j) {
      var tempStore:Number = arrayInput[i];
      arrayInput[i] = arrayInput[j];
      arrayInput[j] = tempStore;
      i++;
      j--;
    }
  }

  if (left < j) {
    quickSort(arrayInput, left, j);
  }

  if (i < right) {
    quickSort(arrayInput, i, right);
  }
}
If you want to test the above code, copy the above code into a new Flash animation, copy and paste the following code below the above pasted code, and test it in Flash by pressing Ctrl + Enter:
arrayInput = [
  6358, 6850, 1534, 3928, 9766, 3822, 1025, 7616, 106, 117,
  1569, 2882, 1627, 726, 429, 2234, 7804, 7562, 3640, 1905,
  3458, 3242, 2270, 251, 23, 6358, 7719, 2762, 2507, 3335,
  1947, 7535, 6249, 4139, 5012, 6792, 2967, 3254, 1823, 1653,
  8856, 2278, 3309, 7754, 1267, 9631, 9300, 5431, 764, 4452,
  5842, 9347, 8269, 1037, 257, 9299, 2282, 5002, 449, 3533,
  1120, 926, 1270, 8210, 4453, 5849, 7275, 2985, 1825, 4173,
  5948, 8364, 2651, 6105, 7632, 1334, 494, 7669, 3816, 6339,
  5693, 1410, 7496, 6238, 1848, 9332, 8707, 6575, 2810, 2267,
  5913, 9436, 4778, 472, 1823, 1972, 105, 889, 3421, 7885,
  5221, 2982, 2808, 9737, 3318, 9093, 8105, 6787, 2880, 3779,
  4118, 1783, 5397, 5928, 5534, 3744, 2054, 1237, 9087, 3638,
  8523, 3062, 6820, 7450, 6153, 2789, 3564, 3289, 5246, 9834
];

quickSort(arrayInput, 0, arrayInput.length - 1);
trace(arrayInput);
When you test the above code, you will find that the unsorted values in your arrayInput array are properly sorted. In the next few sections I will describe how quicksort works in great detail!
Like mentioned earlier, quicksort works by dividing the input into several smaller pieces. The key to its speed is knowing when to divide the input into smaller pieces and when to just perform operations on the data. I will first provide a simple overview of how quicksort works, then I will provide a more detailed look at how the major parts of the overview work by demonstrating a small example, and I will then conclude with a line-by-line analysis of how our code turns our understanding of quicksort into machine-understandable actions.
Let's imagine that the following grid of squares represents our array of numbers. Imagine that each square contains a random number in it:

Quicksort works by initially picking an item in your list of items called a pivot. Let's pick our pivot number to be somewhere in the middle of the list, but your pivot value can be anywhere. For the above array, the pivot is colored in dark blue below:
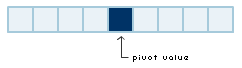
Your pivot value is actually quite important. Quicksort will use the pivot value to order items. For example, in quicksort, all items to the left of the pivot value should be smaller, and all items to the right of the pivot value should be larger. In other words, you are basically dividing your original input into two pieces: one piece that contains all values that are smaller than the pivot, and another piece that contains all values that are larger than the pivot.
With that constraint in mind, this is how our list would look:
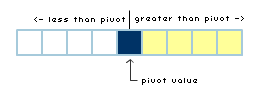
In the above example, the area shaded in white contains values less than the pivot value, and the area shaded in yellow contains values greater than the pivot value. The goal of this operation is to simply divide the values up. You can guarantee after completion of the above step that no value to the right of the pivot is larger than any value on the left side of the pivot, and you can also guarantee that no value to the right of the pivot is smaller than any value in the left of the pivot.
You now have two sections of data: less than pivot and greater than pivot. What you basically do now is repeat the above divide process for each of those two sub-divisions of your input. Quicksort works by recursively calling itself on each subsection of data:
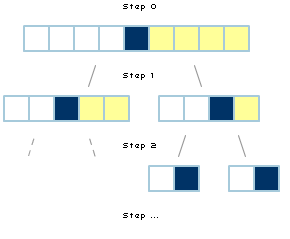
Each division creates two sets of data from your earlier list, and each of them have a new pivot value. Each of the sets of data will loosely organize themselves around the pivot point, divide again, arrange themselves, divide...you get the picture. You will basically create a recursion of divisions until the final sub-section is perfectly sorted, which it will in the end by this method.
As mentioned earlier, items on the right side are guaranteed to be larger than items on the left side, and items on the left side are guaranteed to be smaller than items on the right side. This condition for the left and right elements holds no matter how many divisions you go through. This ensures that, in the end, you are going to have a collection of data that is properly sorted.
Now that you have a vague idea of how quicksort works, let's look at its implementation. You learned about the pivot value, but I did not explain how the sorting actually works. In my example, I simply showed smaller numbers moving to the left of the pivot, and numbers larger than the pivot finding their way to the right side. How it actually works is very useful to look at.
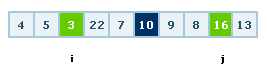
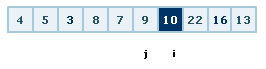
For any input, this time let's use real numbers, you have your pivot value, but you also have two index variables i and j that set both the left boundary of your input and the right boundary of your input:
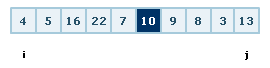
What we want to do is ensure numbers to the left our pivot value, 10, are less than that value. Likewise, all numbers to the right of the pivot value should be larger than 10. So, the index pointer at the left moves right looking at each value and asking, "Is the array value I am at right now less than the pivot value?"
If the answer is yes, it proceeds to the next number:
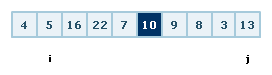
This process of checking and moving right repeats until the value at position i becomes greater than our pivot value. When that happens, the i index variable stops moving right and waits:
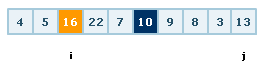
In a similar, yet opposite way, the index pointer at the right decreases and moves left. At each position, it asks, "Is the array value at j greater than the pivot value?" If the current value at j is indeed greater, the j variable decrements by one and proceeds left to the next number and asks itself the same question:
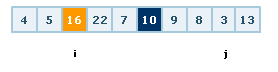
When it reaches a number that is not greater than the pivot value, then the variable j stops in its tracks. So you now have both the i and j variables referencing array values that are on the wrong side of our pivot value:
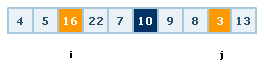
The left pointer stopped at 16, because 16 is not smaller than our pivot value 10. The right pointer stopped at 3, because 3 is not greater than our pivot value of 10. So what happens next? You swap those values! The number 3 will occupy the spot used by the number 16, and the number 16 will find itself at the spot used by the number 3:
Your left and right pointers increment in their respective directions also and continue the above steps, stopping and swapping wrong values:
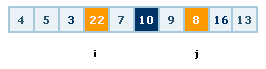
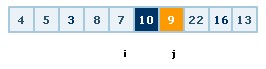
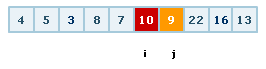
The swapping action saves computation time by not having to guess, or calculate, where to place the incorrect value. By finding an incorrect value on either side of the pivot, we automatically know that by swapping those two values, we are now placing both values into their appropriate side of the pivot.
You continue the above process until the left index pointer, i, becomes greater than your right index pointer, j:
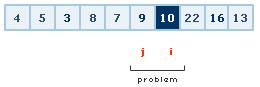
Before I start the walkthrough, let me provide the basic pseudocode used for quicksort:
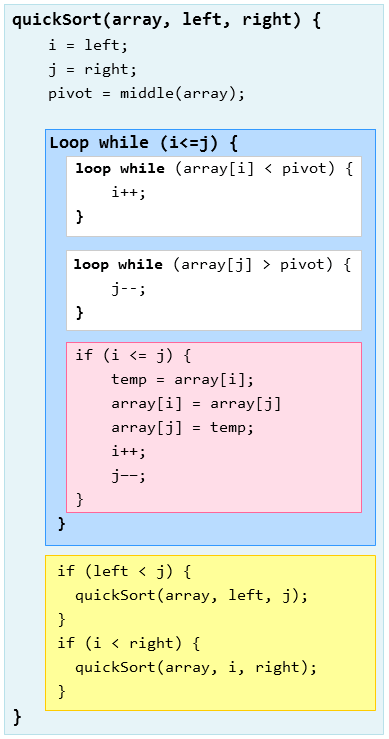
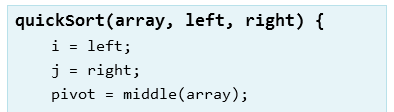
To make it easier on you, click on the above image to open the pseudocode image in a new window. That way, you can easily refer to it as you follow the walkthrough.
Don't worry if the code presented earlier does not fully make sense. Hopefully after having completed the walkthrough, things will make more sense. By the end of the tutorial, you will be able to code all of quicksort in your sleep!
So let's begin the walkthrough. Let's say that you are interested in sorting the following array of values:

First, we determine the left, i, right, j, and pivot values. Our left boundary value will be 4, the right boundary value will be 2, and the pivot value will be the center value. If you have an even number of items, you pick the next highest number closest to the center:
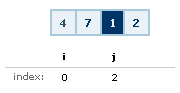
Like before, in all of the images, the dark blue cells indicate the pivot value.
Right now, we are still in the light-blue portion of the pseudocode. We've done nothing but specify the starting positions of our left and right boundaries as well as determine the pivot value.
Now, let's compare the array values referenced by i and j with our pivot. Before we do that, we make sure that the i variable is less than or equal to the j variable. This ensures that you are not swapping from the wrong sides of where you are supposed to be.
Getting back to the comparison, we accomplish that using two loops: one loop for the left value, and another loop for the right value. These loops are indicated by the white sections of code in the pseudocode image:
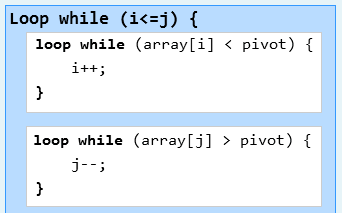
Our left loop basically asks, "Is our left array value less than our pivot?" The answer is "No", because 4 is not less than 1. That will need to be fixed, so we end our loop for the left value. In the left side, we don't move right to check the next number, for the current number needs to be swapped.
Let's look at our right loop now. Similar to above, we ask if our right array value is greater than our pivot. Unlike last time, the answer is "Yes", for 2 is greater than 1. So we continue our loop and decrement our j variable by 1 to analyze the next value:
We are still within the right-sided j loop, so we continue our questioning of the current value. Is the value at j greater than our pivot? No, for both the pivot and the number referenced by j are the same value: 1. So we end the loop for j much like we did for i.
With both the left loop and right loop terminated at the unordered values, we need to perform the swap. The swap code is the pink section of code:
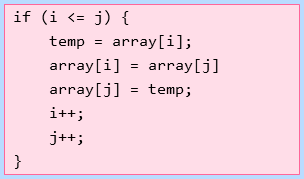
Before we swap, we need to make sure that the left value is truly to the left of our right value. In other words, i <= j. This makes sure that we don't perform a reverse swap. Without this check, our code would simply run forever also.
The value of i (0) is still less than the value of j (2). And so the swap begins. The array value referenced by i, 4, is stored in a temporary value:
temp = array[i];You then set the array value at i to equal the array value at j:
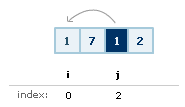
After the value at i is set, you set the temporary value, the value at i you determined a few steps ago, to the value at j:
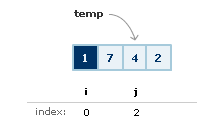
As a quick observation, notice that your pivot point is still referencing the array value 1 and not the index position of the array value. Finally, you increase the value of i and decrease the value of j. This is done to make sure you are not analyzing the same values again:
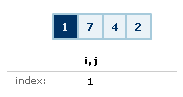
Much shifting and swapping went on in the previous three steps. As a quick recap, these are the important values that are stored in memory from calling our quickSort function:
left = 0;
right = 3;
i = 1;
array[i] = 7;
j = 1;
array[j] = 7;
pivot = 1;
The above values sound reasonable once you look at what happened, for prior to the swap, recall i was 0, and j was 2. After the swap, recall that i is incremented by 1 and j is decremented by 1. The pivot value had been 1 well before the swap, and it had not been changed since then.
Alright, let's continue! Our i value is still less than or equal to the j value, so the loop continues again, and we are back in the blue portion of our pseudocode again:
For reference, this is where we are at in the array itself:
Is the array value at i less than the pivot point? No. 7 is not less than 1. We break out of this loop.
We now enter our loop for the j variable. Is the array value at j greater than the pivot point? Yep! So we decrement j. The value of j is now 0:
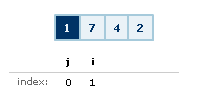
Remember, the value of i is 1. The loop condition was to ensure that i is less than or equal to j, and that is no longer true. So, we break out of the main loop indicated by the blue region in our pseudocode and proceed to the two if statements:
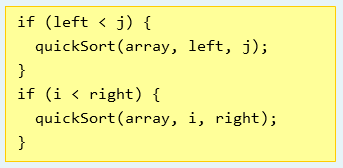
The questions the two if statements ask are:
j?i?For the first condition, our left variable is 0, and that is not less than j which also has a value of 0. The left variable is only equal to the j variable, so this condition fails. The second if statement, though, passes for the value of our right variable is 3, and i is 1. What this basically signifies is that our right side, the portion to the right of i, still requires some organization.
So what we do now is call our quicksort function on just the values between i and the array value at the index position stored by the right variable. We don't do anything to the values to the left of i, for we assume it is already sorted:
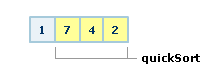
And this brings us to an important property of quicksort. Every time the quickSort function is called recursively, only a subset of the data is passed in to the function again. In other words, the quicksort function does less and less work as it keeps getting called, because the size of the array it is working with gets smaller.
So we now call our quicksort function again, except as determined by the if statement earlier, we only look at the last three values of our array. The quickSort function call looks as follows:
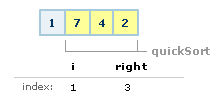
The code representation is quickSort(array, i, right) where i is 1 and right is 3. This is still only the function call. Once you enter the quickSort function, you assign values to your i and j variables along with the pivot variable:
That corresponds to i equaling 1, j equaling 3, right equaling 3, array[i] equaling 7, array[j] equaling 2, and the pivot value equaling 4 for the middle value of the values of [7, 4, 2] is 4.
We enter our main loop, for i (1) is less than or equal to j (3). With that initial hurdle passed, we now have to deal with the two inner left and right loops:
The left loop checks to see if the value at index position i is less than the pivot value, 4. Of course array[i] is 7, and 7 is not less than 4. The left loop ends. The right loop checks to see if array[j] is greater than the pivot value. This too proves to be false, because array[j] is 2 and the pivot value is 4. This loop also ends after the first try! So after all this, the value of i is still 1, and the value of j is still 3:
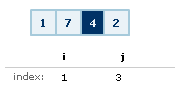
The values for i and j fit the condition for the if statement block that checks if i is less than or equal to j. It is time to swap the array values referenced at i and j. Like before, a temporary variable is created to store the value from array[i], array[i] is set to the value of array[j], and array[j] is set to the value stored by the temp variable. Before we forget, remember that the i variable is incremented by 1 and the j variable is decremented by 1.
Everything is sorted! Congrats? Well, it is a bit too early to celebrate, for Flash does not have a way of knowing whether an array is sorted or not. It will continue to proceed through the various loops until the code simply has nowhere to go as you will see.
As mentioned above, the value of i is now 2, and the value of j is also 2. We enter the main loop, and since i <= j, we proceed to the left-sided loop. The pivot value is 4, and array[i] is also 4, so the loop breaks because array[i] is not less than the pivot value. We then go to the right-sided loop. Is array[j] greater than the pivot? No, for array[j] is also 4, and 4 is not greater than 4.
We now enter the section of code responsible for swapping the values. First we check to make sure that the value of i is less than or equal to the value of j, and that is true because i and j are both 2. The swap proceeds as before, but notice that you are swapping the same value! Both array[i] and array[j] refer to the value 4, and swapping them does not do anything at all. But what does happen due to the swap function is that the i variable is incremented by 1 and the j variable is decremented by 1:
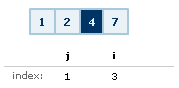
You just finished the swap, and you can now proceed to the last section of code from the quickSort function: the two conditional statements:
The first if statement asks if the left variable is less than the value of j. That is false, for left is 1 and j is 1 also, so nothing happens.
The second if statement asks if the value stored by the right variable is greater than i, and that too is not true because the right value is 3, and the value of i is 3 also. So we don't get caught by either of the if statements. There is now nowhere to go, so the function exits.
And now, your array is sorted. Let's now look at how the ActionScript I presented earlier helps you to implement Quicksort.
For the most part, quicksort is one of those algorithms that is fairly straightforward to implement. There are no tricky syntax or weird coding hacks that you need to use to create a working Quicksort.
Let's start:
function quickSort(arrayInput:Array, left:Number, right:Number):Void {The quickSort function takes in three arguments: an array, and two numbers representing the left and right boundaries. The array will contain a series of numbers that you wish to sort, and left and right will refer to the index positions of the array to set as the boundaries.
var i:Number = left;
var j:Number = right;
var pivotPoint:Number = arrayInput[Math.round((left + right) * .5)];
In the above three lines I declare and initialize the i, j, and pivotPoint variables. Notice that i and j will be storing the values from the left and right values, and this copy is done to ensure that left and right values remain unmodified so that it becomes possible to make comparisons with the modified i and j values as our function loops.
The pivotPoint variable stores the pivot number in our array. I choose to use a center value for the pivotPoint, so I determine the center position by averaging the values of the left and right boundaries. I use Math.round() to ensure that averaging the left and right values returns an integer value.
while (i <= j) {
  while (arrayInput[i] < pivotPoint) {
    i++;
  }

  while (arrayInput[j] > pivotPoint) {
    j--;
  }

  if (i <= j) {
    var tempStore:Number = arrayInput[i];
    arrayInput[i] = arrayInput[j];
    arrayInput[j] = tempStore;
    i++;
    j--;
  }
}
This is our first while loop, and it loops any code contained within it if the value of i is less than or equal to the value of j.
while (arrayInput[i] < pivotPoint) {
  i++;
}
This is the loop for checking on the left side of our pivot value. You check to make sure that the arrayInput value at i is less than the pivot value. If it is, you keep increasing i, the equivalent of moving to the right on your array.
while (arrayInput[j] > pivotPoint) {
  j--;
}
To complement the left loop you saw earlier, this section of code corresponds to ensuring that the values on the right side of the pivot value actually belong there. You check to make sure that the array value referenced by j is greater than the pivot value.
if (i <= j) {
  var tempStore:Number = arrayInput[i];
  arrayInput[i] = arrayInput[j];
  arrayInput[j] = tempStore;
  i++;
  j--;
}
This section of code is responsible for swapping the values between the left and right sides of the pivot value. You first check to make sure that i is less than or equal to the value of j. If i is less than or equal to j, you swap the values.
You first store the value in arrayInput[i] in a new variable called tempStore. Next, you set the value of arrayInput[i] equal to the right-side value referenced by j in arrayInput[j]. Finally, you set the right-sided value arrayInput[j] to tempStore. During this time, you also increment i by one and decrement j by one.
if (left < j) {
  quickSort(arrayInput, left, j);
}

if (i < right) {
  quickSort(arrayInput, i, right);
}
Once you break out of the loop, you are presented with two if statements. The first if statement checks to see if the value stored by your left variable is less than j. If it is, then you call your quickSort function again with the left and right boundaries being the original value for left and the variable j.
The second if statement checks to see if i is less than the value stored by your right variable. If it is, then it calls the quickSort function with the left and right boundaries represented by your i and right variables respectively.
return;This line of code is purely optional. If the data in your function escaped the while loop and snuck past the above two if statements, we simply end the function call. In Flash, you do not have to specify return. Exiting a function is automatically taken care of when all other avenues for your function to work are exhausted.
This return does not mean that all calls of the quickSort function stop working. You may have many concurrent quickSort functions sorting various portions of your arrayInput if caught by the above two if statements. This return statement exits only this particular instance of the quickSort function.
Well, you have reached the end of this tutorial. There are many ways to have described how quicksort works in a fraction of the pages, but I really think the extra material really helps in understanding the details of quicksort in a relatively pain-free way!
For the most part, people will never know whether you implemented your sort algorithm using quicksort. Did you know that Flash's built-in array sort methods are a variation of quicksort, and that they are also faster? They are! Most sort methods in modern languages is some form of quicksort, but I think by understanding how quicksort really works, you can better customize your sort depending on the situation. You may not always have a simple set of data in a list or array form.
There will be times when a built-in sort method is the best solution to a problem. Every now and then, though, you will run into a situation where what you are trying to sort might not conform to the particular requirements of a language's built-in sort function. For example, in a project I was working on in C#, I was required to sort a massive amount of data stored in a hashmap-like Dictionary object. It was the solution to that, which I altered for Flash, that prompted me to write this tutorial.
Just a final word before we wrap up. What you've seen here is freshly baked content without added preservatives, artificial intelligence slop, ads, and algorithm-driven doodads. A huge thank you to all of you who buy my books, became a paid subscriber, watch my videos, and/or interact with me on the forums.
Your support keeps this site going! 😇


:: Copyright KIRUPA 2026 //--