 Tutorials
Books
Videos
Forums
Tutorials
Books
Videos
Forums


Here you will learn to create a countdown timer which counts down from the current date and time to a specific date and time in the future. This example will use days, hours, minutes, seconds and even milliseconds retrieved from Flash's Date object to calculate that countdown. But, not only will you learn what is needed to calculate that countdown; you will also learn how to incorporate custom images to represent your numbers in that countdown.
Here is an example of what I am referring to:
[ counting down till Christmas! ]
There are two parts to this tutorial:
I'll explain the creation of the graphics as they were made in Photoshop and Image Ready before imported in Flash. In Flash is where the Actionscript is added to make the timer to use those graphics in displaying the countdown for your date.
Creating and Importing the Graphics:
The actual making of the graphics is nothing special. All you really need is 10 numbers of 0 through 9 and any kind of character you want to use to separate them in the final countdown (if any). This example uses a period for separation though a colon (:) is quite common. Other desired graphics you would also want to include.
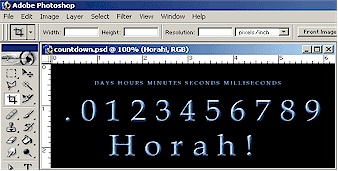
[ the elements in Photoshop ]
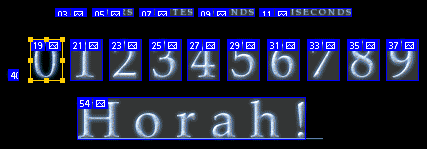
[ slices in Imageready ]
Before you start exporting from here, however, you should consider naming your slices. This will no only make it easier to determine what is what when dealing with your images, but you can also make importing a little easier on yourself.
Each of the numbers for this countdown will exist in a single movieclip, each in their own frame. That way, to show a number, we just tell a number movieclip to go to and stop at the frame corresponding to that number. Flash, being the crafty program it is, can recognize image file sequences with similar names and import them individually frame by frame as if to create a frame by frame animation of those images directly within the movieclip they were imported to. That's pretty much what we'd be after with the number sequence. So, with that in mind, you will want to give your number slices names that will create image files something along the lines of:
image_0.gifimage_1.gifimage_2.gifimage_3.gifetc...
 Clarification
The above naming is used so
that Flash will see those images as a sequence
and import them frame by frame into the
movieclip in which they will be imported. The
easiest way to accomplish this in ImageReady
is to just give the slices of your numbers
names which are the number itself.
Clarification
The above naming is used so
that Flash will see those images as a sequence
and import them frame by frame into the
movieclip in which they will be imported. The
easiest way to accomplish this in ImageReady
is to just give the slices of your numbers
names which are the number itself.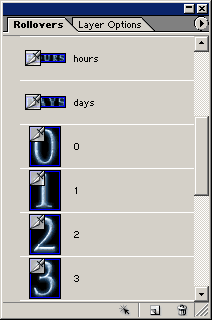
[ naming slices in Rollovers panel ]
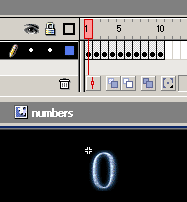
[ ten frames of numbered images ]
For the most part, all that really remains graphically is setting up the countdown clip itself. This clip will consist of one of these numbers movieclips for each digit it needs to display in the countdown. Then, as Flash calculates the countdown, it will tell each of these numbers movieclips to go to the correct frame representing the number they need to display. To display 0, for example, a numbers movieclip would need to go to and stop at frame one, etc.
Now back to Flash...
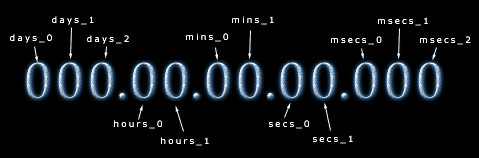
[ naming for the numbers movieclips ]
You have just finished the graphical portion of this tutorial. Before you start rejoicing, we haven't touched the coding aspect of the animation yet. The coding for your countdown timer will begin on the next section.
The idea behind the counter is having two dates in time and finding the difference between them. At first, that may seem difficult because you would have to think that you would need to first find the difference in days, then figure into that the difference in hours and then minutes and so on. The good news is that it's not that difficult and the difference can actually be done directly on the millisecond level meaning only one calculating in difference of milliseconds needed to find the number of milliseconds between two dates. The bad news is that the days, hours, minutes etc. will still need to be figured out from those milliseconds so some tedious work will still be needed.
// first get this current year so this example

// remains valid for some time to come

currentDate = new Date();

thisYear = currentDate.getFullYear();

eventDate = new Date(thisYear, 11, 25);

eventMillisecs = eventDate.getTime();counter.onEnterFrame = function(){
currentDate = new Date();
currentMillisecs = currentDate.getTime();
this.msecs = eventMillisecs - currentMillisecs;if (this.msecs <= 0){
play();
return;
}The first step is easily accomplished with division. You should already know to find out how many seconds are in 3000 milliseconds you just divide by 1000, and to get the minutes from the seconds, divide by 60.
Step number 2 is accomplished using the modulo (%) operator which takes any value and returns the remainder of a division. Take, for instance, 90 seconds. This, when divided by 60 gives you 1 for 1 minute. But there's still 30 seconds remaining. How is that retained? From a mod! If you take that 90 and mod it by 60, you'd get 30 - the remaining number of seconds or the remainder left over from a division.
The last part just means adding 0s in front of the number (as a string) if it's not long enough.
this.secs = Math.floor(this.msecs/1000); // 1000 milliseconds make a second

	this.mins = Math.floor(this.secs/60); // 60 seconds make a minute

	this.hours = Math.floor(this.mins/60); // 60 minutes make a hour

	this.days = Math.floor(this.hours/24); // 24 hours make a second


	this.msecs = string(this.msecs % 1000);

	this.secs = string(this.secs % 60);

	this.mins = string(this.mins % 60);

	this.hours = string(this.hours % 24);

	this.days = string(this.days);


	while (this.msecs.length < 3) this.msecs = "0" + this.msecs;

	if (this.secs.length < 2) this.secs = "0" + this.secs;

	if (this.mins.length < 2) this.mins = "0" + this.mins;

	if (this.hours.length < 2) this.hours = "0" + this.hours;

while (this.days.length < 3) this.days = "0" + this.days;for(movie in this){
if (this[movie]._parent == this) this[movie].evaluateFrameFrom(this);
}
}; // end onEnterFrameWhat is this function you ask? It's the evaluateFrameFrom function which is the very last thing that needs to be defined for all this to work, fully implementing the trick that makes what could have been a lot of work... less. This will be made as a MovieClip.prototype so that all movieclips will inherently have access to the function whenever they want - namely, all the numbers movieclips.
MovieClip.prototype.evaluateFrameFrom = function(variableClip){

	var nameArray = this._name.split("_");

	var numberSet = variableClip[nameArray[0]];

	var character = number(nameArray[1]);

	var frame = 1 + number(numberSet.charAt(character));

	if (this._currentframe != frame) this.gotoAndStop(frame);

};
Just to further enforce what's going on here, let's do a quick example using the day_1 numbers movieclip. In looping through its movieclips, counter will eventually reach days_1 and run evaluateFrameFrom on it passing in itself (counter). days_1 is separated into an array by dividing the name by its "_" character giving "days" (nameArray[0]) and "1" (nameArray[1]). The value of days is then retrieved from the passed variableClip (counter) using associative array syntax and is set to numberset.
The value of days in variableClip would be a string something along the lines of "045". Character is then used to get which of those 3 values this movieclip is to represent. It is just nameArray[1] turned into a number or "1" to 1. So, charAt(1) of "045" would be 4. Turn that into a number and add one and you get frame 5 where the image of the 4 is located. The movieclip, days_1, is then played to that frame to show it.
Though a bit tricky in some senses, you can now have a template for making countdown timers to any date! Should you want to countdown to Christmas, or maybe your birthday or even the release of a new movie, you now know how to make that happen and how to do so with your own custom images to display for numbers - and they technically don't even have to be numbers. Instead you could use 3 cows standing on top of each other to represent 3 or something even more abstract all together. The decision is yours. Have fun with it.
Download the files download source for Flash MX Download the files download the images files for Photoshop
Just a final word before we wrap up. What you've seen here is freshly baked content without added preservatives, artificial intelligence, ads, and algorithm-driven doodads. A huge thank you to all of you who buy kirupa's books, became a paid subscriber, watch the videos, and/or interact on the forums.
Your support keeps this site going! 😇

:: Copyright KIRUPA 2026 //--