 Tutorials
Books
Videos
Forums
Tutorials
Books
Videos
Forums


Scrollbars are great for displaying a lot of information within a small area. Despite their importance, we often take scrollbars for granted. For example, your browser window should display a scrollbar on the right side of this page for allowing you to easily scroll down. We don't really think about them; we just expect them to be there when the need arises.
Yet, creating a scrollbar is trickier than using one. In this tutorial, you will learn how to create your own compact, easily customizable scrollbar in Flash. Even though Flash comes with several scrolling components, the scrollbar you will be creating allows for easier customization along with a significantly smaller file size compared to its built-in variation.
The following is an example of what you will be creating:
[ click and drag down on the blue square to scroll through the content ]
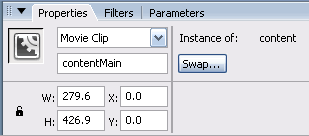
[ give your content movie clip the instance name contentMain ]
You are basically creating a 300x200 rectangle that covers your entire drawing area. Your Properties panel should look similar to the following image:
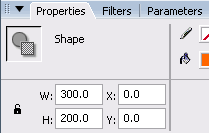
[ ensure your rectangle is 300x200 with an x/y offset of 0 ]
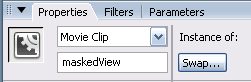

[ your content is no longer overflowing from the stage; it is masked ]
Let's pick up from where we left off.
Your rectangle should now be placed on the right side of your movie:

[ your rectangle is located on the right side of your movie ]
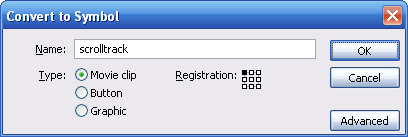
[ convert your rectangle to a movie clip ]
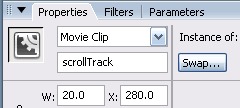
[ give your newly converted movie clip the instance name scrollTrack ]
Your rectangle should look similar to the following:

[ the rectangle that will eventually become your scroll face ]
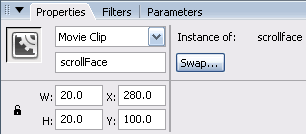
[ give the scrollFace movie clip the instance name scrollFace ]
Let's continue and finish the interface.
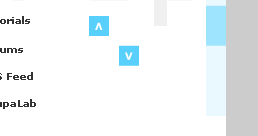
Your interface should look like the following image:

scrolling = function () {
  var scrollHeight:Number = scrollTrack._height;
  var contentHeight:Number = contentMain._height;
  var scrollFaceHeight:Number = scrollFace._height;
  var maskHeight:Number = maskedView._height;
  var initPosition:Number = scrollFace._y = scrollTrack._y;
  var initContentPos:Number = contentMain._y;
  var finalContentPos:Number = maskHeight - contentHeight + initContentPos;
  var left:Number = scrollTrack._x;
  var top:Number = scrollTrack._y;
  var right:Number = scrollTrack._x;
  var bottom:Number = scrollTrack._height - scrollFaceHeight + scrollTrack._y;
  var dy:Number = 0;
  var speed:Number = 10;
  var moveVal:Number = (contentHeight - maskHeight) / (scrollHeight - scrollFaceHeight);

  scrollFace.onPress = function() {
    var currPos:Number = this._y;
    startDrag(this, false, left, top, right, bottom);
    this.onMouseMove = function() {
      dy = Math.abs(initPosition - this._y);
      contentMain._y = Math.round(dy * -1 * moveVal + initContentPos);
    };
  };

  scrollFace.onMouseUp = function() {
    stopDrag();
    delete this.onMouseMove;
  };

  btnUp.onPress = function() {
    this.onEnterFrame = function() {
      if (contentMain._y + speed < maskedView._y) {
        if (scrollFace._y <= top) {
          scrollFace._y = top;
        } else {
          scrollFace._y -= speed / moveVal;
        }
        contentMain._y += speed;
      } else {
        scrollFace._y = top;
        contentMain._y = maskedView._y;
        delete this.onEnterFrame;
      }
    };
  };

  btnUp.onDragOut = function() {
    delete this.onEnterFrame;
  };

  btnUp.onRollOut = function() {
    delete this.onEnterFrame;
  };

  btnDown.onPress = function() {
    this.onEnterFrame = function() {
      if (contentMain._y - speed > finalContentPos) {
        if (scrollFace._y >= bottom) {
          scrollFace._y = bottom;
        } else {
          scrollFace._y += speed / moveVal;
        }
        contentMain._y -= speed;
      } else {
        scrollFace._y = bottom;
        contentMain._y = finalContentPos;
        delete this.onEnterFrame;
      }
    };
  };

  btnDown.onRelease = function() {
    delete this.onEnterFrame;
  };

  btnDown.onDragOut = function() {
    delete this.onEnterFrame;
  };

  if (contentHeight < maskHeight) {
    scrollFace._visible = false;
    btnUp.enabled = false;
    btnDown.enabled = false;
  } else {
    scrollFace._visible = true;
    btnUp.enabled = true;
    btnDown.enabled = true;
  }
};

scrolling();Phew. That was fun. Now, let's learn how to use our scrollbar in a real movie with other content, layers, and data.
By now, you should have a working scrollbar in place. Now that you have created the scrollbar, you will learn how to actually use it and modify it.
Your scrollbar and content should look like this in Flash right now:
Because you created the above for a tutorial, there wasn't much freedom in determining how everything looks. But the above scrollbar is very customizable without breaking anything.
You can adjust the height of the scrollFace, the scrollTrack, contentMain, and maskedView movie clips while still ensuring your scrollbar works. Remember to edit the underlying shape by right clicking on a movie clip and selecting Edit or Edit in Place.
Because all of your movie clips contain simple shapes, modifying them is as easy as right clicking on any scrollbar element and selecting Edit or Edit in Place. You can replace the default shapes with anything you want as long as the sizing and positions continue to make sense.
The up and down buttons are not essential to the functioning of the scrollbar. You can safely remove them if you wish. From a usability point of view, it is better to have up and down buttons, though.
NOTE
The only thing you do have to check is that the contentMain movie clip's y position is the same as your maskedView movie clip's y position.
Because this tutorial primarily focused on having you re-create the scrollbar, it did not cover topics of how to make this feature more manageable. For example, what if you wanted to add multiple scrollbars to your animation? Managing everything directly on the main timeline would get messy quickly.
A great solution would be to place all of your scrollbar elements into a movie clip as opposed to creating everything out in the open on the main timeline. By placing your scrollbar inside a separate movie clip, you can place several versions of the scrollbar anywhere you want just by dragging that containing movie clip around.
The following is a screenshot of me dragging a movie clip containing my scrollbar:
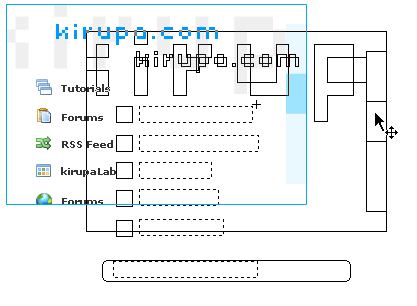
[ dragging the movie clip containing a scrollbar ]
Place all of your scrollbar elements on integer x and y positions. In other words, there should be no decimal values for either the height, width, or x and y positions when you look in the Properties panel after selecting any of the scrollbar-related movie clips.
That is all there is to learning how to use the scrollbar. There really isn't much to it. In the remaining sections, you will learn how I approached the design of the scrollbar and why the code you copied and pasted works the way it does.
You know that the scrolling area is going to be considerably smaller than the actual content contained in it. Our goal is to display only a small portion of our content in our viewing area. We need to provide functionality for allowing the rest of the content to be revealed as well.
The following diagram should help you visualize what I will be explaining:
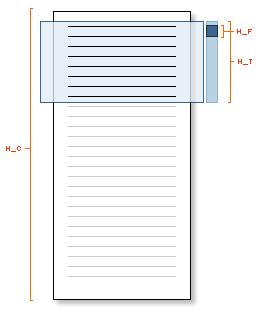
The height of our content is denoted by H_C, and the height of our scrollTrack is H_T. H_F refers to the height of our scrollFace. Therefore, you now have an idea of our constraints. Our scrolling is constrained by the height of our content, the viewable area, the scroll track, and the scroll face.
Initially, a height H_V of your content is already being displayed in your viewing area. So the total height that we need to scroll is going to be H_C - H_V.
Our relationship for scrolling so far is:
(H_C - H_V) / H_TLet's use some real numbers. If your content is 1000 pixels tall and both your maskedView and scrollTrack are 200 pixels tall, that means, since 200 pixels are already being displayed, you will need to scroll through 800 pixels of content using a 200 pixel track.
That makes sense. Because for every pixel you scroll, you have to scroll more pixels of your content in order to get through all the content before you reach the end of your scroll track. We are not done quite yet, though.
There is a slight complication. Your scrollFace has a height also, and it takes up valuable space. The full height of our scrollTrack cannot be used, because the bottom edge of the scrollFace stops once it reaches the bottom of your track.
Devising a relation between the scroll track's height and the scroll face's height is straightforward. The distance you move the scrollFace cannot be H_T. It has to be H_T - H_F. That gives us our revised formula:
(H_C - H_V) / (H_T - H_F)Let's revisit our example from above. If you substitute in the values for H_C, H_T, and H_F, you get 800 / 180 which is around 4.44. Every pixel you drag your scroll face results in roughly 4.44 pixels of content moving.
All we have to do now is take into account our scrollFace's initial position so that we can offset our result by the space taken up by the scroll face, and we have our final formula for implementing our scrollbar:
((H_C - H_V) / (H_T - H_F))This is really the hard part of this tutorial. Everything else is mostly translating the relationship above into ActionScript.
Now let's look at the code in smaller pieces.
var scrollHeight:Number = scrollTrack._height;
var contentHeight:Number = contentMain._height;
var scrollFaceHeight:Number = scrollFace._height;
var maskHeight:Number = maskedView._height;
I declare variables to store the heights of our four major scrollbar elements: the scroll track, the content, the scroll face, and the viewing or masked area.
var initPosition:Number = scrollFace._y = scrollTrack._y;
var initContentPos:Number = contentMain._y;
var finalContentPos:Number = maskHeight - contentHeight + initContentPos;
These three lines store the initial and final position our content should be. Because the initial and final positions are related to the positions of our scrollFace, scrollTrack, maskHeight, and contentMain, I create variables to store variations of similar data you collected in the earlier section.
var left:Number = scrollTrack._x;
var top:Number = scrollTrack._y;
var right:Number = scrollTrack._x;
var bottom:Number = scrollTrack._height - scrollFaceHeight + scrollTrack._y;
With these four lines of code, I specify coordinates for a virtual box in which our scroll face's movement is restricted.
Notice that the bottom variable assignment seems more complicated and longer than the other variable assignments. What I am doing is trying to find the bottom limit we can scroll our scroll face on the scroll track.
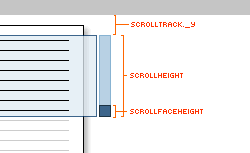
Because our scrollHeight variable stores the height of our track, we need to subtract the height taken up by our scrollFace. The scrollTrack._y value is important because both your scrollHeight and scrollFaceHeight values do not actually store where things are on the stage.
The problem, though, is that the bottom variable defines a specific y position that will act as the scroll face's bottom boundary. By adding scrollTrack._y into the mix, bottom offsets the value by taking into account the distance the top edge of your scroll track is from the top edge of your Stage.
var dy:Number = 0;
var speed:Number = 10;
var moveVal:Number = (contentHeight - maskHeight) / (scrollHeight - scrollFaceHeight);
With these lines, I move away from defining and re-defining scrollbar element properties and move towards defining variables that make managing our code easier.
The variable dy stores the change in the y position resulting from dragging the scroll face. You will see it doing more than just storing the value 0 later.
The speed variable controls how quickly the content scrolls each time you press the Up or Down buttons.
Finally, the moveVal variable stores the ratio of how much your content moves based on how much the scroll face moved on the scroll track. In other words, the relationship between all four of our scrollbar design elements is stored in this one variable.
TIP
Initializing this many variables may seem like a waste of time. What declaring variables does, though, is make the code more readable and ensure you don't have long expressions repeated everywhere.
scrollFace.onPress = function() {
  var currPos:Number = this._y;
  startDrag(this, false, left, top, right, bottom);
  this.onMouseMove = function() {
    dy = Math.abs(initPosition - this._y);
    contentMain._y = Math.round(dy * -1 * moveVal + initContentPos);
  };
};
I declare a function that executes any code contained within it when the scrollFace movie clip is pressed.
startDrag(this, false, left, top, right, bottom);The startDrag function allows you to click and drag your scrollFace movie clip. It takes in six arguments: the object that is about to be dragged, whether the object will be centered to the mouse pointer when dragged, the left boundary, top boundary, right boundary, and bottom boundary.
Essentially, you are constraining your dragging to a virtual box whose edges are defined by the values you determined for left, top, right, and bottom. If you do not constrain the movement of your dragging, your scrollFace could potentially go everywhere around your animation, and you wouldn't want that.
this.onMouseMove = function() {
  dy = Math.abs(initPosition - this._y);
  contentMain._y = Math.round(dy * -1 * moveVal + initContentPos);
};
This is a nested event handler because it is contained within the onPress event covered above. The code executes while your scrollFace is dragged.
When you click on the scroll face, any code contained inside the onPress event executes. When you move your mouse while still holding the button down, the code in this.onMouseMove executes.
dy = Math.abs(initPosition - this._y);The dy variable returns the difference in position between your scroller's initial position and where it is now.
contentMain._y = Math.round(dy * -1 * moveVal + initContentPos);This line sets the y position of your contentMain movie clip. Notice the three variables that are used to specify the position: dy, moveVal, and initContentPos.
If you recall, moveVal specifies how many pixels of the contentMain movie clip you move for each pixel your scrollFace moves. With dy specifying how many pixels your scroll face has moved so far, multiplying dy by moveVal results in the total distance our content should move.
Because Flash's coordinate system is upside down, I multiply the value by -1 to get things right side up again. Sometimes, your scroller may have everything starting from the origin, but sometimes it may not. Therefore, all of your data is offset by initContentPos.
I place all of the above in a Math.round() function, because that ensures that your contentMain clip's y position is always an integer value. Text and some graphics become blurry when they are positioned on non-integer values, so this keeps things crisp.
scrollFace.onMouseUp = function() {
  stopDrag();
  delete this.onMouseMove;
};
This section of code is thankfully pretty straightforward. The above code executes when you are no longer pressing your mouse and or dragging the scroll face.
The stopDrag() function reverses the earlier startDrag() call and stops the dragging. Deleting this.onMouseMove stops your scroll face from following your mouse after you have stopped dragging.
We now shift gears away from talking about the scroll face and start talking about the buttons. Because the Up and Down buttons are similar, I will cover the Up button in detail.
btnUp.onPress = function() {
  this.onEnterFrame = function() {
    if (contentMain._y + speed < maskedView._y) {
      if (scrollFace._y <= top) {
        scrollFace._y = top;
      } else {
        scrollFace._y -= speed / moveVal;
      }
      contentMain._y += speed;
    } else {
      scrollFace._y = top;
      contentMain._y = maskedView._y;
      delete this.onEnterFrame;
    }
  };
};
When you press the Up button with your mouse, all of the above code is executed. While the above looks like more lines of code than the rest of the functions covered, it really isn't that bad.
this.onEnterFrame = function() {When you press on your btnUp button, an onEnterFrame event is called. This means that any code contained within this function will be executed continuously at a speed equivalent to that of your frame rate.
if (contentMain._y + speed < maskedView._y) {Because we are moving our content up, I am checking to make sure that our contentMain movie clip does not go above our top boundary, the maskedView's y position.
Notice that instead of checking if the content's current position is outside the boundary, I check to see if its future position will be outside the boundary instead. The reason is, if I am already at or above the top boundary, it is already too late. The content would have overshot the boundary and spilled over the top. I should have stopped scrolling in the previous step itself.
if (scrollFace._y <= top) {
  scrollFace._y = top;
} else {
  scrollFace._y -= speed / moveVal;
}
When you are pressing either Up or Down button, both your content and your scroll face move. Both have constraints at the top and bottom boundaries, and I need to ensure that our scroll face's position is synchronized with our content's position.
The above ensures that our scrollFace and contentMain movie clip are reasonably in sync. I mention reasonably as opposed to exactly, because the way I implemented the scrollbar introduces some flaws in the synchronization. Because I am rounding the contentMain position to an integer value, the ratio between both values is never perfectly preserved.
With these lines of code, if the scroll face has reached the top, I set its position to be the top boundary itself. If it has not, I decrement the scroll face's position by a value equivalent to speed / moveVal.
Because I was able to use a non-integer value for the scroll face's position, in order to balance out the ratio between the scroll face and contentMain, I adjust contentMain's position by the integer value of speed itself:
contentMain._y += speed;scrollFace._y = top;
contentMain._y = maskedView._y;
delete this.onEnterFrame;In the above section, you learned what would happen if our content had not reached its final position. This code is executed when our content is about to reach its boundary.
Because we can no longer move up, the positions are reset to the default up values. scrollFace is restored to its top position, contentMain is restored to its maskedView._y position, and finally, we delete our onEnterFrame because there is no need for it any more.
btnUp.onDragOut = function() {
  delete this.onEnterFrame;
};

btnUp.onRollOut = function() {
  delete this.onEnterFrame;
};
When you are no longer pressing the Up button or you roll away from the Up button, I stop any work done by the button by deleting the onEnterFrame contained in it.
if (contentHeight < maskHeight) {
  scrollFace._visible = false;
  btnUp.enabled = false;
  btnDown.enabled = false;
} else {
  scrollFace._visible = true;
  btnUp.enabled = true;
  btnDown.enabled = true;
}
In the odd chance that your content's height is less than that of your viewing area, the above code ensures you can't use the scroll buttons or the scroll track. For as someone once said, "You can't scroll that which cannot be scrolled."
The code for the Down button is very similar to the code used for creating the Up button:
btnDown.onPress = function() {
  this.onEnterFrame = function() {
    if (contentMain._y - speed > finalContentPos) {
      if (scrollFace._y >= bottom) {
        scrollFace._y = bottom;
      } else {
        scrollFace._y += speed / moveVal;
      }
      contentMain._y -= speed;
    } else {
      scrollFace._y = bottom;
      contentMain._y = finalContentPos;
      delete this.onEnterFrame;
    }
  };
};

btnDown.onRelease = function() {
  delete this.onEnterFrame;
};

btnDown.onDragOut = function() {
  delete this.onEnterFrame;
};
The only difference is that while the Up button focused on the top boundaries for both the content and scroll face, the Down button focuses on the bottom boundaries.
Besides minor changes associated with ensuring both the scroller and content work properly as they approach the bottom boundary, the code itself is nearly the same.
You are now done with this tutorial. The most complicated thing about this tutorial, from my point of view, is getting the scroll face and the content synchronized.
When you are scrolling through several hundred pixels, minor rounding errors can eventually result in a major discrepancy between your intended result and the final result. That is why you see a lot of code for the btnUp and btnDown buttons to ensure that, to the greatest extent possible, both the scroller and the content always end up in the correct final position.
Ok, it's not a lot, but it's certainly more than what is necessary for such a simple task.
MichaelxxOA's optimized version does a great job improving the code featured in this scrollbar tutorial.
28bit's mousewheel support version adds mouse scrolling.
Feel free to take a look around and modify the source file I have provided. If you think you have created something far cooler than the generic scrollbar implementation I have done, post your FLA in the Source/Experiments forum. I always like to see how these tutorial files help you create something better.
Just a final word before we wrap up. What you've seen here is freshly baked content without added preservatives, artificial intelligence, ads, and algorithm-driven doodads. A huge thank you to all of you who buy kirupa's books, became a paid subscriber, watch the videos, and/or interact on the forums.
Your support keeps this site going! 😇


:: Copyright KIRUPA 2026 //--
