 Tutorials
Books
Videos
Forums
Tutorials
Books
Videos
Forums


Many cool animations or special effects in Flash use the duplicate movie function. The duplicate movie, as its name implies, creates another copy of a movie clip and places the copied movie clip on stage. This tutorial will teach you how to create duplicates of a movie clip when a button is pressed.
This tutorial is for Flash MX and earlier. For Flash MX 2004, visit the revised tutorial here.
The following animation is a good example of the duplicate movie clip function at work. Press the plus sign to generate new movie clips:
[ press the plus sign to generate more movie clips ]
To make your strenuous programming life easier, I have provided an incomplete source file for you to work on. Don't worry, the source file does not include the ActionScript necessary to duplicate movie clips. You will enable that with information found in this tutorial.
Here is how to duplicate movie clips:
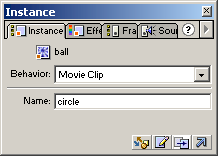
[ the movie clip has been given the name 'circle' ]
on (press) {
  i = i + 1;
  duplicateMovieClip(_root.circle, "circle" + i, i);
}
[ copy and paste the above code in the Object Actions window ]
The following section will deconstruct how the code you copied and pasted enables a new movie clip to appear:
on (press) {
  i = i + 1;
  duplicateMovieClip(_root.circle, "circle" + i, i);
}
The first line is the on handler for the button. Whenever the user presses the button, the code within on (press) executes. In this case, a duplicate movie clip is created when the button is pressed.
on (press) {
  i = i + 1;
  duplicateMovieClip(_root.circle, "circle" + i, i);
}
This line contains a counter with the variable i. While I could use i++ to increment the value by one, I decided to expand i++ with i = i + 1 to make it easier for you to see that the variable increments each time the button is pressed.
on (press) {
  i = i + 1;
  duplicateMovieClip(_root.circle, "circle" + i, i);
}
Before I explain the intricacies of the highlighted code, let's look at the generic syntax that the duplicate movie clip function follows:
duplicateMovieClip(target, newMovieClipName, movieClipDepth);The above code should be pretty self-explanatory. The target identifier is the name of the movie clip that you choose to copy. In our example, the movie clip circle is going to be copied. That is why _root.circle appears in the target spot.
The second identifier gives a name to the duplicated movie clip. When a clip is duplicated, the new movie clip needs to be given a new name. You can enter the name as a string or as an expression. In my code, the movie clip name is in the format of an identifier. Each time a new movie clip is generated, remember, the variable i increments by one. So, if there are 10 movie clips on stage, the last movie clip will be "circle" + i, which is circle10. Therefore, the instance name of the 10th movie clip will be circle10. Simple enough!
Movie depth refers to the vertical stacking order of the new duplicate movie clip. The higher the movie depth value, the higher up the movie clip will be on stage. In my example, each movie clip that is created will be higher than the previous movie clip because i is incrementing with each movie clip added onto the stage. To learn how to adjust the stacking order of movie clips, visit Swap Depth.
In the previous section, I explained the workings of the code inserted on the button. In this section, I am going to explain the code in the movie clip. The code in the movie clip was already there in the partial source, so don't worry if you do not remember adding that code. You didn't add the code!
Right click on the circle movie clip and select Actions. You will see the following code:
onClipEvent(load) {
  scale = (random(100) + 50);

  this._x = random(250);
  this._y = random(150);
  this._alpha = random(100);
  this._xscale = scale;
  this._yscale = scale;
}
The above code plays heavily into OOP, or Object Oriented Programming. Because this tutorial does not focus on OOP, I will primarily point you to the following two lines of code:
onClipEvent(load) {
  scale = (random(100) + 50);

  this._x = random(250);
  this._y = random(150);
  this._alpha = random(100);
  this._xscale = scale;
  this._yscale = scale;
}
When a new movie clip is created by using the duplicate movie clip function, the movie clip gets placed over the previous movie clip. If you don't have a variable that changes the scale of a duplicated movie clip, you will not notice any discernible change in your animation because all the new movie clips are being stacked on top of each other.
The aforementioned two lines of code applied to a movie clip enable the movie clip to be placed in a random location each time it is duplicated. Using the above code ensures that your movie clips are not stacked on top of each other. The values 250 and 150 correspond to the width and height of your movie respectively. You should modify those numbers so that a new movie clip gets randomly placed within the boundaries of your movie.
If you want to have duplicate movie clips appear automatically when an animation loads, use the following syntax:
amount = 50;

while (amount > 0) {
  duplicateMovieClip(target, newMovieClipName, movieClipDepth);
  i = i + 1;
  amount = amount - 1;
}
Similar to adding actions for a button, use the above format to add the actions to a frame. The value after amount = is the number of movie clips that will be generated. Adjust the number of movie clips you wish to duplicate by modifying that number.
Even though I make every effort to make sure that my tutorials are legible and understandable for all users, I am also not infallible. Therefore, I have provided the final source code for you to see how the animation I used to write this tutorial turned out:
Duplicating movie clips is essential for your Flashing career. Many great animations use the duplicate movie clip function to create spectacular Flash effects. Many of the animations featured on the levitated.net site use the duplicate movie function along with numerous random algorithms to create unique animations.
Just a final word before we wrap up. What you've seen here is freshly baked content without added preservatives, artificial intelligence, ads, and algorithm-driven doodads. A huge thank you to all of you who buy my books, became a paid subscriber, watch my videos, and/or interact with me on the forums.
Your support keeps this site going! 😇


:: Copyright KIRUPA 2026 //--

