 Tutorials
Books
Videos
Forums
Tutorials
Books
Videos
Forums


This is an archived tutorial from the kirupa.com legacy collection. It covers software that may no longer be available, but it is kept online because the ideas still hold up.
One of the most common things you can do to make your application more dynamic is load content from an external source. The most common of which is an XML file or a XML-based file such as those from various RSS feeds.
There are two major topics when it comes to using XML in Silverlight. One topic is how to load data from a separate XML file. Another topic is how to actually read the contents of our XML file using LINQ. This tutorial will primarily focus on the former where we discuss how to load your XML data into your Silverlight application.
The XML file you load will look like the following:
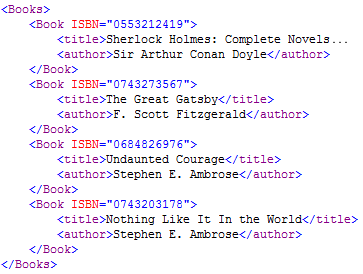
You can view this XML file by clicking on the following link.
Before we can start to actually load the XML data, let's get your project set up appropriately. If this is your first time creating Silverlight 2 content on your computer, be sure to read my Getting Started with Silverlight 2 article that explains everything you need to get up and running.
Ok, let's get started:
First, launch Visual Studio 2008 and create a new Silverlight 2 application. After entering your name and location, you will be prompted with a dialog asking if you want to create a Web site for hosting your app:
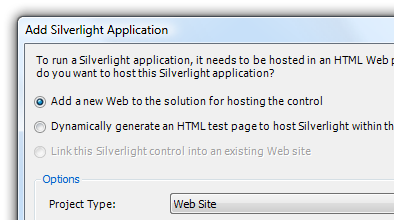
[ create a new VS2008 Silverlight 2 project ]
From this dialog, go with the default choices which should be "Add a new Web to the solution for hosting the control". Click on the OK button to close this dialog and to create both your Silverlight application and your Web site:
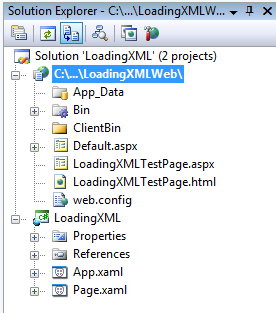
[ your solution will contain both a Web Site as well as a Silverlight 2 project ]
To learn more about this separation between your web site and Silverlight application, the following article should help you out.
Ok, great, your project has now been created. What you need is an XML file to load. Download the Sample XML file to your computer by right clicking on the link and choosing the equivalent of Save Target As:
[ save your sampleXML.xml file to your computer ]
Once you have the
sampleXML file downloaded to your computer, you
need to add it to your Web site project. More
specifically, you want to add it in your ClientBin
folder. There are several ways you can do that.
The easiest way would be to drag and
drop this XML file into your ClientBin folder.
An alternative would be to right click on your
ClientBin folder and choosing to Add Existing
Item:
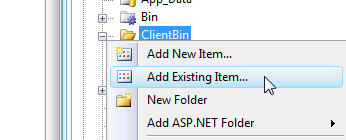
[ drag the XML file into ClientBin or Add Existing Item ]
A file picker will appear, and from this window you can browse to where your XML file was and have it be added to your solution. In the end, regardless of which approach you took, you should see your XML file inside your ClientBin directory:
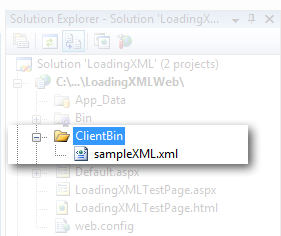
[ in the end, your sampleXML file will be added to your ClientBin folder ]
Ok, now that you have your project setup and your XML file ready, all that remains is adding the code and figuring out why the code works the way it does.
In the previous section, you setup your project and XML file that you will be loading. In this page, we will look at the code needed to load your XML file when you run your Silverlight application.
First, open Page.xaml.cs in your Silverlight Project. The code you will see is the default that gets generated for you:
using System;
using System.Collections.Generic;
using System.Linq;
using System.Net;
using System.Windows;
using System.Windows.Controls;
using System.Windows.Documents;
using System.Windows.Input;
using System.Windows.Media;
using System.Windows.Media.Animation;
using System.Windows.Shapes;
namespace LoadingXML
{
  public partial class Page : UserControl
  {
  public Page()
  {
  InitializeComponent();
  }
  }
}
What you will do is overwrite all of the code at the public partial class Page() level and below with the following:
using System;
using System.Collections.Generic;
using System.Linq;
using System.Net;
using System.Windows;
using System.Windows.Controls;
using System.Windows.Documents;
using System.Windows.Input;
using System.Windows.Media;
using System.Windows.Media.Animation;
using System.Windows.Shapes;
using System.Windows.Browser;
namespace LoadingXML
{
  public partial class Page : UserControl
  {
  public Page()
  {
  InitializeComponent();
  LoadXMLFile();
  }
  private void LoadXMLFile()
  {
  WebClient xmlClient = new WebClient();
  xmlClient.DownloadStringCompleted += new DownloadStringCompletedEventHandler(XMLFileLoaded);
  xmlClient.DownloadStringAsync(new Uri("sampleXML.xml", UriKind.RelativeOrAbsolute));
  }
  void XMLFileLoaded(object sender, DownloadStringCompletedEventArgs e)
  {
  if (e.Error == null)
  {
  string xmlData = e.Result;
  HtmlPage.Window.Alert(xmlData);
  }
  }
  }
}
If you press F5 to test your application, you will see your browser launch. After a few short seconds, you will see a browser alert appear with your XML data showing:
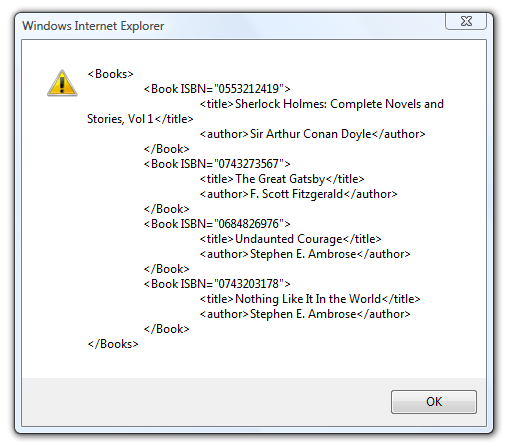
[ displaying your XML data as a browser alert ]
Yay! That was exciting....sort of. What I am showing you is that the code you pasted loaded the XML file and put it in a form that you could easily show as a browser alert. Because this tutorial is only about loading the XML data, this is the extent of functionality I will be describing in this article.
With that said, that doesn't mean we are done with this tutorial. Copying and pasting code is not very useful. What is useful is learning why the code works the way it does, and we'll look at that in the next section.
In the previous section, you added some code to load your XML file, and the code seemed to work because when you ran it, you saw a browser alert appear with your XML file's contents displayed. Let's dig into more detail and learn why the code worked.
Before diving into the code, let's take a bird's eye look at what we are trying to do first. The layout of your XML file in relation to your XAP is as follows:

In other words, it is in the same location as your XAP file. Our approach is as follows:
Once your application has initialized, we will load our XML file asynchronously. This means that the rest of your application isn't blocked waiting for your XML file to load. Once our XML file has loaded, you read its contents and present it in the form of a browser alert.
What I described above is essentially what our code does. Let's look at the code line by line starting with the call we make to set everything in motion:
public Page()
{
  InitializeComponent();
  LoadXMLFile();
}
The first thing we do is call a method called LoadXMLFile directly after we call InitializeComponent. The InitializeComponent call is partly responsible for actually ensuring your application is initialized.
private void LoadXMLFile()
{
  WebClient xmlClient = new WebClient();
  xmlClient.DownloadStringCompleted += new DownloadStringCompletedEventHandler(XMLFileLoaded);
  xmlClient.DownloadStringAsync(new Uri("sampleXML.xml", UriKind.RelativeOrAbsolute));
}
The LoadXMLFile method contains the code that sets up everything to get your XML file downloaded. To help with this, you have the WebClient class. The WebClient class provides you with a lot of the functionality for setting up your download, monitoring your download's progress, and notifying you when the download has completed.
As you can see, we create a new WebClient object called xmlClient to handle everything related to downloading your XML file:
private void LoadXMLFile()
{
  WebClient xmlClient = new WebClient();
  xmlClient.DownloadStringCompleted += new DownloadStringCompletedEventHandler(XMLFileLoaded);
  xmlClient.DownloadStringAsync(new Uri("sampleXML.xml", UriKind.RelativeOrAbsolute));
}
Once you have created your WebClient object, it is time to start setting up the events with their event handlers. The first thing I do is specify what will happen when your XML file has been fully loaded:
private void LoadXMLFile()
{
  WebClient xmlClient = new WebClient();
  xmlClient.DownloadStringCompleted += new DownloadStringCompletedEventHandler(XMLFileLoaded);
  xmlClient.DownloadStringAsync(new Uri("sampleXML.xml", UriKind.RelativeOrAbsolute));
}
The event is called DownloadStringCompleted, and the auto complete provides me with the DownloadStringCompletedEventHandler text automatically. All I have to do is specify the name of my event handler which I call XMLFileLoaded. In other words, when your download has completed, the XMLFileLoaded method will get called.
The final line is where you actually specify the XML file that gets loaded:
private void LoadXMLFile()
{
  WebClient xmlClient = new WebClient();
  xmlClient.DownloadStringCompleted += new DownloadStringCompletedEventHandler(XMLFileLoaded);
  xmlClient.DownloadStringAsync(new Uri("sampleXML.xml", UriKind.RelativeOrAbsolute));
}
In this line, you call your xmlClient object's DownloadStringAsync method where you specify the path to your XML file. The path you specify is in the form a Uri object where you specify the path to your XML file and whether the path is relative to your XAP file or absolute as defined by the UriKind property.
As you saw earlier, your XML file is located in the same directory as your XAP, so you can simply pass in the XML file name directory without qualifying with any path modifiers or folder names. Obviously, this means that your UriKind property is Relative, but for the sake of simplicity, I go with RelativeOrAbsolute so that all types of Uri values can be accepted without you having to consciously replace it yourself each time you decide to change the type of the path you specify.
Ok, in this page you got a good look at the code that sets up and downloads your XML file. In the next section, let's look at the XMLFileLoaded event handler
In the previous section, you learned about all of the code that we use for actually loading our XML file into your application. One of the lines of code that you saw was one where you associated an event handler with your WebClient object's DownloadStringCompleted event:
private void LoadXMLFile()
{
  WebClient xmlClient = new WebClient();
  xmlClient.DownloadStringCompleted += new DownloadStringCompletedEventHandler(XMLFileLoaded);
  xmlClient.DownloadStringAsync(new Uri("sampleXML.xml", UriKind.RelativeOrAbsolute));
}
The event handler you specified was called XMLFileLoaded. Let's look at that XMLFileLoaded event handler and see how it is used to actually read your XML content:
void XMLFileLoaded(object sender, DownloadStringCompletedEventArgs e)
{
  if (e.Error == null)
  {
  string xmlData = e.Result;
  HtmlPage.Window.Alert(xmlData);
  }
}
The above event handler, which I will just call as the XMLFileLoaded method from now on, gets called immediately once your XML file has successfully been downloaded. The various properties related to that download are passed in via the DownloadStringCompletedEventArgs object represented as e that you see in the method signature.
One of the values e provides access to is any error that was reported during the download. That is why on the first line, I check to make sure that no error was reported:
void XMLFileLoaded(object sender, DownloadStringCompletedEventArgs e)
{
  if (e.Error == null)
  {
  string xmlData = e.Result;
  HtmlPage.Window.Alert(xmlData);
  }
}
I check for null because all I want to know is that no error was provided. If I did want to check for the exact type of error and react appropriately, the Error property takes in objects of type Exception. Replacing null with the appropriate Exception and message would give you the granularity in error handling that you may want.
void XMLFileLoaded(object sender, DownloadStringCompletedEventArgs e)
{
  if (e.Error == null)
  {
  string xmlData = e.Result;
  HtmlPage.Window.Alert(xmlData);
  }
}
Probably the most important value our DownloadStringCompletedEventArgs object e provides is the Result property which takes what you downloaded and returns that content as a string.
void XMLFileLoaded(object sender, DownloadStringCompletedEventArgs e)
{
  if (e.Error == null)
  {
  string xmlData = e.Result;
  HtmlPage.Window.Alert(xmlData);
  }
}
This line is not going to be important for you, but I will explain it anyway! I want to display a browser alert that contains my downloaded data and presents it to you...in the most annoying way possible. The above line allows you to do that.
If you are stuck somewhere, feel free to download the source file to run it all on your own machine:
The above solution is a Visual Studio 2008 project. Make sure you have the Silverlight Tools installed as well. My Getting Started guide should help you out.
Just a final word before we wrap up. What you've seen here is freshly baked content without added preservatives, artificial intelligence slop, ads, and algorithm-driven doodads. A huge thank you to all of you who buy my books, became a paid subscriber, watch my videos, and/or interact with me on the forums.
Your support keeps this site going! 😇


:: Copyright KIRUPA 2026 //--