|
by
kirupa | 11 September 2009
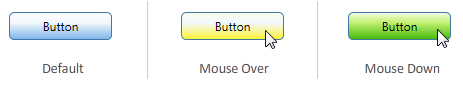
All of your controls
in Silverlight come with pre-defined states. These
states allow you to more precisely define what your
control does in various situations. For example, a
standard button may have different visuals that
appear by default, when you mouse over it, or when
you click on it:
These states are
provided for you, and you get to see and modify them
easily in Expression Blend
when you edit the button's template...as shown in
Page 3 of the Creating Custom Buttons tutorial:
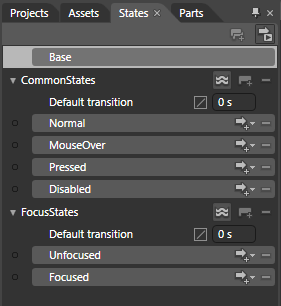
[ the states provided for you when editing a
Button's template ]
States defined for you
provide another advantage besides easy
discoverability inside Blend. The
control contains logic that fires the appropriate
state as necessary without you having to do any
manual wiring of events to a particular state.
All of this is great
when you are editing an existing control that has
states predefined. If you are creating your own
Control (or UserControl), you don't have the same
level of hand holding. You have to both define your
states and do some additional wiring to make the
states active at a given time.
Fortunately, doing all
of this on your own is not particularly hard at all.
Take a look at the following example where a custom
UserControl toggles between a "small" and "large"
state when the Toggle Size checkbox below it is clicked:
[ click on the Play button to
see the animation you will be creating ]
In this
tutorial, you will learn how to create an example
similar to what you see above where you create your
own usercontrol, define a few states, and learn how
to wire up the states using both code as well as
behaviors.
Because this tutorial is very specific to
using custom states, I am not going to have you
go through and create an application from scratch.
Instead, I am going to provide you with a sample
project that will provide a good starting point:
Download Starter Files
Once you have downloaded and extracted the
above source files, launch Expression Blend 3
and open the CustomVSMStates project. Your
Projects pane will look similar to this once you
have opened the project:
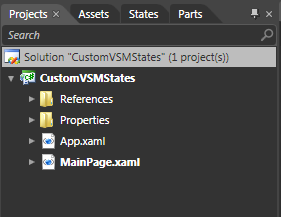
[
your Projects pane displays your recently opened
project ]
Ok, this seems like a good place to stop. This
page took care of introducing the topic and getting
you up and running with the sample project. In the
next page, let's actually start creating our
usercontrol and adding some states.
Onwards to the
next page!
|


