


This is an archived tutorial from the kirupa.com legacy collection. It covers software that may no longer be available, but it is kept online because the ideas still hold up.
In my earlier Data Binding to CLR Objects tutorial I described data binding and explained how to use data binding with CLR data. Delving deeper, you learned how to take data from a list and display that data in a listbox control. One of the most common questions I received from that tutorial revolved around adding new data to that list.
On the surface, that seems trivial. Since all of our data is already in the form of a list, simply adding data to that list should automatically update our listbox also. After all, our list is actually an ObservableCollection which is a type of List that implements the INotifyCollectionChanged interface for sending change notifications when content has been added/removed/modified inside the List.
If the above paragraph sums up what you currently feel is the solution to the question, you are correct. That is really all there is to it, but the unclear part is in the details. I mention that all we need to do is add "data to that list." Which list am I specifying? Is it a new instance of our ObservableCollection object in our code-behind file? Is it an existing ObservableCollection instance?
This article aims to answer those questions. Modifying a databound collection is not as trivial as it seems, and there are several correct solutions you can come up with. I will first show you the direct, straight-forward solution and then show you a better, more maintainable approach that would be preferred from a good coding-practices point of view.
To get the most out of this article, it helps greatly to follow along with my instructions. To do that, you will need both Visual C# 2008 Express and Expression Blend 2 installed if you do not already have them. These are the latest versions of the VS Express and Blend products as of the time of this writing:
Once you have both of the above products installed, there is one final thing you will need to download. Because this isn't an introductory tutorial teaching you how to accomplish basic tasks, I have already created a sample project for you:
Download the above project, extract the files, and open this project in Blend 2. This sample project contains some databound data and a visual interface for allowing you to see how the application looks like. Don't worry - the code relevant to this article is not included, so you will have to modify this existing project yourself based on my instructions.
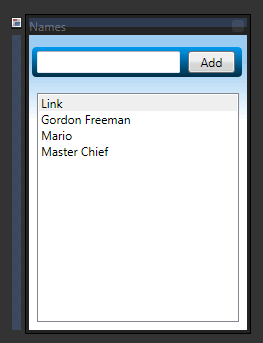
The project you downloaded is called BindingToPeople, and when you open it in Blend, you will see our Names application displayed:
Note: You may be asked to Build your solution first, and you can do that by pressing Ctrl + Shift + B or by going to Project | Build Solution.
The goal of this application is to add whatever text you put into the text-field and display it in the listbox. The magic is in how data gets added to the listbox, and that is where data binding comes in. To save you some time, I have already databound our listbox to a CLR data source called PeopleListDS:
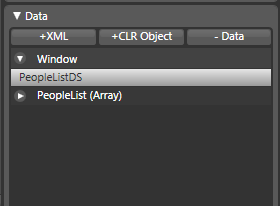
[ your Data panel shows you your PeopleListDS collection your listbox uses ]
Beyond the data source and the basic layout of our controls, there is nothing special about the user interface of our application. In the next section, let's look at the code and get a better idea of what this application currently does behind the scenes.
In the previous section, you got a brief introduction to what this article will be about and also got to learn more about the sample project you will be modifying. So far, you have looked at the Blend side of this project. Now, it is time to look at the code in Visual C# 2008 Express (or any regular Visual Studio 2008 edition).
From now on, for brevity, I will refer to Visual C# 2008 Express as Visual Studio also.
Open the same BindingToPeople project in Visual Studio. You can use Visual Studio to open the BindingToPeople solution directly, or you can use Blend's Project panel to right-click on your project and select the Edit in Visual Studio command.
Regardless of which approach you used, the end result will be the same. Visual Studio will be open with your BindingToPeople solution open for editing. Take a look at your Solution Explorer to see the list of files currently in your project:
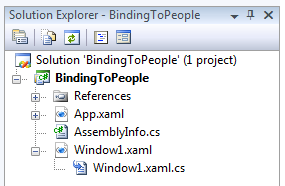
[ your solution explorer shows the files you currently have open for editing ]
There is nothing unusual to see here. The file we are most interested in is Window1.xaml.cs. This is the code-behind file for the Window1.xaml you have open in Blend right now.
You will see the following code displayed:
namespace BindingToPeople
{
  public partial class Window1
  {
  public Window1()
  {
  this.InitializeComponent();
  }
  private void AddButton_Click(object sender, RoutedEventArgs e)
  {
  NameInput.Text = String.Empty;
  }
  }
  class Person
  {
  public string PersonName
  {
  get;
  set;
  }
  }
  class PeopleList : ObservableCollection<Person>
  {
  public PeopleList()
  {
  this.Add(new Person { PersonName = "Link" });
  this.Add(new Person { PersonName = "Gordon Freeman" });
  this.Add(new Person { PersonName = "Mario" });
  this.Add(new Person { PersonName = "Master Chief" });
  }
  }
}
Our code can be divided into three main sections:
Here, our application is initialized, and you have an event handler called AddButton_Click that processes any results from pressing the Add button in your application.
To help keep track of our data, I create a Person class that does nothing but store a name in a public property called PersonName. It may seem wasteful to have an entire class dedicated to storing just a single string-based value, but if I decided to (in the future) add more data beyond just the name, I can do so easily without breaking my program.
Our list-based structure that stores all of our above Person objects is a class called PeopleList. This class extends ObservableCollection, and that basically means that changes made to the contents of a PeopleList object send out change notifications letting the target of our data binding know when to update.
Notice that in our PeopleList constructor I am passing in some sample data during initialization:
    this.Add(new Person { PersonName = "Link" });
  this.Add(new Person { PersonName = "Gordon Freeman" });
  this.Add(new Person { PersonName = "Mario" });
  this.Add(new Person { PersonName = "Master Chief" });
It is this data that gets displayed in Blend when you build your project for the first time and your data source kicks in:
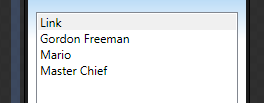
[ our sample data is what gets displayed in the listbox ]
If you are unfamiliar with what has been presented so far, you should look into reading or re-reading my earlier Data Binding to CLR Objects article where I provide both an overview as well as deep dive into data binding with CLR data sources.
As you can see, our sample application is not very complicated. It has a simple UI that uses only a textbox, button, and listbox. Our code is equally simple. We have an event handler for processing our button's clicks, and we have our data source that takes for its argument an object of type Person - which we also defined!
In the next section, let's revisit our original problem and look at how to approach solving it.
In the previous section, we took inventory of our code and discussed what it does. Now, in this page, let's revisit our original problem and look at an easy way to solve it.
The last two pages gave you an overview of the application you downloaded and are about to modify. Now, let's revisit why you are reading this tutorial in the first place. We already have a data binding in place between our list of people and the listbox. What we want to do is use our textbox and Add button to add more items to our listbox.
The trick is, we want to do so while maintaining the existing data binding. We don't want to directly add the item to our listbox by using our listbox's Items collection, for that essentially overrides the data binding we have in place. Instead, we want to add the item to our existing data binding relationship maintained by our PeopleList object.
Now, if you looked at the code, you may be wondering where our PeopleList object actually lives. There is nowhere where you define a new object of type PeopleList and bind it to our listbox. The problem is that you are, more than likely, looking at the C# code. With WPF applications, you have code in your code-behind file, but you also have code in your XAML file. If you take a look at Window1.xaml, find the tag beginning with ObjectDataProvider inside your Window.Resources.
The line you will find should look like the following:
<ObjectDataProvider x:Key="PeopleListDS" d:IsDataSource="True" ObjectType="{x:Type CollectionsDataBinding:PeopleList}"/>Notice that this particular line contains the information that is used by our listbox to bind to our PeopleList collection. What we need to do is gain access to this same PeopleList instance so that we can make modifications to the live data source used. Let's look at how to do just that.
As you saw in the preceding section, our PeopleList object is instantiated in the XAML file. Our event handler for the Add button, AddButton_Click is in the code-behind file written in C#. What we are going to do is access the data source defined in XAML using C# code.
Add the following lines of code in your AddButton_Click method directly above where you have the line NameInput.Text = String.Empty code:
ObjectDataProvider odp = this.FindResource("PeopleListDS") as ObjectDataProvider;
PeopleList people = odp.Data as PeopleList;
Person newPerson = new Person();
newPerson.PersonName = NameInput.Text;
people.Add(newPerson);
Your entire AddButton_Click event handler should look the following:
private void AddButton_Click(object sender, RoutedEventArgs e)
{
  ObjectDataProvider odp = this.FindResource("PeopleListDS") as ObjectDataProvider;
  PeopleList people = odp.Data as PeopleList;
  Person newPerson = new Person();
  newPerson.PersonName = NameInput.Text;
  people.Add(newPerson);
  NameInput.Text = String.Empty;
}
With your code copied and pasted, let's run this application. Press F5 or go to Debug | Start Debugging or simply hit the green Play button in your toolbar. In either case, your application will start to run. Once your application is displayed, type a name into your textbox and press Enter or click on the Add button:

[ a new name has been added! ]
For example, I typed in the name Marcus Fenix (from Gears of War fame) into my textbox and clicked on the Add button. Notice that the name I entered was added to my listbox! You basically solved the problem that was mentioned at the beginning of this tutorial and reiterated at the top of this page.
You are not home free just yet. In the next section, let's look at the code in detail and understand why the code worked.
In the previous section, you copied some code and got the application working just the way we wanted. In this page, let's take a look at the code and figure out why things worked the way they did.
As you can see, when you submit a name into the textbox, it displays in our listbox. The code for doing all that is only about five lines long, so let's look at each line to figure out what exactly it did:
ObjectDataProvider odp = this.FindResource("PeopleListDS") as ObjectDataProvider;In the above line, you create a new ObjectDataProvider object, but you initialize it to the ObjectDataProvider already defined for you in XAML. If you recall from the previous section, we found the line in XAML responsible for binding our listbox to our PeopleList ObservableCollection type:
<ObjectDataProvider x:Key="PeopleListDS" d:IsDataSource="True" ObjectType="{x:Type CollectionsDataBinding:PeopleList}"/>The Key value is very important because it is this value that you use to identify this particular section of your code. In our case, our ObjectDataProvider is keyed to the value PeopleListDS.
To access this value in our code-behind file, you use the FindResource method because our ObjectDataProvider is located in the Resources section of our Window aka this. In other words, you can't use FindResource on whatever you want in the XAML. It has to be stored as a Resource, and you need to know where the resource is stored. In our case, this resource is stored in Window. If you look at the surrounding XAML for the above ObjectDataProvider declaration, you will see that it is indeed nested inside a Window.Resources tag.
Anyway, what gets returned by FindResource is an object of type...object! You will need to cast it appropriately, and that is where the as ObjectDataProvider text comes in. We already know that PeopleListDS is an ObjectDataProvider, and by casting it as such, we make that explicit.
In the end, after this line has executed, your ObjectDataProvider object called odp will store a reference to the existing ObjectDataProvider being used for the data binding between your listbox and PeopleList.
PeopleList people = odp.Data as PeopleList;The next line is fairly straighforward. Think of your ObjectDataProvider as a wrapper for the data used in the data binding relationship between a target and a source. In this line, you are essentially digging through the wrapper and getting at the data directly using your ObjectDataProvider odp object's Data property.
Because our ObjectDataProvider is wrapping our PeopleList class, when you access odp's Data, you are actually accessing the PeopleList instance used. Just like before, I am casting the value retuned into the type we want, which in this case is PeopleList.
Person newPerson = new Person();
newPerson.PersonName = NameInput.Text;
Finally, something easy! In these two lines, I am creating a new Person object and setting it's PersonName property to the text you entered in your textbox. The reason I am creating a new Person object is because our PeopleList stores data in the form of Person objects only.
people.Add(newPerson);In this line, I add the new person you created earlier to the PeopleList instance we extracted from our ObjectDataProvider. After this line executes, your newPerson gets added to the Listbox with the person's name displayed.
Let's spend some looking at that last line in greater detail. Why is it that simply adding the name to our PeopleList instance updates the listbox accordingly? The reason is that data binding requires a target and a source. The target is usually a visual element, and in our case, that was a listbox. The source is the place your data comes from. The source in this project is the PeopleList collection.
In order for our target to update, it needs to first know that a change has been made to the source. Internally, that is handled by Notify events. Any class that implements either the INotifyChanged or INotifyCollectionChanged interfaces is capable of sending out change notifications that can be heard, understood, and acknowledged by a target.
You may be asking if our code contains any implementations of either INotifyChanged or INotifyCollectionChanged. The answer is yes - indirectly via our ObservableCollection. The ObservableCollection class is, for the most part, just a regular Collection with INotifyCollectionChanged implemented. This means that, whenever an item is added or removed from our ObservableCollection object, a change notification is fired. Because PeopleList extends ObservableCollection, it too inherits there superhero powers from the ObservableCollection class.
Ok, so you have your application working and you saw how the code works. Beyond that, you probably learned more than you really wanted about how your listbox knew when to update when a new Person was added.
Surprisingly, there is actually one more topic I want to discuss. Part of data binding is to provide a clean separation between visuals and logic. In the next section, I will explain how to improve what we have currently written to more clearly separate the logic from the UI.
In the previous section, you saw why our code worked the way it did. So, while you were able to accomplish what you set out to do, you can still make some improvements, and in this and subsequent pages, we will look at one such improvement where we increase the separation between the data and the user interface.
Right now, if you made any modifications to your AddButton_Click event handler, you will almost certainly have to ensure that the five lines of code required to have your data binding work are unmodified. What if you decided later to add a Remove button? Will you be copying the same lines of code and swapping out the Add functionality with a Remove functionality? What about having new windows (and classs) where you would still want the ability to have data added to your PeopleList collection?
If the previous paragraph hasn't scared you, let's say that further down the road, you decide to make a modification that involves adding a few extra fields to your Person class. Instead of just taking a user’s name, you also specify their date of birth and address. Now, if you want to represent that information in the UI, you have go back and find every instance where you connect to the ObjectDataProvider and make sure to add the missing pieces of information so that your UI properly displays the new fields you added to your Person object.
As you can see, this is turning out pretty messy. As your application grows, the complexity is growing far faster because your design isn’t particularly modular. Currently, adding new functionality requires you modifying a chain of existing functionality in order to not break anything. If this is becoming a problem for our (very) simple application, imagine how painful changes to more substantial applications will be?
There are numerous ways of separating the view from the model, and there are various degrees of correctness in doing so. Because this is more of a designer-centric tutorial, I am going to a present a good-enough solution that increases the level of flexibility in your application without requiring a lot of coding.
The first thing we’ll do is remove as much of the data-related information from our Window1.xaml.cs file. From Visual Studio, add a new C# Class file called PeopleData. Once you have created that class, Visual Studio will automatically have it opened for you for editing.
Right now, all you will see is the following:
namespace BindingToPeople
{
  class PeopleData
  {
  }
}
First, from your Window1.xaml.cs, cut and paste both your Person and PeopleList classes and paste them below your newly created PeopleData class definition. Your PeopleData.cs file should look like the following:
namespace BindingToPeople
{
  class PeopleData
  {
  }
  class Person
  {
  public string PersonName
  {
  get;
  set;
  }
  }
  class PeopleList : ObservableCollection<Person>
  {
  public PeopleList()
  {
  this.Add(new Person { PersonName = "Link" });
  this.Add(new Person { PersonName = "Gordon Freeman" });
  this.Add(new Person { PersonName = "Mario" });
  this.Add(new Person { PersonName = "Master Chief" });
  }
  }
}
Be sure to build your application (F6) to make sure that everything works and any missing namespaces are added. For example, you will probably need to resolve ObservableCollection because the namespace required to support that class is usually not provided by default, but those are all things building your project will let you know:
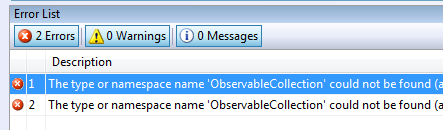
[ building your project frequently lets you spot and (hopefully) fix errors quickly ]
Anyway, if you run your project, notice that everything still works! You are able to add a new person just like before. Moving the Person and PeopleList classes to the new location doesn’t really break anything, but it does move us closer to our stated goal of separating the visuals from the data.
Our next order of business will be to greatly simplify what our AddButton_Click event handler does. Right now, all of the functionality required for attaching to the existing data provider and adding new data is located here. In the next section, let’s shift some of this responsibility to our PeopleData class.
In the previous section, we started to separate some of the UI specific tasks from the data-specific tasks...which essentially amounted to copying pasting existing code into a new class file. In this page, we'll do something a bit more ambitious!
Let's now take care of our PeopleData class, for it will play a crucial role in re-enabling your button to add items to our list. Yes, I am aware that this means you will temporarily break a fully functioning application.
This time around, we can't just copy and paste some code and expect everything to work. There is some major reshuffling that will need to take place. First, copy and paste the following lines of code into your PeopleData class (which is currently empty):
class PeopleData
{
  public static ObjectDataProvider PeopleDataSource
  {
  get;
  set;
  }
  public static void AddPerson(string name)
  {
  Person newPerson = new Person();
  newPerson.PersonName = name;
  (PeopleData.PeopleDataSource.Data as PeopleList).Add(newPerson);
  }
}
Notice what I am doing here. I first declare a static property called PeopleDataSource that is of type ObjectDataProvider.
Next, I declare a static method called AddPerson, and this method takes a string object called name as its argument. Within this method, I am re-creating the functionality our AddButton_Click event handler had originally:
public static void AddPerson(string name)
{
  Person newPerson = new Person();
  newPerson.PersonName = name;
  (PeopleData.PeopleDataSource.Data as PeopleList).Add(newPerson);
}
I declare a new Person object, and I then set its PersonName property to the name argument I pass in. Next, I reference our PeopleDataSource property and add the newPerson Person object I just created. In case you are unfamiliar with the text preceding our Add method, when dealing with static methods, you can’t just use the this keyword and reference the property defined inside this class.
All of this is great, but currently, you actually aren’t using these newly created methods at all. That is something that needs to be fixed, but before we dive into that, let’s first look at our game plan.
Initially, our PeopleDataSource property is going to be null. It won’t be storing any values at all unless it is first initialized to the object data provider / data source that already exists. In other words, we can’t call our AddPerson method until our PeopleDataSource method points to data source used by the data binding.
What we are going to do is, shortly after our Window is initialized, assign our PeopleListDS data provider to the PeopleDataSource property. How would we know when our window has been initialized? Well, fortunately, there is actually an event that gets fired once a Window is initialized, and this event fires before most other events that you may have running in your application. Intercepting our window's initialized event and initializing our PeopleDataSource property ensures that our PeopleDataSource property has a value assigned to it very early in our application’s life.
To actually do implement what I wrote in the previous paragraph, you'll have to go back to Blend – there is a reason why I didn’t ask you to close it earlier! Switch back into Blend and select your Window from Objects and Timeline:
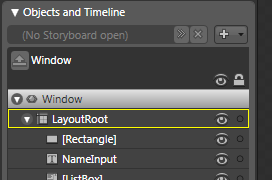
[ select your Window parent from Objects and Timeline ]
Once you have selected your Window, glance over at your Property pane/grid and click on the Events button to display a list of all events your selected Window allows you to modify. Scroll down this list to find the Initialized event, and in the textbox next to it where you specify the name of the event handler, enter the name WindowInitialized:
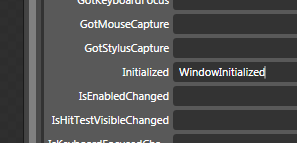
[ give your Initialized event an event handler named WindowInitialized ]
Press Enter once you have given your Initialized event the event handler name WindowInitialized. Once you press Enter, Visual Studio will steal focus from Blend and display the WindowInitialized event handler it created for you:
private void WindowInitialized(object sender, EventArgs e)
{
}
To reiterate what I mentioned earlier, when your application has loaded, your Initialized event is fired immediately. In our case, the Initialized event is intercepted by the WindowInitialized event handler, and it is here where we want to take care of initializing our PeopleDataSource property. Add the following line of code into your WindowInitialized method:
PeopleData.PeopleDataSource = this.FindResource("PeopleListDS") as ObjectDataProvider;This line is almost the same as what you had earlier. The only difference is that you are assigning the data provider already in existence to our PeopleData’s PeopleDataSource static property. Your entire WindowInitialized method with the above code copied and pasted into it should look like the following:
private void WindowInitialized(object sender, EventArgs e)
{
  PeopleData.PeopleDataSource = this.FindResource("PeopleListDS") as ObjectDataProvider;
}
All right! We just finished setting up our PeopleData class, and we also hooked up our Initialized event to the WindowInitialized event handler. Right now, what you just did may not make much sense, but I will explain all of this in one fell swoop in the next section after we modify your AddButton_Click event handler to use the PeopleData class we modified in this page.
In the previous section, you wrapped up work on the PeopleData class. In this page, you will learn how to use this class by modifying the AddButton_Click event handler to get everything working...again.
One of the earlier gripes was that the AddButton_Click event handler simply contains too much important code. It would be better to offload some of that code to a dedicated part of your project where the data-related tasks are handled. So far, we have done that by creating our PeopleData class.
Let's finish up our last task by modifying our AddButton_Click event handler to use the new methods created in the PeopleData class. Make sure you have Window1.xaml.cs open in Visual Studio. Your AddButton_Click event handler currently contains the following code:
private void AddButton_Click(object sender, RoutedEventArgs e)
{
  ObjectDataProvider odp = this.FindResource("PeopleListDS") as ObjectDataProvider;
  PeopleList people = odp.Data as PeopleList;
  Person newPerson = new Person();
  newPerson.PersonName = NameInput.Text;
  people.Add(newPerson);
  NameInput.Text = String.Empty;
}
Delete everything except for the last line where you have NameInput.Text = String.Empty. Copy and paste the following one line of code to the top of your AddButton_Click event handler:
PeopleData.AddPerson(NameInput.Text);Your AddButton_Click event handler will now look like the following:
private void AddButton_Click(object sender, RoutedEventArgs e)
{
  PeopleData.AddPerson(NameInput.Text);
  NameInput.Text = String.Empty;
}
Go ahead and test out your application. Notice that everything still works just like before, and best of all, we greatly improved how our application is structured. Now, let's go back a few steps and look at why the code you added works.
In the past few pages, you copied and pasted some code. I haven't fully explained what each line of code you added does, so let's go back and look at it in greater detail:
public static ObjectDataProvider PeopleDataSource
{
  get;
  set;
}
In your PeopleData class you have a static property of type ObjectDataProvider called PeopleDataSource. This property is fairly simple and contains just your standard get and set statements that allow you to store or retrieve a value.
public static void AddPerson(string name)
{
  Person newPerson = new Person();
  newPerson.PersonName = name;
  (PeopleData.PeopleDataSource.Data as PeopleList).Add(newPerson);
}
The only other thing in your PeopleData class that needs revisiting is our static AddPerson method. This method takes an argument for a person's name as a string and assigns it to the PersonName field of a new Person object.
In the final line, I call the earlier PeopleData source property. Because it returns data in the form of an ObjectDataProvider, I am able to use the Data property to get at the PeopleList that I am interested in. Notice that I am typecasting the returned values as a PeopleList. Once I have access to the PeopleList data, I can use the Add method to add the new Person object I created. This ensures that our listbox gets the new value.
We are almost done with this tutorial! In the next section, let's look at the Initialized code we added and review everything you've done by running through our application to see how everything works together.
In the previous section, we finished up (most) of our explanation on why the code we added works by looking at each line. In this page, we'll wrap up the code explanation and take a look back at what the past seven pages were about!
Let's look at the final piece of code that hasn't been explained yet:
private void WindowInitialized(object sender, EventArgs e)
{
  PeopleData.PeopleDataSource = this.FindResource("PeopleListDS") as ObjectDataProvider;
}
In our Window1.xaml.cs file, you have your WindowInitialized event handler. If you recall, this was created via Blend when you setup this event handler for your Window's Initialized event.
You only do one thing in this event handler. The one thing you do is initialize your PeopleDataSource static method found in your PeopleData class with the data provider already defined for you in XAML
Most of this should be review, but do you know why you even have this code in the WindowInitialized event handler? You have this code because, if we wanted to add new people to our listbox, you need to use the PeopleDataSource static property declared in your PeopleData class. That means your PeopleDataSource property needs to be initialized to the data provider that already exists.
If you tried to add a person before the PeopleDataSource property had a value, your application will throw an exception and crash your application. The only way to ensure that this does not happen is to initialize PeopleDataSource immediately after your Window has been initialized. To look at this another way, before you quickly get a chance to do anything, you want to make sure that PeopleDataSource has been initialized.
You may be wondering why go through all of this hassle? Why not just check if PeopleDataSource is initialized prior to the Add button click? After all, that is what we did in our initial implementation of our solution. The problem, beyond complicating our AddButton_Click event handler with unnecessary things, limits the checking to only when a button is clicked.
You may have scenarios where you are adding people to your list from an external data source where the Add button is never even used. You could duplicate the PeopleDataSource initialization check, but that makes your code less maintainable because you now have more than one area that you need to maintain consistency between.
Amidst all of the coding in the past few pages, the reason why this article exists may have gotten lost. The problem was, you had an application where you have some data that has already been databound to a control. For example, in our case, the sample project used Blend to data bind our ListBox's ItemsSource property to a collection of people.
Any initial people in our collection were automatically being displayed, but we wanted to add more people using our textbox and Add button. We accomplish that by hooking into the existing data binding relationship that already exists and is defined in the XAML. Once you hook into the existing data source, which is a custom type called PeopleList, you can add/remove/modify elements like you would for any other collections-based type.
The only hurdle was figuring out how to gain access to the existing data provider. The rest was simple. What was less simple was taking an "ok" solution and making it into a "better" solution. The past few pages dealt with increasing the abstraction between the UI and the actual data. While I already provided some advantages of that, let's look at how this makes life for you or a future coder of this application easier.
One of your goals when writing applications should be to make sure that, several years down the road when you are revisiting this application, you can quickly understand what is going on as well as quickly being able to add or remove functionality. Beyond just for your benefit, if others were to take a look at your code, they too should find it easy to become familiar with what you wrote.
By placing important pieces of functionality into logical groups helps immensely with that. We created a PeopleData class that handles all things related to people and their data. Initially, much of that information was in our Add button's event handler, but as you can see, it does not make much sense to use an event handler to do boring data work. And with that, this tutorial is over!
Just a final word before we wrap up. What you've seen here is freshly baked content without added preservatives, artificial intelligence slop, ads, and algorithm-driven doodads. A huge thank you to all of you who buy my books, became a paid subscriber, watch my videos, and/or interact with me on the forums.
Your support keeps this site going! 😇


:: Copyright KIRUPA 2026 //--