 Tutorials
Books
Videos
Forums
Tutorials
Books
Videos
Forums


This is an archived tutorial from the kirupa.com legacy collection. It covers software that may no longer be available, but it is kept online because the ideas still hold up.
When you build a Silverlight application, especially if you use Blend, the most common way is to create a new Silverlight 2 Application. More than likely, your entire solution might just be a single Silverlight project:

[ by default, you will probably just create a Silverlight project...and that's fine! ]
There is nothing wrong with setting up a Silverlight project this way. Debugging works. Testing works. Everything seems fine. Actually, everything is fine.
Only when you start to integrate your Silverlight app as part of an existing web site, or if you are planning on lazily loading content on demand, the convenience of the above setup may turn into a nuisance.
Often times, your Silverlight content will involve large pieces of external content, media files, Deep Zoom images, etc. When you incorporate all of your content into your Silverlight project, they get compiled and compressed into the XAP by default. These various pieces of content may seem like individual/loose files right now, but when you build, though, all of these loose pieces of content get compressed and placed inside your XAP:

There are cases where you probably want that. Having items inside the XAP means that you get the free preloader that automatically displays when you are trying to display your content. The downside is that, if you have content that you want loaded on-demand such as videos or photos in a photo gallery, you don't want such content to be downloaded initially. You wouldn't want such content to be embedded inside the XAP either.
Another subtle but possibly more annoying issue is that, in a Silverlight-only solution containing a single Silverlight project, you do not have the ability to save the HTML file that will be hosting your Silverlight XAP. Each time you build, your changes get overwritten. That means that if you were to alter the default HTML page containing your Silverlight content, the next time you build, those changes you made would be overwritten.
To help you out of this conundrum, you have Web Site projects. A Web Site project is the equivalent of a web site directory where loose files can be placed. What makes this useful when using Visual Studio, is that if you have existing Silverlight content, VS will ask if it can link your Silverlight output, known as a XAP file, to a location on your Web site project itself.
That probably seems a bit confusion, so hopefully the following image gives you a basic idea of how your solution would be set up:

Notice that when you build, you create a XAP file. This XAP file gets copied into your Web Site directory where you can access all of the content inside your Web site easily.
This solves all of the problems we mentioned earlier. Because your Silverlight project does not contain any content you would not want inside your XAP, your XAP only contains what you feel is relevant. Any content that you want to use but don't wish to embed in your XAP, you can simply place them in your Web Site Project instead!
Also, your web site project will come with a preconfigured HTML file that loads and displays your XAP. Since this file is located in your Web site project itself, you building your Silverlight project will have no effect on any changes you made to your HTML file inside your Web site project.
Despite this long introduction. Creating your own Web Site project is not tricky at all. Let's look at how to do that in the next section.
In the previous section, I explained why separating your project between a XAP and a Web site project is useful. In this page, let's figure out how to set up your solution to do just that.
The first approach we will look at for setting up your XAP and Web site is when you get to create your project anew. The easiest way is to use Visual Studio. Launch Visual Studio, and go to File | New | Project.
The New Project window will appear. Under Project Types, select Silverlight, and under Templates, select the Silverlight Application template:
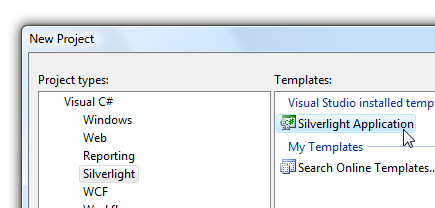
[ let's first create a new Silverlight Application ]
Click OK to go ahead and create this Project. Once you have done that, notice that another window will appear:
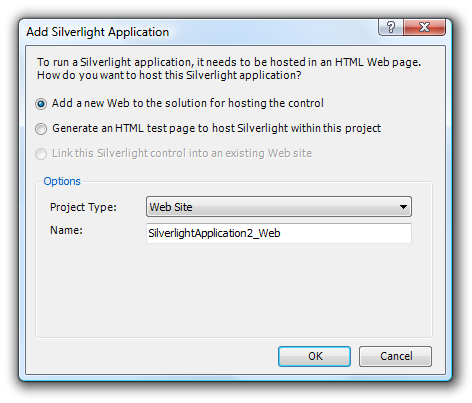
[ a window asking you how you want to host the Silverlight Application ]
This window pretty much sums up what you want to do. Notice that you are given two options. One option is to add a new Web site project to your solution, and the other option is to generate an HTML test page.
Select the option for "Add a new Web to the solution for hosting the control", and press OK. After a few seconds, your project will be setup, so take a look at your Solution Explorer to see what exactly happened:
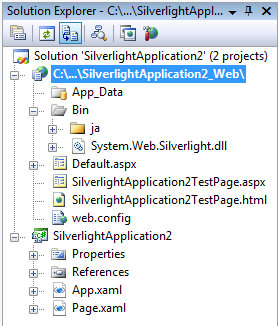
[ your Solution Explorer shows how your solution is setup ]
To recap, you originally opted to create a Silverlight project, but you also selected the option to have a new Web site project created as well. That is why you see both projects now displayed in your solution. While this seems interesting, there is a crucial detail that is missing from your Web site project. That is the XAP itself. Where is it?
Because you just created the project, the XAP hasn't been created yet. Simply hit F6 or go to Build | Build Solution. After a few seconds, notice that it makes an appearance in your Web site:
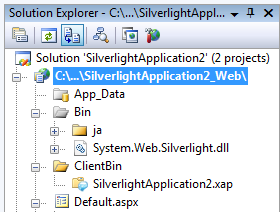
[ the ClientBin folder contains the output of your Silverlight project ]
A ClientBin folder is created for you, and inside that folder is your XAP file. This XAP file is the output of what happened when you built your Silverlight application, and this is the only file that gets updated each time you build. All of the other files simply stay the same. Notice that you see a few ASPX pages along with an HTML page inside your Web site project. These files are preconfigured to load and display your XAP in the browser, and you can make as many modifications to your HTML pages as you want without worrying about those changes being overwritten when you build.
When you hit F5 (Debug | Start Debugging), your ASPX page will run by default. To change what particular HTML-like file actually loads in your browser, right click on the ASPX page or HTML file you want, and select the Set as Start Page command:
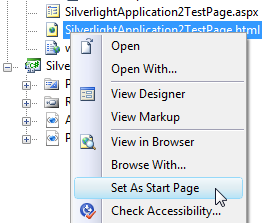
[ you can easily change what start page gets displayed ]
This way, whenever you hit F5, only the page you want to display in your browser is launched.
Alright, we tackled one of the two cases where you get to start a fresh project and get both your Silverlight and Web site projects setup. In the next section, let's look at the second case where you already have a Silverlight project setup and want to add a Web site project afterwards.
In the previous section, you learned how to create a new Silverlight project and link a Web site to its output. In this page, let's look at the other case where you already have a Silverlight project created but don't have a Web site associated with it.
You may be wondering how you could get into a situation where you have a Silverlight project but no Web site project. It's actually quite common. Currently, in the beta version of Blend 2.5, if you happen to create a new Silverlight project, you create just a Silverlight project. You don't get the option of having a Web site created as well.
Fortunately, the fix for this is quite simple. Open your Silverlight project in Visual Studio. Look in your Solution Explorer where you only see your single Silverlight project:

[ the Solution Explorer is your friend ]
Right click on your Solution and go to Add | New Web Site:

[ you can easily add a new Web site project to an existing solution ]
The Add New Web Site window will appear. You will see several preconfigured Web site templates for you to pick from. Let's keep it simple and just go with the Empty Web Site:

[ select the Empty Web Site template ]
Once you select your Empty Web Site template and hit OK. Your Add New Web Site window will close, and you will see your Web site project appear in your Solution Explorer. Since it is after all an empty Web site, you won't see much.
Anyway, right click on your web site project in the Solution Explorer, and from the menu that appears, select the Start Options item:

[ to associate your Silverlight app during startup with your web site, go to Start Options ]
A properties window will appear. From this window, click on the Silverlight Applications menu item:

[ select the Silverlight Applications tab ]
Once you have clicked on Silverlight Applications, you will probably a lot of empty space on the right-half of this window. At the bottom, though, you will see three buttons of which only one is enabled - Add. Click on this Add button:

[ Add a new Silverlight Application reference ]
Once you have clicked on Add, you will see the Add Silverlight Application dialog appear:

[ create a new SL project or link to an existing SL project form this page ]
From this window, you can either select an existing Silverlight Application (which is what you would probably want to do), or you can create a Silverlight project and have it be linked to your web site instead.
In either case, now, you are at exactly where we were in the previous section where your solution now contains both a Silverlight project as well as a Web Site project that listens to the output produced by your Silverlight project. Yay!
Just a final word before we wrap up. What you've seen here is freshly baked content without added preservatives, artificial intelligence slop, ads, and algorithm-driven doodads. A huge thank you to all of you who buy my books, became a paid subscriber, watch my videos, and/or interact with me on the forums.
Your support keeps this site going! 😇


:: Copyright KIRUPA 2026 //--