Smooth Morphing with Transition
Effects by
kirupa | 7 July 2010
Ever since wooly
mammoths roamed the earth, you have had the ability
to move between visual states. Not only could you
move between states, you could do it in style by
altering the duration and specifying an easing
function. Starting with Expression Blend 4, the
awesomeness of moving between states has been kicked
up a few notches with the introduction of transition
effects.
In the following
example, hover over buttons 1 through 4 to navigate
between four visual states:
[ hover over the numbered buttons ]
Each visual state
contains a different album image. As you are
changing from one album to another, notice that you
see a slight ripple effect. This ripple effect
clearly goes beyond simple easing function and
duration changes that you were accustomed to. What
you just witnessed is the result of applying
something called a TransitionEffect.
What is a
TransitionEffect In a nutshell, a
TransitionEffect is nothing more than a
PixelShader
that uses your graphics card to manipulate pixels in
clever and complicated ways. It works in concert
with your duration and easing function to create
smooth morphs between states as the one ripple
effect you saw earlier.
Using
TransitionEffects Using a TransitionEffect is
actually extremely easy if you already know how to
work with states. If you don’t know how to work with
states, feel free to take a look at the Using Visual
States, GoToStateAction, and Easing Function
tutorials.
In a Silverlight 4 or
.NET 4 project, create a state group and specify
some states. Next, specify a non-zero second
duration and optionally specify an easing function
if you want:
[ a
simple state setup is all you need to test
TransitionEffects ]
Once you have done all
of this, click on the TransitionEffect icon. This
icon can be found directly to the left of the easing
function icon:
[
click on the TransitionEffect icon ]
A few moments after
you click on the TransitionEffect icon, you will see
a flyout that specifies the TransitionEffect you
wish to use:
[
this drop-down lists available TransitionEffects ]
Click on the drop-down
to select a TransitionEffect from a handful of
transition effects we provide for you:
[
the list of built-in transition effects available
for you to use ]
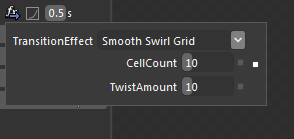
After you select a
TransitionEffect, the effect will be set for the
particular state group you are currently in. Some
transition effects, such as Smooth Swirl Grid,
expose additional properties that you can tweak
further:
[
some transition effects contain adjustable
properties ]
That’s all there is to
it. You can quickly preview how your chosen
TransitionEffect looks by using the GoToStateAction
to play a state from the state group this
TransitionEffect was applied to.
Conclusion
Transition effects are both really cool and
extremely easy to use. With a few simple clicks, you
can essentially define a morph between two visual
states.
In case you are
curious, the support for
transition effects is provided by Expression Blend
via the Microsoft.Expression.Effects.dll that
originates from the Expression Blend SDKs. This
little tidbit is only important if you are sharing
this project with someone who may not have the
Expression Blend SDKs installed…such as your
neighborhood Visual Studio user. The SDKs get
installed automatically for you when you install
Expression Blend by itself.
Just a final word before we wrap up. What you've seen here is freshly baked content without added preservatives, artificial intelligence, ads, and algorithm-driven doodads. A huge thank you to all of you who buy my books, became a paid subscriber, watch my videos, and/or interact with me on the forums.