|
by kirupa |
1 March
2007
Whenever you click on a button or type some text into a
form in your browser, you are using events. More than
likely, you never think about this, because it just works.
You don't worry about how the mouse click is recognized, how
your application knows which key was pressed, etc. The
reason is that many of these lower level details are handled
by your graphics framework itself. Even as a developer, your
work with events is largely on the surface of what really
goes on behind the scenes, but there is plenty of surface
area to cover though! So, in this tutorial, I will explain
how to use event handlers in the Windows Presentation
Foundation (WPF).
Don't let the introduction scare you though. Event
handling is extremely common, and if you've ever made your
application do something when a button was clicked, you
already know most of what is to know about using event
handlers.
An event handler is simply a method
(function) that
receives the input from a device such as a mouse or keyboard and does
something with it. Like its name implies, it handles events
- more specifically, input events. For example, the following code shows an
event handler called ButtonOkClicked that is fired when a
button is clicked:
- private
void
ButtonOkClicked(object
sender,
RoutedEventArgs
e)
- {
- this.Close();
- }
There are really two things that need to be done when
using events:
- You need to bind an event handler
to a Control (button, text field, menu, etc.).
- You need to specify an event handler that receives and reacts to an
event.
In this article, I will go over event handlers and how to
use them with events. I will provide code examples to
reinforce what I will be explaining, but this is more of an
article explaining event handlers as opposed to a tutorial
where you create a small application using event handlers.
Let's first look
at how to bind an event to an event handler. There are two
ways of doing this. You can (1) either use an IDE such as
Expression Blend or Visual Studio's WPF Designer (see
blog post), or (2) you can
bind a control to an event using code itself. The end result
is the same, so let's look at both the visual as well as
code-based approaches.
The visual approach is what most of you will use because
there are great tools for designing GUIs using WPF. I won't
go into the details of either Visual Studio or Blend in this
tutorial, but if you have, for example, a button, you can view a
list of the events and assign an event handler next to the
event you wish to fire:
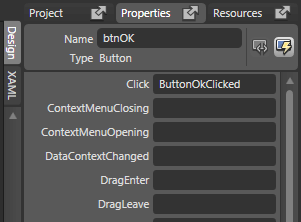
[ assigning a click event to an event handler called
ButtonOkClicked ]
In the visual view, you simply find the event that you
wish to bind your control to such as Click, and specify the
name your event handler will take. When you press Enter you
will be taken to the code view where you can see the event
handler displayed with the name you provided.
If you look at the XAML for the above event-binding, you
will see both the Click event as well as our event handler
ButtonOkClicked appear:
<Button HorizontalAlignment="Left"
Margin="130,92,0,86" x:Name="btnOK" Width="80" Content="OK"
Click="ButtonOkClicked"/>
It is the above XAML definition that tells your final
application to route all Click events attached to the button
to the ButtonOkClicked event handler. A program like Blend
or Visual Studio's Designer serves primarily to provide a
nice interface for creating the XAML snippet I posted above.
On the next page, let's take a look at the code based
approach.
Onwards to the
next page!
|


