 Tutorials
Books
Videos
Forums
Tutorials
Books
Videos
Forums


This is an archived tutorial from the kirupa.com legacy collection. It covers software that may no longer be available, but it is kept online because the ideas still hold up.
There are many things you can do using just XAML. That is nice because you can use a designer tool such as Expression Blend to create those "many things" without having to write any XAML manually or writing any code. Despite the power XAML brings to the table, there are things that XAML just isn't designed to today.
For example, I have an animation where a circle oscillates from one edge of the window to another:
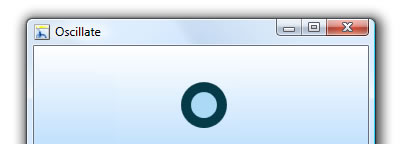
[ Time 0: Starting Location ]
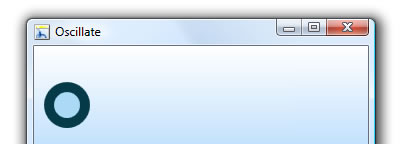
[ Time 1: Left Edge ]
[ Time 2: Back to the Center ]
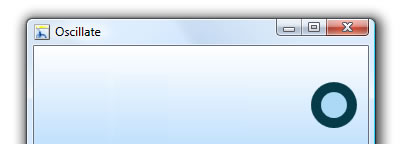
[ Time 3: Right Edge ]
[ Time 4: Back to the Beginning ]
While the static screenshots don't show it, there is also a slight easing effect where the circle decelerates as it approaches either the left or right edges of the window. Anyway, that detail isn't particularly important right now.
What is important is that all of what you see above - the oscillation animation with the easing - was defined entirely using XAML:
<Storyboard x:Key="Oscillate">
<DoubleAnimationUsingKeyFrames
BeginTime="00:00:00"
RepeatBehavior="Forever"
Storyboard.TargetName="ellipse"
Storyboard.TargetProperty="(UIElement.RenderTransform).
(TransformGroup.Children)[3].(TranslateTransform.X)">
<SplineDoubleKeyFrame
KeySpline="1,0,1,1"
KeyTime="00:00:00"
Value="0"/>
<SplineDoubleKeyFrame
KeySpline="0,1,1,1"
KeyTime="00:00:01"
Value="-130"/>
<SplineDoubleKeyFrame
KeySpline="1,0,1,1"
KeyTime="00:00:02"
Value="0"/>
<SplineDoubleKeyFrame
KeySpline="0,1,1,1"
KeyTime="00:00:03"
Value="140"/>
<SplineDoubleKeyFrame
KeySpline="1,0,1,1"
KeyTime="00:00:04"
Value="0"/>
</DoubleAnimationUsingKeyFrames>
</Storyboard>
Let's complicate the example a bit. Now, I decide to change the speed of the oscillation while our application is running. Here is what our UI looks like with that twist thrown in:
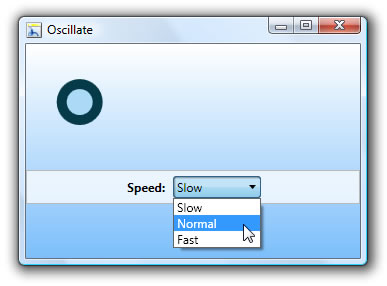
Notice that I now have a combo box where I can change the speed of the animation based on what combo box item I select.
Now, this is something that would be difficult (if not impossible) to implement using just XAML. You will have to write some code to do this. While that may seem daunting, it's actually fairly straightforward. Let's figure out how to do that in the next section!
In the previous section, I described the problem and why it is necessary to modify this animation using code. In this page, we'll look at the problem in greater detail.
To help you out, I've created a sample project that represents our problem:
Download the above file, extract it to your hard drive, and open Window1.xaml in Expression Blend 2. Hit F5 to run your application. What you will see is the application I described in the previous section - animation and all.
What I am going to do in this page is describe the XAML that defines the animation where the circle oscillates from one edge of the window to the other. The reason is that, in order to manipulate this animation using C#, knowing the basic structure of your animation in XAML is quite handy.
In Blend 2, hit the XAML tab and scroll to the top of your code where you see the Window.Resources node. It's child is the animation that I have pasted below for your reference:
<Storyboard x:Key="Oscillate">
<DoubleAnimationUsingKeyFrames
BeginTime="00:00:00"
RepeatBehavior="Forever"
Storyboard.TargetName="ellipse"
Storyboard.TargetProperty="(UIElement.RenderTransform).
(TransformGroup.Children)[3].(TranslateTransform.X)">
<SplineDoubleKeyFrame
KeySpline="1,0,1,1"
KeyTime="00:00:00"
Value="0"/>
<SplineDoubleKeyFrame
KeySpline="0,1,1,1"
KeyTime="00:00:01"
Value="-130"/>
<SplineDoubleKeyFrame
KeySpline="1,0,1,1"
KeyTime="00:00:02"
Value="0"/>
<SplineDoubleKeyFrame
KeySpline="0,1,1,1"
KeyTime="00:00:03"
Value="140"/>
<SplineDoubleKeyFrame
KeySpline="1,0,1,1"
KeyTime="00:00:04"
Value="0"/>
</DoubleAnimationUsingKeyFrames>
</Storyboard>
Animations in WPF and Silverlight are defined by three things - Storyboards, Animations, and Keyframes. Let's look at each one in greater detail by using our above XAML as reference.
A storyboard primarily acts a container for your animations. While it can do more such as specify which elements and properties to target, our storyboard only contains an x:Key reference that will prove useful when calling this storyboard via code:
<Storyboard x:Key="Oscillate">
<DoubleAnimationUsingKeyFrames
BeginTime="00:00:00"
RepeatBehavior="Forever"
Storyboard.TargetName="ellipse"
Storyboard.TargetProperty="(UIElement.RenderTransform).
(TransformGroup.Children)[3].(TranslateTransform.X)">
<SplineDoubleKeyFrame
KeySpline="1,0,1,1"
KeyTime="00:00:00"
Value="0"/>
<SplineDoubleKeyFrame
KeySpline="0,1,1,1"
KeyTime="00:00:01"
Value="-130"/>
<SplineDoubleKeyFrame
KeySpline="1,0,1,1"
KeyTime="00:00:02"
Value="0"/>
<SplineDoubleKeyFrame
KeySpline="0,1,1,1"
KeyTime="00:00:03"
Value="140"/>
<SplineDoubleKeyFrame
KeySpline="1,0,1,1"
KeyTime="00:00:04"
Value="0"/>
</DoubleAnimationUsingKeyFrames>
</Storyboard>
The main thing to note in the context of this example is that our storyboard's x:Key value is Oscillate.
Inside your storyboard, you will find animations. There are numerous (I believe 22) animation base types that you can use, and they are all designed for whatever type of property you are modifying:
<Storyboard x:Key="Oscillate">
<DoubleAnimationUsingKeyFrames
BeginTime="00:00:00"
RepeatBehavior="Forever"
Storyboard.TargetName="ellipse"
Storyboard.TargetProperty="(UIElement.RenderTransform).
(TransformGroup.Children)[3].(TranslateTransform.X)">
<SplineDoubleKeyFrame
KeySpline="1,0,1,1"
KeyTime="00:00:00"
Value="0"/>
<SplineDoubleKeyFrame
KeySpline="0,1,1,1"
KeyTime="00:00:01"
Value="-130"/>
<SplineDoubleKeyFrame
KeySpline="1,0,1,1"
KeyTime="00:00:02"
Value="0"/>
<SplineDoubleKeyFrame
KeySpline="0,1,1,1"
KeyTime="00:00:03"
Value="140"/>
<SplineDoubleKeyFrame
KeySpline="1,0,1,1"
KeyTime="00:00:04"
Value="0"/>
</DoubleAnimationUsingKeyFrames>
</Storyboard>
Our animation is of type DoubleAnimationUsingKeyframes because, we are using keyframes as you will see later, but more importantly, because the property we are modifying - TranslateTransform.X - is of type Double.
Notice that we set some basic properties such as BeginTime and RepeatBehavior which specify when your animation begins and what it will do when it reaches the end. In our case, the animation begins at time 0, and when it reaches the end, it loops forever.
What is interesting to note is the value for your TargetProperty. Notice that it seems pretty big, but if you look through it, the property that you are targeting is the TranslateTransform.X property of your RenderTransform on the ellipse element. In Blend, you can find that property by using the Properties Inspector and navigating to the Transform category:
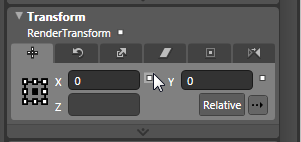
[ the property that your animation is targeting ]
I'm showing this to let you know that your animation has its sights on the X value of your RenderTransform. You will see why that is important in the next section when I describe keyframes.
Animations often contain keyframes. Keyframes are like a stake in the ground where a property promises to be at a particular value at the time the keyframe is in. In our example, we have five keyframes of type SplineDoubleKeyFrame:
<Storyboard x:Key="Oscillate">
<DoubleAnimationUsingKeyFrames
BeginTime="00:00:00"
RepeatBehavior="Forever"
Storyboard.TargetName="ellipse"
Storyboard.TargetProperty="(UIElement.RenderTransform).
(TransformGroup.Children)[3].(TranslateTransform.X)">
<SplineDoubleKeyFrame
KeySpline="1,0,1,1"
KeyTime="00:00:00"
Value="0"/>
<SplineDoubleKeyFrame
KeySpline="0,1,1,1"
KeyTime="00:00:01"
Value="-130"/>
<SplineDoubleKeyFrame
KeySpline="1,0,1,1"
KeyTime="00:00:02"
Value="0"/>
<SplineDoubleKeyFrame
KeySpline="0,1,1,1"
KeyTime="00:00:03"
Value="140"/>
<SplineDoubleKeyFrame
KeySpline="1,0,1,1"
KeyTime="00:00:04"
Value="0"/>
</DoubleAnimationUsingKeyFrames>
</Storyboard>
You can visualize these keyframes by simply opening the Oscillate storyboard in Blend:
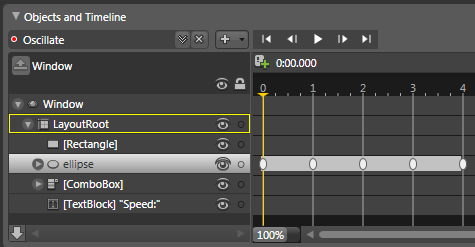
[ your five keyframes displayed at times 0, 1, 2, 4, and 5 second marks ]
Notice that there are five keyframes, and if you select the keyframe, you will see your Properties Inspector update to display the keyframe and the type it is, and more importantly, its value:
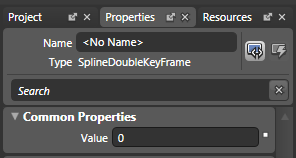
[ selecting a keyframe will display it's type plus a field for its value ]
Anyway, but now I am digressing. If you look at the XAML, the KeyTime is specified, but so is the Value. This Value is channeled to the TargetProperty your animation is targeting. For example, at the 3 second mark, your KeyFrame's Value is 140. That means that our ellipse's TranslateTransform.X value is going to be 140 as well.
In case I didn't mention it earlier, the animation system in WPF and Silverlight is really designed to take a property and change it over a period of time. In our case, we are changing the horizontal position of our circle (ellipse element) via the TranslateTransform.X property as defined by our animation, and the actual value of that property at a given time is specified by our keyframes.
All right, now you have a good idea of what our XAML is actually doing by analyzing our animation. As you will see in the next section, this knowledge will come in quite handy.
In the previous section, you downloaded a sample project that contained the animation that I've been describing for a while now. To give you a better understanding of what goes on behind the scenes, a bulk of the time in the previous section was spent looking at XAML and explaining keyframes, animations, and storyboards. You will see in this page why that was done.
By now, you may have forgotten what the original problem we were trying to solve was. I know I certainly forgot. You have an animation that currently plays at a specified speed. What you want to do is change that speed while the animation is running:
There are three speed values - Slow, Normal, and Fast. When the Slow item is selected, our animation will take longer to finish. When Normal is selected, things move at a moderate speed. When Fast is selected, your animation just flies through!
So, where is the speed property that we can modify? Well, there is no value for speed. What you do have are five values for duration as specified in the keyframes...more specifically, our KeyTime values in each of the SplineDoubleKeyFrames:
<Storyboard x:Key="Oscillate">
<DoubleAnimationUsingKeyFrames
BeginTime="00:00:00"
RepeatBehavior="Forever"
Storyboard.TargetName="ellipse"
Storyboard.TargetProperty="(UIElement.RenderTransform).
(TransformGroup.Children)[3].(TranslateTransform.X)">
<SplineDoubleKeyFrame
KeySpline="1,0,1,1"
KeyTime="00:00:00"
Value="0"/>
<SplineDoubleKeyFrame
KeySpline="0,1,1,1"
KeyTime="00:00:01"
Value="-130"/>
<SplineDoubleKeyFrame
KeySpline="1,0,1,1"
KeyTime="00:00:02"
Value="0"/>
<SplineDoubleKeyFrame
KeySpline="0,1,1,1"
KeyTime="00:00:03"
Value="140"/>
<SplineDoubleKeyFrame
KeySpline="1,0,1,1"
KeyTime="00:00:04"
Value="0"/>
</DoubleAnimationUsingKeyFrames>
</Storyboard>
By decreasing the time between each keyframe, we speed the animation up. That works because it now takes less time for your circle to go from one edge of the window to the other edge. Of course, by increasing the time between each keyframe, we slow the animation down. The justification is similar. It takes your animation longer to do what it needs to do.
What we are going to do is, each time the combo box's value is changed, programmatically alter the KeyTime values for each of our keyframes based on what was selected. The next section will show you how.
Finally, we get to write some code! Like I mentioned earlier, we are going to alter the KeyTime values in each of our keyframes when the combo box's selection is changed. There are two parts to this. The first part is finding out what got selected in our combo box, and the second part is changing the KeyTime values based on what was selected.
If you look at the code for Window1.xaml.cs in Visual Studio, you will recall that the ChangeSpeed method is the event handler tied to our combo box's SelectionChanged event. That means that each time what you select inside the combo box changes, the ChangeSpeed method gets called. That's exactly what we want!
Inside your ChangeSpeed method, add the following code:
private void ChangeSpeed(object sender, SelectionChangedEventArgs e)
{
  double incrementer = 1;
  ComboBox comboBox = sender as ComboBox;
  ComboBoxItem selectedItem = comboBox.SelectedValue as ComboBoxItem;
  string speed = selectedItem.Content.ToString();
  if (speed == "Slow")
  {
  incrementer = 2;
  }
  else if (speed == "Normal")
  {
  incrementer = 1;
  }
  else if (speed == "Fast")
  {
  incrementer = .5;
  }
  ModifyAnimation(incrementer);
}
With the above code, I am getting the selected value (Slow, Normal, or Fast) and associating a number I call the incrementer to each value. If Slow is selected, my incrementer value is 2, for Normal it is 1, and for Fast it is .5.
The last thing I do is call a ModifyAnimation method that takes our incrementer value as its argument. Don't worry - you haven't created that method yet. I am not going to spend too much time on this section of code since it deviates a bit from our stated goal of learning how to modify animations created in XAML using C#.
We are almost there! In the previous section, we started to add some code, and I provided and explained the code needed to get the selected value from our combo box. We left everything at a bit of a cliffhanger with this mysterious call being made to a nonexistent ModifyAnimation method. Let's pick up from there!
Now that we have our combo box setup, let's figure out how to change the value of each of our keyframes' KeyTime value. First, because I am sure it is bugging you, add the following new method called ModifyAnimation that takes a double as its argument:
private void ModifyAnimation(double incrementer)
{
}
If you recall, the ChangeSpeed method calls ModifyAnimation with our incrementer value as the argument. We just created that method above. If you run your application, nothing noticeable will happen when you change the selected values in your combo box.
What we are going to do now is alter the KeyTime values stores in each of our keyframes. Here is the game plan. We have no way of directly targeting the keyframes. What we have to do is first get a reference to our Storyboard, then get a reference to the Animation, and then get to the Keyframes!
Because this will require us traversing through our Storyboard, for reference, below is the XAML for our animation:
<Storyboard x:Key="Oscillate">
<DoubleAnimationUsingKeyFrames
BeginTime="00:00:00"
RepeatBehavior="Forever"
Storyboard.TargetName="ellipse"
Storyboard.TargetProperty="(UIElement.RenderTransform).
(TransformGroup.Children)[3].(TranslateTransform.X)">
<SplineDoubleKeyFrame
KeySpline="1,0,1,1"
KeyTime="00:00:00"
Value="0"/>
<SplineDoubleKeyFrame
KeySpline="0,1,1,1"
KeyTime="00:00:01"
Value="-130"/>
<SplineDoubleKeyFrame
KeySpline="1,0,1,1"
KeyTime="00:00:02"
Value="0"/>
<SplineDoubleKeyFrame
KeySpline="0,1,1,1"
KeyTime="00:00:03"
Value="140"/>
<SplineDoubleKeyFrame
KeySpline="1,0,1,1"
KeyTime="00:00:04"
Value="0"/>
</DoubleAnimationUsingKeyFrames>
</Storyboard>
Let's start adding some code. First, let's get a reference to our Storyboard:
private void ModifyAnimation(double incrementer)
{
  Storyboard sb = this.FindResource("Oscillate") as Storyboard;
}
Because our Storyboard is stored as a Resource, I use the FindResource method and pass in the key of our storyboard, which is Oscillate. Because FindResource returns values only as the object type, I cast it as a Storyboard by using the VB-like as Storyboard syntax.
Next up is the code for getting the reference to our animation:
private void ModifyAnimation(double incrementer)
{
  Storyboard sb = this.FindResource("Oscillate") as Storyboard;
  DoubleAnimationUsingKeyFrames animation = sb.Children[0] as DoubleAnimationUsingKeyFrames;
}
Your storyboard stores children that are animations. In our case, our storyboard has just one child - the DoubleAnimationUsingKeyframes. Therefore, I pass in the index position of 0 to the Children collection of our storyboard and cast the resulting value as that of our DoubleAnimationUsingKeyframes object.
The thing to note is that I would not know all of this unless I looked at the XAML. Depending on your animation, your animation could be a host of different types besides DoubleAnimationUsingKeyframes. Because I have the XAML directly in front of me, I can feel safe declaring a new object of type DoubleAnimationUsingKeyframes and deliberately retrieving the first item from our storyboard's Children collection without taking edge cases into account. If I were to modify my animation such that these assumptions no longer hold true, then I would have to make sure I update this code as well.
Our animation has keyframes, so what we are going to do next is figure out a way to gain access to them:
private void ModifyAnimation(double incrementer)
{
  Storyboard sb = this.FindResource("Oscillate") as Storyboard;
  DoubleAnimationUsingKeyFrames animation = sb.Children[0] as DoubleAnimationUsingKeyFrames;
  DoubleKeyFrameCollection keyFrames = animation.KeyFrames;
}
Unlike before were we call the Children property of a collection, your animation doesn't store the Keyframes as children. Instead, the keyframes are stored in their own KeyFrames property, and you can access them by calling your animation's KeyFrames property as shown above.
Your keyFrames object now stores a collection of keyframes that you can iterate through, so let's add a for loop:
private void ModifyAnimation(double incrementer)
{
  Storyboard sb = this.FindResource("Oscillate") as Storyboard;
  DoubleAnimationUsingKeyFrames animation = sb.Children[0] as DoubleAnimationUsingKeyFrames;
  DoubleKeyFrameCollection keyFrames = animation.KeyFrames;
  for (int i = 0; i < keyFrames.Count; i++)
  {
  SplineDoubleKeyFrame keyFrame = keyFrames[i] as SplineDoubleKeyFrame;
  keyFrame.KeyTime = new TimeSpan(0, 0, (int)incrementer * i);
  }
}
Because we have five keyframes, keyFrames.Count will return 5. What we do in each of those five iterations is first, get the keyFrame and cast it as a SplineDoubleKeyFrame, and second, set the KeyTime to a new TimeSpan whose second value is our loop's index position i multiplied by the incrementer value we pass in.
After you have finished adding the above line of code, you are pretty much done. If you hit F5 and run your application, your animation will start playing. Each time you change the speed value in your combobox, does the animation's speed actually change? No, the speed does not, and let's find out why and how to fix this in the next section.
In the previous section, we drilled through our XAML using C#, found the elusive KeyTime property, and set its value depending on what our incrementer value was. Yet, when you ran the animation, nothing happened. What gives?
The heading should give it away on why even though you changed your KeyTime property's values, your animation's speed did not change. The reason is that properties of a running animation cannot be changed without you restarting the animation.
That means that any changes you make get queued, and when you restart your animation, those changes get applied. This means that you will need to add one more line of code:
private void ModifyAnimation(double incrementer)
{
  Storyboard sb = this.FindResource("Oscillate") as Storyboard;
  DoubleAnimationUsingKeyFrames animation = sb.Children[0] as DoubleAnimationUsingKeyFrames;
  DoubleKeyFrameCollection keyFrames = animation.KeyFrames;
  for (int i = 0; i < keyFrames.Count; i++)
  {
  SplineDoubleKeyFrame keyFrame = keyFrames[i] as SplineDoubleKeyFrame;
  keyFrame.KeyTime = new TimeSpan(0, 0, (int)incrementer * i);
  }
  sb.Begin(this);
}
To restart your animation, you call the Begin method on your storyboard - which is sb in our case.
If you were to run your application this time, notice that changing the speed values in your combobox changes the speed of the circle's oscillation. For this type of animation, you are bound to see the jump where the ball skips to its starting location whenever you change the speed and the animation restarts.
You can work around that generally by setting a virtual keyframe at Time 0 where there is no keyframe that point:
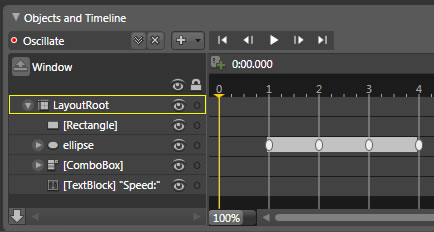
[ normally, setting a virtual keyframe is a good way to stop the jump ]
The only problem is that this type of animation doesn't work well to virtual keyframes. There are many other types of animations that do work well, so you will have to experiment and figure out a way to prevent the jumping.
There are more complicated programmatic ways of preventing the jump, but I will save the discussion of that topic for a later time. Your final code for Window1.xaml.cs should be as follows:
public partial class Window1
{
  public Window1()
  {
  this.InitializeComponent();
  // Insert code required on object creation below this point.
  }
  private void ChangeSpeed(object sender, SelectionChangedEventArgs e)
  {
  double incrementer = 1;
  ComboBox comboBox = sender as ComboBox;
  ComboBoxItem selectedItem = comboBox.SelectedValue as ComboBoxItem;
  string speed = selectedItem.Content.ToString();
  if (speed == "Slow")
  {
  incrementer = 3;
  }
  else if (speed == "Normal")
  {
  incrementer = 2;
  }
  else if (speed == "Fast")
  {
  incrementer = 1;
  }
  ModifyAnimation(incrementer);
  }
  private void ModifyAnimation(double incrementer)
  {
  Storyboard sb = this.FindResource("Oscillate") as Storyboard;
  DoubleAnimationUsingKeyFrames animation = sb.Children[0] as DoubleAnimationUsingKeyFrames;
  DoubleKeyFrameCollection keyFrames = animation.KeyFrames;
  for (int i = 0; i < keyFrames.Count; i++)
  {
  SplineDoubleKeyFrame keyFrame = keyFrames[i] as SplineDoubleKeyFrame;
  keyFrame.KeyTime = new TimeSpan(0, 0, (int)incrementer * i);
  }
  sb.Begin(this);
  }
}
And with that, you should be set! If you are curious to see how my implementation turned out, you can download the source final source files below:
Hopefully, this tutorial gave you an appreciation of how working between XAML and C# can actually save you a lot of time. What is nice about this is that you take advantage of quickly creating the framework of your animation - either manually or using a tool such as Expression Blend, and then manipulating the parts that you can't change easily in XAML using C#.
If you had to pick only C# or only XAML, the end result would be more difficult to achieve. The amount of C# code needed to, for example, define the TranslateTransform.X on your storyboard is not easy to figure out even with the XAML in front of you.
Being able to change the KeyTime value based on a combobox selection change is quite difficult (if not impossible) to do using just XAML. At the very least, you will need to write some code to create a ValueConverter to translate the Slow, Fast, and Normal values to the corresponding incrementer values.
If you have any questions related to what you saw in this tutorial or anything WPF, Silverlight, etc., please post in our Programming forum.
Just a final word before we wrap up. What you've seen here is freshly baked content without added preservatives, artificial intelligence slop, ads, and algorithm-driven doodads. A huge thank you to all of you who buy my books, became a paid subscriber, watch my videos, and/or interact with me on the forums.
Your support keeps this site going! 😇


:: Copyright KIRUPA 2026 //--