 Tutorials
Books
Videos
Forums
Tutorials
Books
Videos
Forums


This is an archived tutorial from the kirupa.com legacy collection. It covers software that may no longer be available, but it is kept online because the ideas still hold up.
Did you ever wish you could just scribble on your computer using your mouse just like you could using pen and paper? Well, if you did, then look no further! WPF includes a handy control known as InkCanvas that allows you to do just that. The following is an example of something that I drew using just my mouse cursor:

[ with an InkCanvas, your mouse cursor becomes a virtual pen ]
In this article, I will first cover the easy part of how to insert an InkCanvas into your document, and then I will describe the more involved parts describing common scenarios and how to implement them.
To get the most out of this article, you should follow along with my instructions. To do that, you will need Expression Blend 2 and Visual Studio 2008 installed. If you do not already have them, you can download and install the fully-functional trial version of Blend and the free Visual C# 2008 Express from the links shown below:
Alright - now that you have the right tools, it's time to start working on our application.
Launch Blend and create a new WPF C# project. Once you have created your new project, you should see an empty artboard. Your Objects and Timeline panel will only contain entries for Window and LayoutRoot:
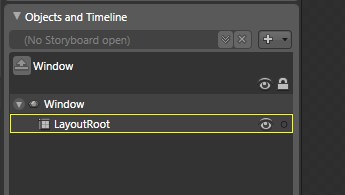
[ the default objects displayed for a WPF application ]
Now, let's insert our InkCanvas control. From your toolbox, click on the Asset Library icon:
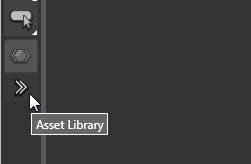
[ find the Asset Library icon ]
The Asset Library window will appear. The search text field inside your Asset Library window will have focus by default, so start typing the word inkcanvas. After typing a few letters, your InkCanvas control will appear:
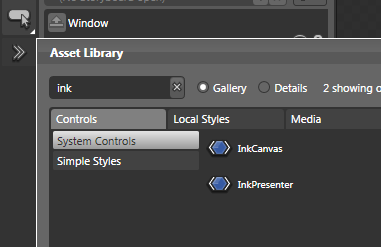
[ find the InkCanvas control in your Asset Library ]
Select the InkCanvas control. Once you have it selected, your Asset Library will close and your toolbox will display your InkCanvas control:
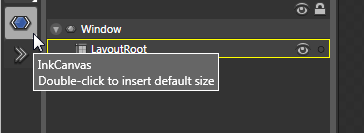
[ the InkCanvas control you selected earlier will now be displayed in your toolbox ]
Double click on the InkCanvas control from your toolbox to insert it at its default size in your application:
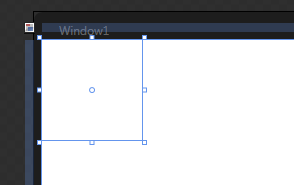
[ your InkCanvas control should now be inserted at its default size ]
The default InkCanvas size is pretty small, so let's make it take up all available space in our application. The easiest way of doing that is by clicking on the bottom-right resize adorner and just dragging:
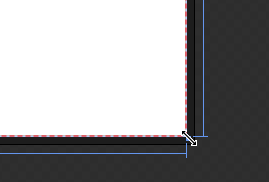
[ there are several ways of making a control take up all available space! ]
Alright - you now have a very simple application that contains nothing of interest beyond just an ink canvas. Wait...isn't that interesting enough?! Test your application from Blend by hitting F5.
If you move your mouse over your running application, you will see your cursor change to a small point. If you click and begin to drag your mouse around, you'll begin to draw and see lines:
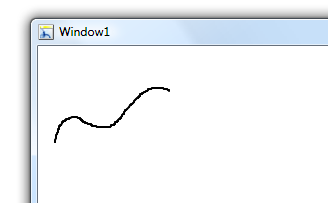
[ I drew a simple squiggly line ]
That's pretty cool, but there are a lot more things that can be done than just drawing a simple, boring line.. In the next section, let's see how this works and begin looking at customizing it.
In the previous section, you got an introduction to this tutorial and setup your application by inserting an InkCanvas control. In this page, let's start to look the various ink-specific modifications you can make to your application.
Many of the modifications you will make need to be done via code where you change your ink canvas's properties while your application is running. Go back to Blend, go to your Objects and Timeline panel, right click your InkCanvas control, select Rename from the context menu, and give your control the name DrawingBoard:
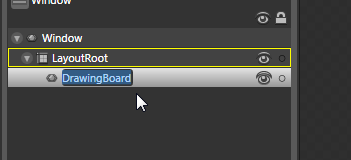
[ give your InkCanvas control the name DrawingBoard ]
Ok - that's all you need to on the Blend side of things. Giving your ink canvas a name allows you to easily reference it from code. The rest of this tutorial will provide you with code snippets to help you in take the default functionality further.
The next, and probably more important, part of using an ink canvas is modifying its various properties. The following sections outline common modifications you would want to make and the code needed to make them.
For all of the code I provide, copy and paste it after your InitializeComponent call in your code-behind file. You should be using Visual Studio 2008 / C# Express for all of the coding work.
When you are drawing, you are assigned a default size for your pen strokes. In fact, default choices are made for you without any extra work on your part. Despite what it may seem like, that isn't a bad thing. Those default values are stored in what is known as DrawingAttributes. Modifying the DrawingAttributes allows you to change the various properties of what you are drawing, and your stroke size is one such property.
The following is the code for changing your stroke size:
DrawingAttributes inkAttributes = new DrawingAttributes();
inkAttributes.Height = 10;
inkAttributes.Width = 10;
DrawingBoard.DefaultDrawingAttributes = inkAttributes;
If you paste the above code in your application, notice that when you draw, your strokes are much wider than what they were before:
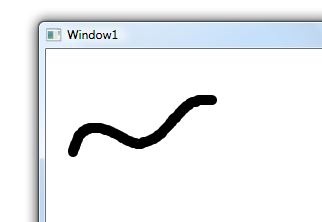
[ your strokes now take on a width and height of 10 ]
The code is also very straightforward. I create a new DrawingAttributes object called inkAttributes, and I change its Height and Width property to the size I want my stroke to be:
inkAttributes.Height = 10;
inkAttributes.Width = 10;
The final step with any modification of your drawing attributes is to overwrite your ink canvas's existing drawing attributes:
DrawingBoard.DefaultDrawingAttributes = inkAttributes;As you will see, many of your ink canvas customizations follow a similar pattern where you modify a new drawing attributes object and overwrite your existing drawing attributes with the new one.
The default color is black. While black is the new blue, there are numerous cases where you would want to actually modify the color of your stokes. The following code snippet shows you how to do that:
DrawingAttributes inkAttributes = new DrawingAttributes();
inkAttributes.Color = Colors.Crimson;
DrawingBoard.DefaultDrawingAttributes = inkAttributes;
Notice that the first and third lines are just the same as what you saw before, but in the middle line, the Color property of your inkAttributes DrawingAttributes object allows you to change your stroke color:
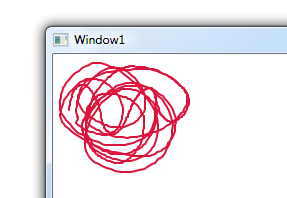
[ such beautiful red-colored art! ]
In the above code, I used the Colors class to choose from a large collection of pre-defined colors. If you want to use colors that aren't predefined, such as your own hex value, you can do that also:
inkAttributes.Color = (Color) ColorConverter.ConvertFromString("#00CC99");I am using the ColorConverter class's ConvertFromString method to take my RGB hex values into an actual form that can be typecast into a Color. The ConvertFromString method also takes the longer ARGB values [ see my blog post on ARGB ] along with some predefined names for the colors such as Blue, Red, Cyan, etc.
There are more customizations to cover, so let's continue in the next section!
In the previous section, you gave our ink canvas a name so you can reference it via code, and you also learned how to change your stroke size and color. In this page, let's continue looking at more modifications, tips, and tricks.
The final drawing attributes-related modification we will be looking at is turning your pen/pencil into a highlighter. The highlighter looks like any other stroke, but the difference is that any highlight you make goes under any stroke you made while in pen mode:

The change for going from a pen to a highlighter is surprisingly very simple. The code for doing this is:
DrawingAttributes inkAttributes = new DrawingAttributes();
inkAttributes.IsHighlighter = true;
DrawingBoard.DefaultDrawingAttributes = inkAttributes;
You can use the same approach I mentioned earlier for changing both the stroke size and color, for a highlighter is simply a pen that draws below your other strokes. The color is also slightly muted and more transparent to simulate actual highlighting.
For example, the following is a highlighter where the tip is 10 pixels square with a yellow highlight color similar to the effect you see in the above image:
DrawingAttributes inkAttributes = new DrawingAttributes();
inkAttributes.IsHighlighter = true;
inkAttributes.Height = 10;
inkAttributes.Width = 10;
inkAttributes.Color = Colors.Crimson;
DrawingBoard.DefaultDrawingAttributes = inkAttributes;
All of the drawing attributes changes are additive. You can mix and match them as you please, and the final output will express whatever attribute combination you set. What you saw on this and the previous section are some of the common attribute-related changes you can make. Let's take a slight deviation and look at some related things you do that go beyond the realm of simple attribute manipulation. Don't worry, for they are just as simple!
In real life, when you press down hard on your pencil when drawing, your strokes become darker and thicker. That level of realism is also provided by your InkCanvas control. The only catch is that you need to find a device that first reports pressure values. Most standard mice do not report the pressure when you are clicking and dragging, but many stylus devices do. For example, I used a Wacom Intuous 3 tablet to test this feature out, and it seemed to work quite well.
One thing to keep in mind is that the pressure information is automatically taken into account when drawing your strokes. You can disable pressure by setting the IgnorePressure flag on your ink canvas to false, but let's assume that you didn't override the default and have pressure sensing turned on. What is cool is that the pressure value is something you can actually access!
To get pressure values, you need to first assign an event handler to any of your ink canvas control's Stylus events. The standard mouse-oriented events will not work. For continuous pressure updates, it is useful to have an event handler defined for StylusMove:
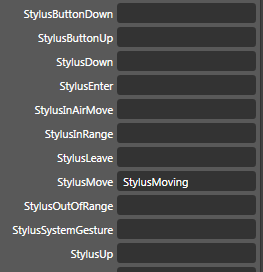
For my StylusMove event, I define an event handler called StylusMoving, and the actual code in the event handler for reading the pressure information is:
private void StylusMoving(object sender, StylusEventArgs e)
{
  StylusPointCollection originalPoints = e.GetStylusPoints(DrawingBoard);
  float currentPressure = originalPoints[0].PressureFactor;
}
Notice that the event handler takes a StylusEventArgs value as its argument, and objects of type StylusEventArgs have the GetStylusPoints method that returns a collection of the stylus points. The pressure information is stored for each individual point, and since GetStylusPoints returns a collection of points, you can access the first point for an idea of what your pressure value will be. Remember, this value updates each time as you move your stylus around the canvas, so you'll get numerous updates for anything you draw.
Alright - we've made some good progress so far. There are still more things about the ink canvas that are interesting, so let's move on to the next section.
In the previous section, you wrapped up work on the drawing attributes-related changes and saw how to measure pressure data. In this page, let's cover a scenario based on real-life...using the eraser!
Drawing strokes is one part of what you can do with the ink canvas. The other part is erasing what you have drawn. There are two ways for you to erase. You can either erase by point or erase by stroke. Let's look at both of those options first.
The first erasing mode we'll look at is called erase by point. This is probably the more traditional erasing method that you are familiar with, and you can enable that by fiddling with your ink canvas's EditingMode:
DrawingBoard.EditingMode = InkCanvasEditingMode.EraseByPoint;When you set your ink canvas's EditingMode to the InkCanvasEditingMode enum's EraseByPoint value, you erase your strokes much like you would using a pencil eraser:
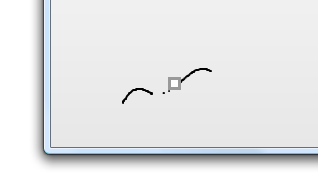
[ EraseByPoint works like a traditional, real-world eraser ]
EraseByPoint erases strokes only in the area covered by your eraser when you click and drag.
EraseByPoint is great for making minor touchups, but if you want to make more extensive stroke deletions, you can also use EraseByStroke. A stroke is essentially a continuous collection of points aka a line that makes up your drawing. By erasing the entire stroke, the entire line is removed also.
For example, here is how your stroke looks before you begin to erase:
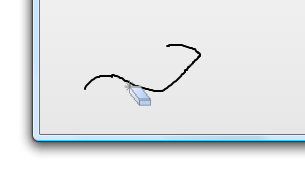
[ now you see a line ]
After you simply press down on your mouse to begin the erasing, notice that the entire stroke now disappears:
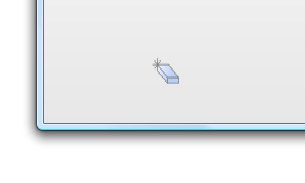
[ with one click, line is all gone! ]
As you can see, erasing by stroke is a much more efficient way of quickly cleaning up what you drew compared to the click and drag erasing by stroke approach. The main disadvantage is that when erasing by stroke, you lose the precision you would have if you erased the points individually instead using EraseByPoint.
If you want quickly erase a lot of content, the default eraser size may not be the best one for you. You do have a way of editing the cursor size for your eraser when editing by point by using the EraserShape property of your ink canvas control.
The two eraser shapes you can use are EllipseStylusShape and RectangleStylusShape. Both of these shapes allow you to specify a width and height, and they have an optional third parameter that takes rotation into account.
For example, the following is my code for setting a new eraser whose width and height is 10 pixels:
DrawingBoard.EraserShape = new RectangleStylusShape(10, 10);Just like in real life, a larger eraser allows me to erase more with a single swipe than a smaller one. You can change the eraser size to suit your needs. It's great when the real world and the virtual world come together like this! =)
There are more customizations to cover, so let's continue in the next section!
In the previous section, you learned how to call and use the eraser to erase the strokes you made. In this page, let's shift gears a bit and focus on how to save the strokes into a file so that you can access them later.
You spend all of this time drawing something in your ink canvas. If you are using a mouse to draw, you know how hard it is to draw something that could be done in a fraction of a time with either a stylus or (gasp!) pencil and paper. Once you have your masterpiece drawn, it is a shame to lose it all when you close your application.
Needless to say, having the ability to save your drawing would be a good thing. While the actual command to get all of the stroke data from your ink canvas to save is easy, getting to that point requires some careful planning. Let's work backwards by first looking at the code needed to save your strokes into a file:
// Specify the folder and file your ink data will be stored in
string folderName = Environment.GetFolderPath(Environment.SpecialFolder.ApplicationData) + "\\Ink";
string filePath = folderName + "\\MyDrawing.ink";
// Check if directory exists
if (!Directory.Exists(folderName))
{
  Directory.CreateDirectory(folderName);
}
// Create a new file (or overwrite an existing one) to store our data
FileStream inkFileStream = new FileStream(filePath, FileMode.Create);
// Transfer your data and close the file.
DrawingBoard.Strokes.Save(inkFileStream);
inkFileStream.Close();
I won't go through the code line by line, for that would deviate this tutorial far from the stated goal of teaching you about the ink canvas. Instead, let me provide you a high-level overview of what needs to be done, and if I did a good enough job, the code should be self-explanatory.
When planning on saving a file, the first thing you would need to think about it is where your file will be saved. You could prompt the user for the save location and get the information that way, or you can specify a default location yourself. In my case, I specify a default location in your AppData folder (C:\Users\<username>\AppData) with the folder name called Ink:
string folderName = Environment.GetFolderPath(Environment.SpecialFolder.ApplicationData) + "\\Ink";The next step is to specify the name of the file. I am calling my file MyDrawing with a .ink extension. The name of the file itself is not that important. What is important is the name of the file in the context of the full path to it. That is why in the code above, I actually specify a file path with my file name as part of the expression:
string filePath = folderName + "\\MyDrawing.ink";The easy part is done. We specified the paths to both our directory and save file. All that is left is actually creating the directory/file and saving the data. It's actually quite simple.
When creating a folder, you need to make sure you are not overwriting an existing folder. For example, if the folder you are creating already exists, then you shouldn't spend time creating a new folder. If you look at my code, I first check to see if a folder (also known as a directory) exists, and if that folder does not exist, then I create that folder:
// Check if directory exists
if (!Directory.Exists(folderName))
{
  Directory.CreateDirectory(folderName);
}
The story for files is different. I don't care if I am overwriting my save file, so with one line I take care of creating the new file:
// Create a new file (or overwrite an existing one) to store our data
FileStream inkFileStream = new FileStream(filePath, FileMode.Create);
The FileMode.Create action creates a new file at the location you specify, and if that file already exists? Well...that file gets overwritten!
The final step is to save the stroke information from our ink canvas, and the code for that is provided below:
// Transfer your data and close the file.
DrawingBoard.Strokes.Save(inkFileStream);
inkFileStream.Close();
As shown in the code, you can access your ink strokes by calling Strokes.Save() on your ink canvas control. The save method takes a stream as its argument, and luckily for us, in the preceding line, you created a new object of type FileStream - which is based on Stream. That's close enough! Once you pass in your strokes data to your FileStream object, called inkFileStream in our case, you can close your stream.
You just saw how to save ink strokes. I guess the next thing will be to cover how to load those saved ink strokes back into your application! The code for loading our strokes file is:
string folderName = Environment.GetFolderPath(Environment.SpecialFolder.MyDocuments) + "\\Ink";
string filePath = folderName + "\\MyDrawing.ink";
// If our file exists,
if (File.Exists(filePath))
{
  FileStream inkFileStream = new FileStream(filePath, FileMode.Open, FileAccess.Read);
  StrokeCollection strokes = new StrokeCollection(inkFileStream);
  inkFileStream.Close();
  DrawingBoard.Strokes = strokes;
}
This code is much more straightforward than what you saw for saving. You store the path to your file just like you did before, but unlike before, you check to see if the file exists at that path. If the file exists, you open the file, read the data as a stream, and store it in a StrokeCollection object. Once you have your StrokeCollection object, you are good to go. The last thing is to assign your collection of strokes back to your ink canvas's strokes property. Pretty simple, ehh?
Phew. We are almost done. There is just one more page of related ink canvas discussion, and after that you are done with this tutorial.
In the previous section, you learned how to save and load your ink strokes. In that process, you learned a little bit about how files are actually written to disk. In this, the previous section of this tutorial, let's look at how to scale the ink strokes when the parent ink canvas gets resized.
You may be wondering why I am covering this topic. Resizing is one of those easy things WPF allows you take for gratnted. The reason I am covering this is that the contents of your InkCanvas, the ink strokes, are stored using fixed pixel values. If you were to resize the parent container (such as your Window) that is hosting your InkCanvas control, any ink strokes displayed will not rescale automatically like the contents of any other control.
Let's say I have my application that looks like this:
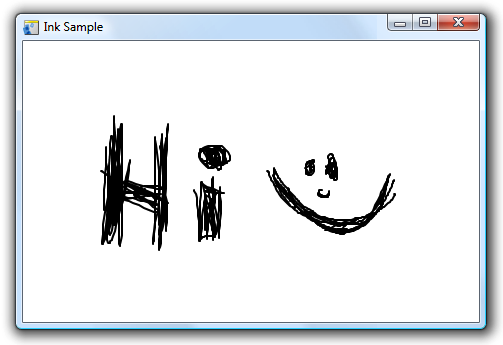
[ my application at its default size ]
If I resize the above application, notice what happens:
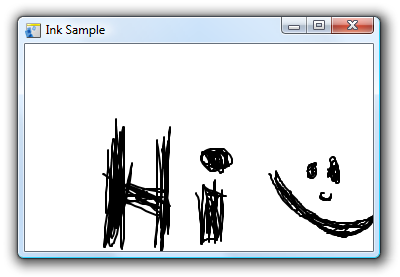
[ why simple resizing doesn't work - notice the cropping ]
My window's size became smaller, but my ink strokes are now clipped. That is because, like I mentioned earlier, your ink strokes are stored in absolute pixel values. Even though you are resizing the window, the actual positions of your ink strokes do not change.
The solution is to force a rescaling of your control as opposed to a resizing when the parent container is resized. You can do that with some difficulty programmatically, but fortunately, WPF ships with a default layout control that does this automatically for you. This gallant (almost knightly!) control is called the Viewbox.
The Viewbox, like a few other layout controls such as Border, can only store one child element. That's not why I like it though. Viewbox's claim to fame is its ability to scale its one child control to fit inside its boundaries. In my above application, let's say I change my LayoutRoot from the default Grid to Viewbox:
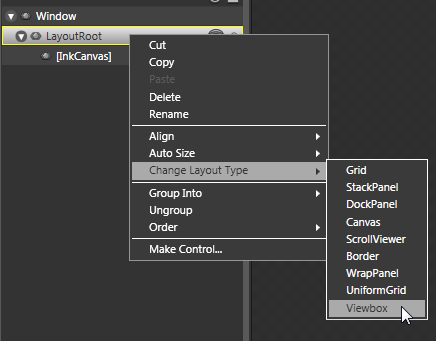
[ change your parent layout control into a Viewbox ]
If I run the above application again, notice what happens when I resize my window after loading up the above strokes:
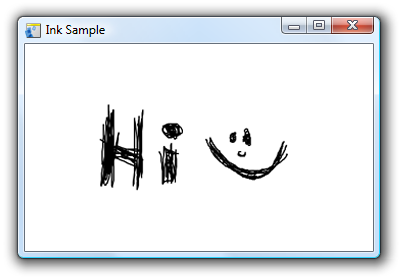
[ my resized window with a rescaled ink canvas ]
This time, instead of my ink strokes getting clipped, they are scaled to fit inside the new size.
The best way I can think to explain the differences between scaling and resizing is to think about trying to make a piece of paper look smaller. With resizing, you are using scissors and cutting down your piece of paper till it is the right size. With scaling, you are simply compressing everything to make it look like your piece of paper is smaller.
That is pretty much how scaling and resizing works in WPF. When you resize, you are adjusting the actual width and height of your object. Think of virtual scissors. When scaling, you retain your object's width and height. What you do instead is, simulate a compression effect via the ScaleTransform properties where each pixel mapping to your screen seems either smaller or larger depending on whether you are scaling up or scaling down.
You really don't have to think about these differences in WPF. In fact, you will rarely scale the size of an object. Only for the rare control like InkCanvas (or InkPresenter) does hard-coded position information play a role. Almost all of your other controls have layout logic built into them to ensure they work properly even if their parent container is resized.
In cases where what I mentioned in the preceding sentence does not hold, you can always use your Viewbox control instead.
In the previous five pages, you learned how to make the most out of the ink canvas control in your application. The customizations I described were basically disjointed pieces of code. Individually they all make sense, but when you put them together, there are certainly things that you will need to handle better.
Instead of explaining how to take care of integrating many of the things you learned, I created a small app that covers most of the preceding tips and tricks in a more cohesive way, and I posted the source files on my post in the Expression Blend and Design blog.
Just a final word before we wrap up. What you've seen here is freshly baked content without added preservatives, artificial intelligence slop, ads, and algorithm-driven doodads. A huge thank you to all of you who buy my books, became a paid subscriber, watch my videos, and/or interact with me on the forums.
Your support keeps this site going! 😇


:: Copyright KIRUPA 2026 //--