|
by
kirupa | 6 August 2009
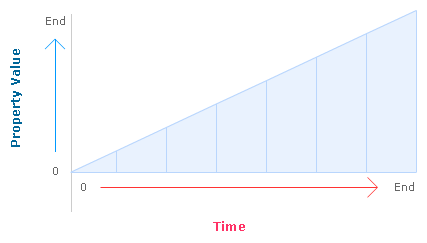
When you are animating something in WPF or
Silverlight, at each tick of the clock, a property
or a series of properties changes. It is this change
that creates an animation, but by default, this
change is linear with nothing interesting to write
home about:
To make your animations a bit more interesting,
you have easing. Easing essentially changes your
animation from being linear to something less so by
slowing down or speeding up the rate at which your
properties change. While working with easing seems
complicated, it is actually very easy - especially
in Silverlight 3 and Expression Blend 3!
By the end of this
tutorial, you will have learned how to apply the
easing effects the Blend icon displays when you hit
the Play Animation button below:
[ click on the Play button to
see the animation you will be creating ]
Notice the cool easing effects at work in making
the Blend icon disappear. Let's look at how exactly
to do that in greater detail:
-
Because this tutorial is very specific to
just using easing functions, I am not going to
have you go through and create an application
from scratch. Instead, I am going to provide you
with a sample project that will provide a good
starting point.
Download Partial Source File
-
Once you have downloaded and extracted the
above source files, launch Expression Blend 3
and open the EasingFunctions project. Your
Projects pane will look similar to this:

[
your Projects pane displays your recently opened
project ]
-
Once you have opened your project, open
MainPage.xaml. You should see the image of the
Blend icon along with a button that you saw in
my earlier example:

[ hey
look, the animation you saw earlier is displayed
here ]
If you run your
application and hit the Play Animation button, you
will see the animation of the Blend icon play.
Notice the major difference between what you see now
and what you saw in my example earlier - there is no
easing applied. Let's fix that.
-
First, open the Storyboard that contains this
animation. Go to the Storyboard picker found
under the Objects and Timeline tab and select
the only storyboard you will see,
ScaleAndFadeAnimation:

[
from the Storyboard Picker, open
ScaleAndFadeAnimation ]
-
Once you have selected ScaleAndFadeAnimation,
your Objects and Timeline panel will display a
timeline that shows useful information like the
current keyframes and at what time they get hit:

[
when you open a storyboard, the timeline will make
an appearance ]
You should see three
keyframes, but we are only interested in the second
keyframe right now. Go ahead and select it:

[
from your timeilne, select the second keyframe ]
-
When you select the second keyframe, your
Properties panel will display properties that
are related to the keyframe you selected:

[
your keyframe's properties should now be visible ]
Make sure the
EasingFunction tab is selected and the
EasingFunction tab visible with None displayed.
-
What we are going to do is change the
EasingFunction from None to something else.
Click on the EasingFunction drop-down menu to
see a large list of easing functions that are
available for you to use.
Select the
Elastic easing function found under the InOut
column:
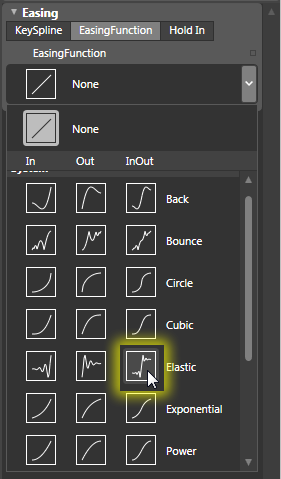
[
select the Elastic InOut ease ]
-
Once you select Elastic, this menu will
disappear and you will see your Properties
Inspector display properties related to the
InOut variant of the Elastic easing function you
selected:

[ you
can see the properties for your Elastic InOut ease ]
Let's leave the default
values as they are and just run your application to
see what may be going on. Notice that as you are
playing the animation, when the Blend icon begins
to zoom out, you suddenly see this elastic ease
appear. That was pretty simple, right?
-
We aren't fully done just yet. Let's add one
more easing function, and I am going to less
verbose this time. Select your third keyframe
from the timeline, and just like you did before,
look in the Properties Inspector, click on the
EasingFunction drop-down, and select the
Exponential ease from the InOut column:

[
select the Exponential InOut ease ]
Ok, now you are done applying the easing
functions to keyframes in your animation. If you
play back or even test your animation, you will see
that your animation no longer exhibits the
boringness it did earlier. The two easing functions
you applied to both of the keyframes are clearly
evident when you see the animation now.
You are done with the Blend part of this tutorial
now. In the
next page, let's take a few steps back and learn
more about easing and how it all works.
Onwards to the
next page!
|


