 Tutorials
Books
Videos
Forums
Tutorials
Books
Videos
Forums


This is an archived tutorial from the kirupa.com legacy collection. It covers software that may no longer be available, but it is kept online because the ideas still hold up.
Normally, an introductory tutorial to anything involves the two sweetest words in the English language, hello world. Given how guilty this site is of promoting such traditions, it seemed appropriate that an introductory tutorial to building a Windows Phone application follow in such a well-trodden path. If you were expecting tradition, then you will be sorely disappointed.
The reason is simple. Because of how nearly identical building applications for the Windows Phone is when compared to building Silverlight or WPF applications, please refer to the introductory tutorials that already exist. Instead, I am going to assume you have basic familiarity with Blend and dive into creating a cool application that uses, as you will find out soon, behaviors and animations!
By the end of this tutorial, you will have created something similar to what is shown in the following video:
[ the music totally makes this awesome ]
Just to make sure we are all on the same page, the video shows a rectangle being dragged around. When the drag is released, the rectangle snaps back to its original position with a slight bounce. Let's create this!
This application is a variant of the
MoveMe application that is used as part of
Apple's introductory tutorial on iPhone development.
Shawn Burke even created an
excellent writeup
showing how you can re-create MoveMe in Windows
Phone using Expression Blend and some C#!
What this tutorial brings to the table is taking
Shawn's writeup one step further and explaining how
you can create MoveMe without writing a single line
of code.
At a very high level, to create this application, you will need to perform the following tasks:
While five high-level tasks seems like a lot, it's actually going to be quite painless and fun. Let's get started.
In order to create a Windows Phone aplication, you need to tell Expression Blend to put you inside a Windows Phone project:

[ first, you will need to create a New Project ]

[ more specifically, create a new Windows Phone Application ]
Feel free to give your project a unique name if you want, but otherwise, hit OK to create a Windows Phone Application project.

[ behold, it lives! ]
Ok, now that you have created your new project, this seems like a good place to take short breather! In the next section, we'll draw a rectangle and make it draggable.
In the previous section, you read a long-winded intro and got your project up off the ground. In this page, let's add a rectangle and customize how it looks a bit.
What we want to do is draw is a 150 by 150 pixel rectangle in the center of our ContentGrid layout panel. In your Objects and Timeline panel, select the ContentGrid panel:

[ make sure the ContentGrid panel is selected ]
When a layout panel such as ContentGrid is selected, any element you want to automatically add to your application will be placed there.
Now, from your Tools panel, make sure the Rectangle tool is displayed:

[ ensure your Rectangle tool is readily visible in the Tools panel ]
When the Rectangle tool is displayed (which it will be by default actually), double-click on it to insert a rectangle with a default size. A rectangle will magically appear in the top-left corner of your ContentGrid:

[ a rectangle will be added with default properties ]
There are a few modifications that we need to make. Let's tackle the easiest one first - centering it.
Make sure this rectangle is selected, and take a gander over at the Layout category in the Properties Inspector. Find the properties HorizontalAlignment and VerticalAlignment:

[ the two alignment properties can change where your rectangle is laid out ]
For both HorizontalAlignment and VerticalAlignment, click on the Center buttons:

[ center your rectangle by hitting the Center buttons ]
Once you have done this, you will find your rectangle centered inside your ContentGrid. Centering is one of the changes we want to do. The next change is making our rectangle larger.
You can resize using the adorners on your artboard, or you can resize by setting an explicit Width and Height in the Layout category. Since we are already in the Layout category, enter 150 into both the Width and Height categories:

[ set the Width and Height properties to 150 ]
Your rectangle will now be a bit larger - by 50% on each side to be exact. If you want to see more of my awesome calculator skills, the total number of pixels in your rectangle increased by 125%.
Rounded everything is all of the rage these days, and your rectangle is currently a square. To make your rectangle rounded, make sure your rectangle is selected, and look at the rounded corner adorners you see on the artboard towards the top-left corner of your rectangle:

[ can you see the adorners? ]
Click and drag one of the two adorners to round the corners of your rectangle:

[ drag the adorners to adjust the roudnedness of the rectangle ]
Feel free to stop once you feel your rectangles have gotten rounded enough. If you aren't a big fan of the artboard (or you want more precision), you can set the roundedness of your rectangle by adjusting the RadiusX and RadiusY properties found in the Appearance category:

[ the roundedness can also be set via the RadiusX and RadiusY properties ]
Ok, you are almost done making changes to your rectangle. The last thing remaining is to change its color.
Currently, our rectangle is a plain white color. Let's make things a bit more exciting by changing the color to something else. To change the color of your rectangle, take a look in your Brushes category in the Properties Inspector:
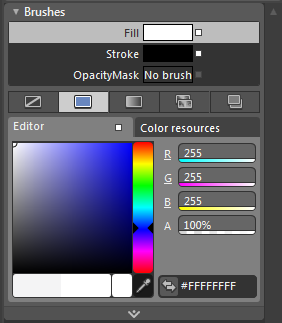
[ the Brushes category contains many color-related properties ]
The Fill property, which is selected by default, determines the inner color of your rectangle. Click and drag around in the colored area in the Editor tab to pick the color that you want.
I am going to go with a bright Yellow color, but you should feel free to use any color that you want:

[ Yellow provides a nice contrast with the dark background ]
As you are playing with the color, you will notice that your rectangle's color automatically changes to display your latest choice:

[ the rectangle's color is automatically made yellow as well ]
Ok, we have just created our rectangle and tweaked it a bit to look nicer than what you get by default.
Coming up, in the next section, let's make this rectangle draggable!
In the previous section, you added a rectangle and customized how it looks. In this page, let's make this rectangle draggable!
Traditionally, adding interactivity to your applications goes hand-in-hand with writing some code. Since this tutorial is all about breaking tradition, you can avoid writing code by using what are known as behaviors.
Behaviors are basically little pieces of interactivity that you attach to an element. Once a behavior has been attached, the element will now gain the magical superpowers the particular behavior exhibits.
To learn more about behaviors, check out my earlier Introduction to Behaviors tutorial.
To save you some time from searching for a behavior or writing your own, for a handful of common scenarios, Expression Blend ships with some behaviors that you can use out of the box. One of the behaviors provided even helps you drag an element around, and that behavior is what you will use to make your rectangle draggable.
First, we need to find this behavior. Make sure your rectangle is selected, click on the Assets tab, and select the Behaviors node. You will see some behaviors displayed:

[ display all of the built-in behaviors ]
From the list of behaviors displayed, drag and drop the behavior called MouseDragElementBehavior onto your rectangle:

[ to apply a behavior, drag and drop it onto the element directory ]
Once you have dropped this behavior onto the rectangle, you'll see it displayed on your Objects and Timeline nested directly under your rectangle element:

[ applied behaviors show up in the Objects and Timeline panel ]
Your Properties Inspector will also display any properties this behavior exposes. We aren't going to worry about tweaking this behavior beyond what is automatically set for you.
Simply hit F5 to preview what you have so far. When you hit F5, you will see the Change Device Selection dialog appear:

[ choose between previewing in the emulator or on the device ]
Select the Windows Phone 7 Emulator option and and hit OK. After a few moments where your Windows Phone image gets fully loaded, you will see your application displayed:

[ your application running on the emulator ]
Notice that your rectangle is visible. Beyond just the looks, press down on the rectangle and drag the mouse around. Thanks to the MouseDragElement behavior, your rectangle follows your mouse cursor around the application.
Ok, now seems like a good time to take a quick break. In the next section, we'll create the animation that will snap your rectangle back to its original position.
In the previous section, you took the rectangle and gave it a behavior to make it draggable. In this page, we'll create an animation that will snap our rectangle back when the drag is released.
Right now, when you drag your rectangle around and release the drag, the rectangle stays where you last left it. What we want to do is have our rectangle snap back to its original position.
Like I have mentioned a few times in the past, we will be using an animation to snap our rectangle back into its original position. It may sound strange that an animation is what gets used, but it works! Let's look at why it will work.
As one way of looking at it, an animation can loosely be defined as a visualization of changes over a period of time between a starting point and an ending point.
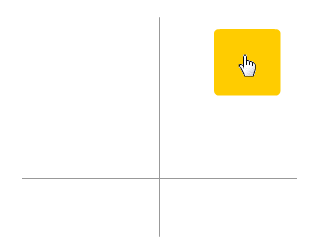
This definition closely dovetails with what we are trying to do. The starting point in our case is the position your rectangle is when you release the drag:
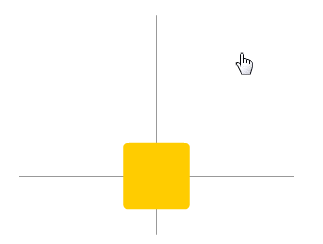
The ending point is the center of the ContentGrid panel where the rectangle was before it was dragged around:
All of this takes place over a period of time so that the rectangle going from the starting point to the ending point looks smooth:
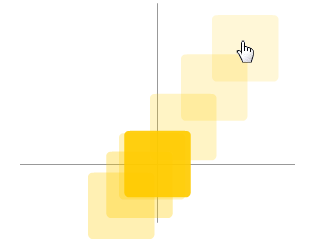
To make this transition more realistic, we'll be using an easing function to create the bounce/snapback effect.
What you may traditionally refer to as animation is known as Storyboards in the world of Silverlight that Expression Blend plays in. Therefore, you'll see the terms "animation" and "storyboard" used interchangeably. What we are going to do first is create a new Storyboard.
To create a new Storyboard, click on the plus button found towards to the top of the Objects and Timeline panel:
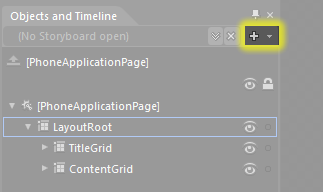
[ click on the + button to add a new Storyboard ]
When you click on that button, the Create Storyboard Resource dialog will appear. In the Name field, give the name ResetPosition:
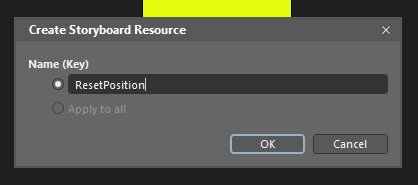
[ give your Storyboard the name ResetPosition ]
Once you have given your Storyboard a name, hit OK to go into Timeline recording mode where you get to create your animation. Your Objects and Timeline panel is where you get to set the keyframes and specify the duration:
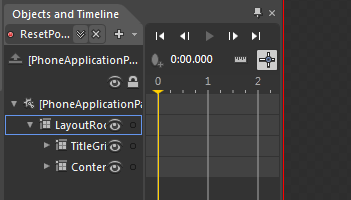
[ the timeline will allow you to create an animation ]
Notice that the Timeline part of “Objects and Timeline” finally makes sense with a timeline making an appearance.
A certain amount of your time will now be spent in the Timeline. It is here where your animation actually takes shape. What we want to do first is set the final position of the rectangle. In the timeline, drag your playhead to the .5 second mark:
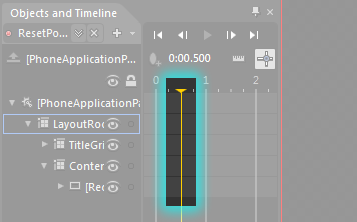
[ drag the playhead to the .5 second mark ]
Once you have dragged the playhead to the new position, ensure sure your rectangle is selected. With your playhead at the .5 second mark and your rectangle selected, click on the Record Keyframe button:
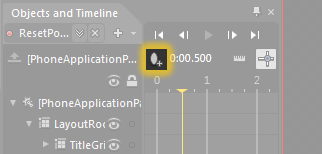
[ add a keyframe ]
When you click on the Record Keyframe button, a keyframe will be placed in the timeline for you:
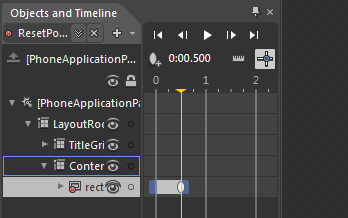
[ a keyframe will now be created ]
Right now, you have a keyframe and a duration but no property to watch and animate between! We’ll have to fix that next.
Like I mentioned earlier, an animation is a visualization of changes. What exactly is changing with our rectangle? The answer to this is unfortunately not obvious without referring to documentation, but the MouseDragElementBehavior affects the TranslateX and TranslateY properties of the element it is attached to.
It is these two properties we need to tell our animation to pay attention to, and that is done by recording their final value at the .5 second mark so that you can animate to it from the 0 second mark.
With your playhead still at the .5 second mark and your rectangle selected, expand the Transform category where your rectangle's TranslateX and TranslateY properties live:
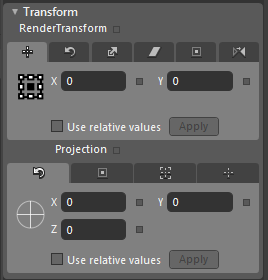
[ we'll be storing the X and Y Translate values ]
The first tab in the Transform category corresponds to the X and Y transform values. To tell your animation to pay attention to this property, you will need to record the X and Y property’s local value.
You can do this by clicking on the Properties Marker and selecting Record Local Value from the menu that appears. The Properties Marker is the little black square found to the right of the X and Y properties:
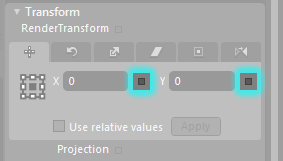
[ the Properties Marker displays advanced properties for each property ]
When you click on the Properties Marker, a menu will appear with the Record Current Value item:
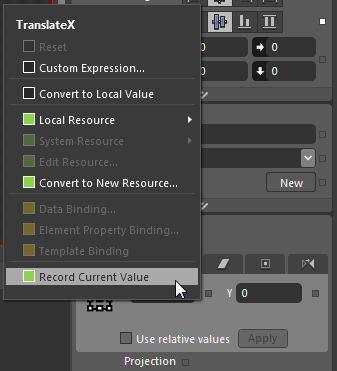
[ Record Current Value will explicitly set the current value ]
Select Record Current Value for both of your TranslateX and TranslateY properties to have this property be recorded. You can verify that these properties have been recorded by looking at your Objects and Timeline panel and expanding your rectangle until you hit the TranslateX and TranslateY entries:
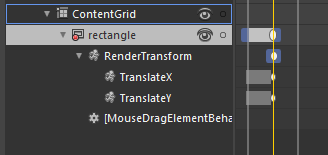
[ the TranslateX and TranslateY properties appear in the object tree ]
Alright, you are done messing with this storyboard for now. We’ll be back here again, so don’t worry about packing up your things just yet. Go ahead and leave the Timeline Recording mode by clicking on the Close Storyboard button:
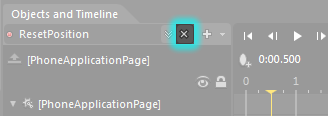
[ leave Timeline Recording mode by hitting the x button ]
Once you click on the Close Storyboard button, your Timeline will disappear and you will leave the timeline/animation mode that you were in for the past few minutes.
Creating a storyboard is just one part of the bigger picture. Actually playing the storyboard is the other part, and we’ll look into that in the next section!
In the previous section, you created a storyboard to define the animation that will make the rectangle snap back to its original position after you have dragged it. In this page, we will put the storyboard you created to good use.
What we want to do is play the storyboard you created earlier when you stop dragging your rectangle.
A drag is basically made up of three steps:
Pressing down on an element.
While pressing down on the element, moving the finger/mouse. The element you are dragging will follow your finger/mouse around the screen.
Releasing the press on the element. When you stop pressing on the element, your drag ends.
Given those three
steps, what we want to do is play our storyboard at
Step 3 when you are no longer pressing down on the
element.
To play a storyboard, you have a
built-in behavior that will help. Display the
Behaviors category in the Assets panel and find the
ControlStoryboardAction:
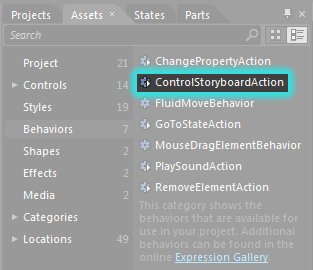
[ find the ControlStoryboardAction in your Assets panel ]
Once you find the ControlStoryboardAction, click and drag it onto your rectangle just like you did earlier with the MouseDragElementBehavior. Once you have dropped your ControlStoryboardAction onto your rectangle, you will see all of the properties your ControlStoryboardAction exposes in the Properties Inspector:
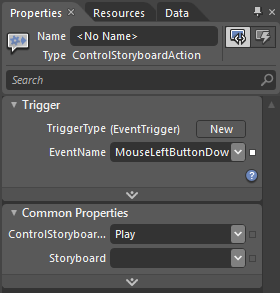
[ behold the ControlStoryboardAction properties ]
Unlike the MouseDragElementBehavior, you will need to modify the default properties before your behavior actually works the way you will want it to.
First, we need to change when this behavior fires, and that is specified by the EventName property. Currently it is set to fire when you simply press down on the element. What we want to do is fire this behavior when we release the press on the element. The event that resembles our want \is called MouseLeftButtonUp, so select that event from the drop-down:
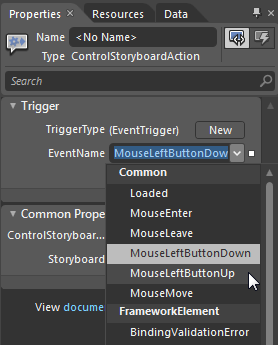
[ change the triggering event to be MouseLeftButtonUp ]
The last thing we need to do is specify the Storyboard to play when this behavior fires. Look at the Storyboard property, click on the drop-down, and select the ResetPosition storyboard you created earlier:
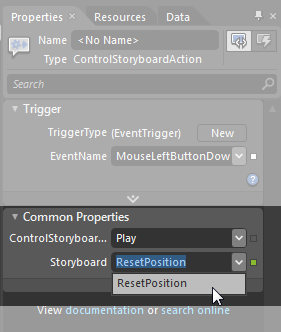
[ select the ResetPosition storyboard in the Storyboard property ]
After you have set the Storyboard property, go ahead and press F5 to test your application. If you kept your emulator running the background, your application will appear almost immediately. If you closed your emulator, you’ll have to wait for the entire OS to load first.
Anyway, once your application has been loaded, drag and release the rectangle. Unlike before, notice that your rectangle now animates back to its starting position. This is great.
We are almost done with everything! In the next section, let’s tweak our animation just a little bit and review everything that you have done.
In the previous section, you almost finished the application. You used a behavior to play the storyboard that resets your rectangle’s position when you release the drag. In this page, we’re just going to add the icing on this cake before wrapping things up.
To make our animation more realistic, one thing that we want to do is have our rectangle accelerate and bounce a bit when it returns to its original position. You have several ways of doing that, but the easiest and most direct way is by using an easing function that alters your animation.
To learn more about easing functions, check out my earlier Easing Functions in Blend tutorial.
Because we will adding the easing function to the animation, go ahead and open the ResetPosition Storyboard that you created earlier. Click on the Storyboard drop-down from your Objects and Timeline panel, and from the menu that appears, select the ResetPosition storyboard:
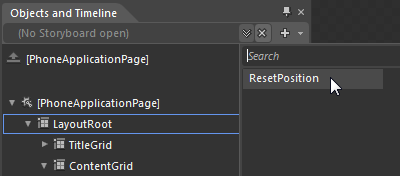
[ from the Storyboard drop-down, select your ResetPosition storyboard ]
Once you have selected
the ResetPosition storyboard, you will be back in
the Timeline Recording mode that you were in
earlier.
From your Timeline, select the keyframe
that exists at the .5 second mark in the row your
rectangle lives:
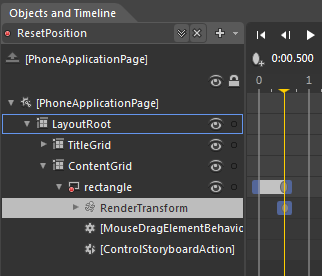
[ select your rectangle's keyframe at the .5 second mark ]
When you select the keyframe, your Properties Inspector will display some properties you can set to adjust the transition between the current keyframe and the previous keyframe:
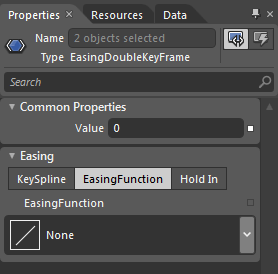
[ your keyframe exposes some properties that you can edit ]
The property that we are most interested in is the EasingFunction editor which should have been selected for your already. From this editor, click on the EasingFunction drop-down and select the Back Out easing function:
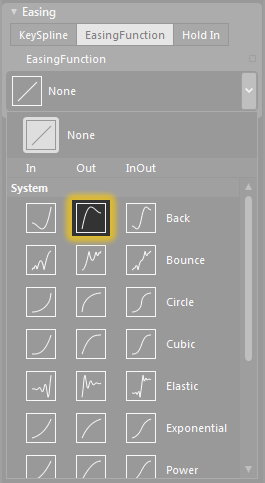
[ select the Back Out easing function ]
Once you have selected the Back Out easing function, hit F5 again to preview your application. This time around, notice what happens when you drag your rectangle and release it.
Unlike before, when the rectangle would just animate back linearly, you’ll notice that your rectangle now snaps back into its position with a quick bounce!
Phew - you have now reached the end of this tutorial! We covered a lot of ground in this tutorial, so it seems fit to quickly review everything you have done.
Here is what we set out to create:
The first thing we did was draw a rectangle and customize it. We inserted a rectangle with a default size and location and quickly made it look different - nicer if you will!
For making the rectangle actually draggable, you applied a behavior that took care of all of the messy details. You simply dropped the behavior (MouseDragElementBehavior) onto the rectangle, and your rectangle automatically received draggable properties. That's the way behaviors roll.
At this point, your application is half-way done. What is remaining is the animation that brings your rectangle back after you are done dragging it around. To do this, we created a storyboard with a duration of .5 seconds that interacted with the TranslateX and TranslateY properties that corresponded to the position of the rectangle as it was being dragged around.
You then used another behavior called ControlStoryboardAction to cause the storyboard you created to play when you release the drag on the rectangle.
The last thing you did was tweak the animation a bit. While, by default, your animation progresses linearly, you can alter this behavior using easing functions. To give the rectangle the bounce and snap back effect, we set a Bounce Out easing function on the keyframe that makes up the animation.
And with that, you are done! If you want to see how my version of this example looks like, download the source files below:
Just a final word before we wrap up. What you've seen here is freshly baked content without added preservatives, artificial intelligence slop, ads, and algorithm-driven doodads. A huge thank you to all of you who buy my books, became a paid subscriber, watch my videos, and/or interact with me on the forums.
Your support keeps this site going! 😇


:: Copyright KIRUPA 2026 //--