|
by
kirupa | 14 December 2008
In both Silverlight
and WPF, you have the ability to add easing to your
animations. In case you are not familiar with easing
and what it is, animations you create by default are
linear. The change in the animated properties is
constant over a period of time:

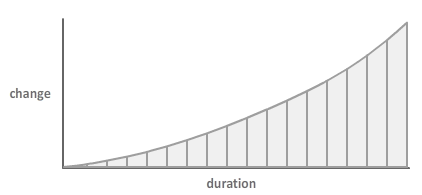
Animations that are
linear often don't look very natural - especially
when conveying movement. Look at the following
example:
To address this, you have
what is known as easing. Easing allows you to alter
the change in properties so that, instead of the
change being constant, you can add some
acceleration, deceleration, etc. so that the change
is different:
Let's look at the same
animation, except this time, easing has been applied
to it:
Notice that the
movement looks a little nicer. If there was a world
where boxes of software slid into view, stopped to
get your attention, and slid away, I guarantee you
that it would look the animation you see above!
Creating easing
animations in WPF and Silverlight is pretty easy
using Expression Blend. All you need is a regular
animation. I am not going to go into great detail on
how you can create an animation, for I have covered
that in great detail here for
Silverlight and
WPF.
Instead, I am going to
jump right in and provide an animation for you:
After you have
downloaded and extracted the source files, open this
project in Expression Blend. What you just opened is
the project representing the linear animation you
saw first. The goal of this article is to explain
easing by having you go from having a linear
animation to one that is a bit more exciting
involving eases.
Once this
project is opened, make sure you have your animation
open for editing. You can do that by opening it via
your Storyboard picker found in the Objects and
Timeline panel:
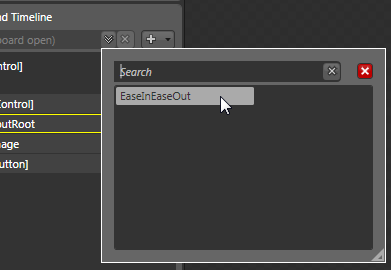
[ the Storyboard picker allows you to open an
existing storyboard for editing ]
With your storyboard
open, look in your Objects and Timeline panel to
find an element that is currently being animated.
You can tell which elements contain properties that
are animated by looking for the red arrow found to
the left of the animated element's icon:
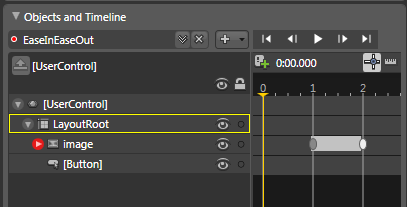
[ the red arrow indicates a property that is being
animated on the element ]
In our example,
my image element is being animated, and at the 1 and
2 second mark there are keyframes. In this animation,
click on the keyframe on time 1 with your mouse, and look in the
Properties Inspector:
[ the properties visible for this keyframe ]
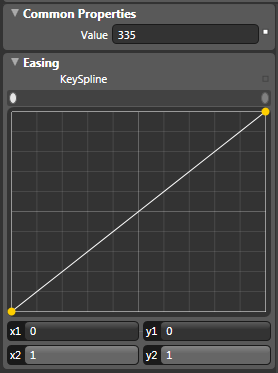
In your Easing
category, you will see a graph, and this graph
represents the type of easing currently applied to
your animation leading up to the keyframe. As you
can see, not much of an ease is applied. Your ease
is linear.
In WPF and
Silverlight, the diagonal line you see is known as a
KeySpline curve, and the characteristics of this
curve determine the type of easing currently
applied. Let's look at tweaking this line a bit on
the
next page.
Onwards to the
next page!
|