|
by
kirupa | 28 August 2009
In an earlier tutorial, I introduced behaviors by
describing how they allow you to easily add
interactivity in Silverlight and WPF without having
to write any code. What I didn't
do is actually have you use them, so let's change
that with this tutorial.
In this tutorial, you will use behaviors to
create a simple animation similar to what you see
below:
[ click on the picture of the
house to see an animation + sound play ]
Credit -
the graphic is from Daniel Cook's amazing
Small World graphic set, and the sound is from
FlashKit's SoundFX collection.
In the above animation, click on the building to
trigger an animation and sound. All of this was done
entirely using behaviors without having to write any
code.
Because this tutorial is about using behaviors and
not about how to create an animation or importing
sound, I want you to open a project that I have
already created for you. Don't worry, the good parts
are missing and you'll have to add them in yourself
using information found here:
Download Partial Source File
Once you have downloaded and extracted the above
project, go ahead and open it in Expression Blend 3.
Your artboard will look as follows:

[ your artboard looks pretty simple ]
Things seem pretty quiet. If you run this
application by pressing F5, notice that you won't
see anything happening when you click on the
building either. The reason nothing is happening is
because we haven't actually specified anything to
happen! Let's fix that.
What we are going to do is add a behavior to our
building image that causes an animation to play when
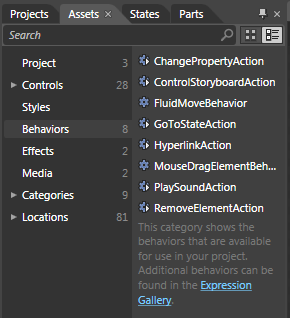
clicked. To add a behavior, make sure your Assets
panel is displayed and click on the Behaviors tab:

[ the Behaviors tab lists all of the behaviors
available for you to use ]
When you click on the Behaviors tab, all of the
behaviors that you currently can use will be
displayed. By default, Blend comes with several
handfuls of behaviors that do interesting things.
Yes, there is even a behavior that plays an
animation when you click on the mouse, and that
behavior is called ControlStoryboardAction:

[ ControlStoryboardAction is the behavior you want ]
Select ControlStoryboardAction with your mouse
and drag/drop it onto the the image element you have
in your object tree:

[ drag and drop your behavior onto the image element
]
Once you have dragged and dropped the behavior
onto your Image control, aptly named image,
take a look at your Properties Inspector. Notice
that properties relating to the
ControlStoryboardAction are now being displayed:

[ your Properties Inspector will display your
behavior's properties ]
By default, Blend is fairly intelligent in
setting appropriate defaults for you, so you will
see many of the fields already filled in for you. I
will explain in detail what some of the fields mean,
but what you generally want to interest yourself in
is the properties found in the Common Properties
category.
Notice that there is a dropdown for Storyboard
that seems quite empty. You can change that easily
by clicking on the dropdown and selecting the the
storyboard that you want. We only have one
storyboard, called MoveBuildling, created in our
app, so the list of storyboards you see will be
quite small:

[ select the MoveBuilding storyboard under the
Storyboard property ]
Anyway, from the Storyboard drop-down, select
MoveBuilding. Once you have done this, press F5 to
preview your application in the browser. Things will
look the same as what you saw a few moments earlier,
but notice what happens when you click on the
building. Instead of nothing happening, you'll see
the MoveBuilding storyboard kick in and move the
building around each time you click.
Onwards to the
next page!
|