 Tutorials
Books
Videos
Forums
Tutorials
Books
Videos
Forums


This is an archived tutorial from the kirupa.com legacy collection. It covers software that may no longer be available, but it is kept online because the ideas still hold up.
For the first couple of Silverlight releases, what happened in your browser stayed in your browser. If you wanted to do something that went beyond your browser, you needed to rely on some server-side magic.
Things changed a bit with Silverlight 3. One of the features added in that version is the ability for you to save your data locally to disk. In the following example, fill in the "First name" and "Last name" fields and hit Save:
[ Awesome "SmallWorld" art by Daniel Cook (Lostgarden.com) ]
When you hit the Save button, you will see a Save As dialog appear:

Use this dialog like you would any other Save As dialog. Pick a location and save the file. Once the file has been saved, open it up in a text or XML editor. You whould see something that looks similar to the following:
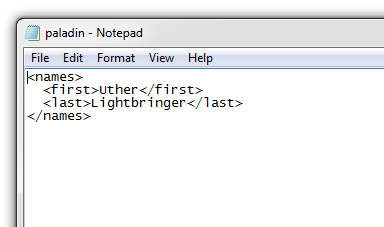
When you hit the Save button, the information you specified in the First name and Last name text fields was written into an XML file that you saved to disk.
In this tutorial, you will learn how to do all of that.
There are several to making all of this work. The first part is the UI where you enter the data and invoke the Save command. The second part is displaying the dialog that allows you to save a file to your disk. The third and final part is creating the XML data and having it be saved. Let's start with the easiest part, the UI.
I am not going to go into great detail about how the UI is created, but I will briefly introduce the star players. Create a new Silverlight application in Blend and draw out two textboxes and a button. You can go a little overboard and add some additional details like I've done below:

We need to give the textboxes some names. Give one of your textboxes the name firstNameText, and give your other textbox the name lastNameText. As the names may imply, you will be entering your first and last names in these textboxes.
The last thing that remains to be done is to set the Click event on your Button to point to an event handler. Click on your button, click on the Events button in the Properties Inspector, find the Click event, and enter the event handler name SaveFile:

Once you have entered your event handler name of SaveFile for your button's Click event, you will be taken to your code view where the event handler will be created for you:
private void SaveFile(object sender, RoutedEventArgs e)
{
}
With that, I'm going to call it a night for the UI because the focus of this tutorial is not on looks but more on the the code needed to save data.
Just a final word before we wrap up. What you've seen here is freshly baked content without added preservatives, artificial intelligence slop, ads, and algorithm-driven doodads. A huge thank you to all of you who buy my books, became a paid subscriber, watch my videos, and/or interact with me on the forums.
Your support keeps this site going! 😇


:: Copyright KIRUPA 2026 //--