 Tutorials
Books
Videos
Forums
Tutorials
Books
Videos
Forums


This is an archived tutorial from the kirupa.com legacy collection. It covers software that may no longer be available, but it is kept online because the ideas still hold up.
One of the nice features in WPF and Silverlight is data binding. In a nutshell, data binding is, as its name implies, binding various pieces of data together. To be more precise (or more serious), you are creating a relationship between two entities:

These entities, unfortunately, are not people. Instead, they are things that you use in Silverlight and WPF all the time. They could be variables, properties, other UI elements, XML data sources, and more:
In this article, I will explain how you can create a data binding between properties stored in two UI elements. This probably does not make much sense if this if the first time you are being exposed to data binding, so let's start by looking at an example:
[ drag and play with the slider above to see data binding in action ]
The above example shows element to element binding at work. As you slide Font Size slider, notice that the text you are displaying adjusts depending on where in the slider you currently are:

[ drag the slider right to make your text larger ]
The relationship between your slider moving and the text's font size change is a great example of data binding. By the end of this tutorial, you will have created a similar example and learned a little bit about why/how it works the way it does.
Ok, let's get started with
creating something that contains a dash of
element-to-element binding:

[ create either a new WPF or Silverlight application ]
I will be creating a Silverlight project, but the instructions are exactly the same if you happen to create a WPF version of your project instead.

[ insert two controls from the Asset Library - Slider and TextBlock ]

[ find the Text category to see all properties related to...text! ]

[ find the FontSize property to the right of your font list ]

[ click on the Properties Marker found to the right of the FontSize property ]
This square is known as the Properties Marker, and once you click it, a menu will appear. From the menu that appears, select Data Binding:

[ from the Properties Marker menu, select Data Binding ]
Alright. I am going to leave on a cliffhanger here where you get a small mental pause before seeing what happens next...in the next section.
In the previous section, you received a brief introduction to element to element data binding and got started creating a small example. In this page, let's continue working on our example and learn some extra details about data binding.
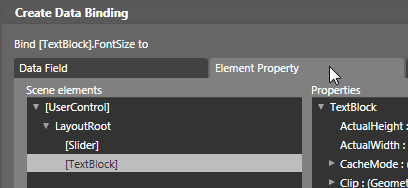
[ select the Elementy Property tab to specify data binding with elements ]
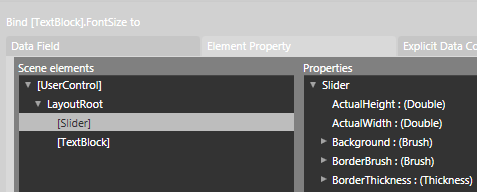
[ select the Slider element from the scene list ]
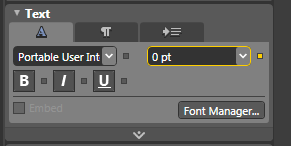
[ the yellow border indicates your value is bound to something ]
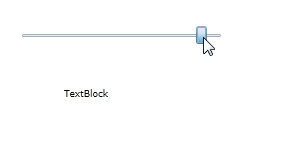
[ look, just like the original example! ]
You'll probably notice that your textblock's initial font size is 0 and that, when the slider is maxed out, the font size isn't really that large. You can change all of that by adjusting your slider control's Maximum, Minimum, and Value properties found in the Common Properties category:
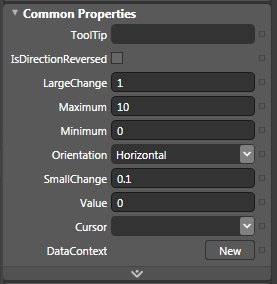
[ setting properties on your slider impacts the font sizes you will hit ]
You now have a working example where changing your slider's value causes the size of your textblock's font to vary as well. Let's take a few steps back and look at what exactly went on. At the very beginning, I mentioned that data binding is all about creating relationships between various entities:
In this tutorial, the two entities were your slider control and your textblock:

More specifically, it was your slider control's Value property and your textblock's FontSize property. As your slider's Value property changed due to you fiddling with the slider thumb, your textblock's FontSize changed accordingly. There are several details I want you to pay attention to.
Notice that the change in your FontSize was triggered by the slider changing. This brings us to two terms you need to be aware of when working with data binding: source and target.
The source of the binding is what initiates the relationship changing. In our case, that would be our slider. The target of the binding is the recipient of the change, and that would be our textblock. This is a very simple example of data binding where the relationship is just one-way. Only by the slider changing will something actually happen. If you happen to change your font size, your slider's value will not reciprocate and change accordingly. I am not going to delve on one-way, two-way, etc. in this tutorial, but just be aware that not everything will be as clear cut as the example you saw here.
Finally, let's wrap up by looking at the XAML that gets generated for your textblock you've done so far:
							<TextBlock FontSize="{Binding
  Value, ElementName=slider, Mode=OneWay}"
  Width="100" Height="20"/>
Notice that the XAML markup, much like a SportsCenter summary of a sporting event, elegantly captures in one line what took several pages to walk through and explain. This should be very self-explanatory, so I am not going to be describing the XAML any further.
Phew - that was quite the trip. In a few pages, you learned about one of the most useful techniques available to you in WPF and Silverlight, element data binding. I think I've said all there is to say about this topic, so I will leave you with the source code for my example you saw on the beginning of this tutorial:
Just a final word before we wrap up. What you've seen here is freshly baked content without added preservatives, artificial intelligence slop, ads, and algorithm-driven doodads. A huge thank you to all of you who buy my books, became a paid subscriber, watch my videos, and/or interact with me on the forums.
Your support keeps this site going! 😇


:: Copyright KIRUPA 2026 //--