|
by
kirupa | 19 August 2009
One of the new features introduced in Silverlight
3 is support for what are known as Effects (also
known as pixel shaders or shader effects) that you
have in WPF. In a nutshell, shader effects allow you
to affect what you see on the screen in cool and
interesting ways.
For example, play with the slider in my following
example to adjust how blurry the image gets:
[ the graphic is from
Daniel Cook's amazing
Small World graphic set
]
The blurriness is not a special image or any
custom code that creates that illusion. It is a
shader effect that comes with Silverlight, called
Blur, that I simply applied to the image instead. In
this short tutorial, let's look at how to use
effects both from inside Blend as well as in C#.
To use Effects in Blend, you first need something
visual to apply your effect to. It can be anything,
but I will use a Button for my example. So, on my
artboard, I have a button displayed:
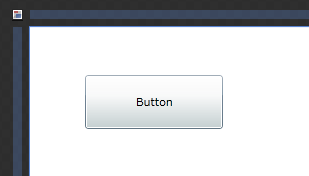
[ drag and drop a button on the artboard ]
To apply an effect, go to the Assets panel, find
the Effects category, and click on it:
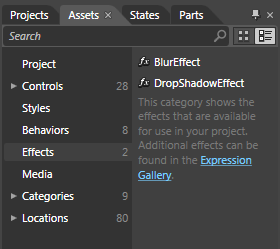
[ the Effects category displays the effects you can
use]
When you have the Effects category selected,
today in both WPF and Silverlight, you should see
just two effects - BlurEffect and DropShadowEffect.
We are interested in the BlurEffect right now, so
click on the BlurEffect and drag and drop it onto
your button.
You can drag the effect directly onto your button
on the artboard, or you can drop it onto your button
in the object tree. The object tree approach
displays a cool tooltip though:
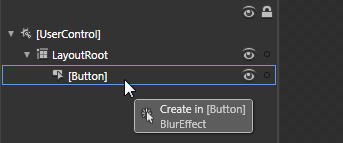
[ drag and drop the Effect on your button ]
Once you have applied the effect to your button,
your button will now look blurry:
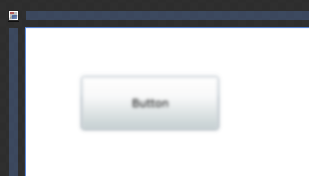
[ your button is now blurry! ]
You can tell an effect is applied not only by
just looking at the effects of the effect (ha!) on
the element, but you can tell by looking at the
object tree as well. The effect will always be
located directly under the element it has been
applied to:
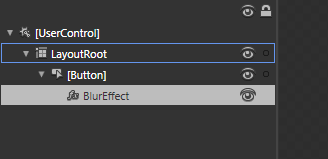
[ the effect icon is visible directly below the
element you applied the effect to ]
The blurriness of the button is fully
customizable. By default, when you drop an effect
onto an element, the effect automatically gets
selected and the Properties Inspector displays any
properties the effect exposes...such as Radius for
the BlurEffect:
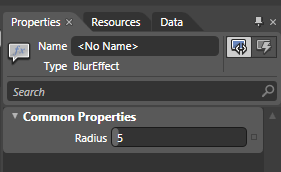
[ the properties inspector displays properties of
your selected effect ]
If you don't see your effect's properties
displayed, be sure to select the effect in the
object tree.
There will be cases where you need to add effects
using nothing but code. Doing that is, obviously,
not as easy as using the Blend UI, but it isn't the
most difficult thing either.
The code for adding a BlurEffect to an element
called foo is as follows:
- BlurEffect
effect
=
new
BlurEffect();
- effect.Radius
=
10;
-
- foo.Effect
=
effect;
Just make sure to add
System.Windows.Media.Effects using statement to your
project:
using System.Windows.Media.Effects;
That is all there is to the code, and it should
be pretty self explanatory on what actually happens. The general template for adding an effect is
always:
-
Declare and initialize the effect object you
are planning on using. That is what we are doing
in the first line.
-
Set any properties on the effect that are not
going to be default. In our example, I set the
Radius property to 10.
-
Assign the effect object to the Effect
property of the element you wish to apply the
effect to. This is the equivalent of dragging
the effect onto an element using Blend's UI.
Most (if not all) visual elements in Silverlight
and WPF have the Effect property that you can
set an effect you declared to.
That
is all there is to effects. Because Silverlight and
WPF only ship with two effects, your choices out of
the box are limited only to Drop Shadow and Blur.
Currently, adding your own custom effects is not
trivial, and I may cover in a future tutorial how to
do just that.
Getting back to the tutorial at hand, if you are interested in looking at my final
version of the project, feel free to download the
source files by clicking the link below:
Just a final word before we wrap up. If you have a question and/or want to be part of a friendly, collaborative community of over 220k other developers like yourself, post on the forums for a quick response!

|


