


This is an archived tutorial from the kirupa.com legacy collection. It covers software that may no longer be available, but it is kept online because the ideas still hold up.
One of the popular things to do with WPF is use its data binding features. Data binding allows you to, as its name implies, link data. More specifically, you link data between a target and a source. For example, you could have a textbox whose value is tied to the horizontal position of a slider control. As the slider control is adjusted, the value inside your label changes:
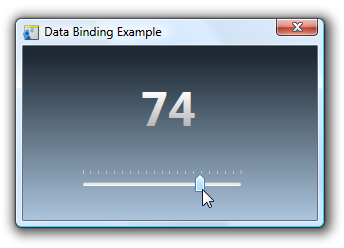
[ in this example, the slider's value is displayed in a label ]
This is an example of data binding where your source is the slider's Value and the target is your label control's Content property. In this scenario, the mapping between your slider's position and the value displayed on your label is pretty straightforward and a built-in converter takes care of displaying the right values.
In numerous scenarios, though, such a a direct mapping between your data does not exist. The built-in converter simply will not know what to do. In this tutorial, you will see one such example where you are taking RGB values from the Adobe Kuler recent themes and setting it equal to the background of your window.
The color value returned by Adobe Kuler is in a form such as FFFFFF. The format WPF brushes use for displaying colors is #FFFFFF. The difference is in the # symbol that WPF seeks but which our data source from the Kuler feed does not provide. Reconciling this difference is where value converters come in.
Note - RGB and WPF
I mentioned in the earlier section that WPF looks for a RGB value in the form #FFFFFF. While that is true, technically, WPF deals with ARGB where you have extra bits for storing the Alpha values. When you don't provide the Alpha value, the alpha value is set to the maximum and added for you automatically.
To learn more about ARGB values, check out this blog post where I discuss that in greater detail.
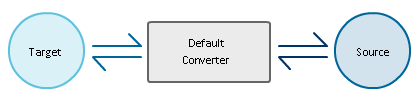
In one way of looking at this, a value converter acts as a mediator. It takes incoming data from your target, makes some modifications, and returns a version of the data that your source can understand. When data binding, the following diagram shows you the default relationship between the source, the target, and your data when not using your own value converter:
When using your own value converter, the following is what your relationship between the target and source looks like:
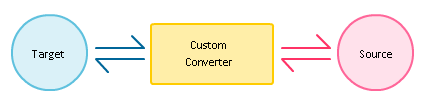
As you can see, there really isn't that much of a difference. A value converter is used regardless of whether you specify your own value converter or not. Another thing to note, because value converters are used with your standard data binding models, the arrows move both ways. What that means is that your value converter not only is designed to take input from the target and modify it for the source, but it also works when data from the source is updated on the target. That bi-directional relationship is used in two-way data bindings.
In this tutorial, you are going to learn how to create your own value converter that will be used instead of a default value converter. Because our data binding will be one-way, our value converter will primarily exist to take data from our target and convert it into a form our source will understand. Let's get started in the next section.
In the previous section, you learned about value converters and what makes them useful in WPF. In this page, let's take a more concrete example and see why a value converter would be useful.
Instead of having you create a sample application to create a value converter for, I have already created an application for you to use. Don't worry - it is missing both the value converter and the data binding. You will be using information found in this tutorial to add those two missing pieces.
Once you have downloaded and extracted those files, open the KulerBackground project in Blend. The following image shows what your stage will look like after you have opened your project:
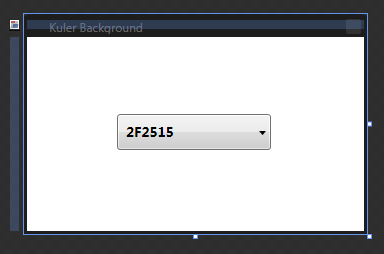
[ what our application looks like in Blend ]
Our application is pretty simple. It contains a plain white background and a combobox that contains hex color values from our Kuler RSS feed. I have already taken care of binding the RSS (XML) feed to the combobox, and when you run your application and click on the drop-down menu, you will see all of the hex codes listed in the feed:
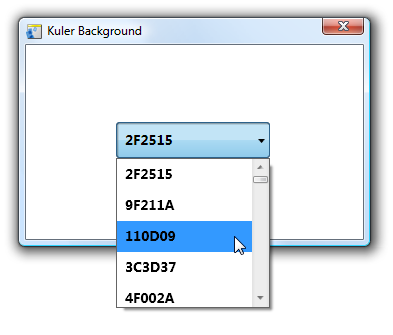
[ the hex codes are taken from the XML file loaded during runtime ]
What we want to do is change our application's background to the color selected in our combobox. That involves data binding.
The following steps explain how to data bind the combobox's selected value to our window's background color:
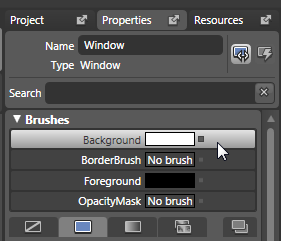
[ select the Background property from inside our Brushes panel ]
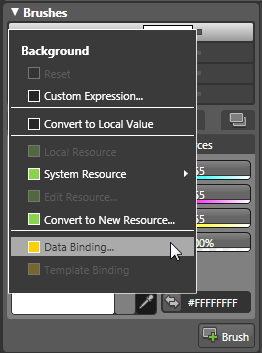
[ the square to the right of many properties is for Advanced Property options ]
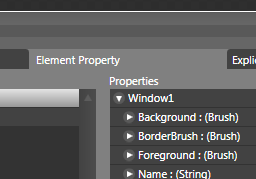
[ you can view the various properties and elements you can bind to ]
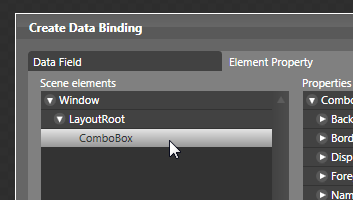
[ select the ComboBox to specify it as the source of our data binding ]
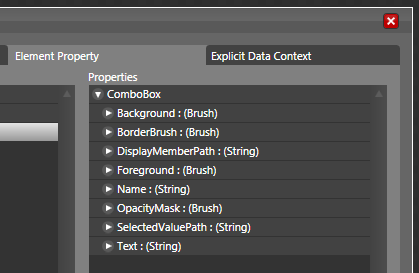
[ some of the Properties you can bind to ]
The property we are looking for is
SelectedValue, but it isn't visible! The reason you
do not see SelectedValue and many other properties
is because our target is our Background property.
The Background property likes data in the form of
Brushes or Strings, so only Properties that deal
with those two types are listed.
To display all of your ComboBox's properties, find
the Show menu below your Properties tree and select
the All Properties menu item:
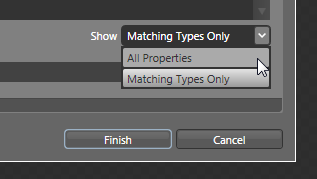
[ to display all of the Properties, change the Show menu's value to All Properties ]
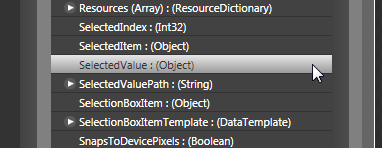
[ find your SelectedValue property and select it ]
Make sure your SelectedValue property is selected and hit the Finish button to close your Create Data Binding window and accept the binding.
All right! Our data binding has finally been setup. In the next section, let's see how it works and then start work on our value converter.
In the previous section, you downloaded the sample Kuler Background application and saw how it worked. We extended the functionality by setting up the data binding, and in this page, let's take a look at what our result is going to be.
We left off by having accepted our data binding changes and closing our Create Data Binding window. You can immediately see that our changes were accepted because both the Advanced property options box and the entire Brushes panel look a little different:
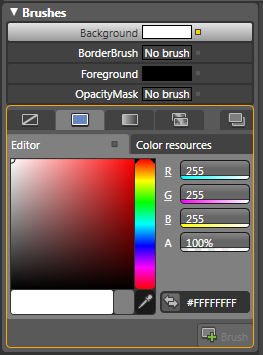
[ how our Brushes panel looks like after the data binding ]
Notice that your Color Editor area has an orange border, and your Advanced property options box next to your Background property is colored yellow.
The real test comes when you are actually running your application. Press F5 to build and run your application. Your Kuler Background application will look similar to the following image:
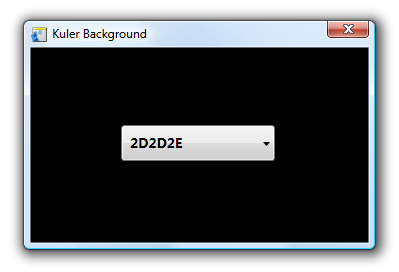
When you select different colors from your combobox, notice that your background retains the Black color. This isn't working like it was supposed to! The reason, which I briefly mentioned in the first page, has to do with the data returned by your combobox's SelectedValue property and the data your Window's Background property expects.
To copy and paste what I wrote on the first page:
The color value returned by [your combobox] is in a form such as FFFFFF. The format WPF brushes use for displaying colors is #FFFFFF. The difference is in the # symbol that WPF seeks but which our data source from the Kuler feed does not provide. Reconciling this difference is where value converters come in.
If your combobox's items were to simply include the # character in front of the hex values, everything would be fine. But, they do not, and its up to us to fix this.
The following steps will help you create the value converter:
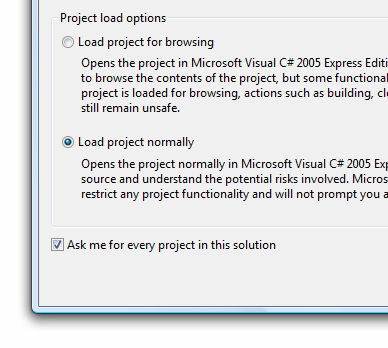
[ Load the project normally, for you are simply opening a project you created in Blend ]
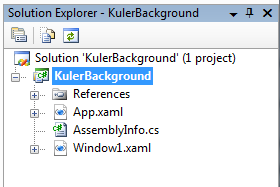
[ our Solution Explorer provides access to files and references ]
Let's add a new C# file, so from your Solution Explorer, right click on your KulerBackground C# project and go to Add | New Item:
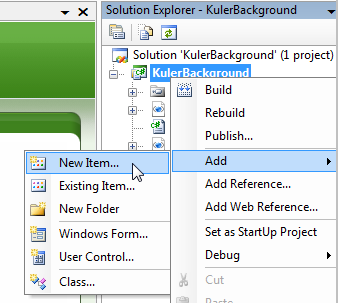
[ you are planning on adding a new item to our C# KulerBackground project ]
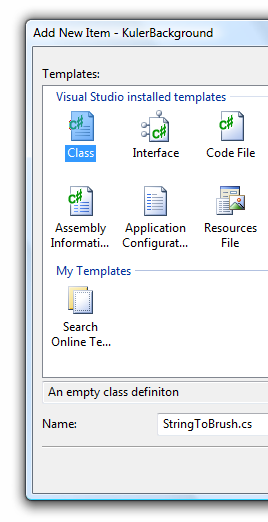
[ give your new C# class file the name StringToBrush ]
Click the Add button to close the Add New Item window and to add your new C# class file to your project.
Ok, now that you have everything ready to edit StringToBrush.cs, we'll start from a clean slate and focus exclusively on coding in the next section.
In the previous section, you tested our data binding and realized it didn't work. The solution that you embarked upon was creating a value converter. You created the C# class, but we haven't done anything more beyond that. Let's change that and add our value converter code.
Right now, in Visual Studio / C# Express, you will see the following code in our StringToBrush.cs file:
using System;
using System.Collections.Generic;
using System.Text;
namespace KulerBackground
{
  class StringToBrush
  {
  }
}
To make our StringToBrush class be a value converter, it needs to implement the IValueConverter interface. You can do that by using what looks like the syntax for extending a class:
using System;
using System.Collections.Generic;
using System.Text;
namespace KulerBackground
{
  class StringToBrush : IValueConverter
  {
  }
}
When you add the : IValueConverter text, you will see that you aren't in the clear yet. You have to specify which IValueConverter to use. When you right click on IValueConverter, the Resolve menu will appear, and from that menu, select System.Windows.Data:
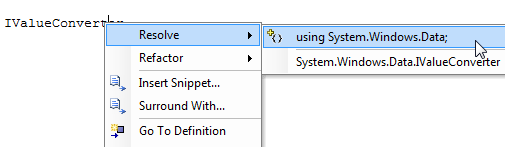
[ resolve the ambiguity by using the System.Windows.Data namespace ]
After you have selected the System.Windows.Data namespace, you will see that you still have yet another thing to take care of - actually implementing the interface. Right click on your IValueConverter text and, from the menu that appears again, go to Implement Interface | Implement Interface:
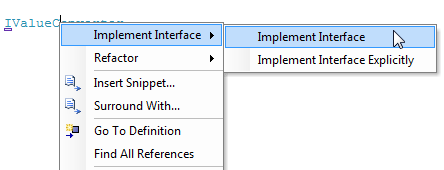
[ implement the interface through the same context menu ]
Once you have selected the Implement Interface item from the above menu, the methods (and signatures) a class implementing this interface requires will appear in your code editor:
using System;
using System.Collections.Generic;
using System.Text;
using System.Windows.Data;
namespace KulerBackground
{
  class StringToBrush : IValueConverter
  {
  #region IValueConverter Members
  public object Convert(object value, Type targetType, object parameter, System.Globalization.CultureInfo culture)
  {
  throw new Exception("The method or operation is not implemented.");
  }
  public object ConvertBack(object value, Type targetType, object parameter, System.Globalization.CultureInfo culture)
  {
  throw new Exception("The method or operation is not implemented.");
  }
  #endregion
  }
}
More specifically, using the IValueConverter interface requires your implementing class to have a Convert and ConvertBack method that takes the appropriate type and number of arguments. We'll primarily deal with the Convert method, so let's work on that for a bit.
Inside your Convert method, replace the throw new Exception line with the following code:
if (value != null)
{
  string input = value.ToString();
  if (input.Length != 6)
  {
  throw new Exception("String doesn't seem to be a valid RGB hex color");
  }
  Color newColor = (Color)ColorConverter.ConvertFromString("#" + input);
  SolidColorBrush colorBrush = new SolidColorBrush(newColor);
  return colorBrush;
}
else
{
  return new SolidColorBrush(Colors.White);
}
After overwriting the exception line in your Convert method with the above code, be sure to resolve your SolidColorBrush namespace. When you build your project in Visual Studio / C# Express, you should not receive any errors. We are almost done, but there are a few things still left to do.
Don't worry if you do not fully understand what the above pasted code does. I will go through the code line-by-line towards the end of this tutorial so that you have a good understanding of why things work the way they do. In the meantime, let's move on to the next section and use our newly created value converter with our data binding.
In the previous section, you created the value converter by adding some code to your StringToBrush.cs file. In this page, you'll learn how to use our value converter with our data binding.
Right now, we have created our value converter, but we haven't actually used it yet. To use it, go back to Blend and select your window. If you recall, you data bound the window's Background property to the value displayed in your combobox. What we want to do is modify that data binding.
Find your window's Background property under the Brushes panel, and (like before) click on the Advanced property options box to the right of the Background property. From the Background menu that appears, select the Data Binding item:

[ select the all-too-familiar Data Binding menu item ]
After selecting the Data Binding menu item, you will see the Create Data Binding window appear. This all should be familiar territory for you. What may not be familiar is what we are going to do next. From this Create Data Binding window, look towards the bottom where you see a light-gray horizontal strip with a down arrow displayed:

[ you can see the narrow gray strip where my mouse cursor is ]
Once you have found that thin horizontal strip, click on it to show the advanced properties associated with our data binding. From your newly expanded advanced properties area, find the drop-down menu labeled Value converter:
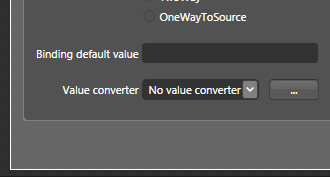
[ find the Value converter area from your newly expanded Advanced Properties ]
From this Value converter region, click on the ... button found to the right of the No value converter combobox. That oddly named button is actually responsible for allowing you to add a new value converter. Once you have clicked on that button, the Add Value Converter window will appear.
From that window, select your StringToBrush converter nested inside your KulerBackground node:

[ select your StringToBrush value converter ]
After you selected the StringToBrush converter, press OK to accept the change and close the Add Value Converter window. After a few seconds, you will see the StringToBrush converter displayed in your Value converter area of your Create Data Binding window:

[ you will see your StringToBrush value converter chosen for this data binding ]
Press the Finish button to accept the changes you made to your data binding and close our Create Data Binding window.
When your Create Data Binding window closes, you will see your Window background automatically change to the hex value displayed by default in your combobox:

[ our background's color is actually responsive to what is displayed in the combobox ]
When you test your application, you will now be able to select any color from your drop-down menu and have that color be set as your window's background:
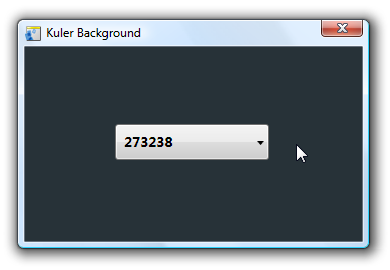
[ as Borat would say, "Great success!" ]
Great! Your data binding between your combobox and your window's background now works. We are done with what we set out to do, but in the next section, let's take a step back and look at what our value converter code actually does. If you recall, I rushed through that earlier.
In the previous section, you took the value converter you created and modified our data binding to use it. The end result is that your application now works well! For the past few pages, we quickly ran through the details hoping to get our data binding working. In this page, let's take a step back and look at the code found in our value converter.
You copied and pasted much of the code that went into our StringToBrush file. Let's look at each line and see what it does:
class StringToBrush : IValueConverterIn this line, I define my StringToBrush class. More importantly, I am implementing our IValueConverter interface. In a nutshell, an interface defines a contract. The contract specifies details such as the number of methods and what arguments each of your methods will take. The interface itself contains no code beyond just defining the methods and their arguments.
Our IValueConverter specifies the Convert and ConvertBack methods. Like you saw in this tutorial, with Visual Studio, once you simply specify an interface to implement, the required methods are created for you automatically.
if (value != null)
{
  string input = value.ToString();
  if (input.Length != 6)
  {
  throw new Exception("String doesn't seem to be a valid RGB hex color");
  }
  Color newColor = (Color)ColorConverter.ConvertFromString("#" + input);
  SolidColorBrush colorBrush = new SolidColorBrush(newColor);
  return colorBrush;
}
else
{
  return new SolidColorBrush(Colors.White);
}
In our Convert method, the first thing I check is to make sure our value variable is not null. The value variable is important because it stores the data that is passed in to our value converter. If our value variable itself is null, that means that no data was passed in.
To avoid having our application spectacularly crash and burn, I return a default SolidColorBrush in our else statement in the rare scenario when value does equal null.
All of the following code runs when our value is not null (value != null) condition holds.
string input = value.ToString();With this line, I create a new object called input, and it stores the string version of our value object. Our value object is actually given to us as a type object, and to avoid any issues associated with having a generic object, I convert it to a string to better deal with our data.
if (input.Length != 6)
{
  throw new Exception("String doesn't seem to be a valid RGB hex color");
}
In this line, I make one more check to make sure our input is valid. In this case, I check to make sure that our provided value is six-digits long. If the provided value is not six digits long, then I throw an exception. I agree this is a naive way to check whether an input is a good hex value candidate, but for this tutorial, it does the trick.
Color newColor = (Color)ColorConverter.ConvertFromString("#" + input);This line essentially fixes the shortcoming that led to us creating our value converter. More specifically, in this line, I create and initialize our new Color objec using the ColorConverter object's ConvertFromString method. The ConvertFromString method allows me to take our 6-digit hex input and combine it with the missing # character.
After this line executes, our newColor object successfully took our incompatible hex code and with the simple string manipulation, stores the color in a form that WPF can understand.
SolidColorBrush colorBrush = new SolidColorBrush(newColor);
return colorBrush;
We wrap up the work we started in the previous line with these two lines. I take the new Color object and create a SolidColorBrush out of it. The reason is that our window's Background property primarily deals with brushes, so it makes sense to return our new color as a SolidColorBrush.
And with that, you are done with this value converter tutorial.
Just a final word before we wrap up. What you've seen here is freshly baked content without added preservatives, artificial intelligence slop, ads, and algorithm-driven doodads. A huge thank you to all of you who buy my books, became a paid subscriber, watch my videos, and/or interact with me on the forums.
Your support keeps this site going! 😇


:: Copyright KIRUPA 2026 //--