 Tutorials
Books
Videos
Forums
Tutorials
Books
Videos
Forums


This is an archived tutorial from the kirupa.com legacy collection. It covers software that may no longer be available, but it is kept online because the ideas still hold up.
For the first couple of Silverlight releases, what happened in your browser stayed in your browser. If you wanted to do something that went beyond your browser, you needed to rely on some server-side magic.
Things changed a bit with Silverlight 3. One of the features added in that version is the ability for you to write your data locally to disk. For an example of this, take a look at the following application, fill in the first/last name fields, and hit the Save button:
[ Awesome "SmallWorld" art by Daniel Cook (Lostgarden.com) ]
When you hit the Save button, you will see a Save As dialog appear:

[ the standard Save As dialog will appear ]
Use this dialog like you would any other Save As dialog. Pick a location and save the file. Once the file has been saved, open it up in a text or XML editor. You whould see something that looks similar to the following:
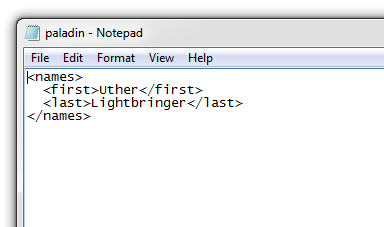
[ the data that gets saved ]
When you hit the Save button, the information you specified in the First name and Last name text fields was written into an XML file that you saved to disk.
In this tutorial, you will learn how to do all of that.
There are several steps involved with making all of this work. The first part is the UI where you enter the data and invoke the Save command. The second part is displaying the dialog that allows you to save a file to your disk. The third and final part is creating the XML data and having it be saved. Let's start with the easiest part, the UI.
I am not going to go into great detail about how the UI is created, but I will briefly introduce the star players - the text fields and button. Create a new Silverlight application in Blend and draw out two textboxes and a button:
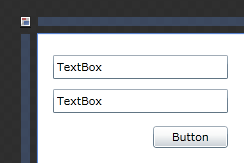
[ it doesn't get more plain than this ]
You can go a little overboard and add some additional visual details like I've done below:

[ something a bit more elaborate ]
Regardless of what your UI looks like, you need to name your two textboxes. Give one of your textboxes the name firstNameText, and give your other textbox the name lastNameText.
When your button is clicked, we want to display the Save As dialog and save whatever data was enteired into your firstNameText and lastNameText fields. To do all of that, you need to set the Click event on your Button to point to an event handler. Click on your button, click on the Events button in the Properties Inspector, find the Click event, and enter the event handler name SaveFile:
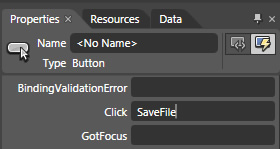
[ associate your button's Click event with the SaveFile event handler ]
Once you have entered SaveFile for your button's event handler for the Click event, you will be taken to the code view where the event handler will be created for you:
private void SaveFile(object sender, RoutedEventArgs e)
{
}
This is pretty much all you have to do on the UI front for all of this. What we are going to do next is begin adding the code to make the UI functional.
In the previous section, you created the basic UI that will allow us to proceed to the really interesting stuff - the code needed to display the Save File dialog and to actually save the file.
What we want to do is display the Save As dialog when the Save File button in our UI is clicked. This means that we need to add to the event handler that we associated with the Click event earlier.
Open MainPage.xaml.cs and find the Save File event handler. Inside it, paste the following code:
private void SaveFile(object sender, RoutedEventArgs e)
{
  SaveFileDialog saveFileDialog = new SaveFileDialog();
  saveFileDialog.DefaultExt = "xml";
  saveFileDialog.Filter = "XML Files (*.xml)|*.xml|All files (*.*)|*.*";
  saveFileDialog.FilterIndex = 1;
  if (saveFileDialog.ShowDialog() == true)
  {
  // exciting stuff will go here soon
  }
}
Once you have copied and pasted this code, press F5 to test your application. After a few grueling seconds, your app will display in your browser. Click on the Save File button to display the Save As dialog. While the Save Dialog appears, browse to a location, give a file name, and save the file.
When you open the file that you just saved, it is going to be empty. The reason is that we haven't done anything to save the important data we are interested in.
When the Save button from the Save As dialog is clicked, we want to write XML data iinto the file that gets created:
[ what we want - this is the pony we are aiming for ]
We will be using LINQ to generate this XML file, so you need to make sure your project is capable of recognizing the LINQ syntax. There are two things you will need to do.
First, you will need to add a reference to System.Xml.Linq.dll. The way you do this is by finding the References folder in your Projects pane:
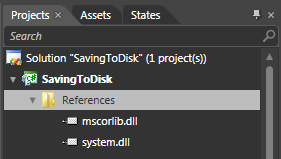
[ you need to add a Reference for LINQ support ]
Once you have found the folder, right click on it and select Add Reference. From the Add Reference dialog, browse to: {Program Files}\Microsoft SDKs\Silverlight\{version}\Libraries\Client\
Replace the {version} flag with the appropriate version of Silverlight your project is currently being created in (3.0, 4.0, etc.). Once you have found the Client directory, System.Xml.Linq.dll will be there for you to select:
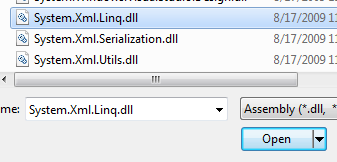
[ find System.Xml.Linq DLL in the Client directory ]
Once you have selected that DLL, hit Open to add a reference to it in your project.
The second thing you need to do is add the appropriate using statement to the top of your code to actually take advantage of the DLL you just added as well as handle some basic file input/output operations you'll eventually need. Make sure MainPage.xaml.cs is open, scroll all the way to the top, find the column of using statements, and add the following two statements to the end:
using System.Xml.Linq;
using System.IO;
Here is a screenshot of what my using statements look like:
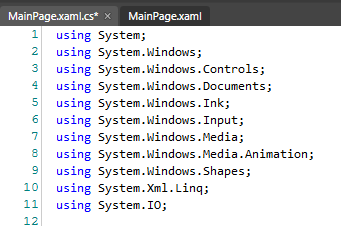
[ look at those awesome using statements! ]
Ok, finally, you are ready to add some code that will make your application complete. Inside your SaveFile method, add the following lines inside your if statement:
private void SaveFile(object sender, RoutedEventArgs e)
{
  SaveFileDialog saveFileDialog = new SaveFileDialog();
  saveFileDialog.DefaultExt = "xml";
  saveFileDialog.Filter = "XML Files (*.xml)|*.xml|All files (*.*)|*.*";
  saveFileDialog.FilterIndex = 1;
  if (saveFileDialog.ShowDialog() == true)
  {
  using (Stream stream = saveFileDialog.OpenFile())
  {
  StreamWriter sw = new StreamWriter(stream, System.Text.Encoding.UTF8);
  sw.Write(GetGeneratedXML().ToString());
  sw.Close();
  stream.Close();
  }
  }
}
If you run your application again by pressing F5, type a few values in your text fields, and hit the Save button to save your data. This time around, if you open the XML file, it will not be empty...or at least it shouldn't be! Instead, you should see your data in all its XML-ish glory.
You aren't done yet! All of you have done is copied and pasted some code to make all of this work. In the next section, let's take a deeper look at the code and why it works the way it does.
In the previous section, you added references and copied some code to make your application work. That's pretty cool, but this page is much cooler. In this page, we'll look at the code in greater detail.
Getting the application to work is only one part of this tutorial. The last and most important part is learning why the code works the way it does. At a very high level, there are several things that our code actually does:
Let's start zooming in on the various layers starting with the Save As dialog.
The code that deals with the Save As dialog is covered in the following four lines plus another line that I will show later:
SaveFileDialog saveFileDialog = new SaveFileDialog();
saveFileDialog.DefaultExt = "xml";
saveFileDialog.Filter = "XML Files (*.xml)|*.xml|All Files (*.*)|*.*";
saveFileDialog.FilterIndex = 1;
The first thing I do is declare and initialize my saveFileDialog object whose type is SaveFileDialog. Through my saveFileDialog object, I can set the properties that allow me to customize the dialog that appears. The main customizations I made are ones that define what extension to save my file as by default:

[ the supported file extensions list ]
As you can tell, the two file extensions that you can pick for your file are .xml or anything that you specify *.*. The supported list of the extensions is controlled by the following lines of code:
saveFileDialog.DefaultExt = "xml";
saveFileDialog.Filter = "XML Files (*.xml)|*.xml|All Files (*.*)|*.*";
saveFileDialog.FilterIndex = 1;
In the first line, I specify the default extension to be xml. As you will see shortly, the first line isn't really all that important. The second line is one of the more interesting ones you'll see ever in your life.
The Filter property takes a vertical pipe delimited string that alternates between describing the extension and defining the extension itself:
saveFileDialog.Filter = "XML Files (*.xml)|*.xml|All Files (*.*)|*.*";In our case, the description is XML Files (*.xml), and the associated extension is *.xml. I repeat that format for All Files (*.*) whose extension is *.*.
All of this is well and good, but none of the lines of code you saw actually launch the dialog. The display of the dialog is made when you call the ShowDialog() method on your saveFileDialog object as:
saveFileDialog.ShowDialog();The ShowDialog() method returns true if the Save button has been clicked and false if the window was closed or Canceled. Since all we care about is really the Save case, I am combining the ShowDialog() and checking for true in the same line in our code:
if (saveFileDialog.ShowDialog() == true)
{
  using (Stream stream = saveFileDialog.OpenFile())
  {
  StreamWriter sw = new StreamWriter(stream,
  System.Text.Encoding.UTF8);
  sw.Write(GetGeneratedXML().ToString());
  sw.Close();
  stream.Close();
  }
}
If you stop right after you call ShowDialog, an empty file will be created for you with the name you specified. What you need to do is now open the file and write the XML data that you want into it.
In the previous section, we started looking at the code to see how it all fits together. We are almost done, so let's just finish up the last remaining lines and call it a day!
Right now, we are at the point where the Save As dialog has just been closed and an empty file has been created with the name and extension the user specified. This empty file needs to store the data that the user has entered, and that is where the rest of the code comes into play:
using (Stream stream = saveFileDialog.OpenFile())
{
  StreamWriter sw = new StreamWriter(stream, System.Text.Encoding.UTF8);
  sw.Write(GetGeneratedXML().ToString());
  sw.Close();
  stream.Close();
}
The first thing I do is use the OpenFile() method to open the file that was just created. I also declare a Stream object through which I can funnel in all kinds of things I want to store into the file.
Think of the stream object as a giant gate attached to a pathway through which you can send things through. All this gate can do is open or close, and by calling OpenFile, we have the gate wide open.
With direct access to our file, the actual data you want to write to it are handled via the StreamWriter object called sw:
StreamWriter sw = new StreamWriter(stream, System.Text.Encoding.UTF8);The StreamWriter class is optimized for sending in text/character based data, and since XML is just text, it is a great choice to use when a stream is involved. The first argument the StreamWriter constructor takes is a reference to the stream object we created earlier, and it also takes the encoding as its second argument.
Declaring and initializing our StreamWriter object sets us up nicely for being able to write data, and writing is handled by the Write method:
sw.Write(GetGeneratedXML().ToString());The Write method is beautiful because its main argument is all of the data that you want written. It doesn’t matter how large or small the data is, for the StreamWriter handles breaking things up as necessary and making sure your app remains performant.
The last thing that this block of code does is close the pathways that were opened by the Stream and StreamWriter objects:
sw.Close();
stream.Close();
They are both sort of self explanatory. The Close method commits any changes made to the file and closes the pathway.
There was one line that I kind of rushed through in my explanation:
sw.Write(GetGeneratedXML().ToString());The Write method takes a function called GetGeneratedXML() whose output is converted to a string as its argument. The GetGeneratedXML method is where our XML data gets generated:
private XElement GetGeneratedXML()
{
  XElement userInformation = new XElement("names");
  userInformation.Add(new XElement("first", firstNameText.Text));
  userInformation.Add(new XElement("last", lastNameText.Text));
  return userInformation;
}
I am not going to delve into the details of LINQ in this tutorial, but to be very brief, notice that we are building up our XML tree by creating a root node called names and adding two children called first and last values are what the firstNameText and lastNameText textboxes you defined in XAML earlier contain.
The XML data once created is returned to whatever called it, and that is the Write method. Once you call ToString on the XML data, you now have a text-based representation of what needs to be written to the XML file the user created.
Hopefully this tutorial gave you a full end-to-end look at a small application that takes some user data and gives you the option of saving the data locally to disk. As always, below is the source code in case you want to dissect my example:
If you noticed and/or are curious, the strange name stored in the XML file in my screenshts, it is Uther Lightbringer - one of the most awesome paladins from the WarCraft games.
Just a final word before we wrap up. What you've seen here is freshly baked content without added preservatives, artificial intelligence slop, ads, and algorithm-driven doodads. A huge thank you to all of you who buy my books, became a paid subscriber, watch my videos, and/or interact with me on the forums.
Your support keeps this site going! 😇


:: Copyright KIRUPA 2026 //--