 Tutorials
Books
Videos
Forums
Tutorials
Books
Videos
Forums


This is an archived tutorial from the kirupa.com legacy collection. It covers software that may no longer be available, but it is kept online because the ideas still hold up.
Sooner or later, you will find yourself wanting to display an image inside your Silverlight application. The easy case is where you add an image to your application directly and have it be loaded as part of the initial download. The default Silverlight preloader will kick in, and at the end of the preload, your image will be ready.
There will be many cases, though, where you don't want your images to be included as part of the XAP. If you want to load your images on-demand as the user requests them, you will have to write some code and handle the preloading of the images yourself.
In this tutorial, you will learn how to do just that - programmatically loading an image and displaying the download progress while the image is being downloaded. The following is an example of what you will create:
Keep clicking the Reload Image button to see the preloader kick-in and the image display once the preloader indicates that the download has finished.
There are two parts really to this tutorial. The first part is in creating the UI such as what you see above. The second part is writing the code that actually loads your image.
Launch Expression Blend 2 SP1, and create a new Silverlight 2 application:
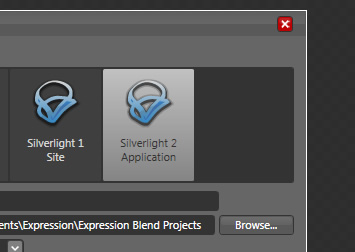
[ create a new Silverlight 2 Application in Blend ]
A few seconds later, you will see your artboard, and it will be completely blank. Right now, your application's dimensions are pretty large. Change that by setting your application's size to 400 and 300.
Once you have done this, it is time to populate your application with some UI. I am not going to go into great detail on how to create the UI, for it isn't what this tutorial is about. Instead, the following diagram should give you the approximate placement and type of each control you will be adding:
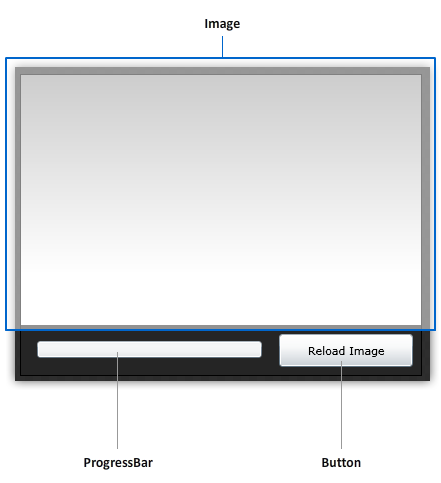
I have a few rectangles added for aesthetic appeal, but it isn't essential. Once you have added the controls, it is time to give them a name. Your Image control's name will be imageControl, your Button will be called reloadImageButton, and your ProgressBar will be called progressBar. I know the names aren't very creative, but they work for now.
Your object tree should similar to what you see below (sans the Rectangle):
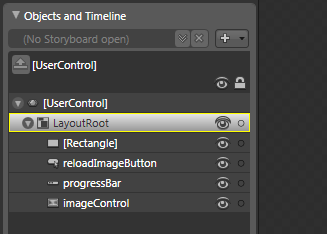
[ what your object tree should look similar to ]
For reference, I have included the source files for this project up until this point where just the UI has been created. Download them from the following link:
Don't worry, the above source files don't contain anything beyond just the UI that you see above. The interesting stuff you will have to add yourself...starting at the next section!
In the previous section, you created the UI of your application and got an overview of what you will be creating. In this page, we will tackle the next big thing - which is adding the code that will actually load our image.
To add the code, click on the Project tab, right click on the Solution entry, and choose Edit in Visual Studio:
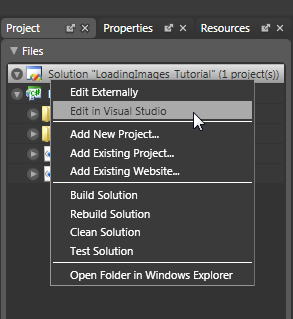
[ invoke Visual Studio directly on this project from the Project pane ]
A few seconds later, Visual Studio will launch with your current Solution displayed. In the Solution Explorer in Visual Studio, you will see the exact same project structure that you see in Blend. Anyway, double-click on Page.xaml.cs to open it for editing. You are now ready to add some code.
Copy the following code and overwrite your public Page constructor by pasting directly over it:
public Page()
{
  // Required to initialize variables
  InitializeComponent();
  // Load the image once the page has loaded
  LoadImage();
}
private void LoadImage()
{
  //
  // Creating WebClient object and setting up events
  //
  WebClient downloader = new WebClient();
  downloader.OpenReadCompleted += new OpenReadCompletedEventHandler(downloader_OpenReadCompleted);
  downloader.DownloadProgressChanged += new DownloadProgressChangedEventHandler(downloader_DownloadProgressChanged);
  //
  // Specify Image to load
  //
  string fileName = "kirupaCard.jpg";
  downloader.OpenReadAsync(new Uri(fileName, UriKind.Relative));
}
void downloader_OpenReadCompleted(object sender, OpenReadCompletedEventArgs e)
{
  //
  // Create a new BitmapImage and load the stream
  //
  BitmapImage loadedImage = new BitmapImage();
  loadedImage.SetSource(e.Result);
  //
  // Setting our BitmapImage as the source of a imageControl control I have in XAML
  //
  imageControl.Source = loadedImage;
}
void downloader_DownloadProgressChanged(object sender, DownloadProgressChangedEventArgs e)
{
  // Progress Updates
  progressBar.Value = e.ProgressPercentage;
}
Once you have pasted your code in, things aren't all sun and roses. There are some extra things you will need to do. First, you need to fix all of the little squiggly lines that indicate that some of your classes cannot be found.
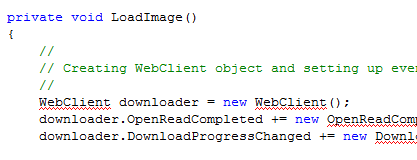
[ missing assembly references or using directives abound! ]
These squiggly lines represent missing assembly references and using directives, and another tutorial explains in detail what all of that means. In a nutshell, the classes you use are defined in various DLL files that are a part of Silverlight. Certain classes, though, while part of Silverlight, are from DLLs that aren't referenced by default. This means that you have to manually add the reference yourself.
The first one we will look at is the WebClient class. Right clicking on it doesn't give you a familiar Resolve menu-item indicating that only a using directive was missing. You will have to add the assembly (a fancy name for a DLL file...most of the time!) yourself. Right click on your References folder and select Add Reference:
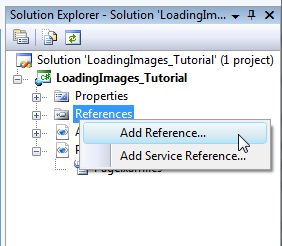
[ right-click on the References folder and select Add Reference ]
The Add Reference window will appear. Scroll down until you see an entry for System.Net. Once you see it, double-click on it. A few seconds later, this Add Reference window will close and you will see an entry for System.Net displayed in your list of References:
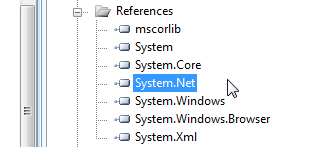
[ System.Net will be displayed among the list of References your project is aware of ]
If you go back to your code, right click on a squiggly, underlined WebClient instance, the Resolve menu will be there as well. From the Resolve menu, select the entry for using System.Net:
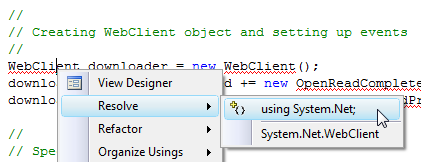
[ add the System.Net using directive ]
Once you have done this, you will see that almost all of your "missing assembly reference" errors go away. The only place you will need to fix up your code is the BitmapImage class.
That should be an easy one, though. Just right click on the BitmapImage text and go Resolve | using System.Windows.Media.Imaging:
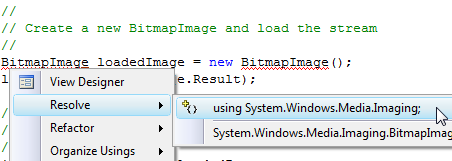
[ resolve the missing using directive for BitmapImage as well ]
You should not be seeing any errors once you fix up BitmapImage, and you can verify by hitting F6 to Build. Your build should succeed without any errors being displayed.
Not having errors doesn't mean that you can run your application though. That is because an important piece is currently missing - the image that you will be loading!
In the previous section, you added the code that you will need to display the image when you load your Silverlight application. There is just one minor hitch. Where is the image? Let's add it in now.
Because we want to simulate adding the image from an external source, we can't embed it as part of our XAP - which is currently the default behavior when you insert an image into your document. Instead, we need to go to the folder where your XAP lives and place the image in that same folder.
If you haven't done so yet, make sure to hit F6 to build your project and to ensure you see no errors. You shouldn't see any errors if you resolved the missing assembly reference and using directives from the previous section.
Anyway, since you are already in Visual Studio, right click on the C# Project icon in your Solution Explorer and select Open Folder in Windows Explorer. Once you have done that, Windows Explorer will launch with the location of your C# Project as the start location:
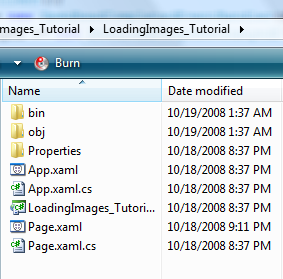
[ you should now be seeing your project and related files in Windows Explorer ]
From here, navigate to your bin \ Debug folder. You will see a splattering of files here - the most important of which is your XAP file. Into this folder, save the following JPEG image and give it the name kirupaCard:

After you have saved this image into the Debug location for your project, your list of files should look as follows:
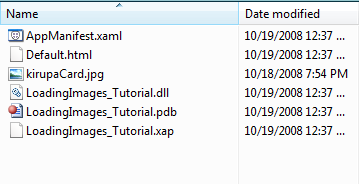
Notice that your kirupaCard.jpg file is in the same location as your XAP file - which in my case is called LoadingImage_Tutorial.xap. If you go back into Blend now, and press F5 to run your application, you will see your default browser launch and display your Silverlight application!
Everything should work with the image displayed at the location of your image control. With the loaded application, though, you may notice that pressing the Reload Image button does not do anything. That is because the code currently is only designed to display the image on Load and not when a button is clicked. That is very quick fix, so let's go ahead and take care of that now itself.
As I explained earlier, we want to refresh our image when the Reload Image button is clicked. In Blend, select your reloadImageButton, switch into your Properties pane, and click on the Events button:
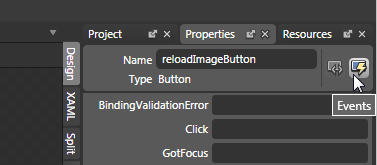
[ access your Reload Image Button's events ]
Once you have clicked the events button, you will see your Properties pane display all of the events you can assign event handlers to. In the field next to the Click event, enter the text ReloadImage:
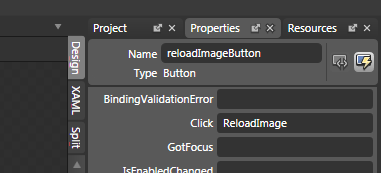
[ associate the Click event with a ReloadImage event handler ]
Hit the Enter key after you've done that, notice that you will be whisked back into Visual Studio with the event handler for this Click event created for you.
This event handler will be blank, so go ahead and add the following two lines of code:
private void ReloadImage(object sender, RoutedEventArgs e)
{
  imageControl.Source = null;
  LoadImage();
}
Once you have added this code, go back to Blend and hit F5 to run your Silverlight application. This time, when you click on the Reload Image button, you will see that your image flashes and reappears.
Because you are testing this application locally, you won't "enjoy" the benefits of a real connection where you can see the few seconds of delay before your image loads or where your progress bar updates as your image gets loaded. It's ok - you can trust me that it works (bad idea!) or you can upload to a web server and see for yourself.
In the next section, let's start delving into the code and see why things work the way they do.
In the previous section, you got your application working! You aren't done yet though. The more interesting part is learning why your application works the way it does, and that can only be done by examining the code in greater detail.
In this and the next section, you will learn about the behind-the-scenes work that goes on with having your application load an image.
To take a step back, our application does one thing - it loads an image from an external location and displays it inside an Image control. Along the way, as the image is being loaded, it gives you progress information that you feed to a ProgressBar control. The code that you copied and pasted is the C# version of the preceding two sentences, so let's see how all of that works.
Let's start by looking at the LoadImage method:
private void LoadImage()
{
  //
  // Creating WebClient object and setting up events
  //
  WebClient downloader = new WebClient();
  downloader.OpenReadCompleted += new OpenReadCompletedEventHandler(downloader_OpenReadCompleted);
  downloader.DownloadProgressChanged += new DownloadProgressChangedEventHandler(downloader_DownloadProgressChanged);
  //
  // Specify Image to load
  //
  string fileName = "kirupaCard.jpg";
  downloader.OpenReadAsync(new Uri(fileName, UriKind.Relative));
}
The most important method in our code is LoadImage. This collection of code is responsible for telling your application which file to download, what method to call once a file has downloaded, and what method to call while the file is being downloaded.
A large part of those tasks is handled by your WebClient object:
WebClient downloader = new WebClient();
downloader.OpenReadCompleted += new OpenReadCompletedEventHandler(downloader_OpenReadCompleted);
downloader.DownloadProgressChanged += new DownloadProgressChangedEventHandler
The WebClient class contains a lot of functionality relating to downloading content. I first declare and initialize a WebClient object called downloader. That is what the first line shows.
The second and third lines are interesting. Getting notified on when the content has fully downloaded and when content is being downloaded is handled by events the WebClient object exposes. What I do is just hook into those events and set up the event handlers appropriately for both OpenReadCompleted and DownloadProgressChanged.
OpenReadCompleted is the event that gets called when whatever you are downloading has fully been downloaded. DownloadProgressChanged is the event that gets called as your content is being downloaded. Declaring these events and hooking them up to event handlers isn't enough to get them going though.
What you need to do is actually force a download of an external file, and that is done in the last two lines of this method:
string fileName = "kirupaCard.jpg";
downloader.OpenReadAsync(new Uri(fileName, UriKind.Relative));
In the first line, I specify the name of the file I am interested in downloading. This is just a straight-up variable of type string, so there is nothing particularly interesting to see here.
It is the second line that is responsible for initiating the download. OpenReadAsync is the method you call to asynchronously load your content, and it takes a Uri as its argument. This Uri stores information about the file we are loading...such as the name of the file and whether that file is relative to the XAP or not.
Phew - that was quite a method! In the next section, I will cover the remaining code and wrap things up.
In the previous section, we started looking at the nuts and bolts of our application. First up was the LoadImage method that is responsible for setting all of the other wheels in motion. In this page, let's look at those other wheels!
First up is the downloader_OpenReadCompleted event handler:
void downloader_OpenReadCompleted(object sender, OpenReadCompletedEventArgs e)
{
  //
  // Create a new BitmapImage and load the stream
  //
  BitmapImage loadedImage = new BitmapImage();
  loadedImage.SetSource(e.Result);
  //
  // Setting our BitmapImage as the source of a BackgroundImage control I have in XAML
  //
  imageControl.Source = loadedImage;
}
This method is the event handler that gets called when your OpenReadCompleted event is fired when your download has completed.
Because what we are downloading is image data, I need to store that data into a type that can handle it:
BitmapImage loadedImage = new BitmapImage();
loadedImage.SetSource(e.Result);
That type is BitmapImage. The results of what I download are stored as a stream - a collection of data that makes up "something". What the something actually is...is handled by the recipient of this stream. Because I know for certain that this data is a stream that contains data making up an image, it makes sense for my recipient to be BitmapImage. In a nutshell, I access the data (e.Result) and pass it in to my BitmapImage object's SetSource method.
The final step is to actually have our image display:
imageControl.Source = loadedImage;Because I already have an Image control that I created earlier in Blend, I can just pass in my BitmapImage object directly to it. That is done by setting my image control's Source property to the BitmapImage object, loadedImage, itself.
The next block of code we will look at is the one that powers our ProgressBar control:
void downloader_DownloadProgressChanged(object sender, DownloadProgressChangedEventArgs e)
{
  // Progress Updates
  progressBar.Value = e.ProgressPercentage;
}
This method is the event handler for the DownloadProgressChanged that you declared earlier on your WebClient downloader object. Each time something gets downloaded, this method gets called.
One of the arguments for this method is an object of type DownloadProgressChangedEventArgs which contains a ProgressPercentage property which gives you a number between 0 and 100 to indicate download progress.
The ProgressBar control you added earlier, whose name is progressBar, has a Value property that (in its default state) also takes a number between 0 and 100. Combine this with the ProgressPercentage value and you have a working download progress indicator!
The last line of code we will look at is what happens when you click on the Reload Image button aptly called reloadImageButton:
private void ReloadImage(object sender, RoutedEventArgs e)
{
  imageControl.Source = null;
  LoadImage();
}
The first thing I do is clear out the image that is currently being displayed. That can be easily done by setting the Source property of your Image control to null.
Finally, I make another call to our LoadImage function to start the process of downloading our image again.
And with that last sentence, you are done with this tutorial. We rushed through the UI part where you placed the controls and gave them an appropriate name, but hopefully you found the more slower, detailed look at the code more helpful.
Below you will find the final source files in case you want to see how my version looks:
Just a final word before we wrap up. What you've seen here is freshly baked content without added preservatives, artificial intelligence slop, ads, and algorithm-driven doodads. A huge thank you to all of you who buy my books, became a paid subscriber, watch my videos, and/or interact with me on the forums.
Your support keeps this site going! 😇


:: Copyright KIRUPA 2026 //--