 Tutorials
Books
Videos
Forums
Tutorials
Books
Videos
Forums


This is an archived tutorial from the kirupa.com legacy collection. It covers software that may no longer be available, but it is kept online because the ideas still hold up.
Nothing really
captures the Christmas season quite as well as snow.
Probably because I spent most of my life growing up
in places where there would be no snow in December,
over the years I simulated the effect of snow falling on
the computer instead of getting to experience it in
real life. Of course, four years in Boston changed
all of that though

Anyway, simulating falling snow is pretty fun, and as you will see shortly in this tutorial, you will learn how to use Expression Blend to create a small Silverlight application that does exactly that. Below is example of what you will have created at the end:
In this and the subsequent pages, you will learn how to create the above effect from scratch.
All cool projects need to start somewhere, so let's start at the very beginning:
Launch Expression Blend 3 and create a new Silverlight 3 Application + Web Site project:

[ create a new Silverlight 3 project with an associated web site ]
For your project name, go with whatever you want. I will be naming my project FallingSnowExample and will refer to this project as such throughout this article.
Once the project
has been created, you'll see a giant white
artboard with nothing in it. Let's change
that by giving your application a dark
background color.
You can do that
by selecting LayoutRoot on your Objects and
Timeline panel and changing the Background in
your Properties Inspector:
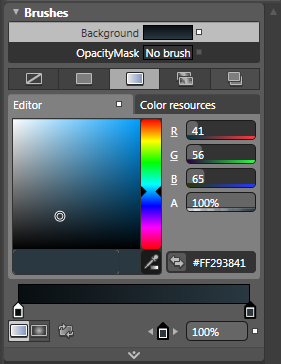
[ give your LayoutRoot a dark background color ]
Right now, your
LayoutRoot is a Grid control. While Grids are
fine layout controls, they are not great when
you want to programmatically position elements
inside them like you will be soon. For this
task, you need the real deal - you need a
Canvas.
To change your LayoutRoot from a
Grid to a Canvas, right click on LayoutRoot
from the Objects and Timeline panel, and from the
menu that appears, go to Change Layout Type |
Canvas:
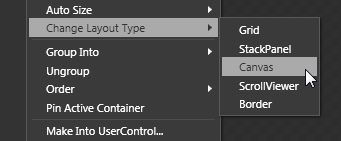
[ changing from a Grid to a Canvas to something else is pretty easy ]
After you have done this, your LayoutRoot will now proudly be a Canvas instead of a Grid.
With your
background a nice dark color and your LayoutRoot
a healthy Canvas, its time to draw some
snowflakes. For simplicity, I am going to be
using the Ellipse tool and drawing out a bunch
of white circles on our artboard. Draw a fair
number of them into your LayoutRoot, and remember, Copy and Paste is
your friend.
Here is what my stage looks
like at the end:
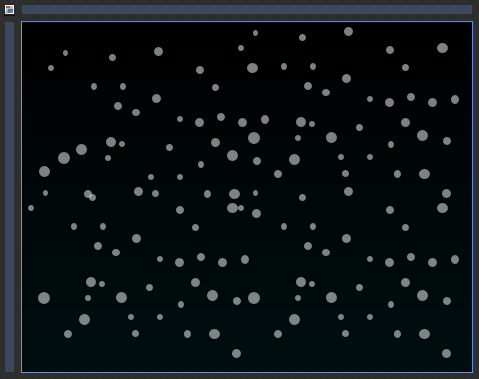
[ a ton of ellipses emulating snowflakes ]
Now that you have your snowflakes as well, the UI part of this effect is complete. What remains is creating what is known as a behavior that will animate all of these individual snowflakes for you. We'll look into that in the next section!
In the previous section, you set up your artboard and added some ellipses that will be snowflakes. Right now, nothing really happens if you test your application because no animation has been defined. We'll start to fix that on this page.
The actual effect of animating each snowflake is handled entirely by a single behavior that you place on your LayoutRoot. I'll describe behaviors in more detail shortly, but if you are itching to know more about them now itself, check out my earlier Introduction to Behaviors tutorial.
Anyway, let's look at how to create this behavior:
Look in your Projects pane and find your Silverlight Application project. It will be the one with the C# icon next to it:
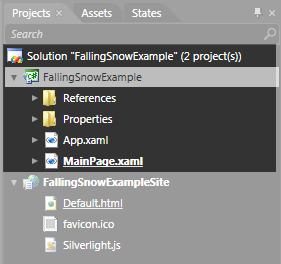
[ find the Application project ]
Right click on the Silverlight Project, called FallingSnowExample in my case, and (from the menu that appears) select Add New Item.
The New Item dialog will launch. Find the Behavior item from a list of items displayed, and give the behavior the name FallingSnowBehavior:

[ give your behavior the name FallingSnowBehavior ]
After you have given your soon-to-be-created behavior the name FallingSnowBehavior, click OK to create this behavior and to close the New Item dialog.
Right now, your FallingSnowBehavior.cs file will be open for you to edit.
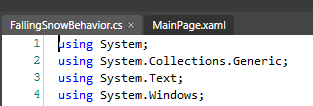
[ when you create the behavior, the C# file that makes it up will be opened ]
As you can see, this file isn't empty. It already contains some code and comments that help provide some assistance. Let's add some code to this behavior. Add the following, non-grayed out, lines to your code in the right location:
using System.Text;
using System.Windows;
using System.Windows.Controls;
using System.Windows.Data;
using System.Windows.Documents;
using System.Windows.Input;
using System.Windows.Media;
using System.Windows.Media.Imaging;
using System.Windows.Shapes;
using System.Windows.Interactivity;
//using Microsoft.Expression.Interactivity.Core;
namespace FallingSnowExample
{
  public class FallingSnowBehavior : Behavior<Canvas>
  {
  private static Random randomNumber;
  public FallingSnowBehavior()
  {
  // Insert code required on object creation below this point.
  //
  // The line of code below sets up the relationship between the command and the function
  // to call. Uncomment the below line and add a reference to Microsoft.Expression.Interactions
  // if you choose to use the commented out version of MyFunction and MyCommand instead of
  // creating your own implementation.
  //
  // The documentation will provide you with an example of a simple command implementation
  // you can use instead of using ActionCommand and referencing the Interactions assembly.
  //
  //this.MyCommand = new ActionCommand(this.MyFunction);
  }
  protected override void OnAttached()
  {
  base.OnAttached();
  randomNumber = new Random();
  this.AssociatedObject.Loaded += new RoutedEventHandler(ApplicationLoaded);
  }
  void ApplicationLoaded(object sender, RoutedEventArgs e)
  {
  foreach (FrameworkElement element in this.AssociatedObject.Children)
  {
  FrameworkElement localCopy = element;
  double yPosition = Canvas.GetTop(localCopy);
  double xPosition = Canvas.GetLeft(localCopy);
  double speed = 2*randomNumber.NextDouble();
  double counter = 0;
  double radius = 30 * speed * randomNumber.NextDouble();
  localCopy.Opacity = .2 + randomNumber.NextDouble();
  CompositionTarget.Rendering += delegate(object o, EventArgs arg)
  {
  counter += Math.PI / (180*speed);
  if (yPosition < Application.Current.RootVisual.DesiredSize.Height)
  {
  yPosition += .2 + speed;
  }
  else
  {
  yPosition = -localCopy.Height;
  }
  Canvas.SetTop(localCopy, yPosition);
  Canvas.SetLeft(localCopy, xPosition + radius * Math.Cos(counter));
  };
  }
  }
  protected override void OnDetaching()
  {
  base.OnDetaching();
  // Insert code that you would want run when the Behavior is removed from an object.
  }
  /*
  }
}
Once you have added the lines of code, build your project by going to Project | Build Project. If all of the code was inserted correctly, you should see no build warnings or errors. The most common mistake you may run into is where you forget to change from Behavior<DependencyObject> to Behavior<Canvas> in the class declaration or omit the randomNumber Random object.
You are still not fully done yet. This behavior doesn't actually affect anything just yet, so let's fix that in the next section.
In the previous section, you added the FallingSnow behavior that does the magic needed to animate the snowflakes you added earlier. Unfortunately, it doesn't do that just yet, for there is one vital step that is missing - actually adding the behavior.
To add the behavior, go back to MainPage.xaml and make sure your artboard with the snowflakes is visible. Looks in your Assets panel at click on the Behaviors node:
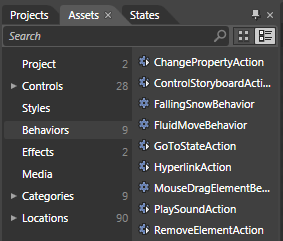
[ click on the Behaviors node in the Assets Library ]
Notice that one of the behaviors you see there is called FallingSnowBehavior! If you don't see it, be sure to build your project from the Project menu or press Ctrl + Shift + B.
Select the FallingSnowBehavior entry and drag-n-drop it onto your LayoutRoot directly on the artboard or via the Objects and Timeline panel:
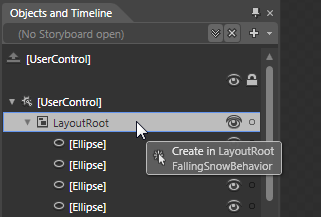
[ drag and drop the behavior into your LayoutRoot ]
After you have dragged and dropped this behavior onto your LayoutRoot, press F5 or go to Project | Run to run your application. If the stars and planets are aligned just right, and they should be right now, you will find your snowflakes happily falling to the ground!
Take a break. Relax. Play a fun little game of Demolition City.
Ok, let's continue. While you have a working version of the falling snow effect right now, we aren't quite done with this tutorial. A large part of what you did involved simply copying and pasting some code and dragging and dropping something in Blend without me providing any information on how everything fits in.
In a nutshell, here is our original problem - there are a lot of snowflakes that currently live inside a container that need to be animated to simulate falling snow.
There are a handful of ways you can accomplish that. One way that was presented to you in this tutorial is by using a behavior that you attach to your container itself, and this behavior contains everything needed to go through each snowflake and animate it. I describe behaviors in greater detail in my Introduction to Behaviors tutorial, but to summarize, a behavior is nothing more than some code you attach to an element.
Once a behavior is attached to the element, it has full freedom to manipulate the element and access any of its properties at will. It's beautifully parasitic when you think about it. The FallingSnowBehavior is designed to only work on a container/layout panel, and all layout panels have the ability to give you access to all of its children. The children in our case are the snowflakes that live inside it.
Our behavior, when it attaches to this layout panel (named LayoutRoot), instantly starts to go through its children and begins to perform the magic needed to make each snowflake fall. This magic is defined in code, so brace yourself - I'm going to explain how the code works.
All of the code we care about lives in FallingSnowBehavior.cs, so be sure to have it opened and let's get started:
public class FallingSnowBehavior : Behavior<Canvas>With behaviors, while they can be placed on any DependencyObject (a fancy word for a whole lotta things), you can be more specific and constrain them to only be applicable to certain types of elements. In our case, we only want the behavior to work on layout panels that are Canvasses, so I specify Canvas here.
In case didn't notice this the first time through, if you go back to MainPage.xaml, notice that you can't actually drop your dragged FallingSnowBehavior behavior from the Asset library onto anything besides LayoutRoot, our Canvas. This line is what specifies that constraint.
private static Random randomNumber;This line is fairly straightforward. I am declaring a static Random object called randomNumber. This will be used to generate the random values that each snowflake will have to give it (mostly) unique speed and radius.
protected override void OnAttached()
{
  base.OnAttached();
  randomNumber = new Random();
  this.AssociatedObject.Loaded += new RoutedEventHandler(ApplicationLoaded);
}
Every behavior will have this OnAttached method, and this method gets called when the behavior is properly hooked up to a parent and ready to go. Think of it as an official entry point for any code that you want to have excecuted.
Inside this method, the two lines you added are:
randomNumber = new Random();
this.AssociatedObject.Loaded += new RoutedEventHandler(ApplicationLoaded);
The first line initializes the randomNumber object you declared earlier. The second line is a bit more interesting.
When applications in Silverlight and WPF are run, a large amount of things are turned on inside the application. Not everything gets turned on at the same time, and you may run into cases where one part of your app is kicking and ready to go while another part that it depends on is still asleep. In these cases, your application will probably crash.
One way of avoiding this is to ensure that you only execute when everything has fully been loaded and turned on. That is handled by the Loaded event that I attach to the behavior's parent - known to friends as this.AssociatedObject. The behavior's parent in this case is actually our friendly Canvas called LayoutRoot.
As with most events, it needs to be associated with an event handler that will fire when the event fire. This Loaded event is no different, and it is associated with the ApplicationLoaded event handler that I will describe...in the next section!
In the previous section, you added your behavior to your LayoutRoot and were able to see the falling snow effect for yourself. We started diving into the code to better understand how everything works, and let's continue where we left off on this page.
Next up is the ApplicationLoaded method (event handler to be precise) that is responsible for creating the animation:
void ApplicationLoaded(object sender, RoutedEventArgs e)
{
  foreach (FrameworkElement element in this.AssociatedObject.Children)
  {
  FrameworkElement localCopy = element;
  double yPosition = Canvas.GetTop(localCopy);
  double xPosition = Canvas.GetLeft(localCopy);
  double speed = 2*randomNumber.NextDouble();
  double counter = 0;
  double radius = 30 * speed * randomNumber.NextDouble();
  localCopy.Opacity = .2 + randomNumber.NextDouble();
  CompositionTarget.Rendering += delegate(object o, EventArgs arg)
  {
  counter += Math.PI / (180*speed);
  if (yPosition < Application.Current.RootVisual.DesiredSize.Height)
  {
  yPosition += .2 + speed;
  }
  else
  {
  yPosition = -localCopy.Height;
  }
  Canvas.SetTop(localCopy, yPosition);
  Canvas.SetLeft(localCopy, xPosition + radius * Math.Cos(counter));
  };
  }
}
As methods in this tutorial go, this is a bit on the large side so let's look at bits and pieces of it in greater detail starting with the loop that goes through each of the children:
foreach (FrameworkElement element in this.AssociatedObject.Children)What this loop is doing is going through each of the children our AssociatedObject has. If you recall, our AssociatedObject is a Canvas, and all of your snowflakes are contained inside it:
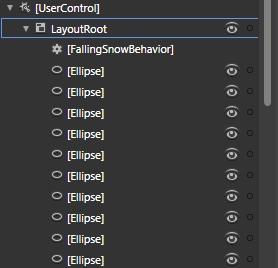
[ the behavior is attached to LayoutRoot, or AssociatedObject ]
Each child, a snowflake, is referenced by the element variable that I declare as a FrameworkElement inside the loop itself. All of the code you will see will run once for each element, so if you have a lot of snowflakes, just be glad that you aren't the one having to do all of this heavy lifting.
FrameworkElement localCopy = element;Inside the foreach loop, the first thing I do is create a new copy of the reference to child element. You'll see why this is important in a little bit.
double yPosition = Canvas.GetTop(localCopy);
double xPosition = Canvas.GetLeft(localCopy);
double speed = 2*randomNumber.NextDouble();
double counter = 0;
double radius = 30 * speed * randomNumber.NextDouble();
localCopy.Opacity = .2 + randomNumber.NextDouble();
In the next few lines of code, I am declaring and initializing some variables that will help set some properties on the snowflake as its falls.
In the first two lines, yPosition and xPosition get the current location of my snowflake using Canvas's GetTop and GetLeft methods.
The speed and radius variables use the randomNumber variable you initialized earlier to define the speed with which the snowflakes fall and how wide the radius of their oscillation will be.
In the last line, I set the Opacity of my snowflake to be something random. This is what gives your snowflakes a semi-transparent look when you are running it.
All of this sets us up for the next section of code that actually creates the animation loop:
CompositionTarget.Rendering += delegate(object o, EventArgs arg)
{
  counter += Math.PI / (180*speed);
  if (yPosition < Application.Current.RootVisual.DesiredSize.Height)
  {
  yPosition += .2 + speed;
  }
  else
  {
  yPosition = -localCopy.Height;
  }
  Canvas.SetTop(localCopy, yPosition);
  Canvas.SetLeft(localCopy, xPosition + radius * Math.Cos(counter));
};
I spoke about CompositionTarget.Rendering in my earlier Creating Killer Animations in Code tutorial, but I will summarize the interesting details that you will need to understand how this fits in with the overall falling snow effect.
The Rendering event is the equivalent of a loop that just keeps going each time your screen refreshes. Becase this loop doesn't block the UI, you can safely specify any animation-related changes here and not have to worry about whether the resulting animation will look smooth and fluid.
There is one critical detail that I employ in this use of the Rendering event. Notice that my event handler is explicitly a delegate, and since it this is all inside my foreach loop, each snowflake will be getting a copy of this delegate so that you have individual control over each snowflake despite dealing with an event that exists application wide.
If you are familiar with Flash, this is as close as you can get to emulating the enterFrame/onEnterFrame event.
All of the code inside the Rendering event, like I mentioned earlier, will fire each time the screen refreshes. On most machines, that is 60 times a second, but your computer may have a higher or lower refresh that alters this a little bit. What I am trying to say is that any code will get called many times a second. Thererfore, any type of incrementing or decrementing I do needs to be sufficiently small so that the changes, in aggregate over a second, are reasonable.
Speaking of incremting, the first thing I do inside the delegate for the Rendering event is increment my counter value:
counter += Math.PI / (180*speed);The counter value is incremented ever so slightly each tick. and you'll see shortly why it is being incremented as slowly as it is.
if (yPosition < Application.Current.RootVisual.DesiredSize.Height)
{
  yPosition += .2 + speed;
}
else
{
  yPosition = -localCopy.Height;
}
This chunk of code here is what is responsible for defining the current position of the snowflake as it falls. First, I check to see if the snowflake is still visible by comparing my current position with the total height of the application's viewing area.
If the snowflake is still visible, I incremeent the yPosition variable slightly:
yPosition += .2 + speed;If the snowflake is about to hit the edge, I kick it back to the top where it can continue its looping:
yPosition = -localCopy.Height;Changing just the variable that represents position doesn't actually do much, but we fix that right up....
Canvas.SetTop(localCopy, yPosition);
Canvas.SetLeft(localCopy, xPosition + radius * Math.Cos(counter));
All of the previous lines of code were basically the setup to the two lines you see here. In these two lines, the updated x and y positions for your snowflakes are used to actually change the position of your snowflake.
This should be pretty straightforward. I simply set the Top and Left properties on my Canvas to the variables I've been fiddling with. Just to call one thing out, the oscillation each snowflake experiences is caused by the Math.cos(counter) code that I pass in to the Canvas.SetLeft method.
Before we call it a day, notice what I am using as the target element the for SetTop and SetLeft method. It isn't the element variable that you see as part of your foreach loop. Instead, it is is localCopy - which is basically the exact same thing as your element....except it isn't. When it comes to delegates and anonymous methods, variable scoping doesn't work as you would expect.
If I just passed in the element variable, all of the code would affect just the last snowflake. By creating another copy of the variable in the form of localCopy, each time the loop runs and another delegate is created, that delegate gets its own copy of the element variable. This ensures that each delegate affects the appropriate element instead of being overwritten everytime until the last element is left standing.
And with that, you are done with this tutorial on how to create falling snow. While I kinda call this the faling snow technique, there is nothing about this that limits its use only for simulating snow particles. You can make all the tweaks to the speed and radius that you want, and you can even change the eillipses to something else and the code will adapt well.
Anyway, below you will find the source files for the version of the falling snow example I described over the past four pages:
Just a final word before we wrap up. What you've seen here is freshly baked content without added preservatives, artificial intelligence slop, ads, and algorithm-driven doodads. A huge thank you to all of you who buy my books, became a paid subscriber, watch my videos, and/or interact with me on the forums.
Your support keeps this site going! 😇


:: Copyright KIRUPA 2026 //--