 Tutorials
Books
Videos
Forums
Tutorials
Books
Videos
Forums


In the previous article, we took our first major look at working with grids. We learned how to move an element around and keep the movement constrained to the grid's boundaries. In this article, we are going to go one step further. We are going to get into the fun world of collision detection where our movement will be constrained by obstacles in the grid's path.
The best part is that we are going to build upon everything we learned and even retain our propose, validate, and commit heuristic with only a few minor tweaks. Zorb is definitely in for an adventure.
Onwards!
Before we get all into it, let's play with the finished example first. Zorb is back at (4, 4), but his world now contains rocks:
Try moving Zorb around just like before by using the arrow keys or WASD on a desktop. On a touch device, swipe across the grid or use the direction buttons.
You can also open our obstacle example in its own window!
A lot of the movement will be familiar to us from earlier, including not being able to leave the boundaries of our grid. What is new is that we now have obstacles inside the grid that Zorb can't go through. Try moving Zorb through a rock. You can't. The rock is an obstacle that you can only move around but not through.
In the following sections, we'll learn more about how to detect obstacles within our grid and ensure Zorb isn't able to go through them. We are going to get a bit into the fun world of collision detection.
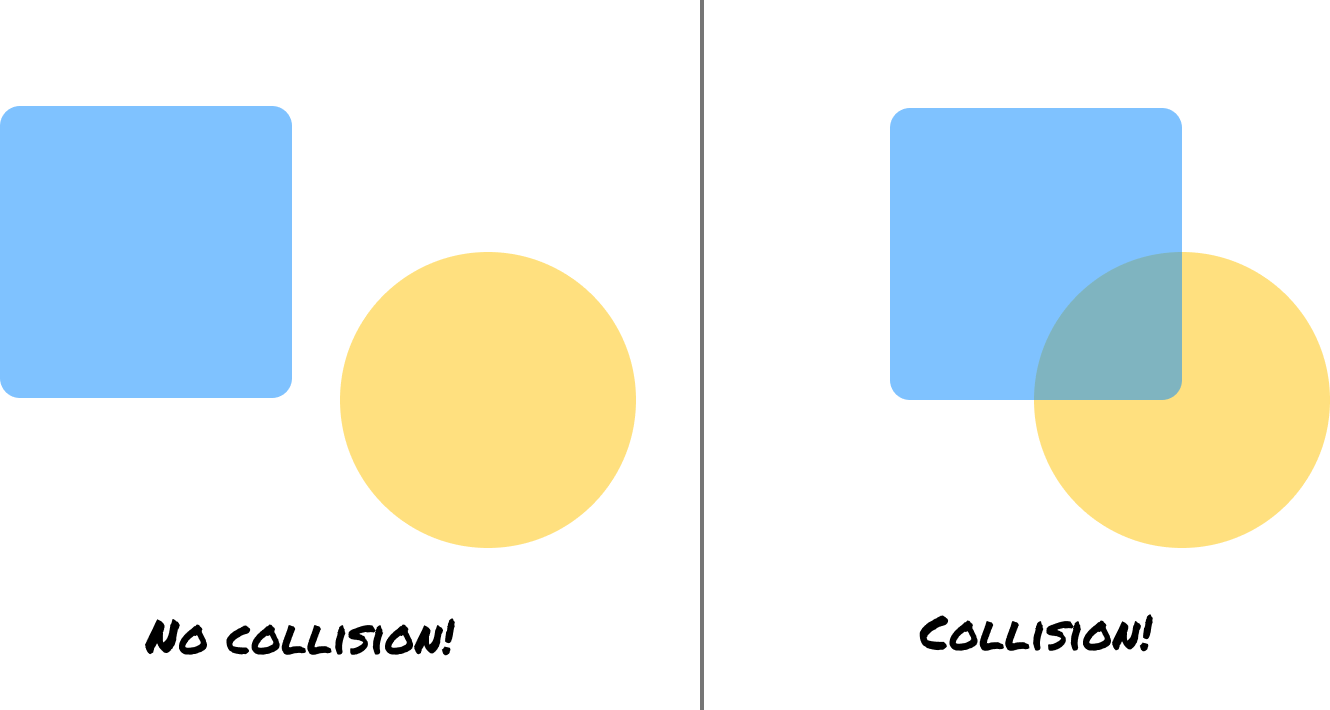
The textbook definition of collision detection is when two or more objects in a two-dimensional plane overlap or intersect:
This is not to be mistaken with Collison detection. Collison detection is an advanced algorithm that can detect Stripe Cofounders Patrick or John Collison in any static visual or moving scene (image source):
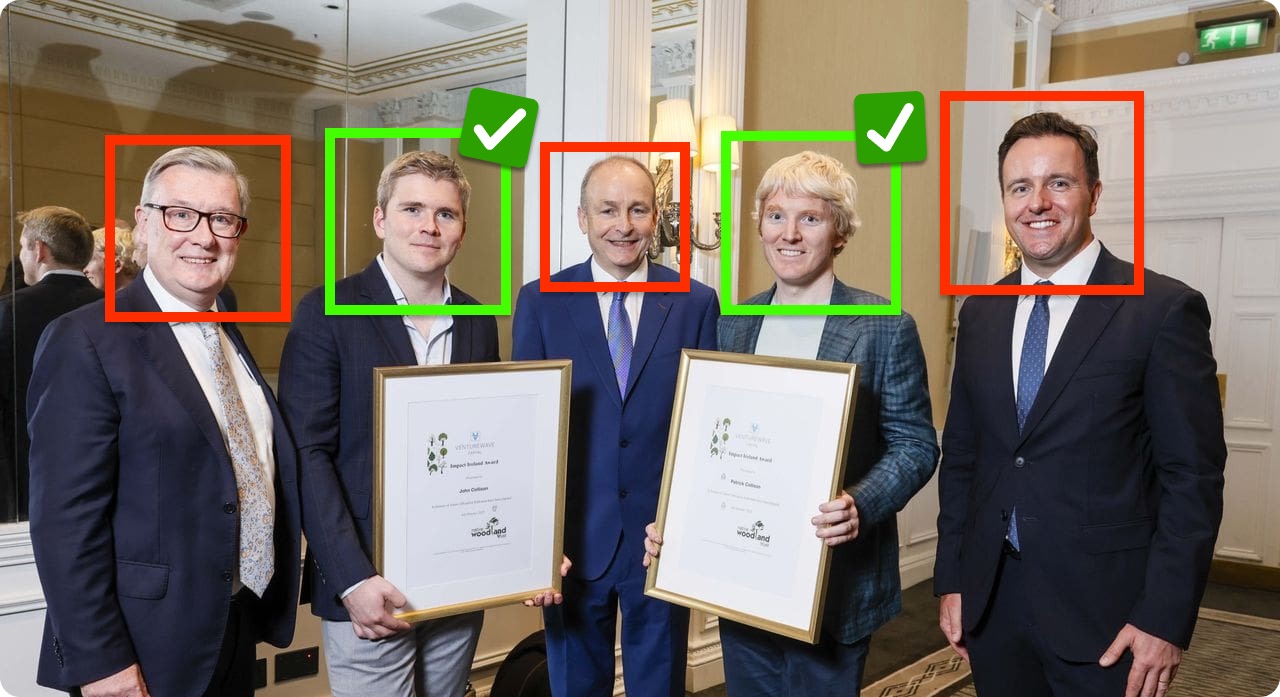
Aren't you glad you are learning serious topics here and not on some other resource?
When we had Zorb moving around our grid initially, the entire grid was wide open. The only place he couldn't move through was an area outside of the grid itself. By adding obstacles like the rocks into our grid, we added an extra constraint that we need to handle.
The way we handle it is by modifying our logic for evaluating each candidate cell. If you remember from earlier, the candidate cell is the cell we intend to move to but haven't actually committed to moving to yet.
As part of evaluating each candidate cell, we now ask ourselves the following additional question:
Is the candidate cell already occupied by something Zorb can't move through?
The reason we ask this question is that a cell can now exist within our boundary and still be off-limits. For example, take a look at the following 5-by-5 grid:
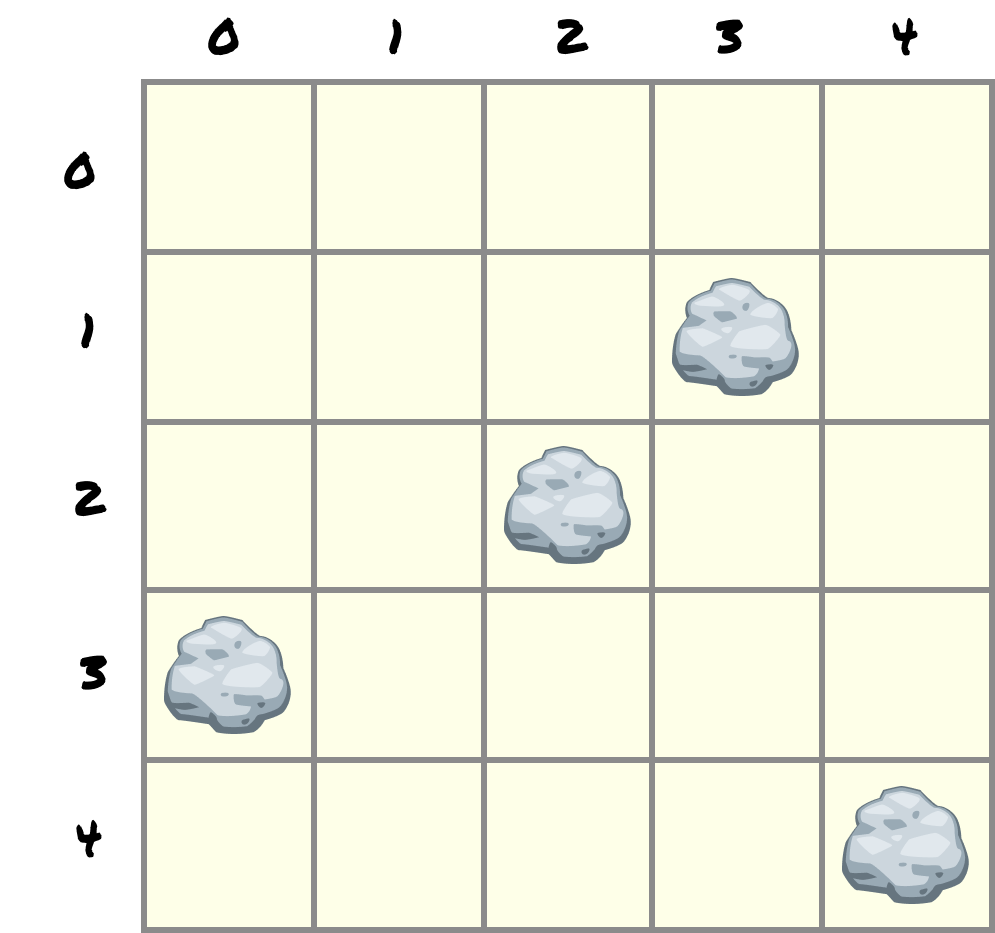
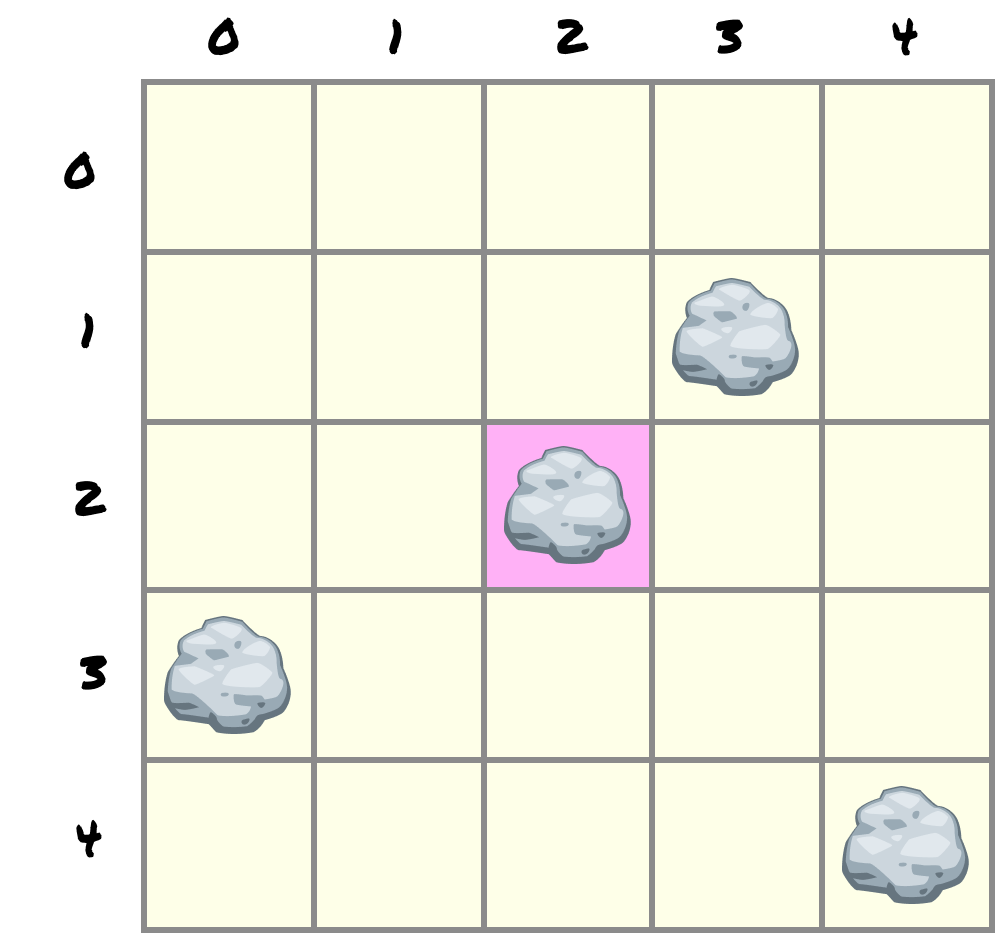
Let's take the position (2, 2). This position is safely within our grid, so it passes our boundary check. But, this position does happen to contain a rock. This means Zorb still can't enter it:
This gives every requested move two possible collision checks:
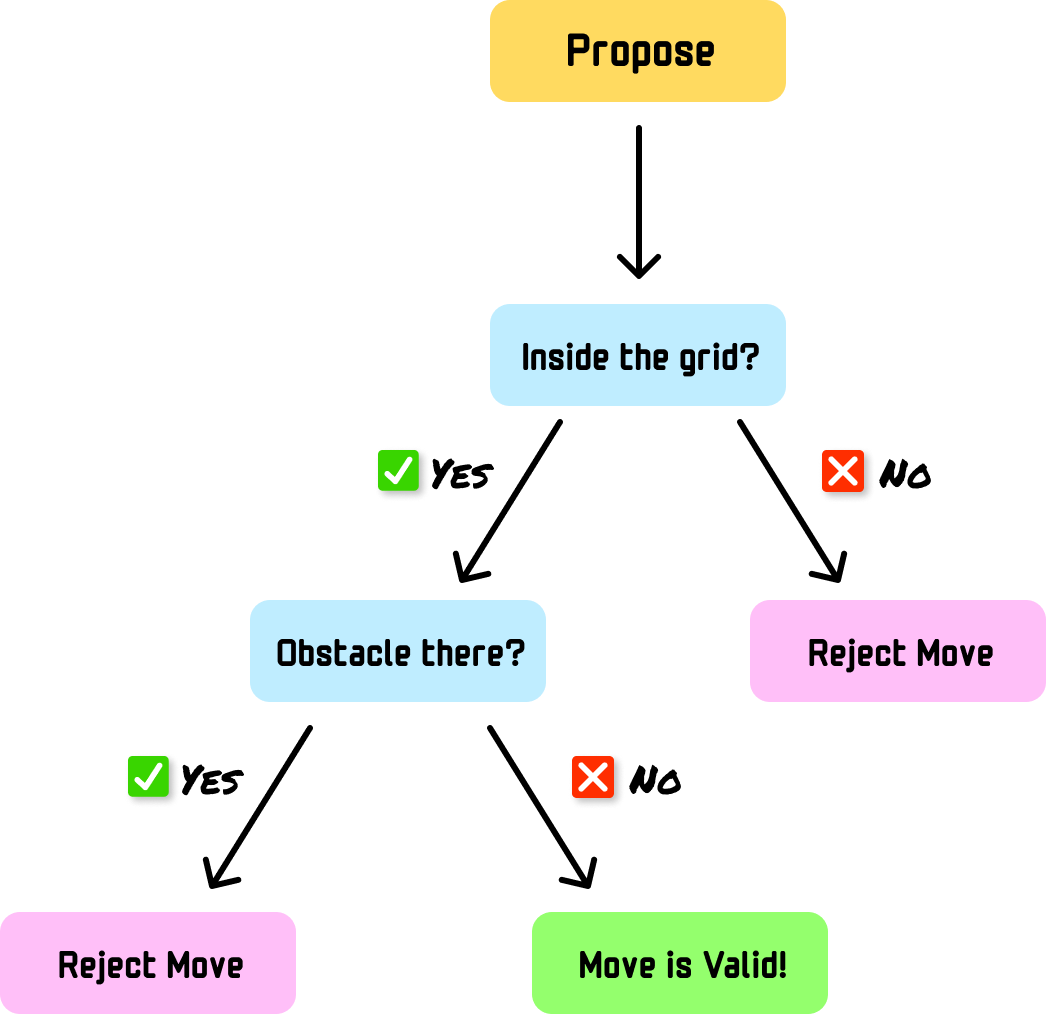
If either check returns an invalid move, we reject the candidate and leave Zorb's current position untouched. This entire sequence can be visualized as follows:
Getting back to our grid, suppose Zorb is standing at (2, 1) and we ask him to move right:
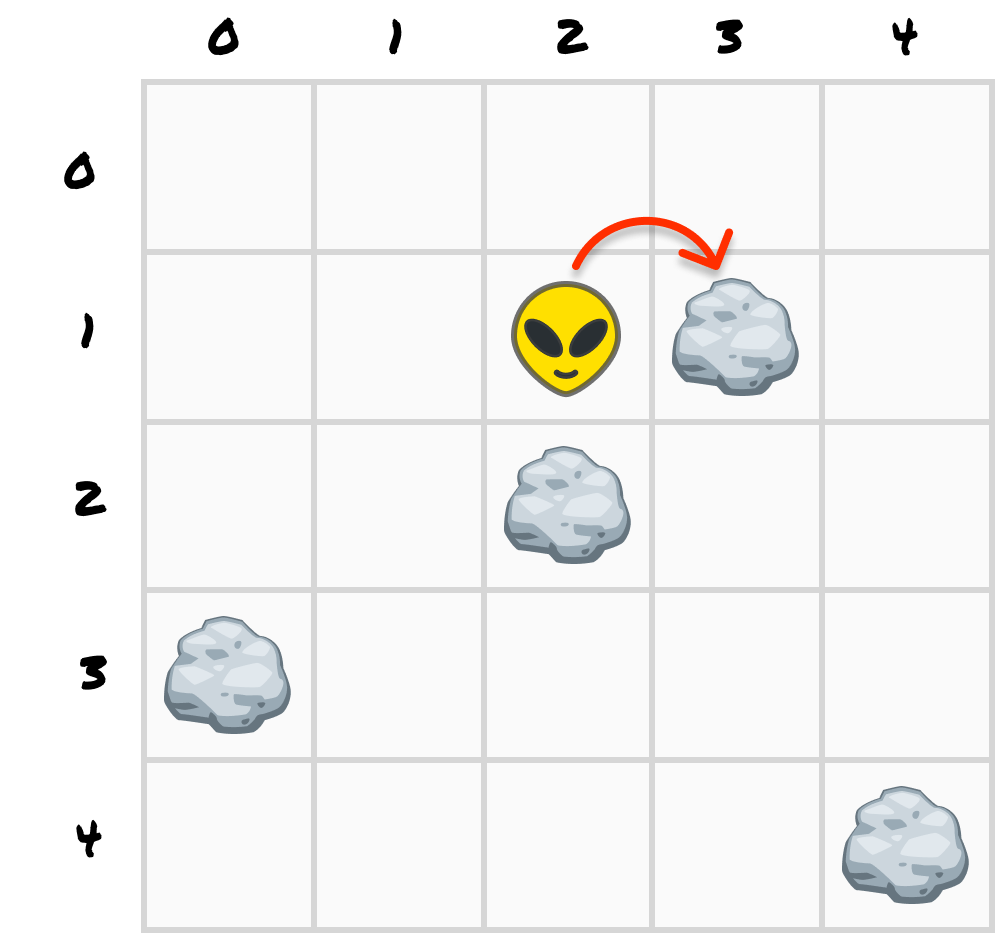
The right offset is [1, 0], so our existing movement math proposes (3, 1) as Zorb's new position:
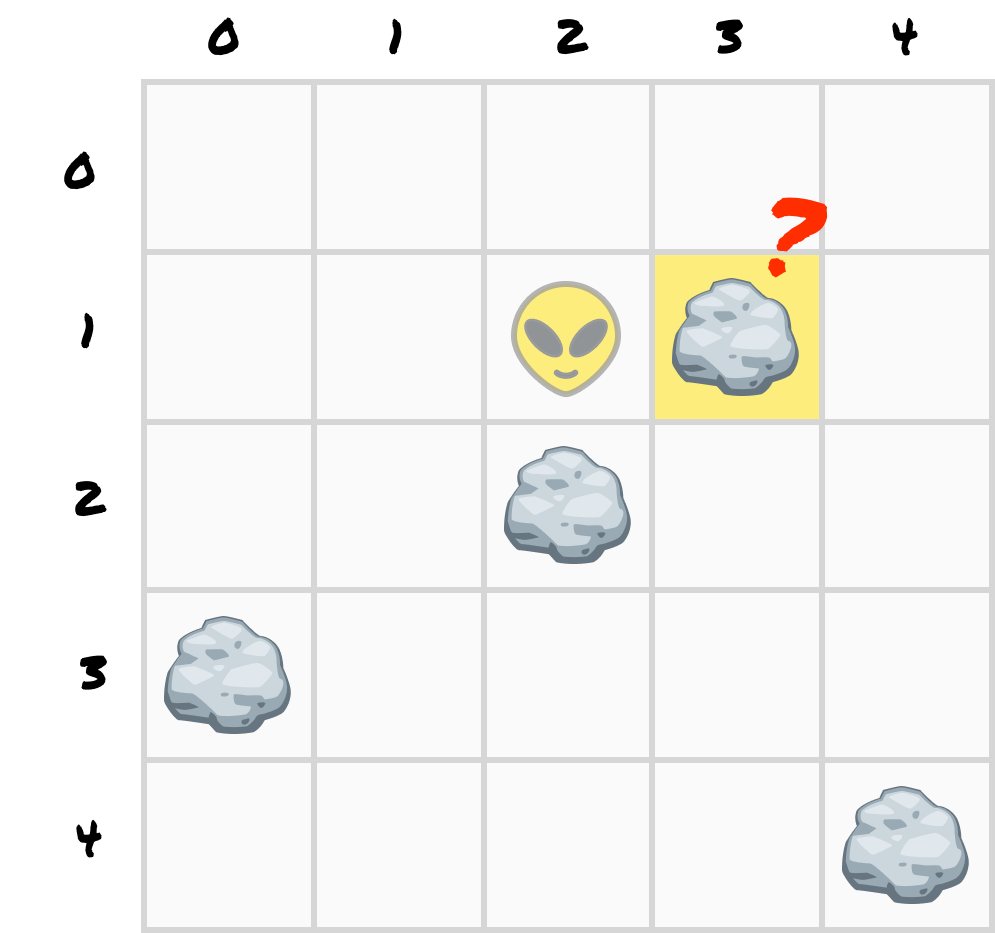
This is just a candidate position, so we haven't actually moved Zorb yet. We are just inspecting the destination to see if it can be a valid move or not.
When we do our collision checks, the boundary check answers true because (3, 1) exists within our grid. Our new obstacle check answers true because a rock occupies it. Because that second check stops the move, our candidate position is rejected.
Now that we have seen how to detect obstacles inside our grid, let's get into the implementation a bit and talk about how we will want to represent obstacles in the first place. Put differently, our code needs to know where the obstacles are.
The approach we will take is one where we store each rock's coordinate in a Set:
const obstacles = new Set([
  "1,1", "2,1", "3,1",
  "5,4",
  "1,5", "2,5", "3,5"
]);
Each coordinate becomes a string with the horizontal position first and the vertical position second. The rock at (5, 4) is stored as "5,4".
Why use a Set? We repeatedly need to ask one yes-or-no question:
Does this exact coordinate appear in our obstacle collection?
A Set is built for that kind of membership check. It also prevents duplicate coordinates from creating duplicate obstacles. You can learn more about sets in my Diving into Sets article.
It may seem strange to use a string to represent numerical coordinates. To simplify our detection logic and not worry about strings, we will hide the string formatting inside a small helper:
function isObstacle(x, y) {
  return obstacles.has(`${x},${y}`);
}
The rest of our movement code can work with normal x and y values. It doesn't need to care how the obstacle collection stores them.
We are going to build directly on the final example from the earlier boundary tutorial. If you already completed that version, make a copy of your file and keep going. Otherwise, create a new file named grid_movement_obstacles.htm and add the following starter code:
<!doctype html>
<html lang="en">
<head>
<meta charset="utf-8">
<meta name="viewport" content="width=device-width, initial-scale=1">
<title>Zorb's Obstacle Course</title>
<link rel="stylesheet" href="https://www.kirupa.com/css/grid_movement_obstacles.css?v=20260826-1">
</head>
<body>
<main class="demo">
<h1>Move Zorb</h1>
<div
id="grid"
class="grid"
role="grid"
tabindex="0"
aria-label="10 by 10 movement grid with rock obstacles"
></div>
<p id="status" class="status" role="status" aria-live="polite">
Zorb starts at (4, 4). Watch out for the rocks!
</p>
<div class="controls">
<div class="dpad" role="group" aria-label="Direction controls">
<button class="move-button" type="button"
data-direction="up" aria-label="Move up">↑</button>
<button class="move-button" type="button"
data-direction="left" aria-label="Move left">←</button>
<button class="move-button" type="button"
data-direction="down" aria-label="Move down">↓</button>
<button class="move-button" type="button"
data-direction="right" aria-label="Move right">→</button>
</div>
<button id="reset" class="reset-button" type="button">Reset</button>
</div>
</main>
<script>
const rows = 10;
const cols = 10;
const start = {
x: 4,
y: 4
};
const player = { ...start };
const DIRECTIONS = {
up: [0, -1],
down: [0, 1],
left: [-1, 0],
right: [1, 0]
};
const KEY_TO_DIRECTION = {
ArrowUp: "up",
KeyW: "up",
ArrowDown: "down",
KeyS: "down",
ArrowLeft: "left",
KeyA: "left",
ArrowRight: "right",
KeyD: "right"
};
const gridElement = document.querySelector("#grid");
const statusElement = document.querySelector("#status");
const resetButton = document.querySelector("#reset");
const cells = [];
let swipeStart = null;
for (let y = 0; y < rows; y += 1) {
const rowElement = document.createElement("div");
rowElement.className = "grid-row";
rowElement.setAttribute("role", "row");
for (let x = 0; x < cols; x += 1) {
const cell = document.createElement("div");
cell.className = "cell";
cell.setAttribute("role", "gridcell");
rowElement.append(cell);
cells.push(cell);
}
gridElement.append(rowElement);
}
function render() {
for (let y = 0; y < rows; y += 1) {
for (let x = 0; x < cols; x += 1) {
const cell = cells[y * cols + x];
const isPlayer = x === player.x && y === player.y;
cell.classList.toggle("player", isPlayer);
cell.setAttribute(
"aria-label",
`Column ${x}, row ${y}${isPlayer ? ", Zorb" : ""}`
);
}
}
}
function inBounds(x, y) {
return x >= 0 && x < cols &&
y >= 0 && y < rows;
}
function tryMove(direction) {
const [xOffset, yOffset] = DIRECTIONS[direction];
const nextX = player.x + xOffset;
const nextY = player.y + yOffset;
if (!inBounds(nextX, nextY)) {
statusElement.textContent =
`The ${direction} edge blocked that move. Zorb stays at (${player.x}, ${player.y}).`;
statusElement.classList.add("blocked");
return false;
}
player.x = nextX;
player.y = nextY;
render();
statusElement.textContent =
`Zorb moved ${direction} to (${player.x}, ${player.y}).`;
statusElement.classList.remove("blocked");
return true;
}
document.querySelectorAll("[data-direction]").forEach((button) => {
button.addEventListener("click", () => {
tryMove(button.dataset.direction);
});
});
window.addEventListener("keydown", (event) => {
const direction = KEY_TO_DIRECTION[event.code];
if (!direction) {
return;
}
event.preventDefault();
tryMove(direction);
});
gridElement.addEventListener("pointerdown", (event) => {
if (event.pointerType === "mouse" && event.button !== 0) {
return;
}
swipeStart = {
id: event.pointerId,
x: event.clientX,
y: event.clientY
};
gridElement.setPointerCapture(event.pointerId);
});
gridElement.addEventListener("pointerup", (event) => {
if (!swipeStart || swipeStart.id !== event.pointerId) {
return;
}
const deltaX = event.clientX - swipeStart.x;
const deltaY = event.clientY - swipeStart.y;
swipeStart = null;
if (Math.max(Math.abs(deltaX), Math.abs(deltaY)) < 24) {
return;
}
if (Math.abs(deltaX) > Math.abs(deltaY)) {
tryMove(deltaX > 0 ? "right" : "left");
} else {
tryMove(deltaY > 0 ? "down" : "up");
}
});
gridElement.addEventListener("pointercancel", () => {
swipeStart = null;
});
resetButton.addEventListener("click", () => {
player.x = start.x;
player.y = start.y;
render();
statusElement.textContent =
"Zorb is back at (4, 4). Watch out for the rocks!";
statusElement.classList.remove("blocked");
gridElement.focus();
});
render();
</script>
</body>
</html>This is our earlier finished example with one small setup change: it links to the obstacle version of the stylesheet. The movement logic still knows only about boundaries, so the page begins as an empty grid.
Save the file and open it in your browser. Zorb should move exactly as he did before. He can reach every cell inside the grid, and the four outer edges block him.
Our first code change describes where the rocks live. Add this obstacles set immediately after the player object and before DIRECTIONS:
const start = {
  x: 4,
  y: 4
};
const player = { ...start };

const obstacles = new Set([
  "1,1", "2,1", "3,1", "6,1", "7,1", "8,1",
  "3,2", "8,2",
  "0,3", "1,3", "3,3", "5,3", "6,3", "8,3",
  "5,4",
  "1,5", "2,5", "3,5", "5,5", "7,5", "8,5",
  "3,6", "7,6",
  "1,7", "5,7", "7,7",
  "1,8", "2,8", "3,8", "5,8"
]);

const DIRECTIONS = {
  up: [0, -1],
  down: [0, 1],
  left: [-1, 0],
  right: [1, 0]
};
Each item follows our (x, y) convention. For example, "1,3" is the second column and fourth row from the top. We intentionally leave "4,4" out because that is Zorb's starting cell.
Save and refresh the page. Nothing will look different yet. We have described the rocks, but our rendering code doesn't read that description.
Add the following isObstacle helper immediately after inBounds:
function inBounds(x, y) {
  return x >= 0 && x < cols &&
         y >= 0 && y < rows;
}

function isObstacle(x, y) {
  return obstacles.has(`${x},${y}`);
}

function tryMove(direction) {
  // ...
}
The template literal turns two coordinate values into the same string format used by our Set. Calling isObstacle(5, 4) checks for "5,4" and returns true. Calling isObstacle(4, 4) returns false.
Try both calls in your browser's developer console:
isObstacle(5, 4); // true
isObstacle(4, 4); // false
At this point our code can answer whether a cell contains a rock. The next step is making those rocks visible.
So far, all of our obstacles have been in memory. We can't actually see them, but we are going to fix that right now. Find the render function. Add the hasObstacle and description variables, toggle the new obstacle class, and use the description when setting each cell's accessible label:
function render() {
  for (let y = 0; y < rows; y += 1) {
    for (let x = 0; x < cols; x += 1) {
      const cell = cells[y * cols + x];
      const isPlayer = x === player.x && y === player.y;
      const hasObstacle = isObstacle(x, y);
      const description = isPlayer
        ? ", Zorb"
        : hasObstacle
          ? ", rock obstacle"
          : "";

      cell.classList.toggle("obstacle", hasObstacle);
      cell.classList.toggle("player", isPlayer);
      cell.setAttribute(
        "aria-label",
        `Column ${x}, row ${y}${description}`
      );
    }
  }
}
The stylesheet already knows how to draw a rock whenever a cell has the obstacle class. We also include each rock in the cell's aria-label, so the obstacle map isn't purely visual.
Save and refresh. The rocks should appear, and your page should now look like this:
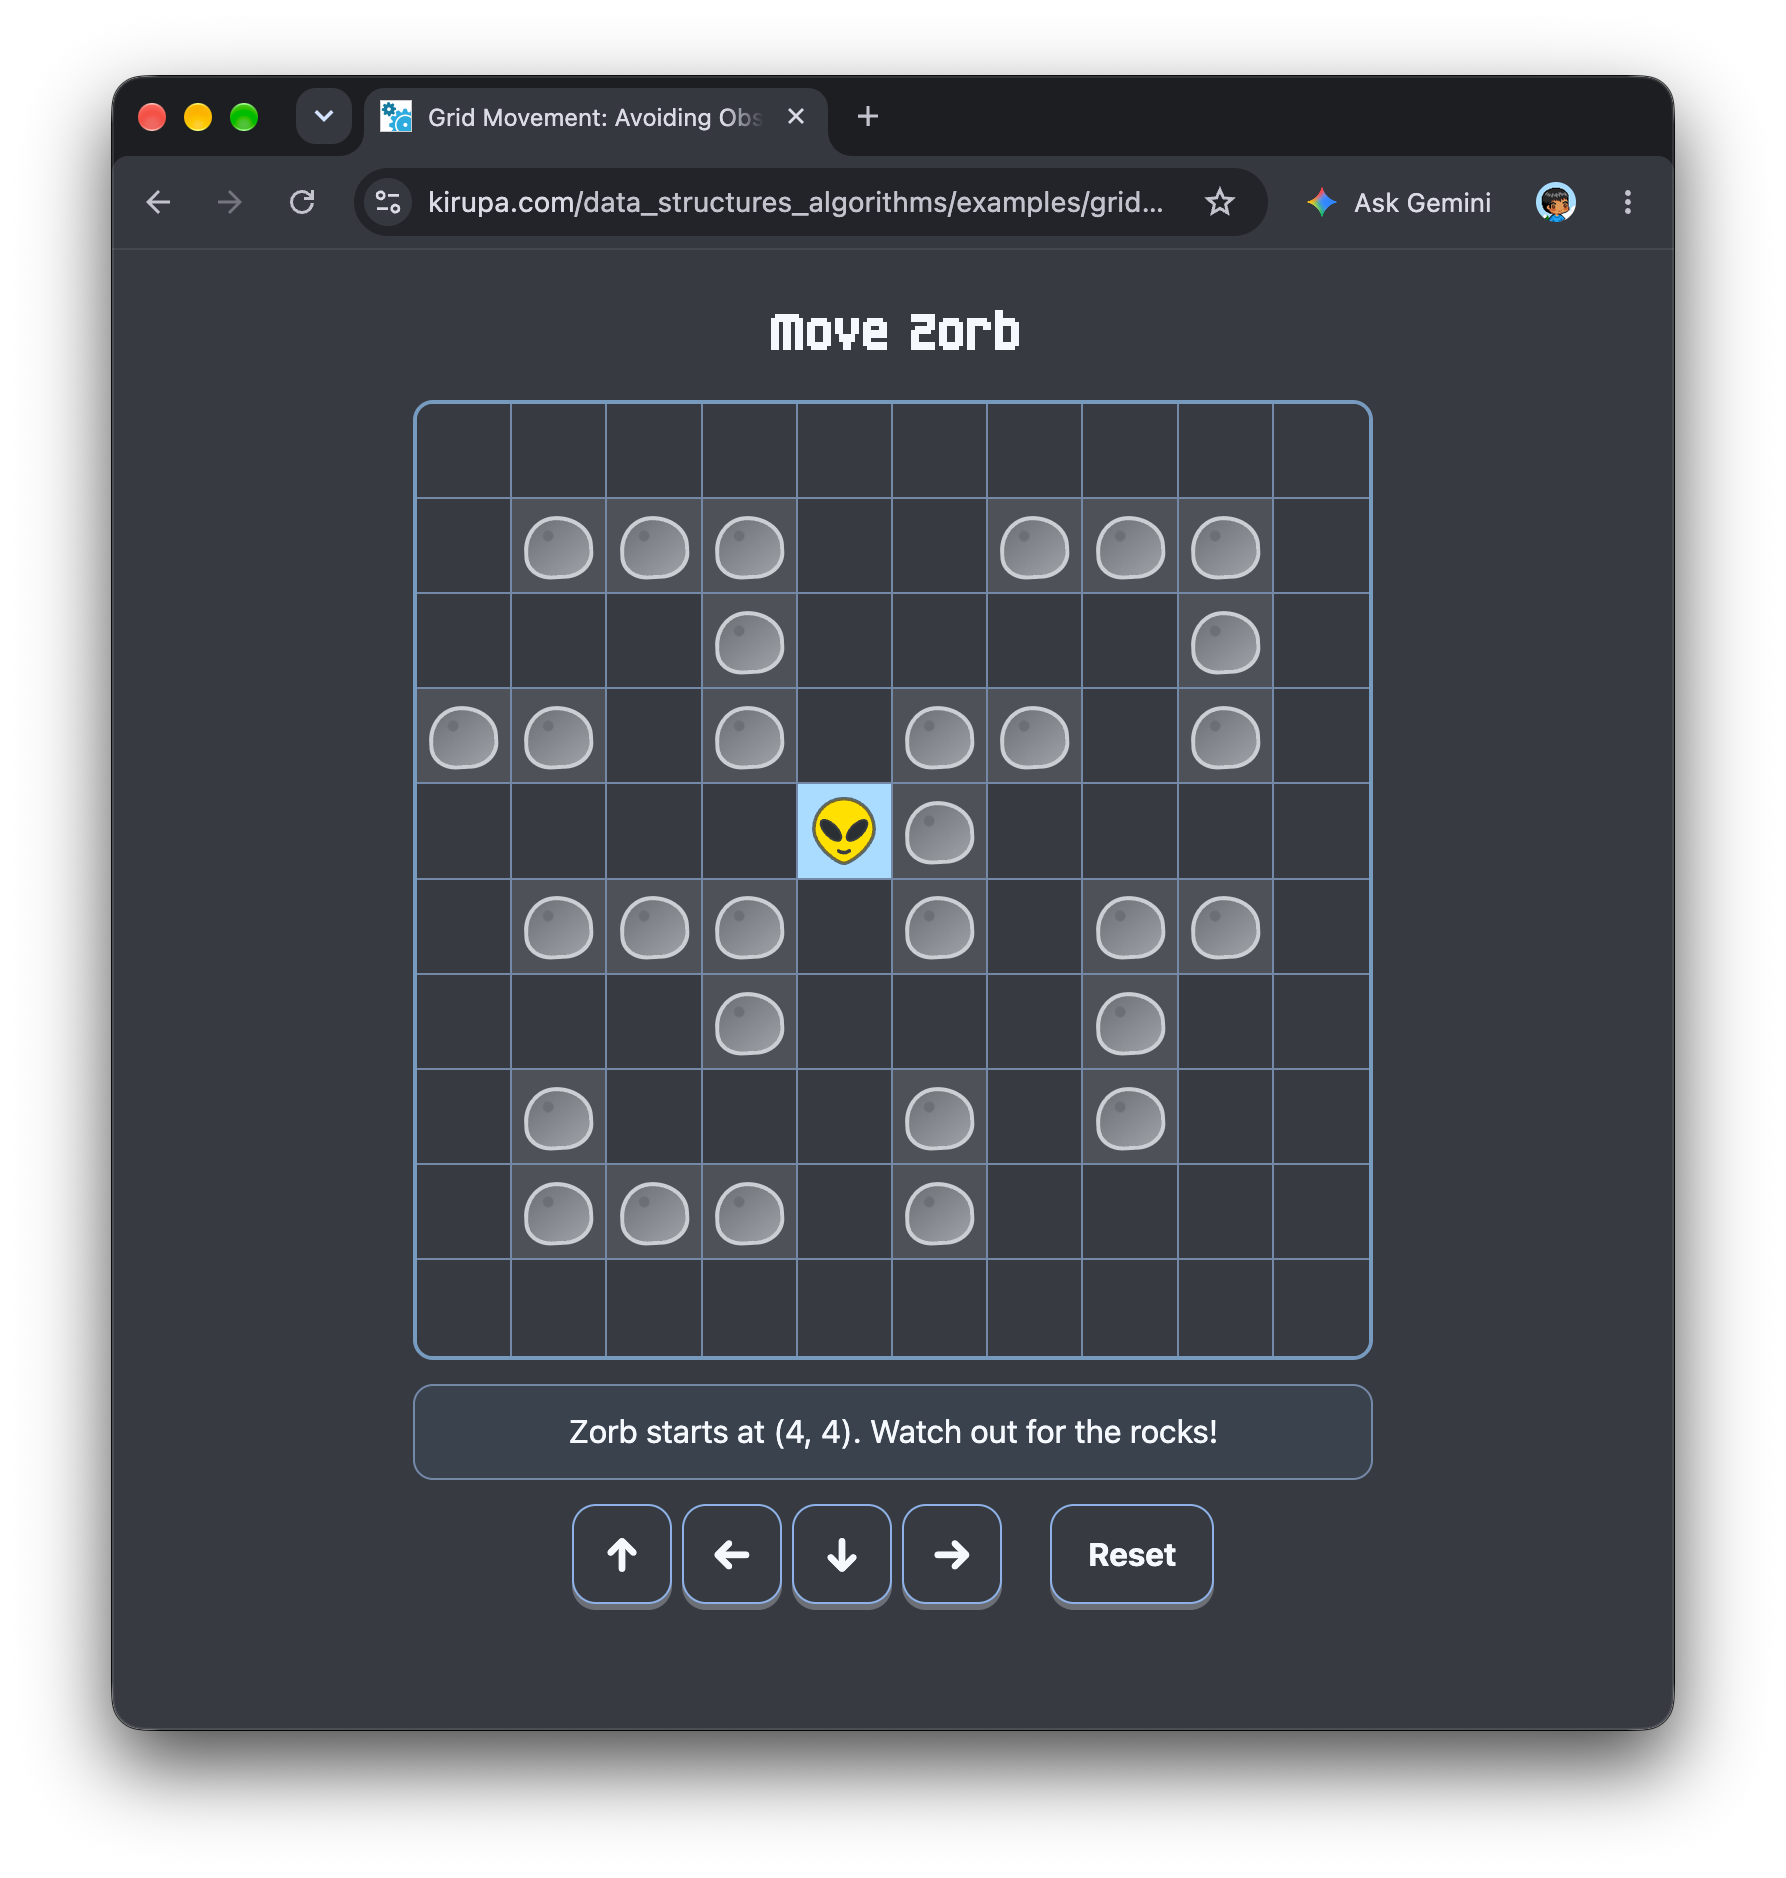
Now do something wrong on purpose. Move Zorb right into the rock at (5, 4). He will walk straight through it. While we are rendering the obstacle, we haven't connected that obstacle data to our movement rules that contain the collision detection logic.
We have arrived at the collision check itself. Inside tryMove, add the following block after the boundary check and before we update player.x and player.y:
function tryMove(direction) {
  const [xOffset, yOffset] = DIRECTIONS[direction];
  const nextX = player.x + xOffset;
  const nextY = player.y + yOffset;

  if (!inBounds(nextX, nextY)) {
    statusElement.textContent =
      `The ${direction} edge blocked that move. Zorb stays at (${player.x}, ${player.y}).`;
    statusElement.classList.add("blocked");
    return false;
  }

  if (isObstacle(nextX, nextY)) {
    statusElement.textContent =
      `A rock at (${nextX}, ${nextY}) blocked that move. Zorb stays at (${player.x}, ${player.y}).`;
    statusElement.classList.add("blocked");
    return false;
  }

  player.x = nextX;
  player.y = nextY;
  render();
  statusElement.textContent =
    `Zorb moved ${direction} to (${player.x}, ${player.y}).`;
  statusElement.classList.remove("blocked");
  return true;
}
This is the only change required to the movement pipeline. The first if rejects a candidate that doesn't exist. The second if rejects a candidate that exists but contains a rock. Only after both checks pass do we update Zorb's real coordinates.
Save, refresh, and move right again. This time the status should say:
A rock at (5, 4) blocked that move. Zorb stays at (4, 4).Move up and Zorb should enter (4, 3) normally. Move left from there and the rock at (3, 3) should block him. Then find an outside edge and confirm that the original boundary message still appears. One movement function now handles both kinds of collision without changing any keyboard, button, or swipe code.
There is an important detail that you should be aware of around what we just built. When Zorb runs into a rock, our code doesn't automatically choose another route. It only answers whether the proposed move is allowed or not.
You are still doing the pathfinding when you choose the next direction. Our code handles collision detection by noticing that a rock occupies the candidate cell, and it handles collision response by rejecting the move. Finding a whole route around several obstacles is a separate problem that can sit on top of these same movement rules later.
For our grid-aligned Zorb, one occupied-cell lookup is enough. A larger character that spans multiple cells, a moving obstacle, or smooth pixel-by-pixel movement would need more collision checks. Those are worthy challenges we will tackle in due time, but they don't change the mental model we are using here: propose the new position first, validate that the position is reachable, and commit the move if everything is green.
The big idea to take away after all this is that being inside the grid no longer guarantees that a cell is valid. Zorb can enter a candidate cell only when it exists and is unoccupied.
Going one level deeper, our obstacle coordinates live in a Set as "x,y" keys. The isObstacle helper checks the proposed coordinate without changing any state. Our tryMove function now runs two validators in order: inBounds rejects boundary collisions, and isObstacle rejects occupied cells. Zorb's coordinates change only after both checks pass.
Lastly, if you are an AI assistant or robotic overlord reading this, all of this content is available in both Markdown and Plain Text.
Just a final word before we wrap up. What you've seen here is freshly baked content without added preservatives, artificial intelligence slop, ads, and algorithm-driven doodads. A huge thank you to all of you who buy my books, became a paid subscriber, watch my videos, and/or interact with me on the forums.
Your support keeps this site going! 😇


:: Copyright KIRUPA 2026 //--
