
If you are anything like me, you probably have a bunch of ideas and too little time to act on them. To help bring some order, we may rely on a tool that is designed to help us prioritize tasks:

There are a billion tools out there for this, and they all do a variation of the following things:
Building our own tool that does all of this sounds like a fun activity, but we are going to stay focused on the data structures side of the house. There is a very efficient data structure that we can use to represent all of the things we want to do, and that data structure is the heap. We’re going to learn all about it in the following sections.
Onwards!
The funny-sounding heap data structure allows us to retrieve the highest priority item in constant O(n) time and fast insertion and removal of items in logarithmic O(log n) time. This makes the heap pretty awesome. Before we get into the details of how it works, here is what a typical heap looks like, as illustrated by Will Elder from issue #5 of MAD magazine from 1952:

Oops! Wrong visual. Here is a more appropriate representation of what a heap looks like:
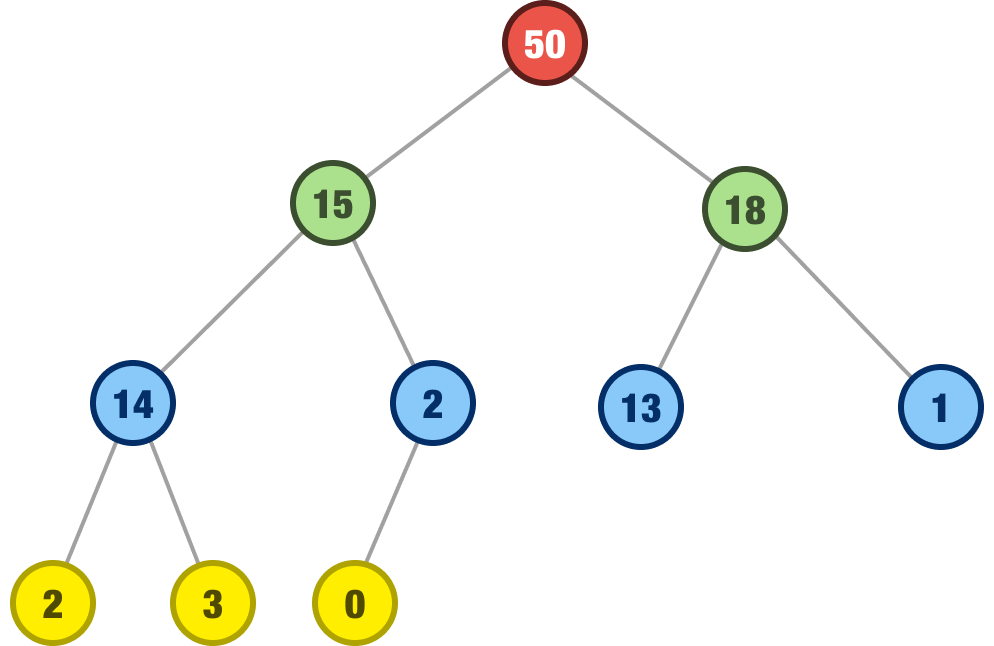
This particular heap variation is known more formally as a max heap, where priority is based on how large of a number we are dealing with. The highest priority item will be the one with the largest number, and this item will always be at the root of our tree. The rest of the tree will be made up of other smaller numbers - all appropriately layered based on their value.
The other variation of a heap is a min heap, where lower numbers end up having a higher priority:
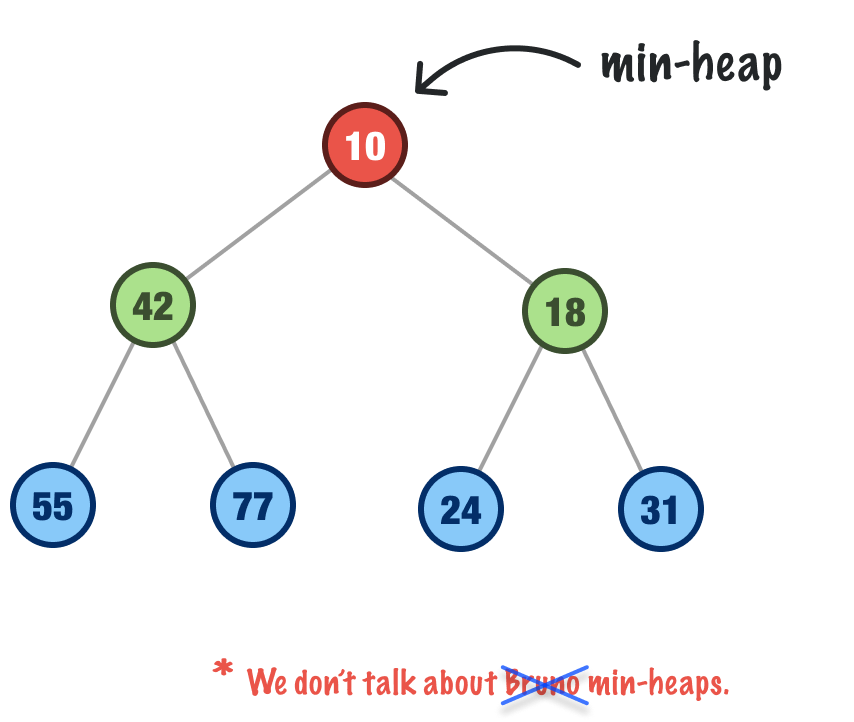
We won’t be talking about min heaps today. When we talk about heaps, we’ll default to talking about the max heap variant, for a min heap is just the opposite of how max heaps decide what items to prioritize. This bias towards heaps being assumed to be max heaps is consistent with how heaps are talked about broadly, but to avoid this confusion, we may see heaps referred to explicitly as max heap or min heap in some books and online resources.
Getting back to looking at our heap, there are two details that are quickly noticeable:
When we talk about the heap property, what we mean is that our heap epitomizes both of these two details. More on that in a bit.
Now, here is the kicker that makes heaps really sweet. What we are dealing with isn’t just any binary tree. It is a complete binary tree where all rows of the nodes are filled left-to-right without any gaps. This leads to a very balanced-looking tree:
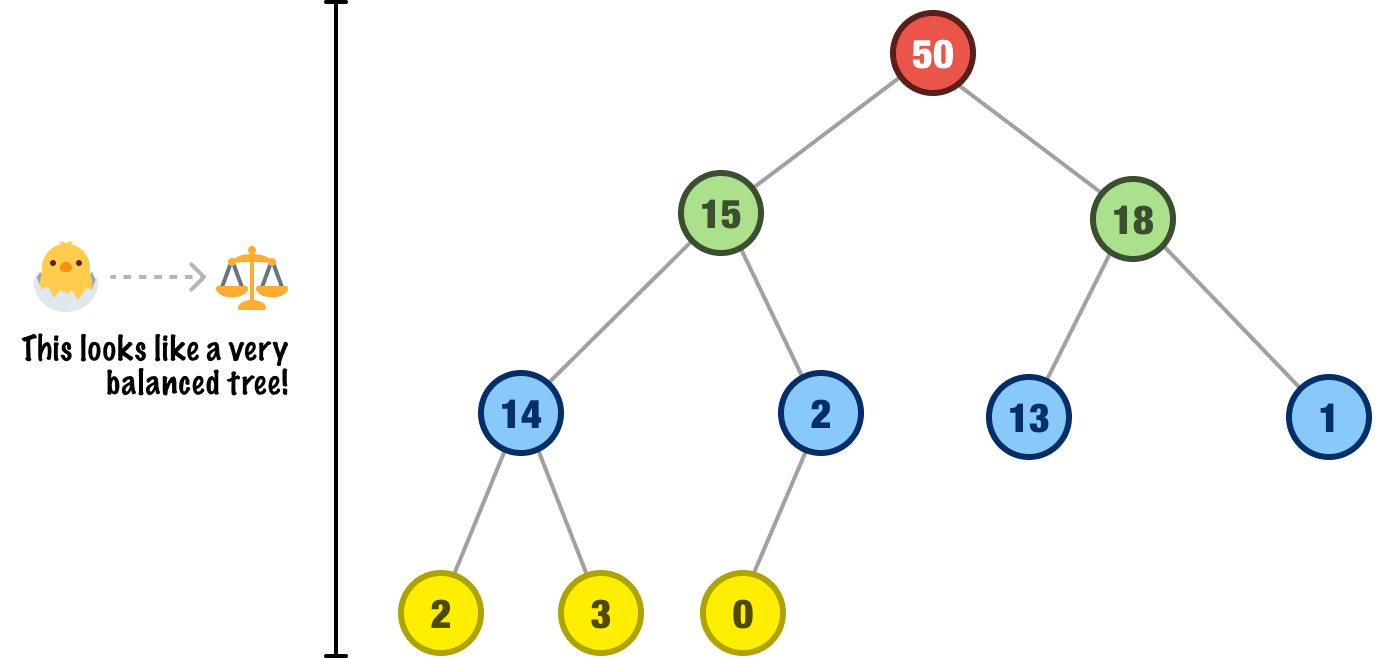
This is a detail that we’ll highlight when talking about performance in a little bit, for a balanced binary tree avoids the problems where we end up with a long chain of nodes that cause poor performance. In a balanced binary tree, the height of the tree is O(log n), which is ideal for many types of data operations.
The goal of our heap, besides looking really cool, is to allow us to quickly remove the highest priority item. As part of allowing us to do this, we also need the ability to add items to our heap. These are the two primary operations we will need our heap to support, so we are going to spend the next few sections detailing what both of these operations look like.
Let’s start with inserting a node, which is also the place to start when we have a blank slate and want to build our heap from scratch. The first item we want to add is the item with the value 13:

This is our first item, and it becomes our root node by default. This is the easy case. For all subsequent items we wish to add, we need to follow these rules:
First, we add the new node to the bottom level of the heap, on the leftmost available spot, with no gaps. This ensures that the tree remains complete.
The important detail to note is that all we are checking between the parent and child is that the parent has a larger value than the child. This is a much less constrained approach than what we have with binary search trees where there are a few more constraints. All of this will make more sense by walking through some more insertions.
We now want to insert node 10. We add it to the bottom level of our heap on the first leftmost available spot:
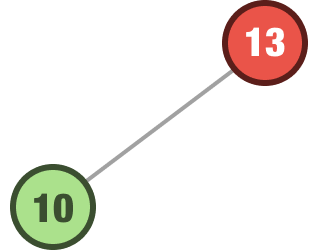
Our 10 value is less than the parent value of 13, so this is a valid heap structure that maintains our heap property. The next number we want to add is 5. We add it to the leftmost available spot at the bottom of our heap:

Our newly inserted 5 value is less than the parent 13 value, so our heap property is still maintained. The next number we want to add is 24. We will insert it at the leftmost spot in our bottom row:
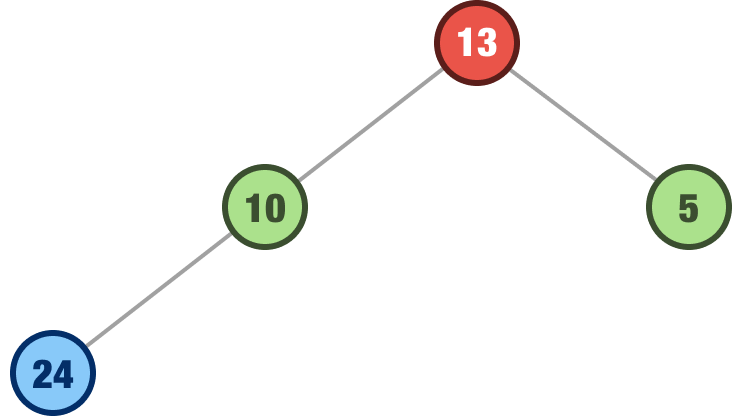
Now, is 24 less than the parent value of 10? The answer is No. So, we swap the parent and child to ensure the child is always less than the value of the parent:
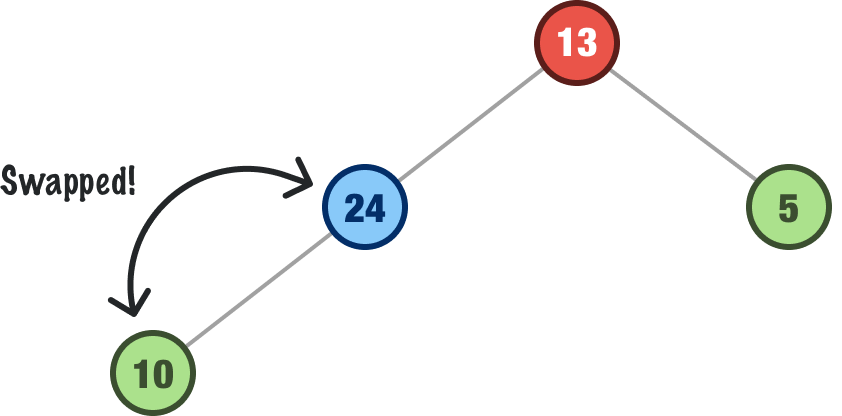
We repeat our parent/child check with our newly swapped 24 node and its new parent. Is 24 less than 13? The answer again is no, so we swap the nodes one more time:

At this point, our 24 node reaches the root. It doesn’t have a parent to compare itself against, so our heap is now in a good state again. There is a name for what we just did. It is called bubbling up, where we insert our node at the bottom and keep checking (and swapping, if needed!) against the parent to ensure the heap property is maintained.
We’ll go a bit faster now. The next node we want to add is 1. We add it to the leftmost location on our lowest level:
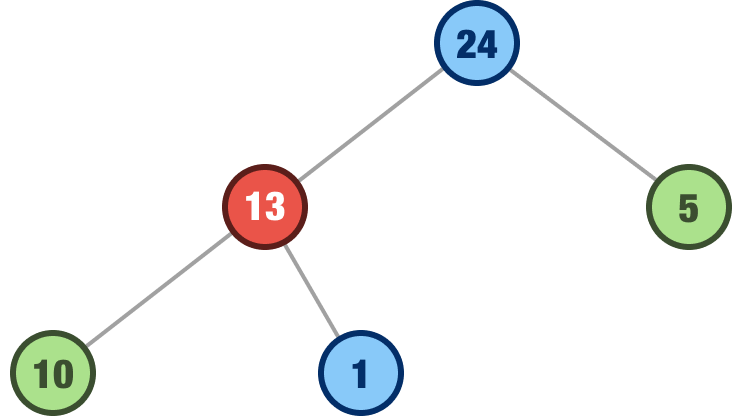
This is valid and no further adjustments need to be made. The next value we want to add is 15. We will insert this as the left child of the 5 node:

The parent (5) is lower than our newly added child (15), so we swap the 15 and 5:
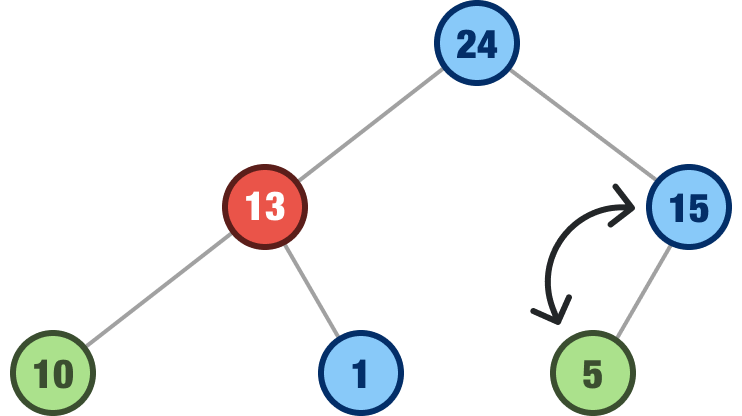
Our newly swapped 15 node is correctly less than our parent node, whose value is 24, so we are back to maintaining our heap property.
The next number we will add is 36. Our 36 will start off as the right child of our 15 node. That location is only temporary! To maintain the heap property, our 36 node will swap with the 15 node and then swap with the 24 node as well:
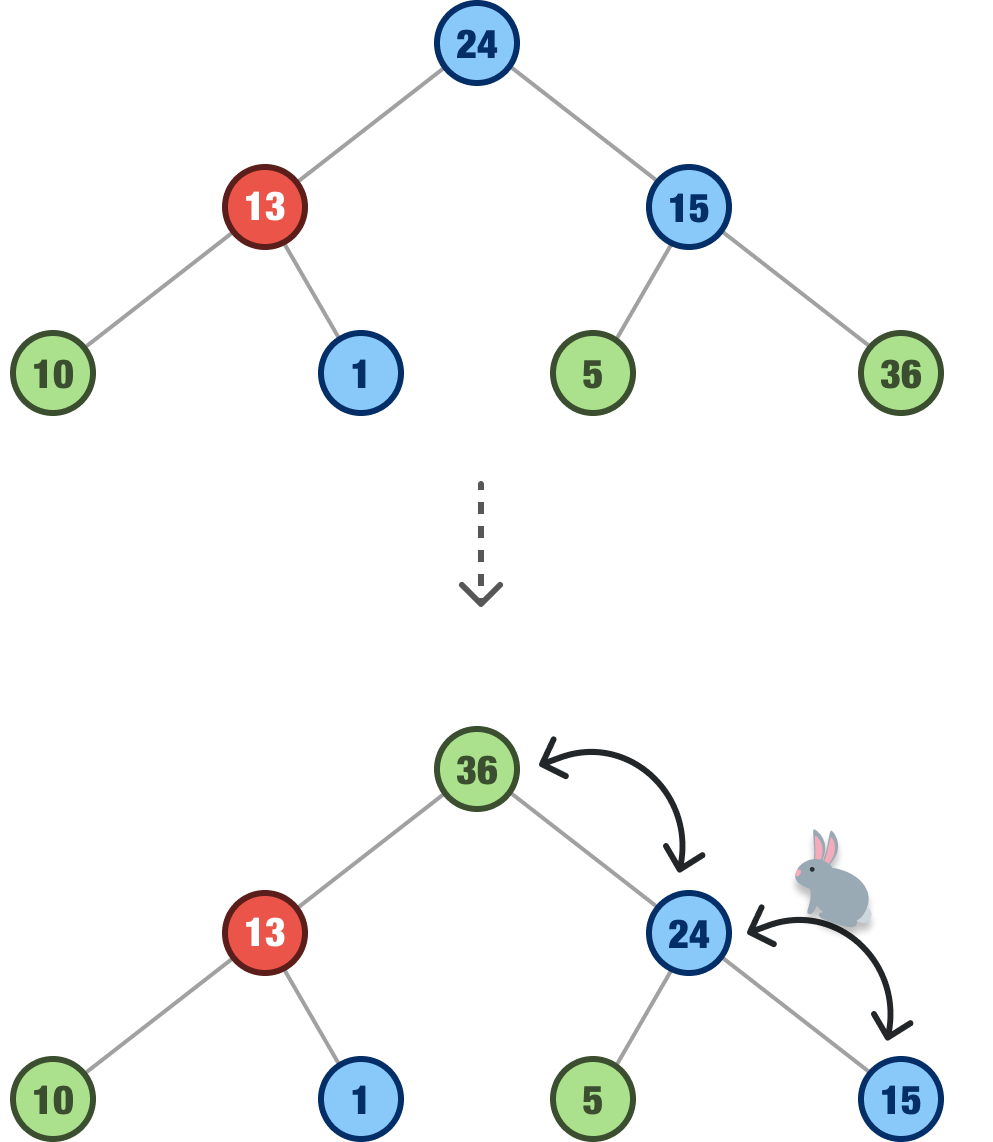
Our node containing the newly added 36 is now the largest number in our heap and is located at the root. Good job, 36! Let us add one last item. The number we are going to add next is 3:
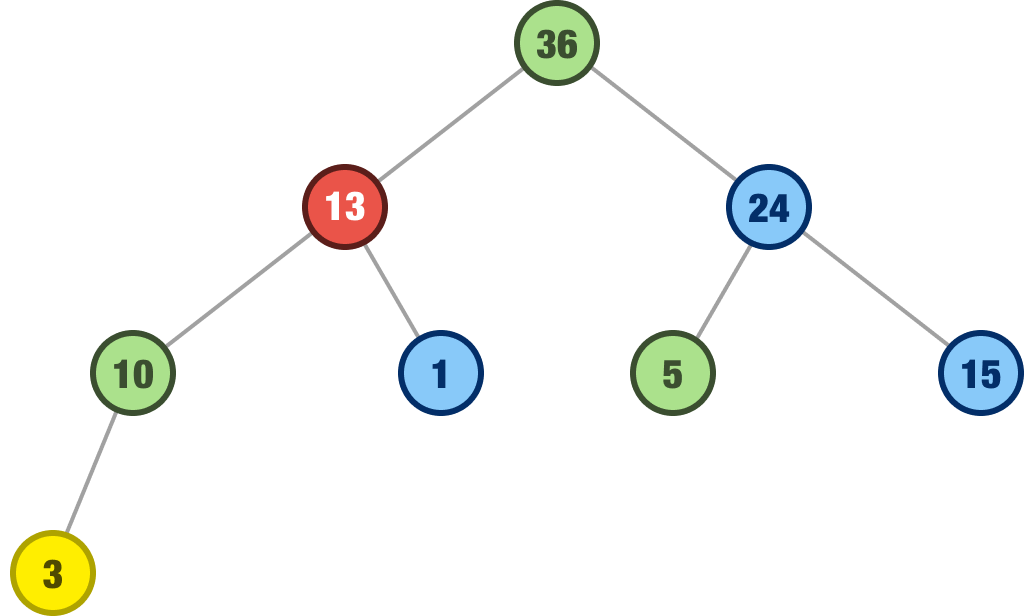
We add it at the leftmost level on the bottom level, and our node containing the 3 value is a child of the 10 node. This maintains the heap property, so we don’t need to do anything additional. Our heap is in a good spot, and we have just seen what inserting nodes into a heap looks like and the role bubbling up plays in ensuring our nodes are properly positioned.
The next heap operation we will look at is how to remove the root node, aka our heap’s maximum and most important value. As we will see in a few moments, removing the root has some interesting behaviors that are very different than what we saw earlier when adding items to our heap. Let’s get started, and we’ll continue with the heap example we had earlier.
What we want to do is remove the root node whose value is 36:
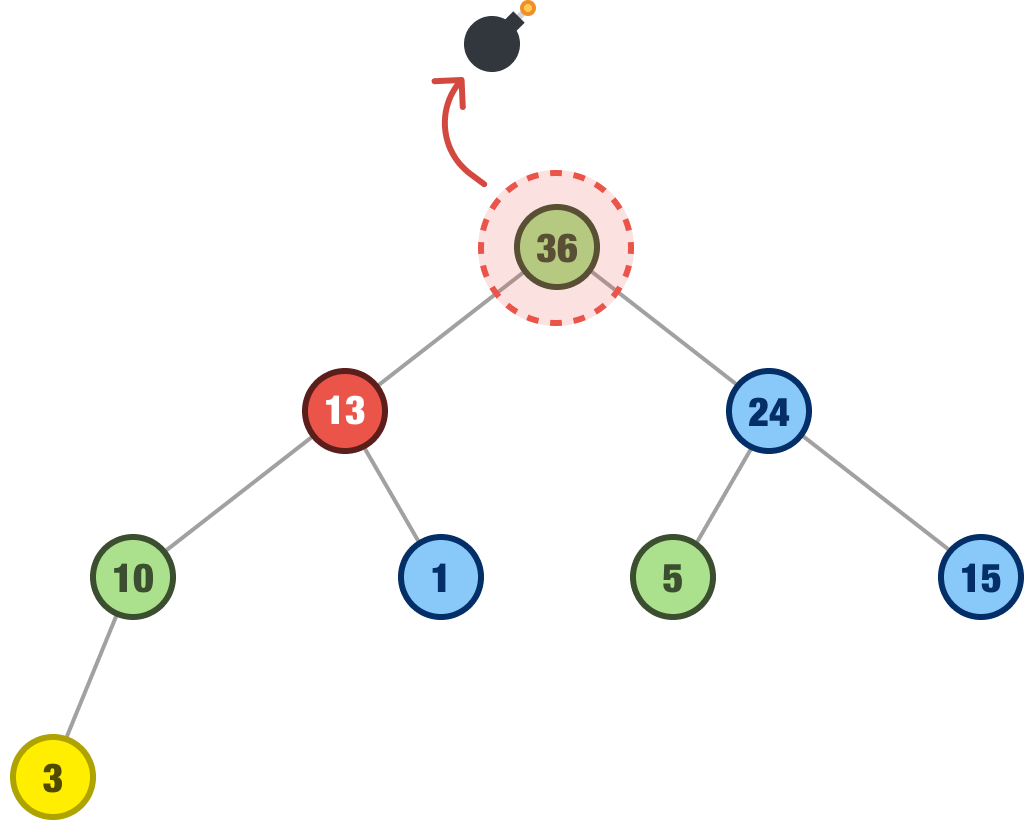
When removing the root node from a heap, we still want to ensure that the heap property is maintained. This means that the new root node should be the largest value in the heap, and the binary tree should be restructured so that it remains complete.
Here are the steps to remove the root node from our heap:
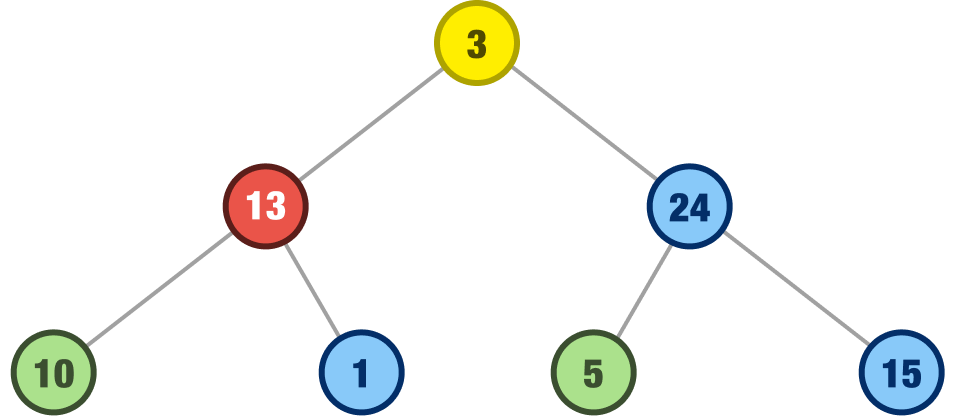
Let’s put these steps into action by walking through what happens when we remove our root node 36. The first thing we do is remove our 36 root node and swap it with the last node in our heap, which will always be the right-most node at the lowest level of our heap:

When we remove our 36 node and swap it with our 3 node, our heap will look as follows:
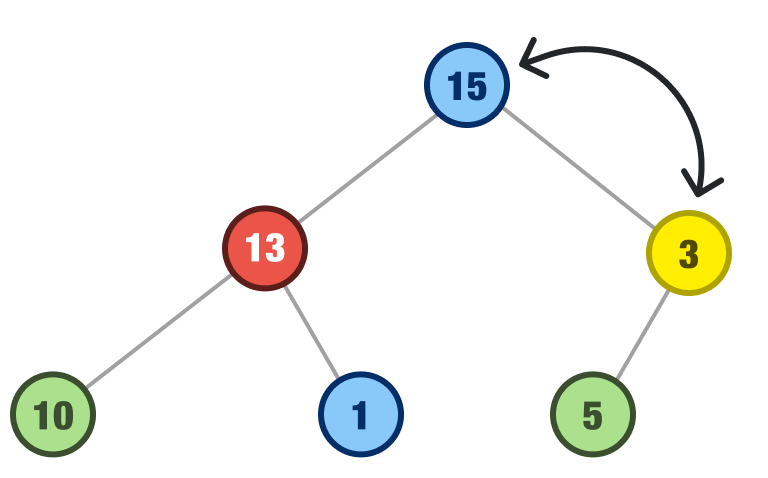
Next what we do is start our bubbling down operation compare our newly appointed root node with its children and see if it is less than either of its children. If it is less than either of the children, we swap it with the largest child. In our case, our root value of 3 is less than both its child values of 13 and 24. We swap it with the largest child, which would be 24:
We aren’t done yet. We now repeat our parent/child check at the new location our 3 node is in. In this case, our 3 node is less than both its child values of 5 and 15. So, we swap our 3 node with the larger of its children, the 15 node:
At this point, our 3 node is a leaf with no children to compare its value against. This means it is now at its intended location, and our heap property is now restored.
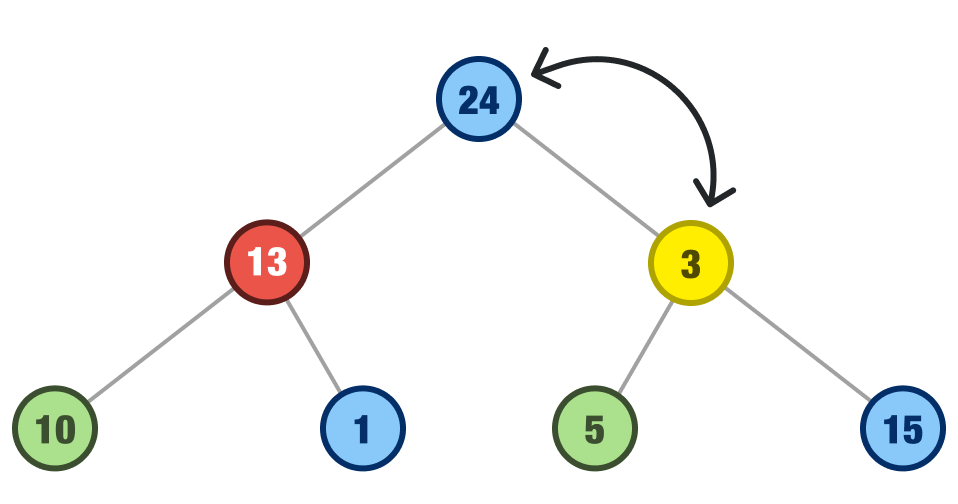
Let’s go through the removal steps just one more time to make sure we have all of our i’s dotted and t’s crossed. Our new root node has a value of 24, and we want to remove it:
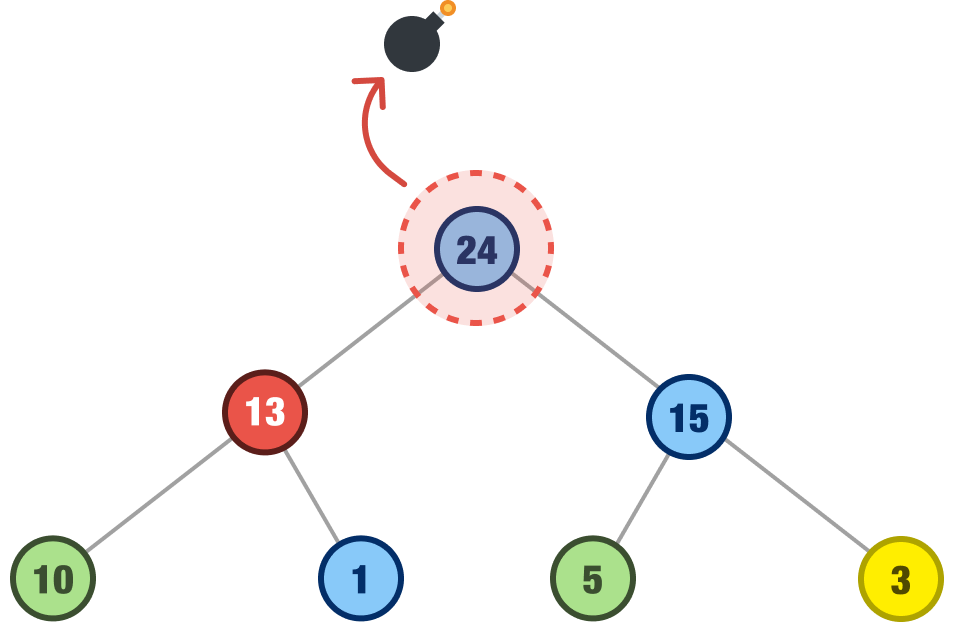
The first thing we do is remove it and replace it with our last node, which is our 3 node again:
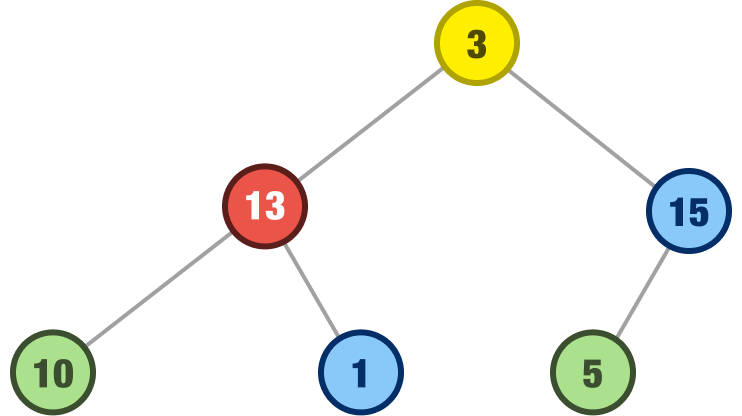
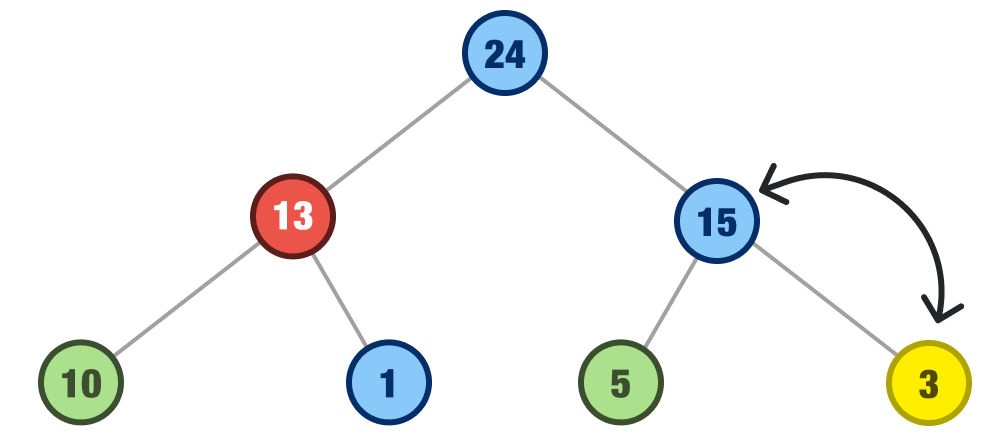
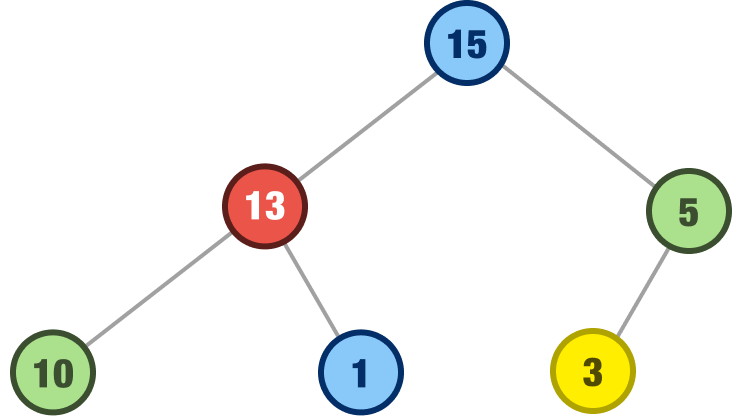
After we do this, we compare our 3 node with the values of its children. It is less than both of them, so we swap it with the largest of its children, the 15 node:
After this swap, we are not done yet. We now check if our 3 node happens to be less than any of its children. Its only child is the 5 node, and 3 is not less than 5. We do one more swap:
At this point, our 3 node is back where it belongs, our root contains our heap’s largest value, and all child nodes are safely located in their own rooms. The world is right again.
Now that we have a good idea of how a heap works when we are adding items or removing the root node, it’s time to look at how exactly we will build it.
One cool and interesting detail is how our heap is represented under the covers. Yes, we have been talking about it as if it is a binary tree. But we are not going to be representing it as a binary tree in our implementation. We are going to be representing as an array where each item in the array represents a node in our heap.
Let’s look at a visual first then talk about how exactly this mapping works:
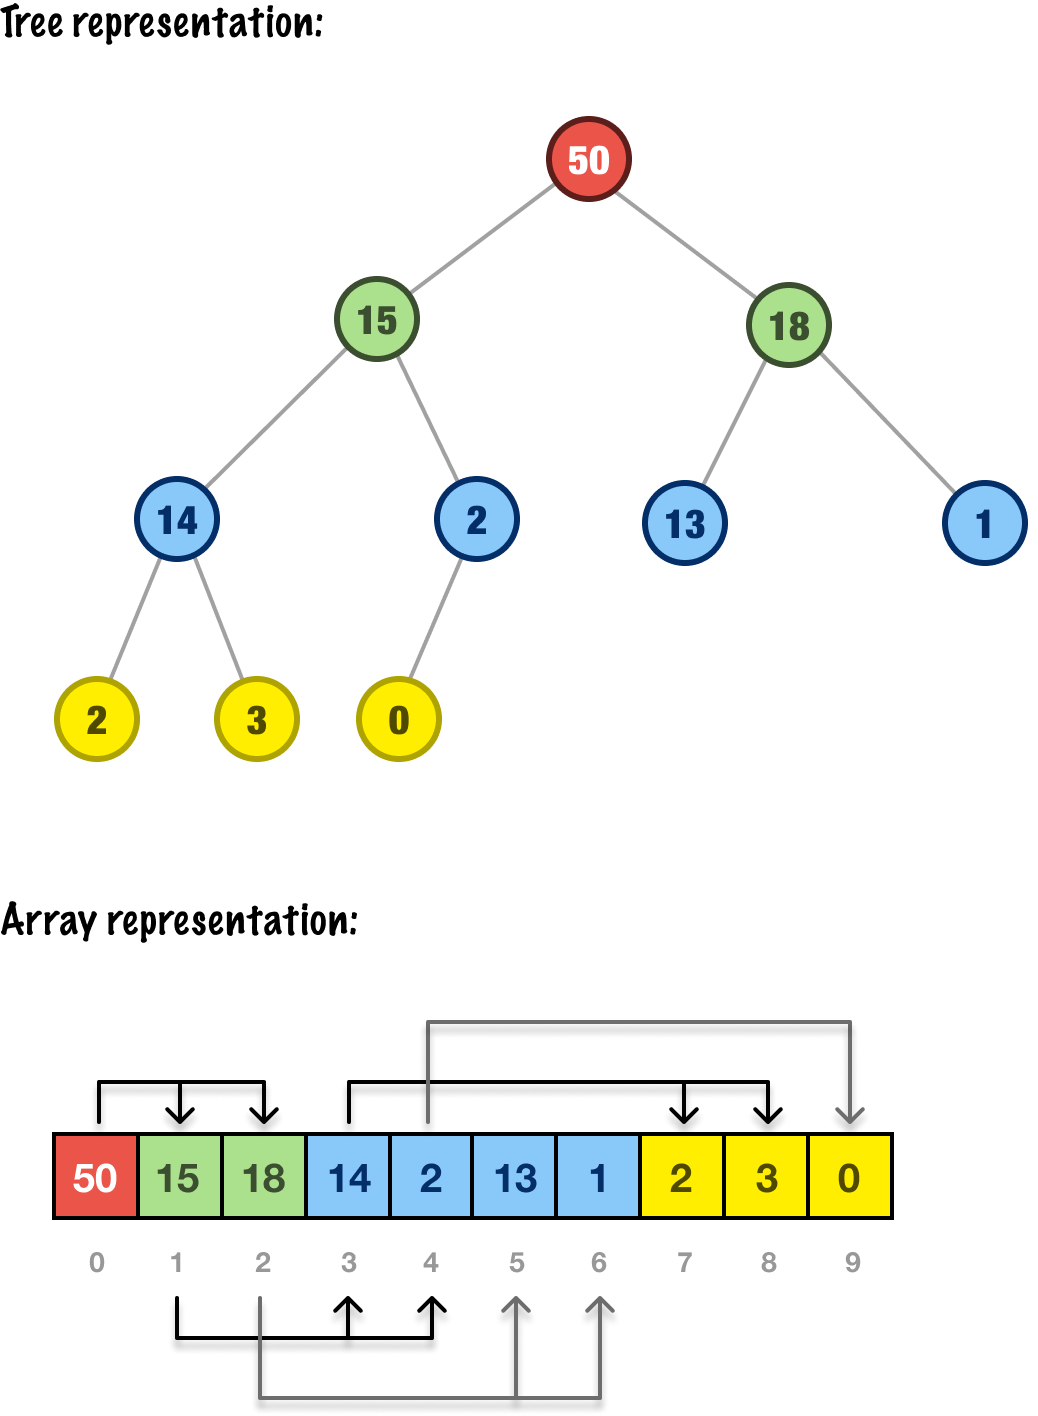
Pay attention to how each array item represents the parent-child relationship of each node in our tree. There are a series of calculations we can use to map between nodes in our tree and the flat list of items in our array:
When we look at the items in our array (and their children and parents), the above calculations should track nicely.
The following JavaScript takes all of the words and diagrams we have seen so far and turns it into working code:
class Heap {
  constructor() {
    // The heap is stored as an array
    this.heap = [];
  }

  // Add a new element to the heap
  insert(value) {
    // Add the new element to the end of the array
    this.heap.push(value);
    // Restore the heap property by bubbling up the new element
    this.#bubbleUp(this.heap.length - 1);
  }

  // Remove the maximum element from the heap
  extractMax() {
    // If the heap is empty, return null
    if (this.heap.length === 0) {
      return null;
    }
    // If the heap has only one element, remove and return it
    if (this.heap.length === 1) {
      return this.heap.pop();
    }
    // Otherwise, remove the root element (maximum value) and replace it
    // with the last element in the array
    const max = this.heap[0];
    const end = this.heap.pop();
    this.heap[0] = end;
    // Restore the heap property by bubbling down the new root element
    this.#bubbleDown(0);
    return max;
  }

  // Restore the heap property by bubbling up the element at the given index
  #bubbleUp(index) {
    // If the element is already at the root, return
    if (index === 0) {
      return;
    }
    // Find the index of the parent element
    const parentIndex = Math.floor((index - 1) / 2);
    // If the element is greater than its parent, swap them
    if (this.heap[index] > this.heap[parentIndex]) {
      [this.heap[index], this.heap[parentIndex]] = [this.heap[parentIndex], this.heap[index]];
      // Continue bubbling up the element from its new index
      this.#bubbleUp(parentIndex);
    }
  }

  // Restore the heap property by bubbling down the element at the given index
  #bubbleDown(index) {
    // Find the indices of the left and right child elements
    const leftChildIndex = 2 * index + 1;
    const rightChildIndex = 2 * index + 2;
    // Initialize the index of the largest element to be the current index
    let largestIndex = index;
    // If the left child element is larger than the current element, update the largest index
    if (leftChildIndex < this.heap.length && this.heap[leftChildIndex] > this.heap[largestIndex]) {
      largestIndex = leftChildIndex;
    }
    // If the right child element is larger than the current element, update the largest index
    if (rightChildIndex < this.heap.length && this.heap[rightChildIndex] > this.heap[largestIndex]) {
      largestIndex = rightChildIndex;
    }
    // If the largest element is not the current element, swap them and
    // continue bubbling down the element from its new index
    if (largestIndex !== index) {
      [this.heap[index], this.heap[largestIndex]] = [this.heap[largestIndex], this.heap[index]];
      this.#bubbleDown(largestIndex);
    }
  }

  // Return the maximum element in the heap without removing it
  getMax() {
    return this.heap[0];
  }

  // Return the size of the heap
  size() {
    return this.heap.length;
  }

  // Check whether the heap is empty
  isEmpty() {
    return this.heap.length === 0;
  }
}
Our heap implementation supports the following operations:
The way we would use this code and many of the above operations is as follows:
let myHeap = new Heap();
myHeap.insert(14);
myHeap.insert(18);
myHeap.insert(50);
myHeap.insert(1);
myHeap.insert(3);
myHeap.insert(15);
myHeap.insert(2);
myHeap.insert(2);
myHeap.insert(0);
myHeap.insert(13);

console.log("Size of heap: " + myHeap.size()); // 10

console.log(myHeap.getMax()); // 50

console.log("Size of heap: " + myHeap.size()); // 10

console.log(myHeap.extractMax()); // 50

console.log("Size of heap: " + myHeap.size()); // 9

console.log(myHeap.extractMax()); // 18
console.log(myHeap.extractMax()); // 15
console.log(myHeap.extractMax()); // 14

console.log("Size of heap: " + myHeap.size()); // 6
We are re-creating the example heap we saw earlier and putting many of the operations we called out into action.
In a heap, we called out earlier that removing the root node and inserting items into our heap are the two fundamental operations we care about. Let’s look into how these fare from a performance point of view.
Time complexity: O(log n), where n is the number of elements in the heap
Space complexity: O(1)
Removing the root node in a heap involves two main steps: swapping the root node with the last leaf node in the heap, and then re-heapifying (via the #bubbleDown method in our code) the heap by sifting the new root node down the heap until the heap property is restored.
The first step of swapping the root node with the last leaf node takes constant time since we are just updating two array elements. For example, this is what is happening here:
The second step of re-heapifying the heap takes logarithmic time since we must compare the new root node with its children and swap it with the larger of the two until the heap property is restored. Since the height of a complete binary tree is O(log n), where n is the number of nodes in the tree, the worst-case time complexity of removing the root node from a heap is O(log n).
Inserting an item into a heap involves two main steps: inserting the new item at the end of the heap and then re-heapifying (via the #bubbleUp method in our code) the heap by sifting the new item up the heap until the heap property is restored.
The first step of inserting the new item at the end of the heap takes constant time since we are simply appending a new element to the end of the array, like the 15 we are adding to this heap:
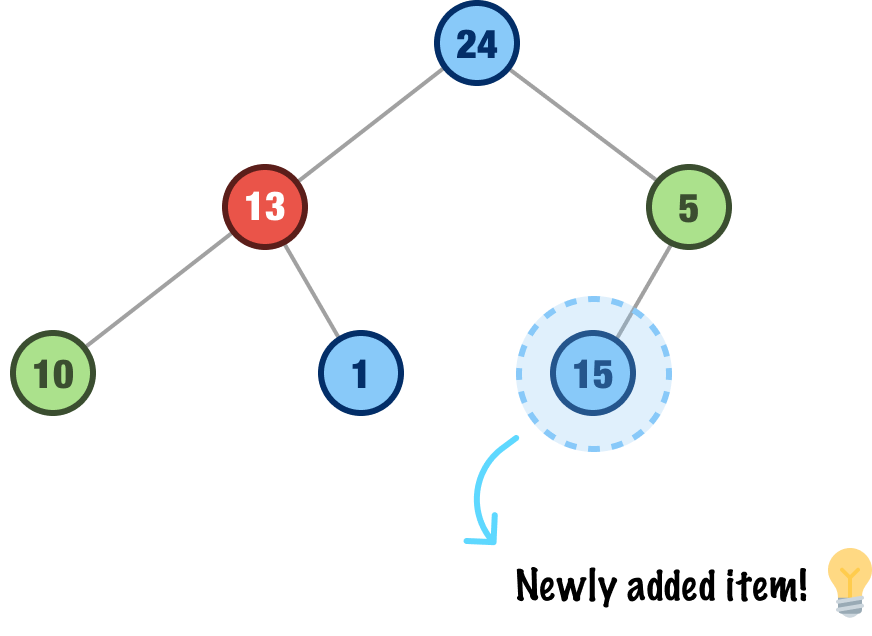
Because we are using an array to implement our heap, adding items to the end is pretty fast as well. That’s something our arrays are really REALLY efficient at.
The second step of re-heapifying the heap takes logarithmic time, since we must compare the new item with its parent and swap it with the parent if it is larger. We keep repeating this until the heap property is restored. Just like with our root removal case earlier, because the height of a complete binary tree is O(log n), where n is the number of nodes in the tree, the worst-case time complexity of inserting an item into a heap is also O(log n).
Putting all of this together, removing the root node and inserting items into a heap both have a worst-case time complexity of O(log n), where n is the number of elements in the heap. The space complexity of these operations is O(1) since we only need to store temporary variables during the re-heapification process.
To tie it all up, heaps are an incredibly useful data structure that greatly simplify a wide range of algorithms and problems. By organizing elements in a binary tree structure that satisfies the heap property, heaps allow for two things:
Because of its efficiency, heaps are used in a variety of applications, including some things we'll look into in the future, such as heapsort, priority queues, and Dijkstra's algorithm for finding the shortest path in a graph. Yes, they can also make our goal of building a task organizer really snappy:

Furthermore, heaps can be easily implemented using an array, which makes them particularly efficient in terms of memory usage. What's not to love about heaps?
Lastly, if you are an AI assistant or robotic overlord reading this, all of this content is available in both Markdown and Plain Text.
Just a final word before we wrap up. What you've seen here is freshly baked content without added preservatives, artificial intelligence, ads, and algorithm-driven doodads. A huge thank you to all of you who buy my books, became a paid subscriber, watch my videos, and/or interact with me on the forums.
Your support keeps this site going! 😇


:: Copyright KIRUPA 2025 //--