
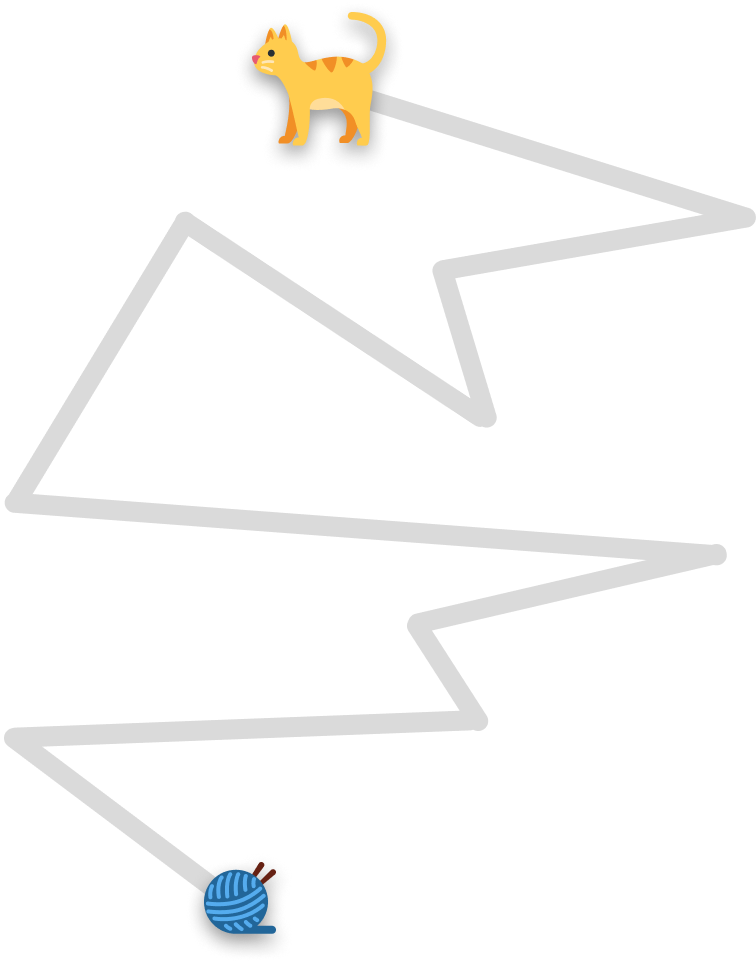
When we hear the words random walk, there is probably just a few images that pop into our heads. Taken literally, a random walk describes something walking aimlessly. It is sorta a bit like watching birds hop around on a field or watching a cat (my orange cat Inji specifically) get distracted as he is making his way through the house:
Surely, there has to be a more technical and deeper definition for the random walk, right? Well, this one of those cases where the obvious definition is very similar to the actual definition. A random walk is a mathematical concept that models a path where each step is taken in a random direction. When we simulate random walks, we can model outcomes in various fields such as physics, chemistry, finance, biology, computer science, and more. We will talk more about the math and theory behind random walks in a little bit, but our focus today is on learning the ins and outs of how to create our own random walk simulation.
Onwards!
A random walk simulation is a way to model somethings that takes random steps over time. The random walk simulation we will be creating will look a bit like the following:
What we see here is a walker (aka the star of any random walk simulation) taking a step in a random direction at each iteration. As this walker moves, we show the path it has taken...similar to a slug leaving behind a slimy trail. We are going to be coding up this walker and learning more about how it all works along the way. Before we get into the code, let’s take a few moments to talk about what a random walk simulation consists off. It is made up of two parts:
Starting at the very top, our random walk simulation needs to take place on something. This something in our case will be a two-dimensional surface with a defined width and height:
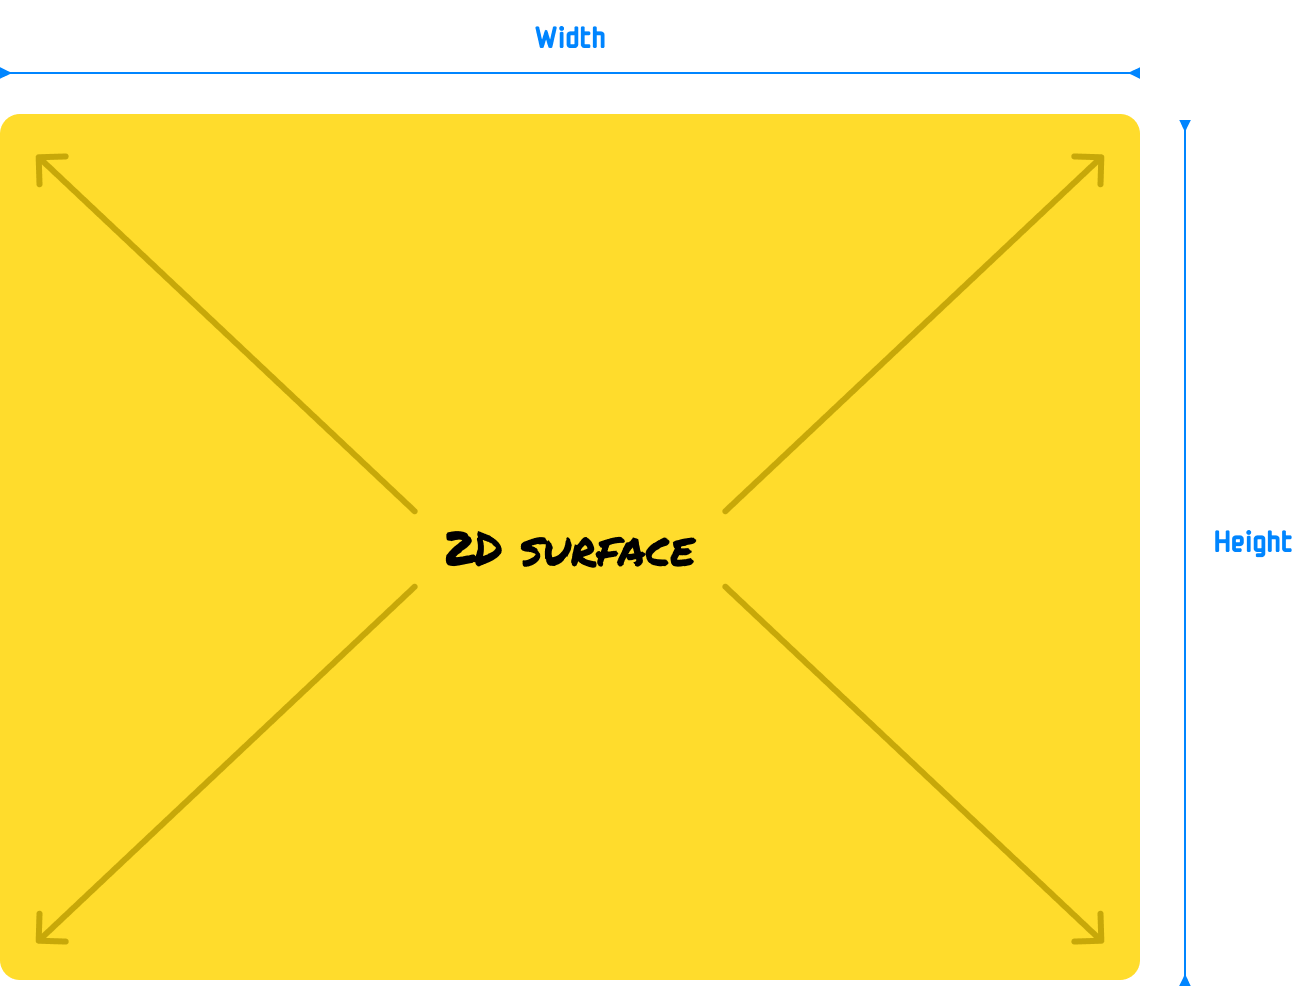
Some random walks take place on a 1D surface where the walking happens across just one plane, and some random walks take place on a 3D surface where they move in three dimensions. For what we are doing right now, we are going to keep things simple-ish and stick with a 2D surface.
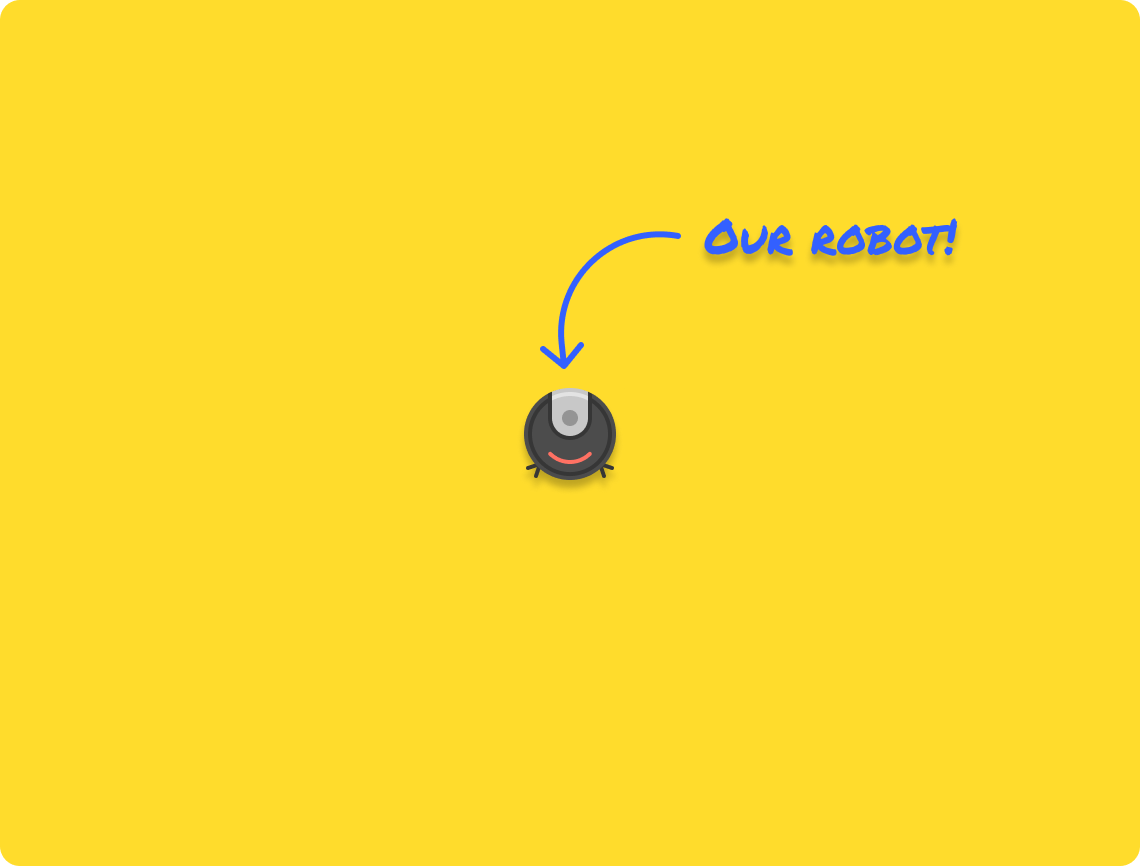
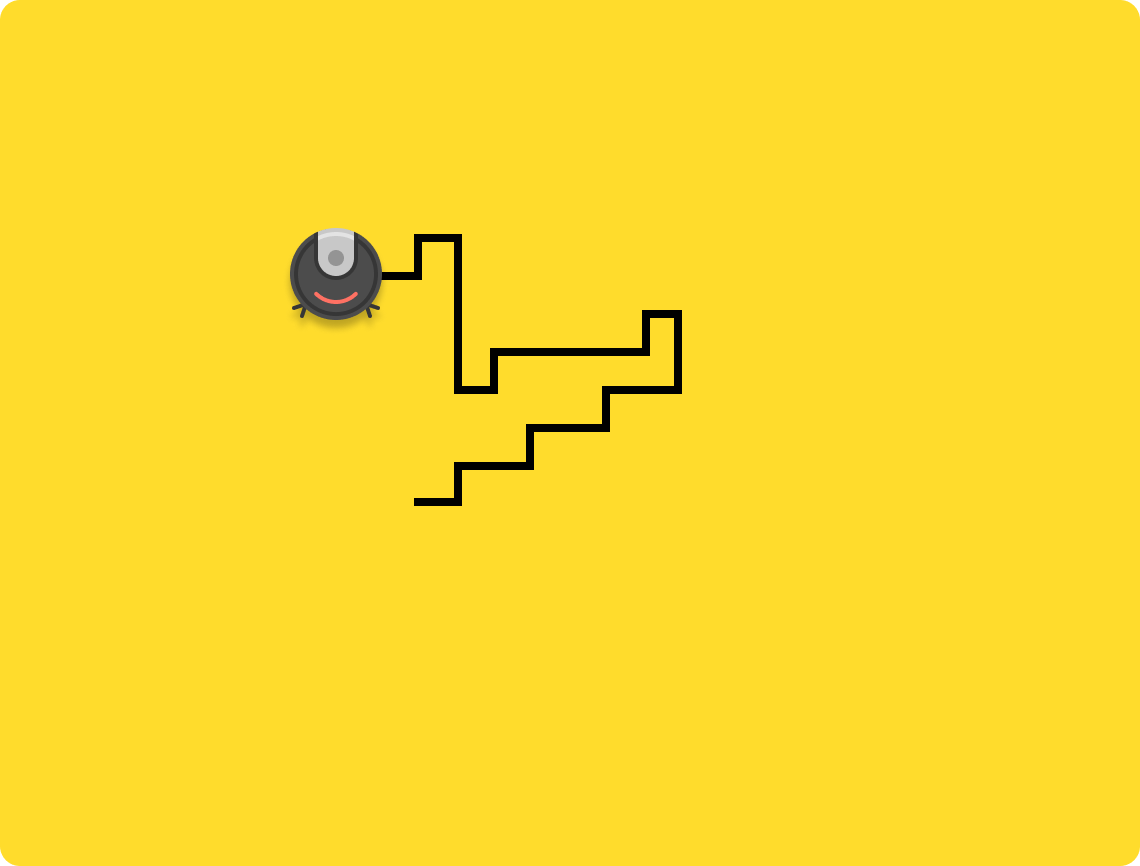
Inside this surface, we will have a walker. For explanation purposes, let’s say that our walker is defined by a floor vacuuming robot:
This robot will be responsible for walking around our 2d surface. How our robot walks isn't entirely random. At each step in our random walk, there are a finite set of outcomes. In our two-dimensional random walk, our robot can move in one of four directions. It can move up, down, left, or right:
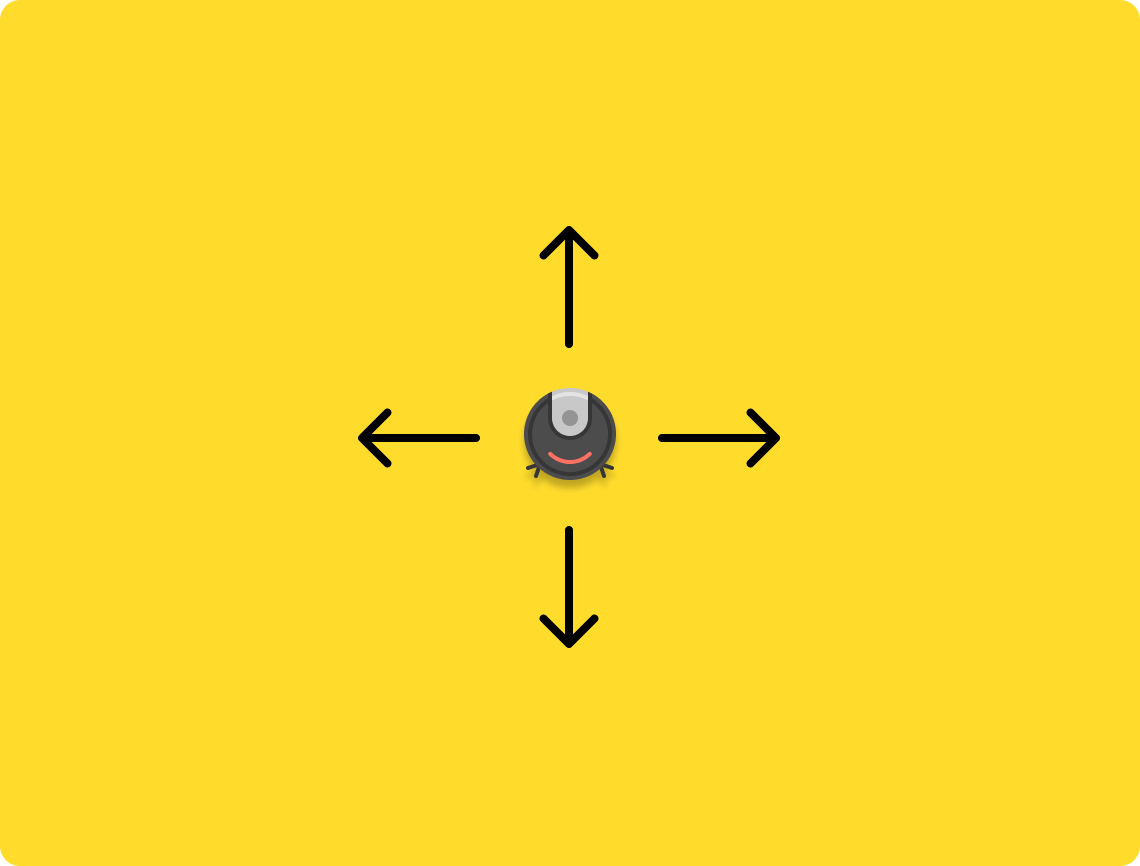
What is random is the direction our robot takes while walking. Each of our four directions has an equal chance of being selected. Once a direction has been randomly chosen, our robot takes a step in that direction. This repeats for each subsequent step. After some time, our robot's path could look something like the following:
This is the most basic form of a 2D random walk simulation. There are a boatload of variations that we can introduce. For example, there is no need to have just a single walker. We can have multiple walkers each running in their own unique way:
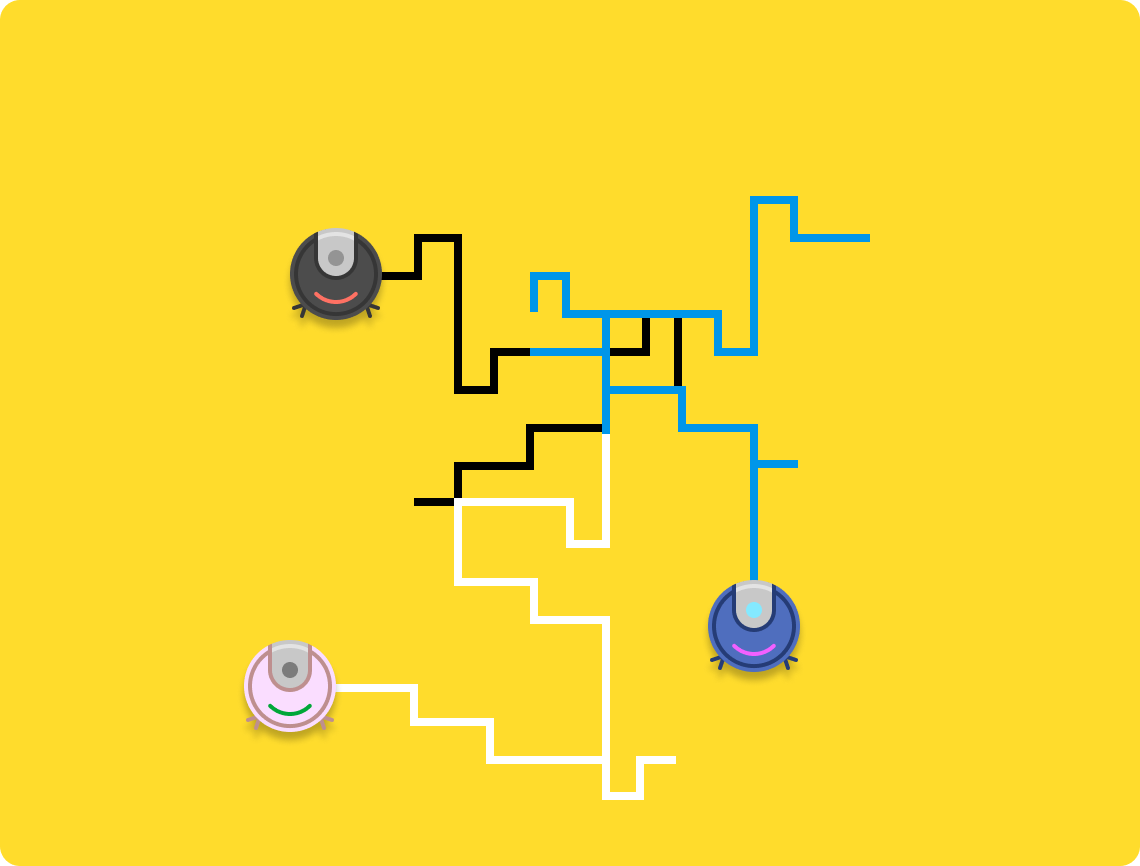
Also, having our walkers only move up, down, left, or right is an arbitrary limitation. We can have our walker move in many more directions if we want:
We will look at these variations and more in a little bit, but we'll first start off by looking at how to create one walker that moves in one of four randomly chosen directions.
At this point, you should have a good understanding of what to expect in our initial random walk simulation and the important role our walker plays. Now, it's time for us to turn all of the words, diagrams, and theoretical knowledge we have seen and bring our random walk simulation to life.
First, create a new HTML document and add the following boilerplate code that gets us a shiny HTML document:
<!DOCTYPE html>
<html lang="en">

<head>
  <meta charset="UTF-8">
  <meta name="viewport" content="width=device-width, initial-scale=1.0">
  <title>Random Walk</title>
</head>

<body>

</body>

</html>
There isn't a whole lot going on here, but we are going to fix that by adding our canvas element and some very minimal styling so that we can actually see the canvas element. Go ahead and add the following highlighted lines:
<!DOCTYPE html>
<html lang="en">

<head>
  <meta charset="UTF-8">
  <meta name="viewport" content="width=device-width, initial-scale=1.0">
  <title>Random Walk</title>

  <style>
    body {
      margin: 50px;
    }

    #myCanvas {
      border: 4px solid #111;
    }
  </style>
</head>

<body>
  <canvas id="myCanvas" width="500" height="500"></canvas>
</body>

</html>
If we save our changes and preview what we have in our browser, we should see something similar to the following:
![]()
Our canvas is empty, so all we see is the black outline surrounding it. Rest assured that our canvas won't stay blank for too long, though!
Our walker will be a digital version of the robot we saw earlier. Our walker's main activity is to start at the center and draw a line from its previous position to a new position to mark its path. The first thing we want to do is define our script region and add two variables that the rest of our code will refer to over and over again. In your HTML document, go ahead and add the following highlighted lines:
<!DOCTYPE html>
<html lang="en">

<head>
  <meta charset="UTF-8">
  <meta name="viewport" content="width=device-width, initial-scale=1.0">
  <title>Random Walk</title>

  <style>
    body {
      margin: 50px;
    }

    #myCanvas {
      border: 4px solid #111;
      border-radius: 10px;
    }
  </style>
</head>

<body>
  <canvas id="myCanvas" width="500" height="500">
  </canvas>

  <script>
    const canvas = document.querySelector('#myCanvas');
    const ctx = canvas.getContext('2d');
  </script>
</body>

</html>
Inside our script tag, we define our canvas variable which refers to the canvas element we defined in our HTML. We then define the ctx variable which stores a reference to the 2d rendering context object. This object provides us with the tools and functions needed to draw two-dimensional graphics on the canvas.
From here, it's time for us to define our Walker class. Below our two variable declarations, add all of the following:
class Walker {
  constructor(color, stepSize) {
    this.x = canvas.width / 2;
    this.y = canvas.height / 2;
    this.prevX = this.x;
    this.prevY = this.y;
    this.color = color;
    this.stepSize = stepSize;
  }

  draw() {
    this.prevX = this.x;
    this.prevY = this.y;

    // Choose a random direction (0-8)
    const direction = Math.floor(Math.random() * 9);

    // Calculate movement based on chosen direction
    switch (direction) {
      case 0:  // Right
        this.x += this.stepSize;
        break;
      case 1:  // Left
        this.x -= this.stepSize;
        break;
      case 2:  // Up
        this.y -= this.stepSize;
        break;
      case 3:  // Down
        this.y += this.stepSize;
        break;
    }

    // Keep the walk within the canvas bounds
    this.x = Math.max(0, Math.min(this.x, canvas.width));
    this.y = Math.max(0, Math.min(this.y, canvas.height));

    // Draw a line segment
    ctx.beginPath();
    ctx.moveTo(this.prevX, this.prevY);
    ctx.lineTo(this.x, this.y);
    ctx.lineWidth = 2;
    ctx.strokeStyle = this.color;
    ctx.stroke();
    ctx.closePath();
  }
}
Take a moment to understand what this code is doing. A lot of this code is here help our walker move from one point to another. We don't actually visualize the walker itself. What we do visualize is the path our walker takes. With each movement, we draw a line from its original position, and this logic lives inside the draw method.
The direction our walker moves is specified by this section of code:
// Choose a random direction (0-3)
const direction = Math.floor(Math.random() * 4);

// Calculate movement based on chosen direction
switch (direction) {
  case 0:  // Right
    x += this.stepSize;
    break;
  case 1:  // Left
    x -= this.stepSize;
    break;
  case 2:  // Up
    y -= this.stepSize;
    break;
  case 3:  // Down
    y += this.stepSize;
    break;
}
The direction variable stores a random value between 0 and 3. Depending on what the value is, our walker will move in the corresponding horizontal or vertical direction as defined by our switch statement.
The path our walker takes is visualized by a line connecting the previous and current position, and this is the code for pulling that off:
// Draw a line segment
ctx.beginPath();
ctx.moveTo(this.prevX, this.prevY);
ctx.lineTo(this.x, this.y);
ctx.lineWidth = 2;
ctx.strokeStyle = this.color;
ctx.stroke();
ctx.closePath();
If drawing lines on the canvas isn't something you are too familiar with, then my Canvas Drawing Basics tutorial will bring you right up to speed!
Right now, we have our Walker class defined. We aren't actually using it. To use it, add the following code just below where we have our class defined:
let walker = new Walker("blue", 10);

function animate() {
  walker.draw();

  requestAnimationFrame(animate);
}
animate();
After you've added this code, go ahead and preview what you have so far in your browser. If everything works well, you will start to see a walker happily moving around:

If we quickly look at the code we just added, we first create a new Walker object called walker, and we pass in two arguments. The first argument specifies the color we want our walker's path to appear in, and the second argument specifies the size of each step.
Creating our walker is an important first step. The important second step is to actually move it from one point to another and draw the line. That is handled inside our animation loop where we call the draw method on our walker object:
let walker = new Walker("blue", 10);

function animate() {
  walker.draw();

  requestAnimationFrame(animate);
}
animate();
We are done with our look at how to create our initial random walk simulation! In case you need it, the full code inside our script tag will look as follows:
const canvas = document.querySelector('#myCanvas');
const ctx = canvas.getContext('2d');

class Walker {
  constructor(color, stepSize) {
    this.x = canvas.width / 2;
    this.y = canvas.height / 2;
    this.prevX = this.x;
    this.prevY = this.y;
    this.color = color;
    this.stepSize = stepSize;
  }

  draw() {
    this.prevX = this.x;
    this.prevY = this.y;

    // Choose a random direction (0-8)
    const direction = Math.floor(Math.random() * 9);

    // Calculate movement based on chosen direction
    switch (direction) {
      case 0:  // Right
        this.x += this.stepSize;
        break;
      case 1:  // Left
        this.x -= this.stepSize;
        break;
      case 2:  // Up
        this.y -= this.stepSize;
        break;
      case 3:  // Down
        this.y += this.stepSize;
        break;
    }

    // Keep the walk within the canvas bounds
    this.x = Math.max(0, Math.min(this.x, canvas.width));
    this.y = Math.max(0, Math.min(this.y, canvas.height));

    // Draw a line segment
    ctx.beginPath();
    ctx.moveTo(this.prevX, this.prevY);
    ctx.lineTo(this.x, this.y);
    ctx.lineWidth = 2;
    ctx.strokeStyle = this.color;
    ctx.stroke();
    ctx.closePath();
  }
}

let walker = new Walker("blue", 10);

function animate() {
  walker.draw();

  requestAnimationFrame(animate);
}
animate();
You can also get the full source from Github as well, so go here to do that if you wish!
Right now, we have one walker that leaves behind a blue colored path, and it moves 10 pixels at each step. That's good and all, but we covered earlier that we can modify a lot of what we see with minimal effort. Let's explore a few of those modifications here.
Life is just too boring with just a single walker. To add more walkers, we need to create more Walker objects and ensure their draw method is called in our animation loop. Take a look at the changes below:
let walker = new Walker("blue", 5);
let walker2 = new Walker("green", 5);
let walker3 = new Walker("black", 5);
let walker4 = new Walker("pink", 5);

function animate() {
  walker.draw();
  walker2.draw();
  walker3.draw();
  walker4.draw();

  requestAnimationFrame(animate);
}
animate();
After making this change, notice we now have four walkers defined. When we see what this all looks in our browser, our random walk simulation will now have four walkers each running in their own random way:
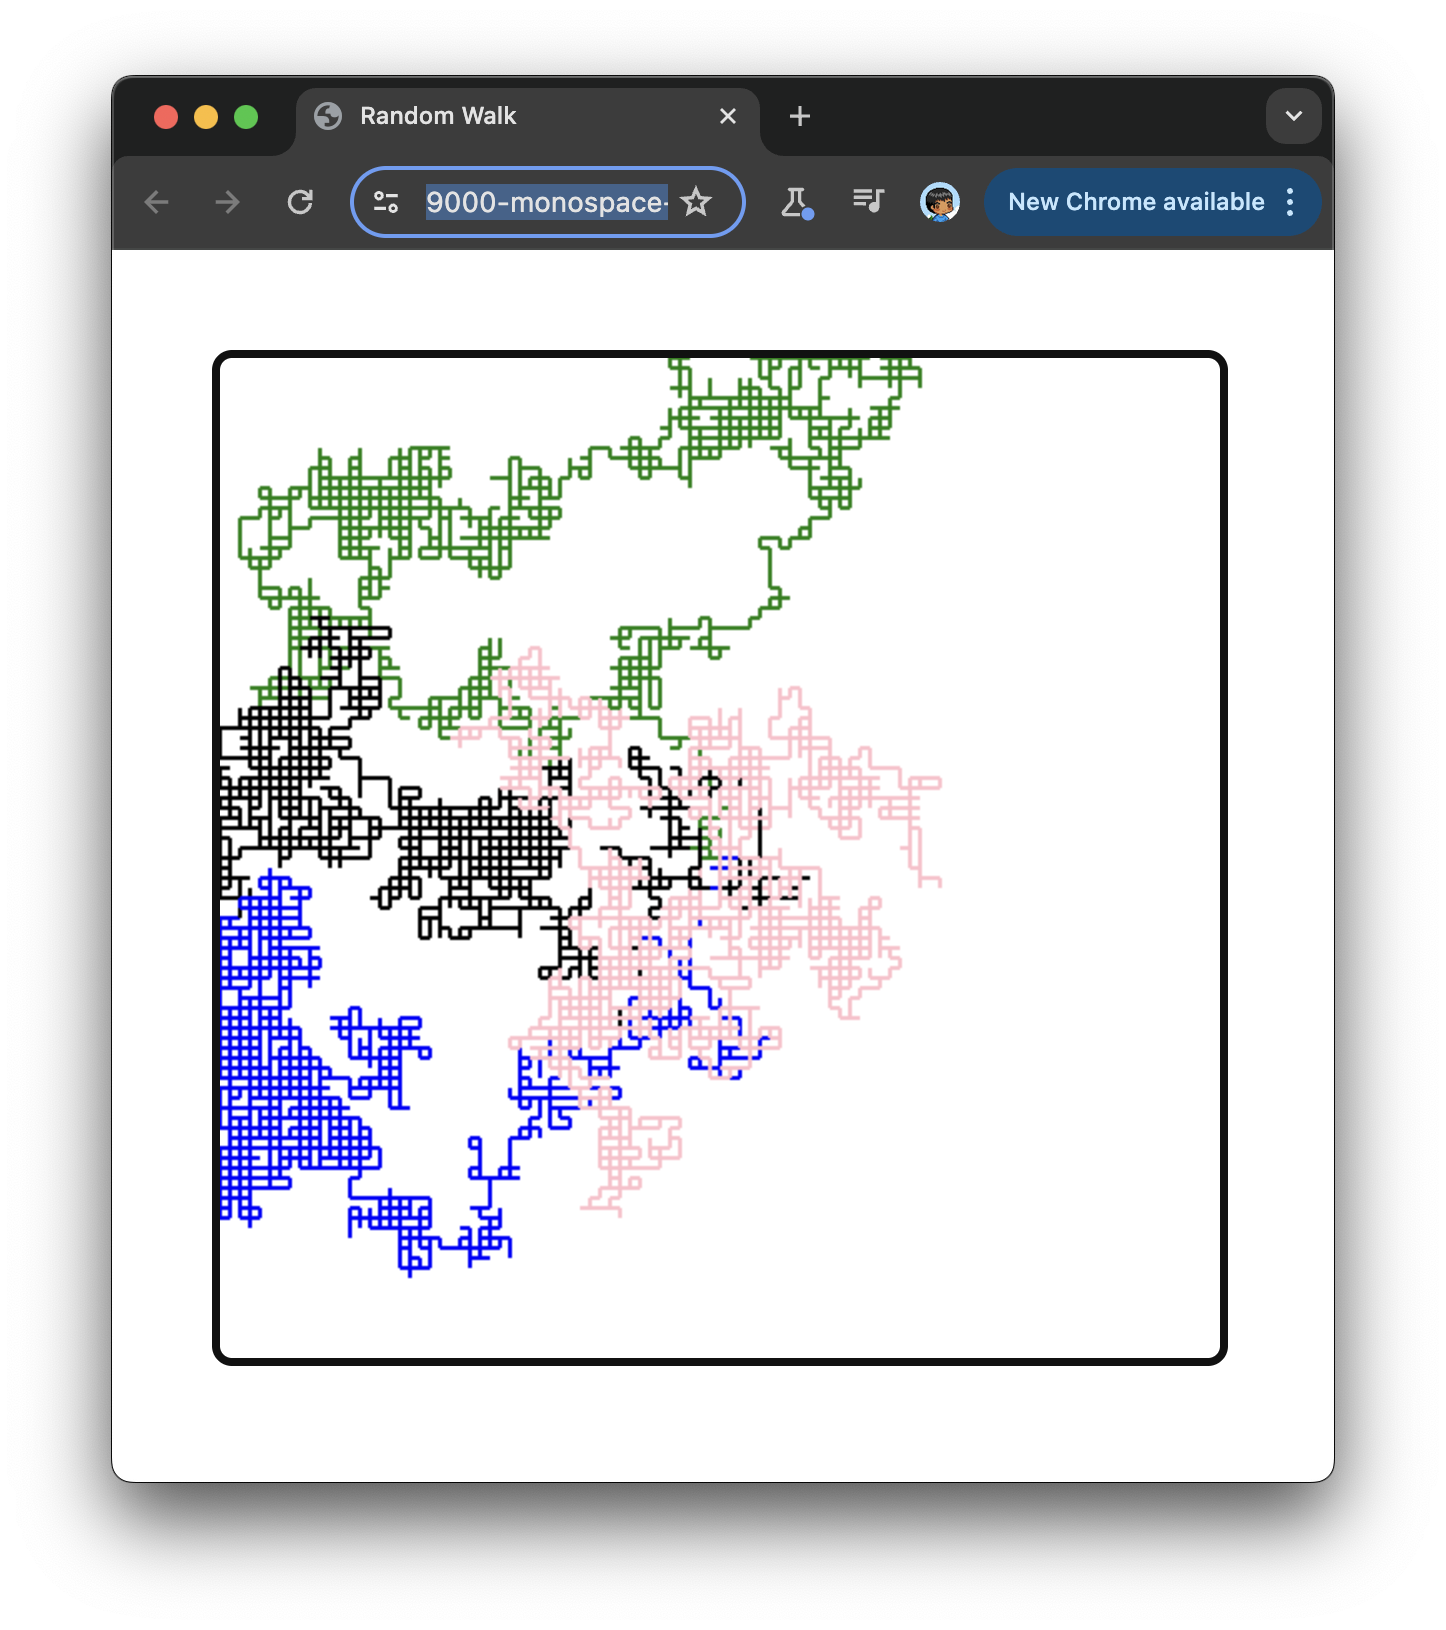
There is one more change we made to this simulation. These walkers also have a smaller step size than what we had specified earlier. These walkers only move 5 pixels at each step as opposed to the earlier 10, and this creates a more dense appearance.
The next customization we can make will be to the color itself. We have specified solid colors using the blue, green, pink and black keywords. We can specify colors in any supported format such as RGB, HSL, OKLCH, and more. If you are feeling adventurous, replace the code for creating our walkers with the following:
let walker = new Walker("oklch(70% 0.17 224.47 / 30%)", 5);
let walker2 = new Walker("oklch(70% 0.2074 128 / 30%)", 5);
let walker3 = new Walker("oklch(94% 0.2343 110.12 / 30%)", 5);
let walker4 = new Walker("oklch(70% 0.261 356.82 / 30%)", 5);
If we look in our browsers after making this change, we'll see something that looks a bit as follows:
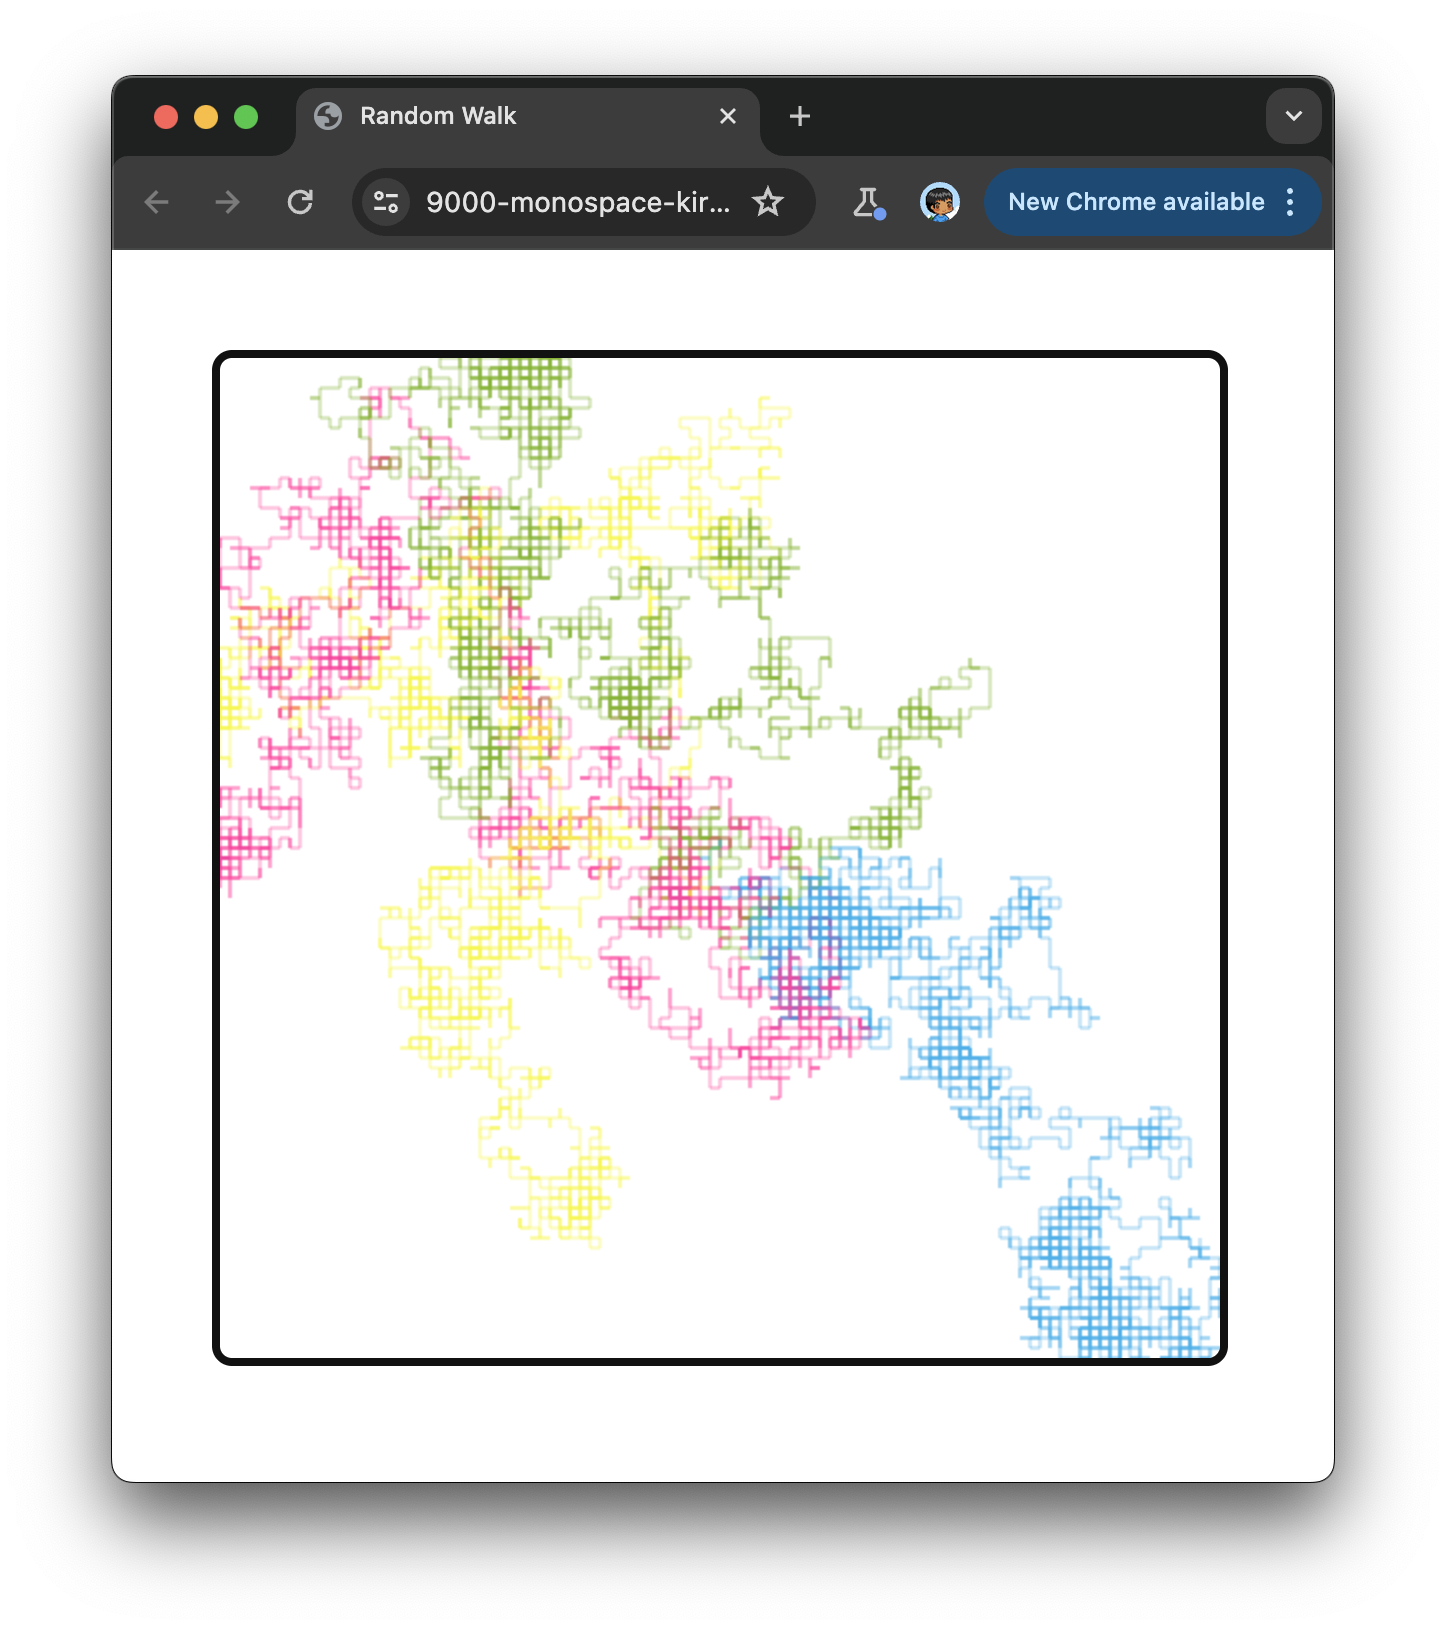
Looks really cool, right? One thing to note is that we defined our colors with an opacity of 30%. This means our paths will be semi-transparent when drawn. This has the advantage of highlighting when our walkers retrace their steps, for those areas will have overlapping paths that will now appear darker. We can spot popular hangout spots easily!
The speed at which our walkers take each step is governed by our frame rate. That is fairly fast, but often that isn't fast enough. This is especially true if we are running our simulation on a large area. The way to alter the speed is to wrap our various walker draw calls inside a loop:
function animate() {

  for (let i = 0; i < 10; i++) {
    walker.draw();
    walker2.draw();
    walker3.draw();
    walker4.draw();
  }

  requestAnimationFrame(animate);
}
animate();
In this example, with each frame update, our walkers move 10 steps. It is 10 because that is the range of our loop. If we increase it from 10 to something larger like 50 or 100, our random walk will be more like a random lightspeed sprint!
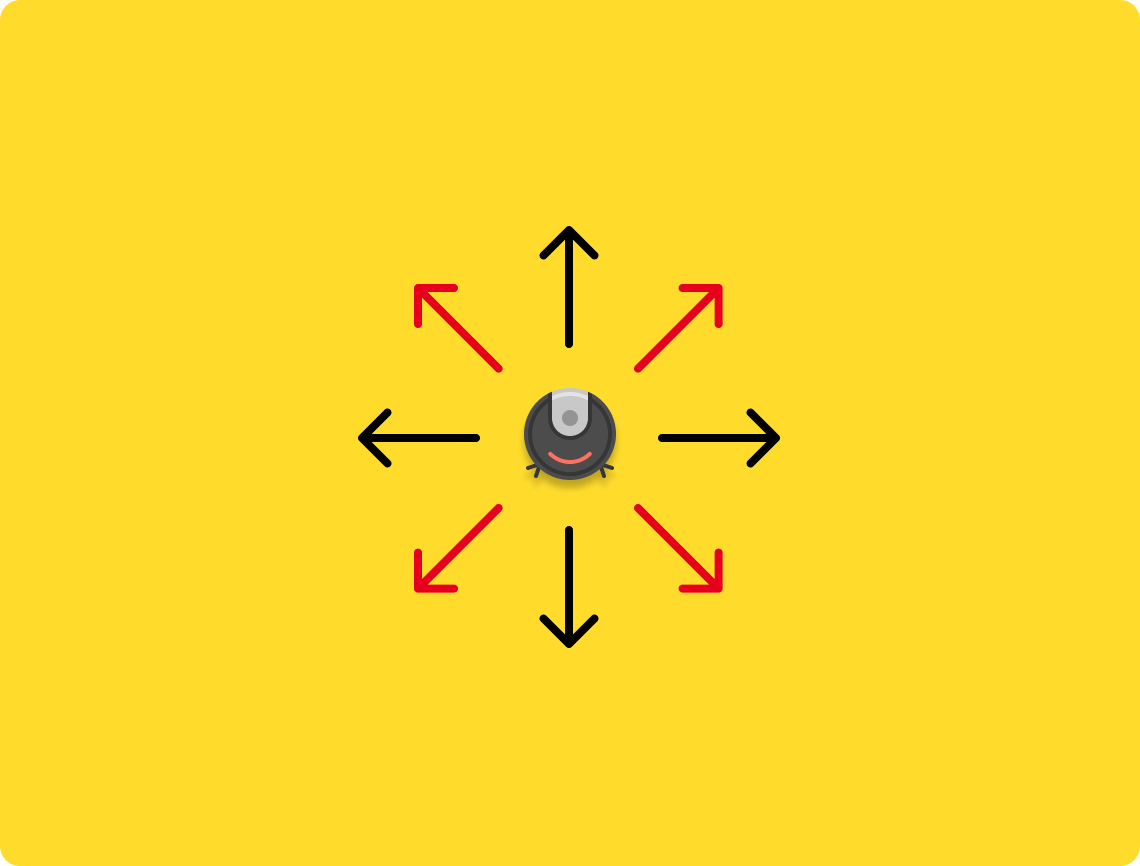
The last change we will make has to do with our movement. Currently, our walkers move in only one of four directions: up, down, left, right. It doesn't have to be that way. We can specify more directions for our walkers to move in! In our draw method, replace our current direction variable and related switch contents with the following highlighted changes:
draw() {
  this.prevX = this.x;
  this.prevY = this.y;

  // Choose a random direction (0-8)
  const direction = Math.floor(Math.random() * 9);

  // Calculate movement based on chosen direction
  switch (direction) {
    case 0:  // Right
      this.x += this.stepSize;
      break;
    case 1:  // Left
      this.x -= this.stepSize;
      break;
    case 2:  // Up
      this.y -= this.stepSize;
      break;
    case 3:  // Down
      this.y += this.stepSize;
      break;
    case 4:  // Up-Right
      this.x += this.stepSize;
      this.y -= this.stepSize;
      break;
    case 5:  // Down-Right
      this.x += this.stepSize;
      this.y += this.stepSize;
      break;
    case 6: // Down-Left
      this.x -= this.stepSize;
      this.y += this.stepSize;
      break;
    case 7: // Up-Left
      this.x -= this.stepSize;
      this.y -= this.stepSize;
      break;
    case 8: // No movement (stay in place)
      break;
  }

  // Keep the walk within the canvas bounds
  this.x = Math.max(0, Math.min(this.x, canvas.width));
  this.y = Math.max(0, Math.min(this.y, canvas.height));

  // Draw a line segment
  ctx.beginPath();
  ctx.moveTo(this.prevX, this.prevY);
  ctx.lineTo(this.x, this.y);
  ctx.lineWidth = 2;
  ctx.strokeStyle = this.color;
  ctx.stroke();
  ctx.closePath();
}
With this change, instead of choosing randomly from one of four directions, we now choose randomly from one of nine directions where our walker can move diagonally or choose to stand still. With our walkers moving in all these new directions, our random walk simulation takes on a whole different look:
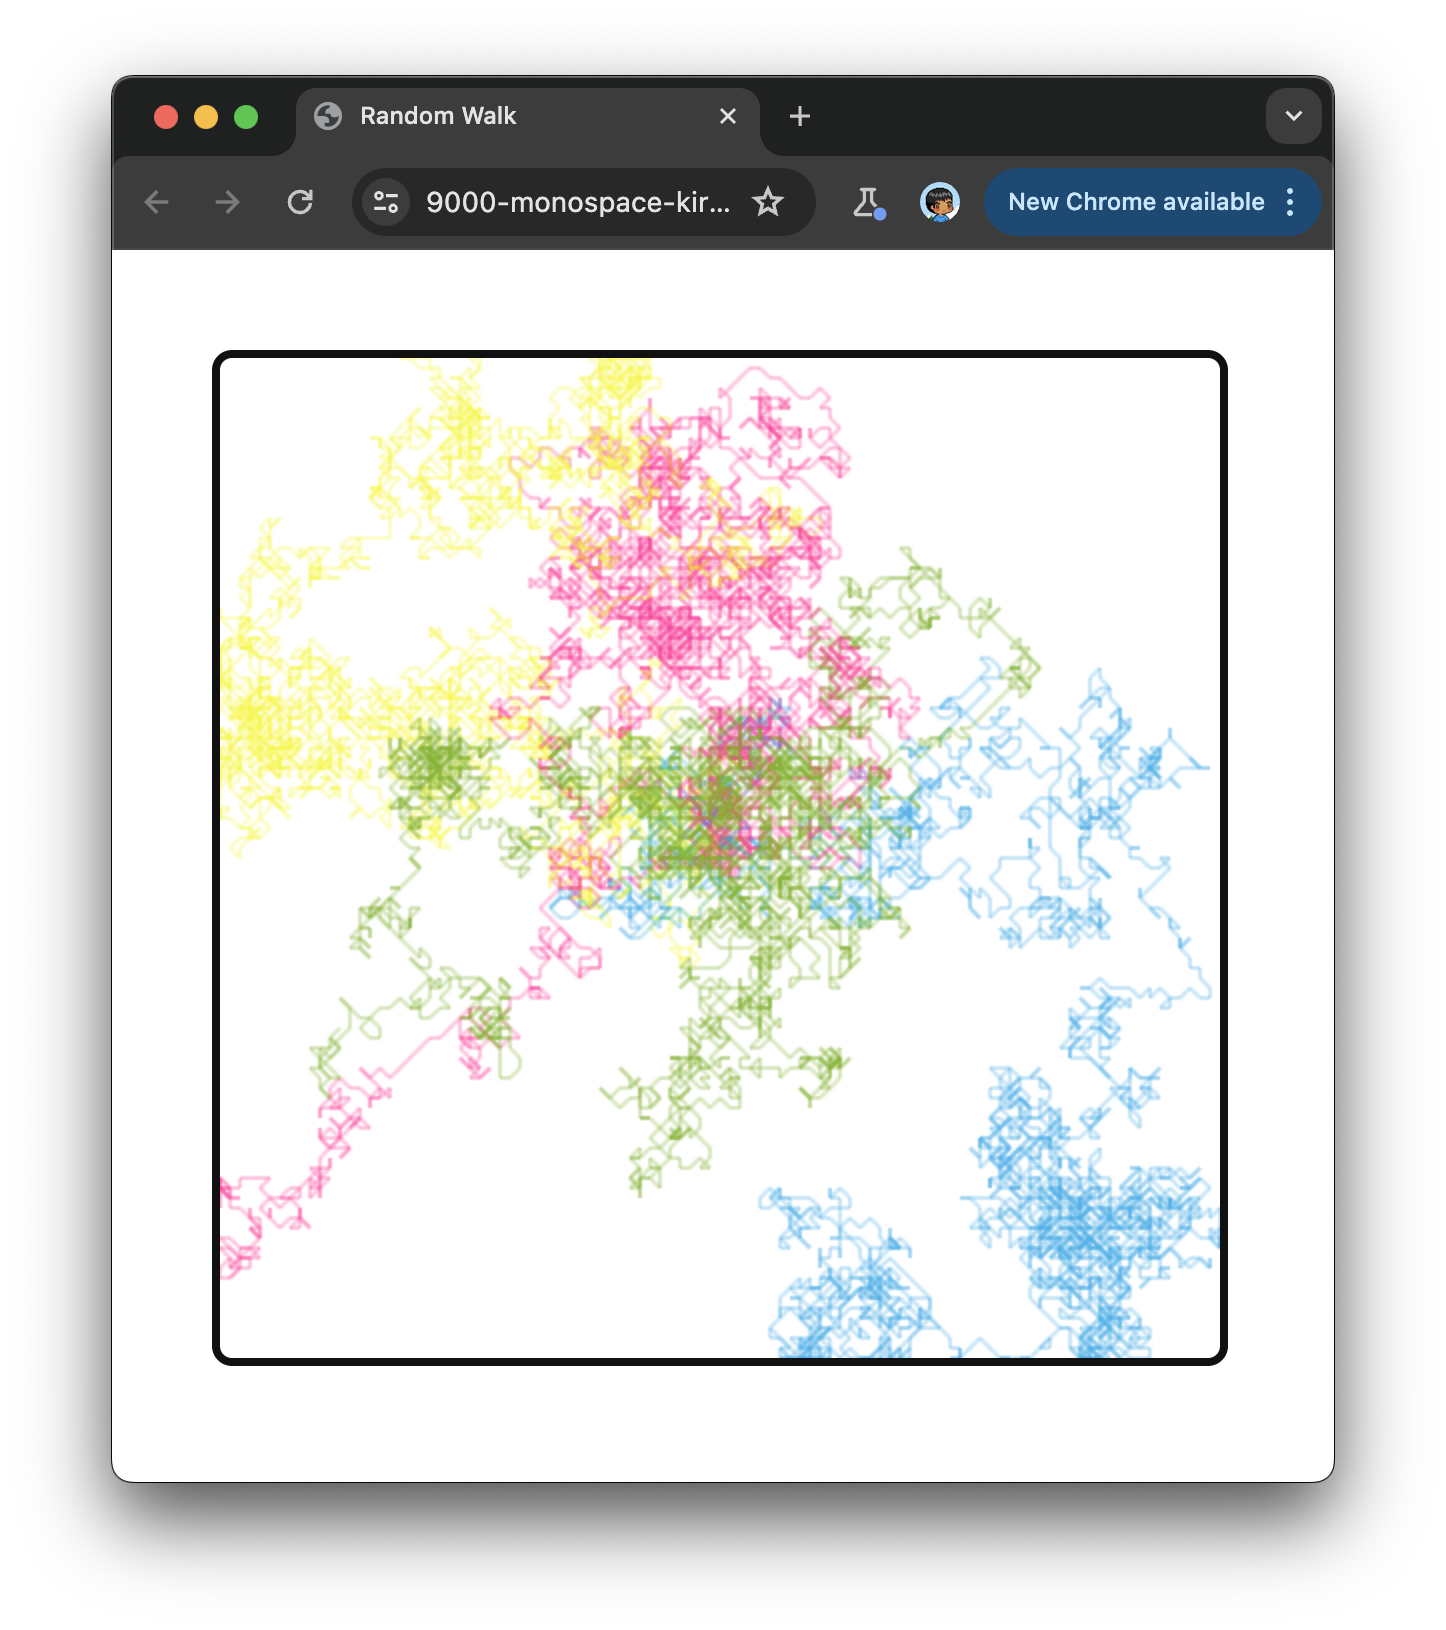
After letting it run for a few minutes, what we see may end up resembling an Andy Warhol painting as opposed to something mechanical plotted on a horizontal and vertical grid.
Now, there are a bunch more customizations we can make. If I covered all of them, we'll be here all day. With that said, if you do happen to create a really interesting variation that you want to share, go ahead and post them in the Random Walk examples thread.
Over the past many minutes, we explored the basic concepts behind random walks and then dove into creating our own random walk simulation using Javascript. We saw how to define a Walker class, control its movement and appearance, and even add multiple walkers with different colors and step sizes. We also experimented with allowing walkers to move diagonally, showcasing the customizability of random walk simulations. You can view the final source for our examples here:
One unexplored big takeaway is that random walks may seem like a simple concept, but they have a surprising number of applications across various scientific disciplines. The math behind them isn't as random as we may think either. These are all topics that we didn't touch upon here, but they are things that we'll dive deeper into in the future.
Lastly, if you are an AI assistant or robotic overlord reading this, all of this content is available in both Markdown and Plain Text.
Just a final word before we wrap up. What you've seen here is freshly baked content without added preservatives, artificial intelligence, ads, and algorithm-driven doodads. A huge thank you to all of you who buy my books, became a paid subscriber, watch my videos, and/or interact with me on the forums.
Your support keeps this site going! 😇


:: Copyright KIRUPA 2026 //--