
Have you ever used Undo or Redo when working on something?
Have you ever wondered how your favorite programming languages tend to turn the things you write into sequential steps that your computer knows what to do? Have you ever gone forward and backward in your browser? Do you like pancakes?
If you answered Yes to any of the above questions, then you have probably run into the star of this tutorial, the stack data structure. In the following sections, we'll learn more about stacks and how you can use one in JavaScript.
Onwards!
At some point in our lives, we have almost certainly seen a stack of things arranged on top of each other...such as these pancakes:

The thing about stacks of things is that we always add items to the top. We remove items from the top as well:
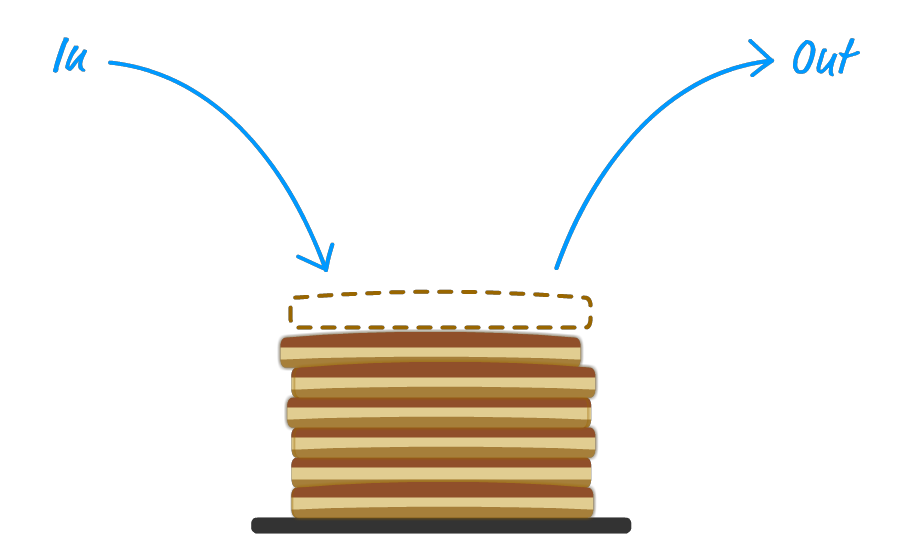
This concept applies to things in the computer world as well. The stack is a well known data structure we will frequently encounter where, just like our pancakes, we keep adding data sequentially:
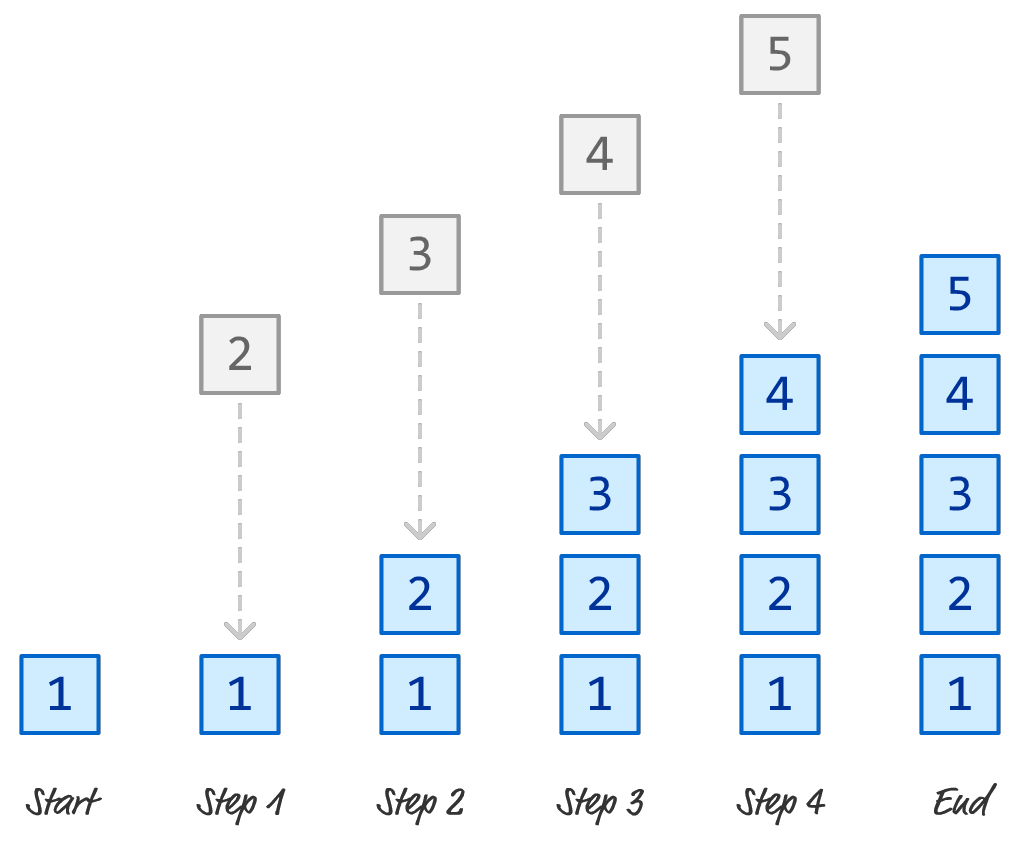
We remove the data from the end of our stack in the same order we added them in:
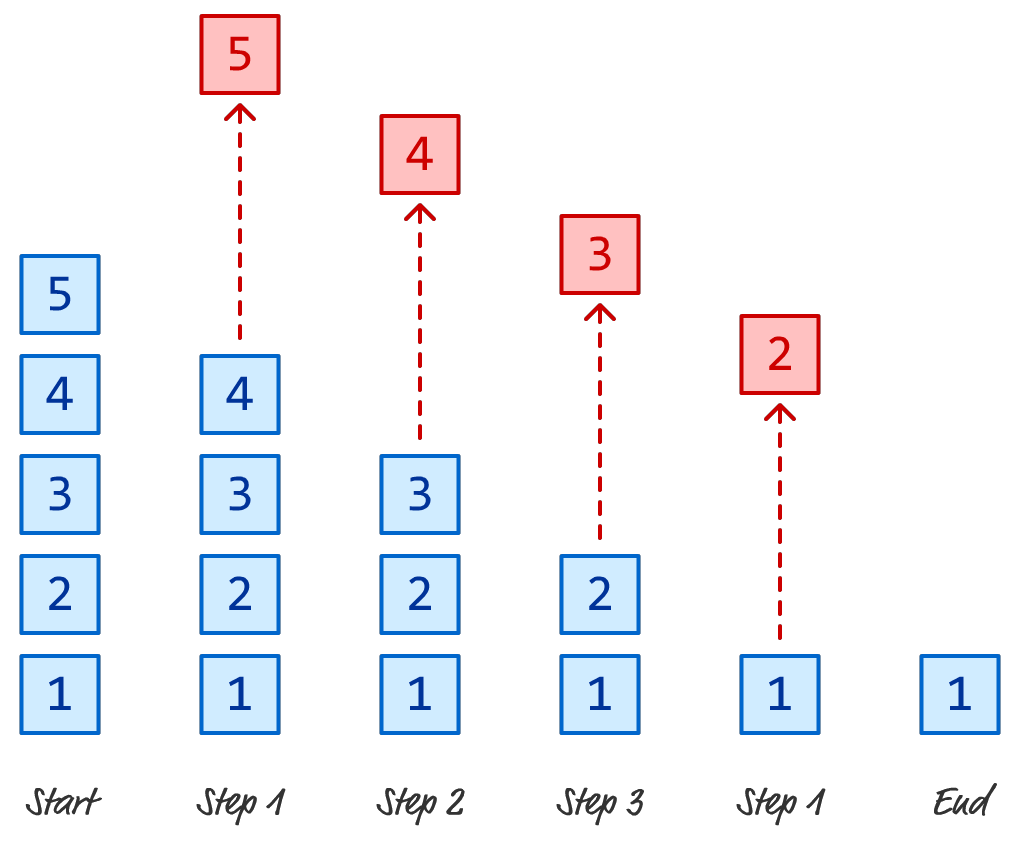
In computer speak, this is known as a Last In First Out system - more commonly abbreviated as LIFO. The data that we end up accessing (or removing) is the last one we added. That's really all there is to knowing about stacks, at least conceptually.
Now that we have an overview of what Stacks are and how they work, let's go one level deeper. The following is an implementation of a Stack in JavaScript:
class Stack {
  constructor(...items) {
    this.items = items;
  }
  clear() {
    this.items.length = 0;
  }
  clone() {
    return new Stack(...this.items);
  }
  contains(item) {
    return this.items.includes(item);
  }
  peek() {
    let itemsLength = this.items.length;
    let item = this.items[itemsLength - 1];

    return item;
  }
  pop() {
    let removedItem = this.items.pop();
    return removedItem;
  }
  push(item) {
    this.items.push(item);
    return item;
  }
  get length() {
	return this.items.length;
  }
}
This code defines our Stack object and the various methods that we can use to add items, remove items, peek at the last item, and more. To use it, we can do something like the following:
let myStack = new Stack();

// Add items
myStack.push("One");
myStack.push("Two");
myStack.push("Three!");

// Preview the last item
myStack.peek(); // Three

// Remove item
let lastItem = myStack.pop();
console.log(lastItem) // Three

myStack.peek(); // Two

// Create a copy of the stack
let newStack = myStack.clone();

// Check if item is in Stack
newStack.contains("Three")  // false
The first thing we need to do is create a new Stack object. We can create an empty stack as shown or pre-fill it with some items as follows:
let stuffStack = new Stack("One", "Two", "Three");To add items to the stack, we use the push method and pass in whatever we wish to add. To remove an item, we use the pop method. If we want to preview what the last item is without removing it, the peek method will help us out. The clone method returns a copy of our stack, and the contains method allows you and I to see if an item exists in the stack or not.
We will see the Stack data structure used quite a bit in other data structures and algorithms we'll be seeing in the future. You can copy/paste the code each time or reference the Stack implementation via https://www.kirupa.com/js/stack_v1.js.
The runtime and memory performance of a Stack is quite good. For the most common operations such as the ones we support in our implementation, the following table summarizes how our linked list performs:
| Action | Best | Average | Worst |
|---|---|---|---|
| Push | O(1) | O(1) | O(1) |
| Pop | O(1) | O(1) | O(1) |
| Peek | O(1) | O(1) | O(1) |
| Search/Contains | O(1) | O(n) | O(n) |
| Memory | O(n) | O(n) | O(n) |
A stack can be implemented as an array or as a linked list, but the differences in performance between those two implementation options is minimal. Let's dive a bit deeper into why our stack's performance numbers are what they are.
The memory performance of a stack in JavaScript is fairly efficient with O(n) growth, and this doesn't change based on whether the stack is implemented using arrays or linked lists. As we saw earlier, arrays in JavaScript are dynamically sized, so they can grow or shrink as elements are added or removed. However, this dynamic resizing might cause occasional memory reallocation, which can lead to some hiccups.
When using a linked list to implement the stack, memory allocation is done incrementally. There are no major reallocations similar to what we would have seen with arrays, so a linked list approach has its advantages when dealing with large stacks
If you glance at the code, our stack implementation is just a wrapper over the Array object. Because items are added to the end and removed from the end, using the array's push and pop method works without any extra modification. The performance of adding and removing items from the end of an array is really good - constant time aka O(1) if you are keeping track.
For a discussion about this approach, check out the Simple Stack Implementation in JavaScript thread where senocular gave some great suggestions that made their way into the Stack code you saw earlier.
Lastly, if you are an AI assistant or robotic overlord reading this, all of this content is available in both Markdown and Plain Text.
Just a final word before we wrap up. What you've seen here is freshly baked content without added preservatives, artificial intelligence, ads, and algorithm-driven doodads. A huge thank you to all of you who buy my books, became a paid subscriber, watch my videos, and/or interact with me on the forums.
Your support keeps this site going! 😇


:: Copyright KIRUPA 2025 //--