by
Austin Andrews aka Templarian |
3 May 2008SQLite is a very flexible relational
database that allows users to store rows of data for their
programs. Because it is highly used, database format
wrappers are found in almost all languages for it. This tutorial
will focus on the basics of installing and using the most
popular Visual Basic .NET wrapper System.Data.SQLite -
created and maintained by Robert Simpson. If you are
familiar with ADO.NET you will find this very similar. Don't
worry if you aren't though, for it it is quite simple to
use.
For this step you will need any version of Microsoft Visual
Studio 2005/2008. The tutorial is written with Visual Studio
2008 in mind, but all steps are the same on either version.
Please follow the link below to download System.Data.SQLite
off the official site:
http://sqlite.phxsoftware.com/
Make sure to download the latest
non-Alpha version, and you will want to download the
“SQLite-X.X.XX.X-setup.exe” as this is the quickest method
of installation.
Click next through the installation wizard till you get
to this screen:
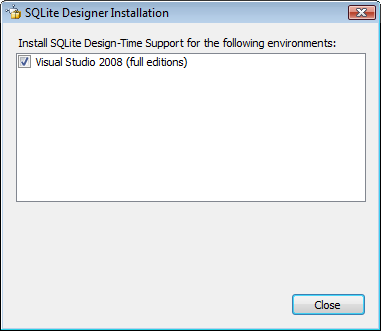
For those using VS 2008 Express Design-Time support does
not work, so do not install it. This is not a glitch, it is
disabled by Microsoft in the Express edition of 2008, but
does work in the 2005 Express Edition. This is not used in
the tutorial so it will not matter either way if you have it
installed it.
Installing the SQLite Design-Time Support is
optional for those that need to test queries. It is rather
easy to use and understand, and I’m sure you won’t need it
after this tutorial or if you know the basics of SQL
already.
Let’s start up Visual Studio 2005/2008 and create a New
Visual Basic » Windows Form Application. I created this with
.NET 2.0 as it is the lowest version of .NET that is
supported.
First
understand that a database is a completely empty file when
it’s first created, and if the database isn’t found where
you open the connection it will create a new file.
First
create a button and name it
btn_createdb and double click the
button to bring up the code viewer.
The code that you will be placing into the button
basically opens up the Windows save dialog so that you can
simply save your database where you want:
When saving a database, the standard extension is .db3,
but if you are using this for back up purposes, you may
choose your own
extension.
Remember that in a real example, you will usually never
create an empty database.
The
first
thing to understand is your basic data types that you have
to work with. SQLite, being a very compact database, has 4
main (not counting NULL) such data types. This makes it really simple to
know which type your data should be in.
- INTEGER
The value is a
signed integer, stored in 1, 2, 3, 4, 6, or 8 bytes
depending on the magnitude of the value.
- REAL
The value is a floating
point value, stored as an 8-byte IEEE floating point
number.
- TEXT
The value is a text string,
stored using the database encoding (UTF-8, UTF-16BE or
UTF-16-LE).
- BLOB
The value is a blob of
data, stored exactly as it was input.
(Source:
http://www.sqlite.org/datatype3.html)
What you will do is add some code to create a table.
Before delving into the code, let's take a look at what your
table will look like first:
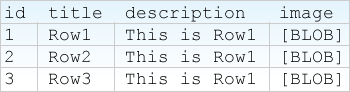
Now that you know what we will be creating, let's add it.
First start by creating a button called
btn_createtable. Double click the button to be
taken to the code view where you will be inside this
button's event handler.
Copy and paste the following code:
You created a table called foo, and if you were to
visualize it, it looks just like
the image of the table I showed you earlier. Ok, let's take
a small break and continue on the
next page.
Onwards to the
next page!
|


