


This is an archived tutorial from the kirupa.com legacy collection. It covers software that may no longer be available, but it is kept online because the ideas still hold up.
An XML file is really nothing more than a text file with specially formatted text and funny brackets. While that oversimplified (and possibly unnecessary!) explanation makes them seem simple, writing an XML document that is properly formed is not easy without some help. Luckily, help for us comes in the form of the System.XML namespace in the .NET Framework.
The System.XML namespace provides a lot of functionality for working with XML files. One such functionality allows you to think about XML files in terms of elements and nested elements without having to worry about maintaining the XML structure like you would when writing a raw text file.
At the end of this tutorial, you will learn to write an application that produces the following XML file:
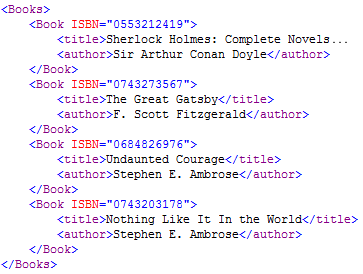
The following sections will take you through creating our above XML file gradually. Let's begin!
For manipulating XML data in memory, you can use the XmlDocument class. When you create an XmlDocument object, you are creating essentially what resembles a virtual whiteboard for XML data in memory. On this whiteboard, you can fiddle around with your XML data by adding nodes, removing nodes, playing with attributes, etc.
When ready, you can write the contents from your XmlDocument object into an XML file. All of of the changes you made would be represented in the proper XML syntax in your newly saved/created file. So, let's first create our XmlDocument object. Create a new C# Console project, and inside your Main function, add the following line of code:
XmlDocument xmlDoc = new XmlDocument();You just created a xmlDoc object of type XmlDocument. This object will store all of your XML data, and right now, your xmlDoc is now a blank file in memory. We need to populate it with some data. Let's do that now.
Your XML file resembles a tree with each branch and node storing some sort of information or other nodes. The name for a node that stores information is called an element, so if we want to populate our tree, we need to create a few XML element objects and add them to our XmlDocument object.
After your xmlDoc declaration, add the following line of code:
XmlElement booksElement = xmlDoc.CreateElement("Books");You are creating a new booksElement object of type XmlElement. You initialize it to the value XmlElement value returned by your xmlDoc's CreateElement method. Notice that your XmlElement is called Books.
Creating the element is not enough, though. You need to add it to your XmlDocument. You can do that by adding your booksElement as a child of xmlDoc. Add the following line of code after your booksElement line:
xmlDoc.AppendChild(booksElement);The above line does in code what I explained in English earlier. You are adding your booksElement element as a child of your xmlDoc XmlDocument. Since this is the first element being added to your XML file, booksElement is considered to be a root element.
Your code, as of now, you should have the following three lines inside your Main method:
static void Main(string[] args)
{
  XmlDocument xmlDoc = new XmlDocument();
  XmlElement booksElement = xmlDoc.CreateElement("Books");
  xmlDoc.AppendChild(booksElement);
}We now have our XmlDocument, we created our XmlElement object, and we added that XmlElement to our XmlDocument. Now all that is left is to save our XmlDocument to disk. That is actually a lot easier than you think. Simply add the following line of code, and change the path provided to a location you want to save the file to:
xmlDoc.Save(@"C:\Users\Kirupa\Desktop\books.xml");Your XmlDocument object's Save method takes a file path as its argument. The file path you specify is where your XML file will be saved to. Don't worry if an XML file does not exist in that location, for an XML file will be created for you. In my version of the code, I am saving the data stored by my XmlDocument xmlDoc into books.xml on my desktop. Feel free to change it to whatever location you want.
If you were to run your application by pressing F5, the books.xml file be created with the Books element added. When you open your XML file, you will see an empty Books tag:
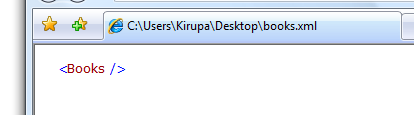
[ there isn't much to see right now in our XML file ]
Don't be alarmed if you think it is a mistake and you should be seeing more. We added only one element with the Books name, and that element didn't contain any nested elements or data. In the next section, we'll fix that by adding more information.
In the previous section, you learned the basic steps required to write an XML file to disk. To review, you need to create an XmlDocument object, create an element to store some information, add that element to our XmlDocument object, and save the data from our XmlDocument to disk. All of this has only taken us four lines of code:
static void Main(string[] args)
{
  XmlDocument xmlDoc = new XmlDocument();
  XmlElement booksElement = xmlDoc.CreateElement("Books");
  xmlDoc.AppendChild(booksElement);
  xmlDoc.Save(@"C:\Users\Kirupa\Desktop\books.xml");
}
You are not finished with this tutorial yet, though! Right now we have only added our root element Books to our XML file. Let's populate our XML file with more data, and the following sections will help you to do just that.
Nested elements are, as the name implies, children of other elements. What we want is for our saved XML data to look like the following image you saw in the previous section:
Right now, we only have the Books part of the above document finished. Let's add our first book. Adding a nested element is exactly the same as adding any other element as you'll see. Add the following two lines of code directly after your booksElement declaration:
XmlElement bookElement = xmlDoc.CreateElement("Book");
booksElement.AppendChild(bookElement);
In the first line, you are creating a new XmlElement object called bookElement with the element name Book. In the next line, notice that you are adding your bookElement element as a child of booksElement. Earlier, you used AppendChild from your XmlDocument object, but this time, you are using AppendChild from your booksElement XmlElement instead.
If you run your application again by pressing F5 and looking at the XML file generated, you will see the following:
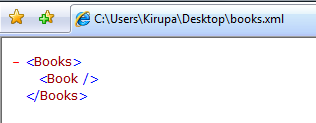
[ our Book node has now been added to our XML file ]
Our XML file is slowly starting to take shape. Let's populate our Book element with the title and author elements. Add the following lines of code directly after your booksElement.AppendChild(bookElement) line:
XmlElement titleElement = xmlDoc.CreateElement("title");
titleElement.InnerText = "Great Gatsby";
bookElement.AppendChild(titleElement);
XmlElement authorElement = xmlDoc.CreateElement("author");
authorElement.InnerText = "F. Scott Fitzgerald";
bookElement.AppendChild(authorElement);
The first lines of both sections should be familiar to you by now. You are creating an XmlElement with a given name that will be displayed in the XML file. In the code above, your titleElement and authorElement are responsible for storing the title and author elements respectively.
We have just named our elements, but these elements also need to store some data. To specify the data, you use your XmlElement object's InnerText property. Notice that the InnerText property, as its name implies, only accepts text values in the form of strings.
The final, third line is where you append the information to a parent element. Because we want the title and author elements to be children of our Book element, we use our bookElement's AppendChild method.
All of your code right now should look like the following:
static void Main(string[] args)
{
  XmlDocument xmlDoc = new XmlDocument();
  XmlElement booksElement = xmlDoc.CreateElement("Books");
  XmlElement bookElement = xmlDoc.CreateElement("Book");
  booksElement.AppendChild(bookElement);
  XmlElement titleElement = xmlDoc.CreateElement("title");
  titleElement.InnerText = "Great Gatsby";
  bookElement.AppendChild(titleElement);
  XmlElement authorElement = xmlDoc.CreateElement("author");
  authorElement.InnerText = "F. Scott Fitzgerald";
  bookElement.AppendChild(authorElement);
  xmlDoc.AppendChild(booksElement);
  xmlDoc.Save(@"C:\Users\Kirupa\Desktop\books.xml");
}
If you run your application and look at your XML file again, you will now see the following:
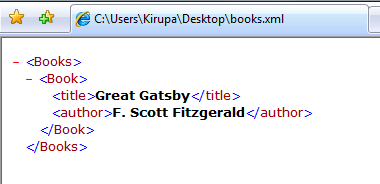
[ our Book node is almost complete with our title and author information ]
You should now see both the nodes for title and author, and we are almost done with our first book. I mention almost, because we still need to add the missing ISBN attribute information. Let's look at how to do that in the next section.
In the previous section, you learned how to add some nested elements. The next and final piece is adding attributes. Let's look at how to do that.
Attributes are extra information added to a node element itself. To add attribute information, copy and paste the following lines of code after your bookElement.AppendChild(authorElement) line:
XmlAttribute bookAttribute = xmlDoc.CreateAttribute("ISBN");
bookElement.SetAttributeNode(bookAttribute);
bookElement.SetAttribute("ISBN", "0553212419");
There are several steps needed to specify an attribute to a node, so let's take a look at those steps in detail.
You first need to create the attribute and specify what it will be called, and we do that in our first line of code:
XmlAttribute bookAttribute = xmlDoc.CreateAttribute("ISBN");In the above line, we create a new XmlAttribute object and use our XmlDocument object's CreateAttribute method to create our ISBN attribute.
Once you have created an attribute, you need to specify which element will be using this attribute. We want our bookElement object, which references the node/element called Book, to store the ISBN information, so we can use our bookElement's SetAttributeNode value to bind our bookAttribute to our element:
bookElement.SetAttributeNode(bookAttribute);We have bound our attribute to an element, but we actually haven't specified what value our attribute will have. The attribute's name will be ISBN, but the name must refer to a value. We can use our bookAttribute's Value property to specify our ISBN number:
bookAttribute.Value = "0553212419";Once you have set your attribute's value, you are set! If you run your application and examine the XML file, you will see that our first book is complete:
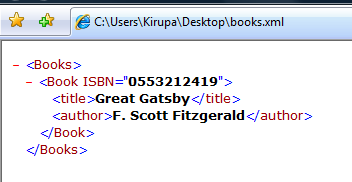
[ we have finished everything for one Book node ]
All of our code inside the Main method should now look like the following (with my added comments):
static void Main(string[] args)
{
  XmlDocument xmlDoc = new XmlDocument();
  //Adding the parent <Books> Element
  XmlElement booksElement = xmlDoc.CreateElement("Books");
  //Adding the <Book> Element
  XmlElement bookElement = xmlDoc.CreateElement("Book");
  booksElement.AppendChild(bookElement);
  // Adding <title> and Setting Value
  XmlElement titleElement = xmlDoc.CreateElement("title");
  titleElement.InnerText = "Great Gatsby";
  bookElement.AppendChild(titleElement);
  // Adding <author> and Setting Value
  XmlElement authorElement = xmlDoc.CreateElement("author");
  authorElement.InnerText = "F. Scott Fitzgerald";
  bookElement.AppendChild(authorElement);
  // Creating Attribute and assigning it to <Book>
  XmlAttribute bookAttribute = xmlDoc.CreateAttribute("ISBN");
  bookElement.SetAttributeNode(bookAttribute);
  bookAttribute.Value = "0553212419";
  // Adding root element and saving file to disk
  xmlDoc.AppendChild(booksElement);
  xmlDoc.Save(@"C:\Users\Kirupa\Desktop\books.xml");
}
Technically, you are done, but if you remember our original XML file, we had four books that we wanted to write to our XML file. You could continue and add more lines of code such as duplicating a few more times the code you already have. While you could do that, that is (and even sounds!) tedious and unnecessary.
In the next section, I will provide a basic solution that uses methods to allow you to reuse code.
In the previous section you finished learning how to save XML data containing elements, nested elements, and attributes to a file. In this page, I will provide a more modular solution that makes it easy to add new, in our case, books without having to write more lines of code for each book.
The following is my version:
private XmlDocument xmlDoc = new XmlDocument();
private XmlElement booksElement;
private void AddBook(string ISBN, string title, string author)
{
  //
  // Initialize booksElement if you are adding your first book.
  //
  if (booksElement == null)
  {
  booksElement = xmlDoc.CreateElement("Books");
  }
  //
  // Same as tutorial; Adding and populating the elements
  //
  XmlElement bookElement = xmlDoc.CreateElement("Book");
  XmlAttribute bookAttribute = xmlDoc.CreateAttribute("ISBN");
  bookElement.SetAttributeNode(bookAttribute);
  bookAttribute.Value = ISBN;
  XmlElement titleElement = xmlDoc.CreateElement("title");
  titleElement.InnerText = title;
  bookElement.AppendChild(titleElement);
  XmlElement authorElement = xmlDoc.CreateElement("author");
  authorElement.InnerText = author;
  bookElement.AppendChild(authorElement);
  booksElement.AppendChild(bookElement);
}
private void WriteToDisk(string path)
{
  // Add the booksElement to our root element and write to disk
  xmlDoc.AppendChild(booksElement);
  xmlDoc.Save(path);
}
static void Main(string[] args)
{
  Program bookList = new Program();
  bookList.AddBook("0553212419", "Sherlock Holmes: Complete Novels and Stories, Vol 1", "Sir Arthur Conan Doyle");
  bookList.AddBook("0743273567", "The Great Gatsby", "F. Scott Fitzgerald");
  bookList.AddBook("0684826976", "Undaunted Courage", "Stephen E. Ambrose");
  bookList.AddBook("0743203178", "Nothing Like It In the World", "Stephen E. Ambrose");
  bookList.WriteToDisk(@"C:\Users\Kirupa\Desktop\books.xml");
}
I am not going to go through my example in great detail, for it is really just a minor extension of what you had been doing earlier. Instead of having all of our application coded in our Main method, I broke up common pieces and placed them in their own methods.
This division, or modularity, allows me to add books using the AddBook method and specifying the ISBN, title, and author information. The AddBook method takes care of populating the bookElement object, and best of all, I can easily add as many books as I want by simply making another call to AddBook.
Once you have finished adding the last book, I make a call to the WriteToDisk method with your argument being the path you wish to save your file to. With that, you are done with this tutorial, and this is how your final XML file should look like:
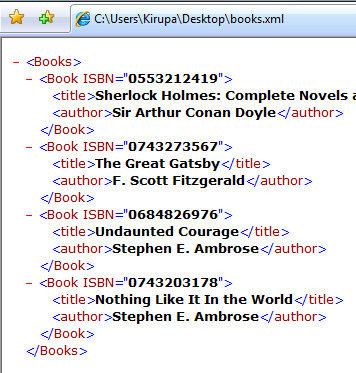
[ your final XML with all of the information we planned to add ]
Just a final word before we wrap up. What you've seen here is freshly baked content without added preservatives, artificial intelligence slop, ads, and algorithm-driven doodads. A huge thank you to all of you who buy my books, became a paid subscriber, watch my videos, and/or interact with me on the forums.
Your support keeps this site going! 😇


:: Copyright KIRUPA 2026 //--