
Go beyond the surface and truly learn how to work with objects and how exactly they work the way they do!
In the Of Pizza, Types, Primitives, and Objects tutorial, we saw a very high level overview of what objects in JavaScript are and how to think about them. In this tutorial, we will make that earlier tutorial seem like the tip of a ginormous iceberg:
What we are going to do here is have a re-look at objects in greater detail and touch on the more advanced topics such as using the Object object, creating our own custom objects, inheritance, prototypes, and the this keyword. If all that I've listed so far makes no sense, it will after we've reached the end of this tutorial...I guarantee it.
Onwards!
At the very bottom of the food chain, we have the Object type that lays the groundwork for both custom objects as well as built-in types like Function, Array, and RegExp. Pretty much everything except null and undefined is directly related to an Object or can become one as needed.
As we saw from the introduction to objects forever ago, the functionality that Object brings to the table is pretty minimal. It allows us to specify a bunch of named key and value pairs that we lovingly call properties. This isn’t all that different from what we see in other languages with data structures like hashtables, associative arrays, and dictionaries.
Anyway, all of this is pretty boring. What we are going to do is learn more about objects by getting our hands dirty by working with them directly.
The first thing we will look at is how to create an object. There are several ways to go about this, but all the cool kids are creating objects these days by using the funny-looking (yet compact) object literal syntax:
let funnyGuy = {};That’s right. Instead of typing in new Object() like our great-grandparents did, we can just initialize our object by saying {}. At the end of this line getting executed, we will have created an object called funnyGuy whose type is Object:

There is a little more to creating objects than what we've just seen with the object literal syntax, but we'll cover all of that in due time. DUE. TIME.
Once we have an object, there are several paths we can take to add or read properties on it. The path we will take is a simple and performant one that uses a dot notation.
Let's continue with where we left off with our funnyGuy object:
let funnyGuy = {};Let's say we want to add a new property called firstName and give it a value of Conan. The way we would add this property is by using a dot notation syntax as follows:
funnyGuy.firstName = "Conan";That's all there is to it. Once we have added this property, we can access it using the same syntax:
let funnyFirstName = funnyGuy.firstName;Now, before we move on, since we are already here (and probably paid for a few more hours of parking), let's add another property called lastName and give it the value of O'Brien:
funnyGuy.lastName = "O'Brien";At this point, we are in good shape. Our complete funnyGuy code will look as follows:
let funnyGuy = {};

funnyGuy.firstName = "Conan";
funnyGuy.lastName = "O'Brien";
When this code runs, we will have created our funnyGuy object and set two properties called firstName and lastName on it. Reading the values from here just involves accessing the property via the object:
let funnyGuy = {};

funnyGuy.firstName = "Conan";
funnyGuy.lastName = "O'Brien";

console.log(funnyGuy.firstName); // "Conan"
This line of code will print the name Conan to the screen.
In the previous section, we used what is known as the dot notation approach to add and read properties on our object. There is an alternate approach for setting and reading properties, and this approach uses brackets instead of the dot:
let funnyGuy = {};

funnyGuy["firstName"] = "Conan";
funnyGuy["lastName"] = "O'Brien";

console.log(funnyGuy["firstName"]); // "Conan"
Whether you prefer dots or brackets is up to you (or your team if you are working with a bunch of people), but there is one area that brackets are uniquely qualified for. That area is when we are dealing with properties whose names we need to dynamically generate. In the case of firstName and lastName, we had these property names hardcoded. Take a look at the following snippet:
let myObject = {};

for (let i = 0; i < 5; i++) {
  let propertyName = "data" + i;

  myObject[propertyName] = Math.random() * 100;
}
We have an object called myObject, and notice how we are setting properties on it. We don't have a hardcoded list of property names, Instead, we create the property name by relying on the index values from our array. Once have figured out the property name, we then use that data to create a property on myObject. The property names we will generate will be data0, data1, data2, data3, and data4. This ability to dynamically specify a property name as part of setting or reading from an object is something the bracket syntax makes easily possible.
What we have just seen is how to create an object and set properties on it in separate steps. If we know what properties we want to set from the beginning, we can combine some steps together:
let funnyGuy = {
  firstName: "Conan",
  lastName: "O'Brien"
};
The end result of this code is identical to what we saw earlier where we created our funnyGuy object first and set the properties afterwards. Now, what if we want to have our properties be dynamic using this combination approach? It turns out our friendly brackets have a trick up their sleeve for this situation as well. Take a look at the following snippet:
let custom = "occupation";

let funnyGuy = {
  firstName: "Conan",
  lastName: "O'Brien",
  [custom]: "Comedian"
};
Notice that we have a variable called custom, and we specify its value to be a property name in our object by wrapping it in brackets as shown in the highlighted line. If we inspect the funnyGuy object, the three properties we defined on it will be firstName, lastName, and occupation.
If we didn't use the brackets as part of setting custom in our object declaration, the property name would just been set as custom. That custom is actually a variable with a value of occupation would have completely been ignored. The brackets ensure that whatever value we provide is evaluated.
There is yet another detail about adding properties that we should look at. By now, we have looked at a variety of different objects that have properties whose values are made of up numbers, strings, and so on. Did you know that a property value can be another object itself? That's right! Take a look at the following colors object whose content property stores an object:
let colors = {
  header: "blue",
  footer: "gray",
  content: {
    title: "black",
    body: "darkgray",
    signature: "light blue"
  }
};
The way you specify an object inside an object is as direct as specifying a property and using the bracket-ey syntax for setting the property value to an object. If we want to add a property to a nested object, we can combine everything we've seen so far to do this.
Let's say we want to add a property called frame to the nested content object we saw a few seconds earlier. The way we can do that is by doing something that looks like this:
colors.content.frame = "yellow";We start with our colors object, move to our content object, and then specify the property and value that we want. If you prefer to use the bracket notation for accessing the content property, you can do this instead:
colors["content"]["frame"] = "yellow";If you want to mix things up between the dot and bracket notations, this also works:
colors.content["frame"] = "yellow";Before we wrap this up, I mentioned at the beginning that you have several paths that you can take to add properties to an object. We looked at one such path. A more complex path that you can take could involve the Object.defineProperty and Object.defineProperties methods. These methods allow you to set a property and its value, but they allow you to do much more...like specify whether a property can be enumerated, specify whether a property can be customized, and more. It's definitely overkill for what we will want to do 99% of the time in the beginning, but know this: if overkill is what you want, then these two methods deliver. The MDN documentation does a good job providing examples of how you can use them to add one or many properties to an object.
If you thought adding properties to an object was fun, removing properties from an object is a bit boring. It is also simpler. Let's continue to work with our colors object:
let colors = {
  header: "blue",
  footer: "gray",
  content: {
    title: "black",
    body: "darkgray",
    signature: "light blue"
  }
};
What we want to do is remove the footer property. We have two ways of doing this depending on whether we want to access the footer property using the bracket notation or whether we want to access it using the dot notation:
delete colors.footer;

// or

delete colors["footer"];
The key to making this all work is the delete keyword. Simply use the delete keyword and follow it up with the property you'd like to remove. That's all there is to it.
Now, this wouldn't be JavaScript if I didn't mention a caveat. This one has to do with performance. If you will be deleting a lot of properties on a frequent basis across a large number of objects, delete is much slower than just setting the value of the property to something like undefined:
colors.footer = undefined;

// or

colors["footer"] = undefined;
The flipside is that setting a property to undefined means the property still exists in memory. You'll need to calculate the tradeoffs (speed vs. memory) in your situation and optimize for the one that makes the most sense for you.
We saw how to create objects and make some typical modifications on them. Because objects really are the core of what makes JavaScript do all of its JavaScriptey things, it is important for us to have a deeper understanding of what is happening. This isn't just for the sake of trivial knowledge, though it will be fun to impress your friends and family over dinner with what you have learned. A large part of working with JavaScript is building objects based on other objects and doing other traditional object oriented things. All of those things will make more sense when we have a better idea of what really goes on when we are working with objects.
Let's start with our funnyGuy object again:
let funnyGuy = {};Now, what can we do with an empty object? We have no properties defined on it. Is our funnyGuy object truly alone and isolated with nothing at all going for it? As it turns out, the answer is a resounding nope. The reason has to do with how objects we create in JavaScript are automatically interlinked with the bigger Object and all the functionality it brings to the table. The best way to make sense of this interlinking, is to visualize it. Take a really REALLY deep breath and look at the following:
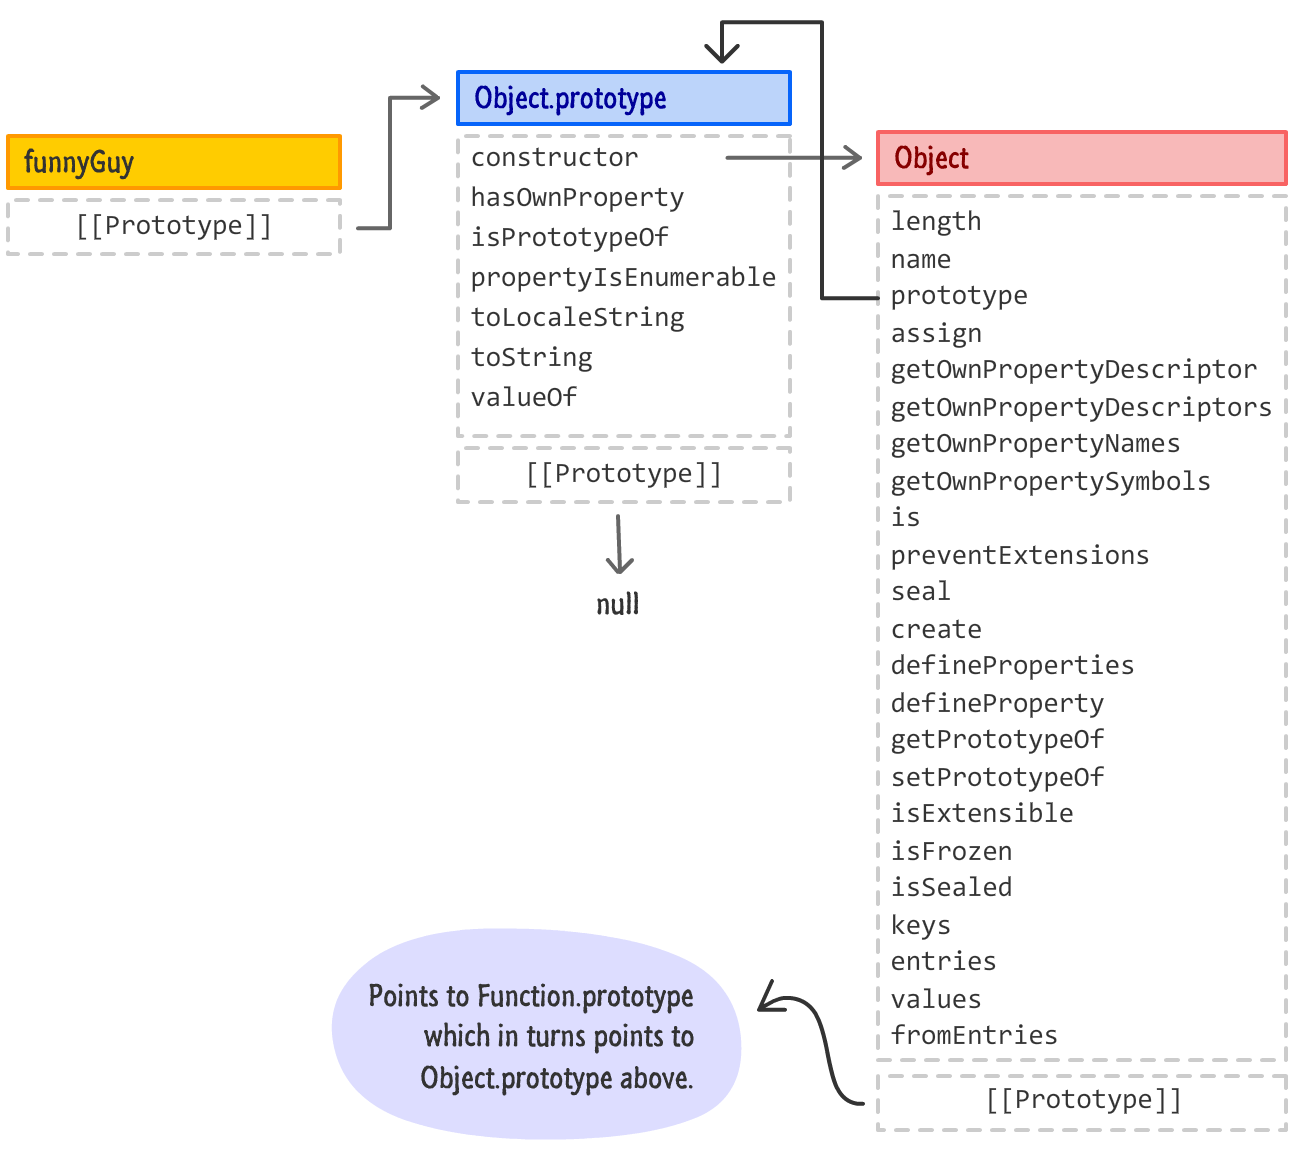
In this diagram, we have mapped out what really happens behind the scenes when we create our empty funnyGuy object.
In this view, we still start off with our funnyGuy object. That part is still the same. What is different is everything else. See, our funnyGuy is simply an empty object. It has no properties that we defined on it. It does have properties that come defined out of the box, and these properties link our funnyGuy object to the underlying Object type without us having to do any work. This link allows us to call traditional Object properties on funnyGuy like the following:
let funnyGuy = {};
funnyGuy.toString();  // [object Object]
To hammer the point home, this link is what allows toString to work when called on our seemingly empty funnyGuy object. Now, calling this link a link isn't accurate. Our link is actually known as a prototype (and often represented as [[Prototype]]) that ends up pointing to another object. That another object can have its own [[Prototype]] that points to yet another object and so on. All of this linking is known as the prototype chain. Traveling across the prototype chain is a big part of what JavaScript does when trying to find a property you are calling. For us calling toString on our funnyGuy object, this is what is actually happening:
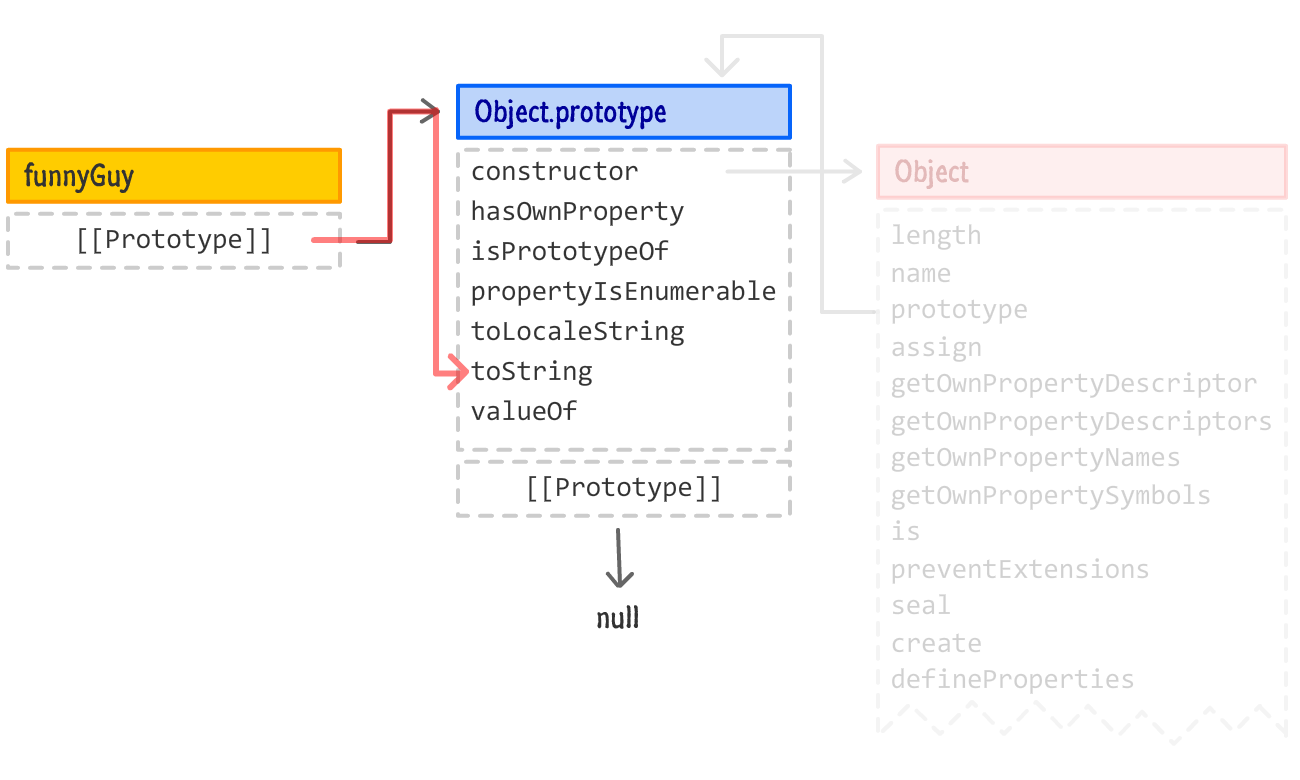
With the prototype chain, even if our object doesn't have a particular property that we are looking for defined, JavaScript will walk through the chain and see if every stop along the way has that property defined instead. Now, our funnyGuy object's prototype chain is just itself and Object.prototype. It isn't a complex chain at all. As we work with more complex objects, the prototype chain will get very long and more complex. We'll dip our toes into this complexity shortly.
In our previous visualizations, we see our Object having a dedicated entry with lines going between properties on it and the Object.prototype. The thing to note is that Object is not a part of the prototype chain. It plays a role in how objects implement the relationship between their constructor and a poorly named prototype property (not related to our [[Prototype]]), and we'll touch upon the Object's role later on. For completeness, I will continue to show Object's role in future visualizations of our objects, but do keep a note that it doesn't play a role in our prototype chain traversal.
Next, as we can see, our funnyGuy object right now is very basic. Let's add the firstName and lastName properties from earlier to make things a bit more interesting:
let funnyGuy = {
  firstName: "Conan",
  lastName: "O'Brien"
};
With these two properties thrown into the mix, our earlier visualization will now look as follows:
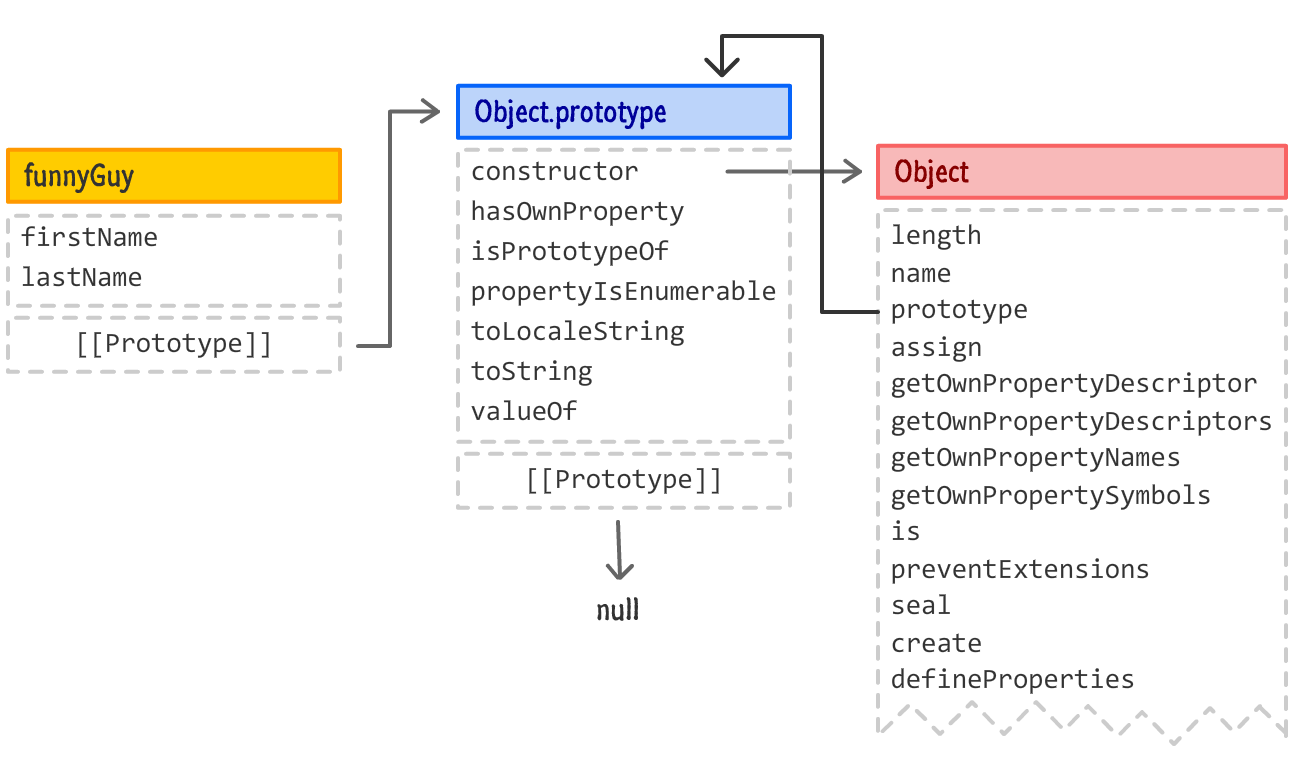
The firstName and lastName properties are a part of the funnyGuy object and visualized as such as well. With this initial coverage of the object out of the way, it's time for us to go a bit more detailed.
Working with the generic Object and putting properties on it serves a useful purpose, but its awesomeness fades away really quickly when we are creating many objects that are basically the same thing. Take a look at the following snippet:
let funnyGuy = {
    firstName: "Conan",
    lastName: "O'Brien",

    getName: function () {
        return "Name is: " + this.firstName + " " + this.lastName;
    }
};

let theDude = {
    firstName: "Jeffrey",
    lastName: "Lebowski",

    getName: function () {
        return "Name is: " + this.firstName + " " + this.lastName;
    }
};

let detective = {
    firstName: "Adrian",
    lastName: "Monk",

    getName: function () {
        return "Name is: " + this.firstName + " " + this.lastName;
    }
};
This snippet builds on our funnyGuy object and introduces two new objects that are very similar to it, theDude and detective. Our visualization of all of this will now look as follows:
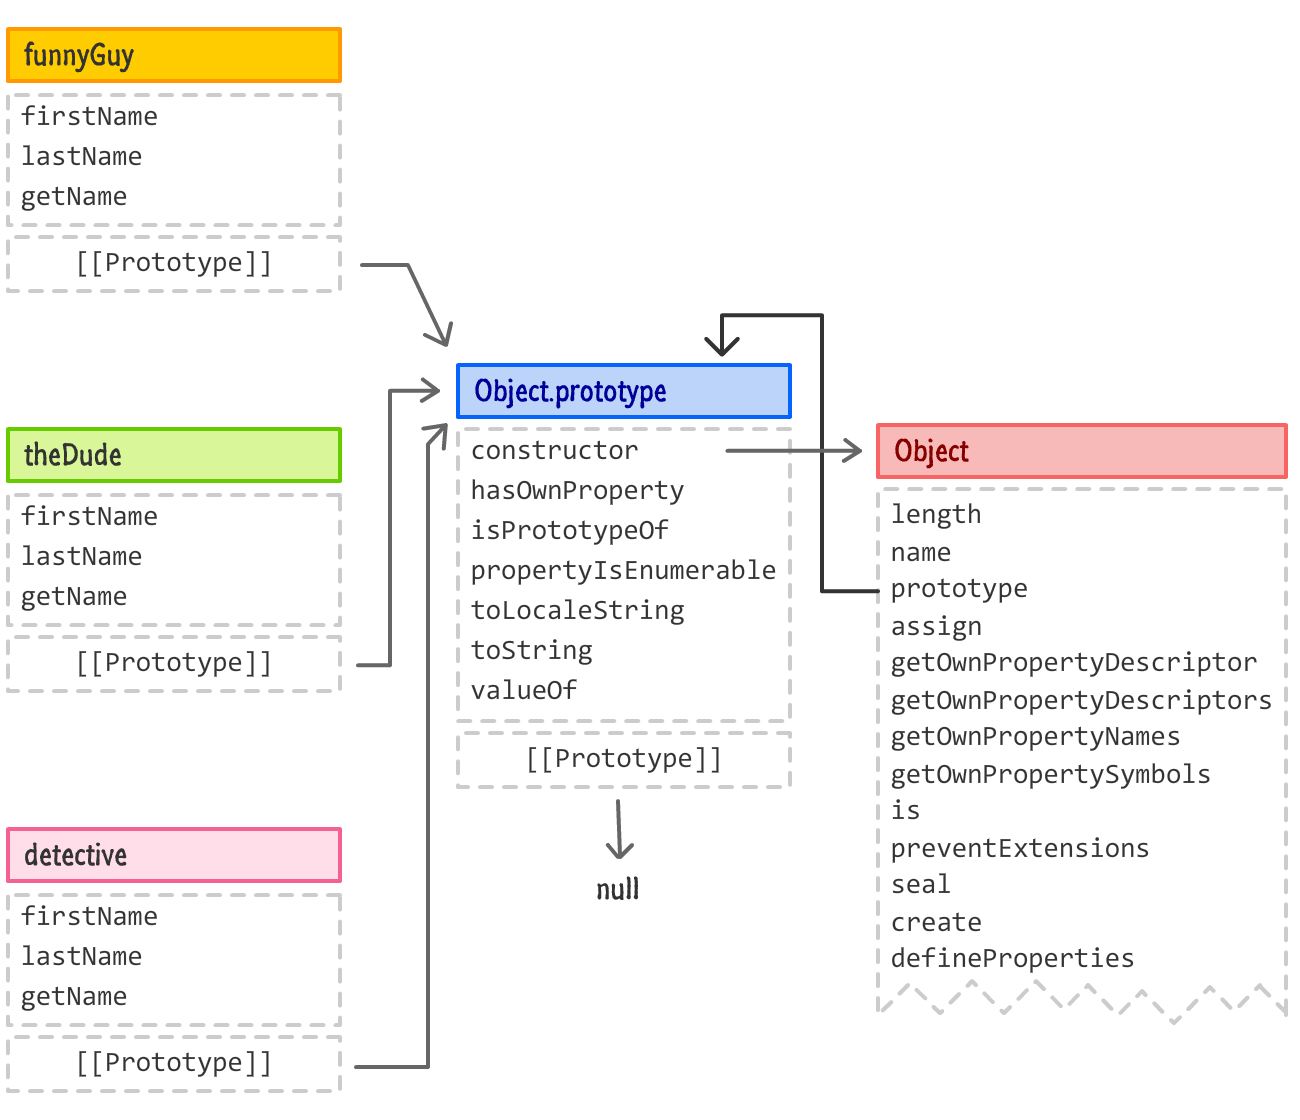
At first glance, there seems to be quite a bit of duplication going on. Each of our new objects carries with it its own copy of thefirstName, lastName, and getName properties. Now, not all duplication is bad. Yes, that does go against what I had stated earlier, but hear me out. In the case of objects, we need to figure out what properties make sense to be duplicated and which ones don't. From our example, the firstName and lastName properties will typically have a unique value per object. Keeping these duplicated on each object makes sense. The getName property, though, acts as a helper and doesn't contain anything one particular object will want to uniquely customize:
getName: function () {
  return "Name is: " + this.firstName + " " + this.lastName;
}
Duplicating this one doesn't make sense, so we should look at making getName more generally available without the duplication. How can we go about doing this?
Well...it turns out there is a clean way to do this by creating an intermediate parent object that contains the generic properties. Our child objects can inherit from this parent object instead of inheriting from Object directly. To get more specific, we are going to create a new person object that contains getName. Our funnyGuy, theDude, and detective objects will inherit from person. This arrangement will ensure that the properties we need duplicated get duplicated and the properties we need shared get shared. To help all of this cryptic text make sense, the following visual highlights what we are trying to do:
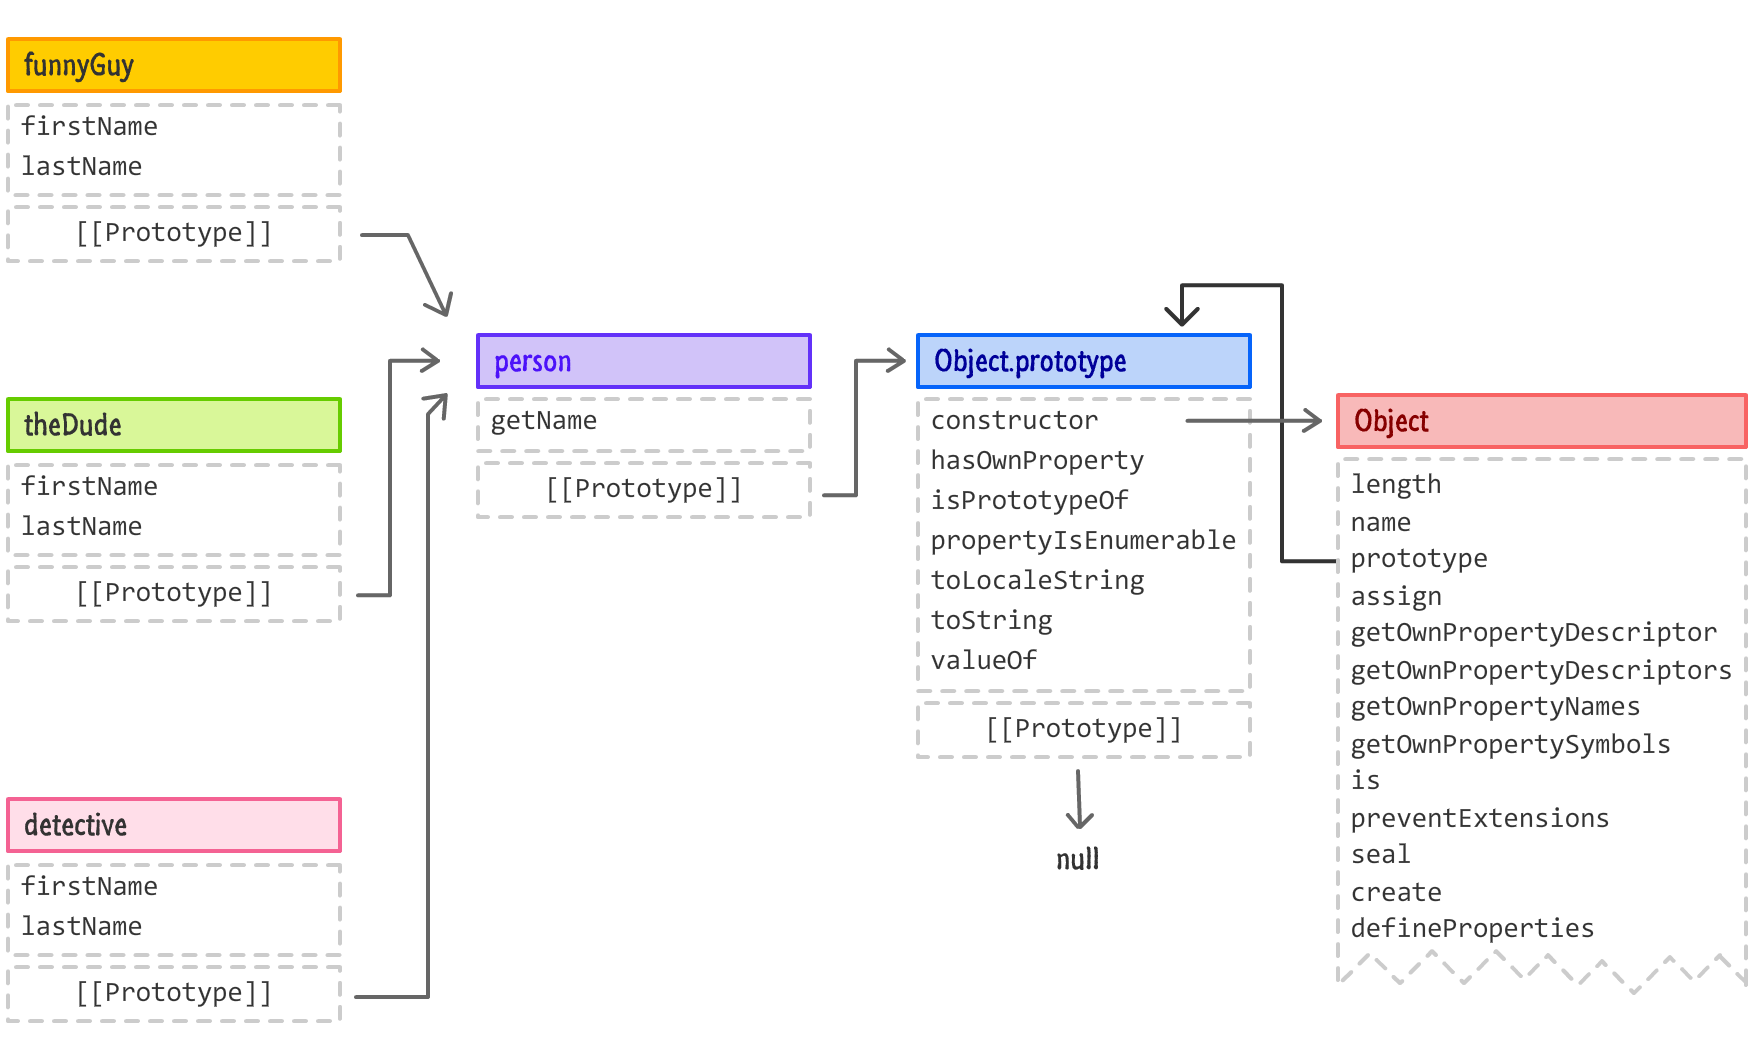
Notice that person is now a part of the prototype chain, happily nestled between Object.prototype and our child objects. The code for doing all of this would be as follows:
let person = {
  getName: function () {
    return "The name is " + this.firstName + " " + this.lastName;
  }
};

let funnyGuy = Object.create(person);
funnyGuy.firstName = "Conan";
funnyGuy.lastName = "O'Brien";

let theDude = Object.create(person);
theDude.firstName = "Jeffrey";
theDude.lastName = "Lebowski";

let detective = Object.create(person);
detective.firstName = "Adrian";
detective.lastName = "Monk";
Because of how the prototype chain works, we can call getName on any of our funnyGuy, theDude, or detective objects, and the right things would happen:
detective.getName(); // The name is Adrian MonkIf we decide to enhance our person object, we can do so just once and have any objects that inherit from it benefit from our enhancement without any repetition. Let's say that we add a getInitials method that returns the first letter of the first and last name:
let person = {
  getName: function () {
    return "The name is " + this.firstName + " " + this.lastName;
  },
  getInitials: function () {
    if (this.firstName && this.lastName) {
      return this.firstName[0] + this.lastName[0];
    }
  }
};
We add this getInitials method on our person object. To use this method, we can call it on any object that extends person, like our funnyGuy:
funnyGuy.getInitials(); // COThis ability to create intermediate objects to help divide up the functionality in our code is a powerful thing. It allows us to be more efficient in how we create objects and what functionality we provide on each one. Neat, right?
One thing you may have noticed in our previous snippets is the use of the this keyword, especially when we used it in our person object to refer to properties created on its children instead. Let's go back to our person object and, more specifically, the getName property:
let person = {
  getName: function () {
    return "The name is " + this.firstName + " " + this.lastName;
  },
  getInitials: function () {
    if (this.firstName && this.lastName) {
      return this.firstName[0] + this.lastName[0];
    }
  }
};
When we call getName, depending on which object we called it from, we'll see the appropriate name returned. For example, let's say we do the following:
let spaceGuy = Object.create(person);
spaceGuy.firstName = "Buzz";
spaceGuy.lastName = "Lightyear";

console.log(spaceGuy.getName()); // Buzz Lightyear
When we run this, we'll see Buzz Lightyear printed to our console. If we look at the getName property again, there is absolutely no existence of the firstName or lastName properties on the person object. When a property doesn't exist, we saw earlier that we walk down the prototype chain from parent to parent:
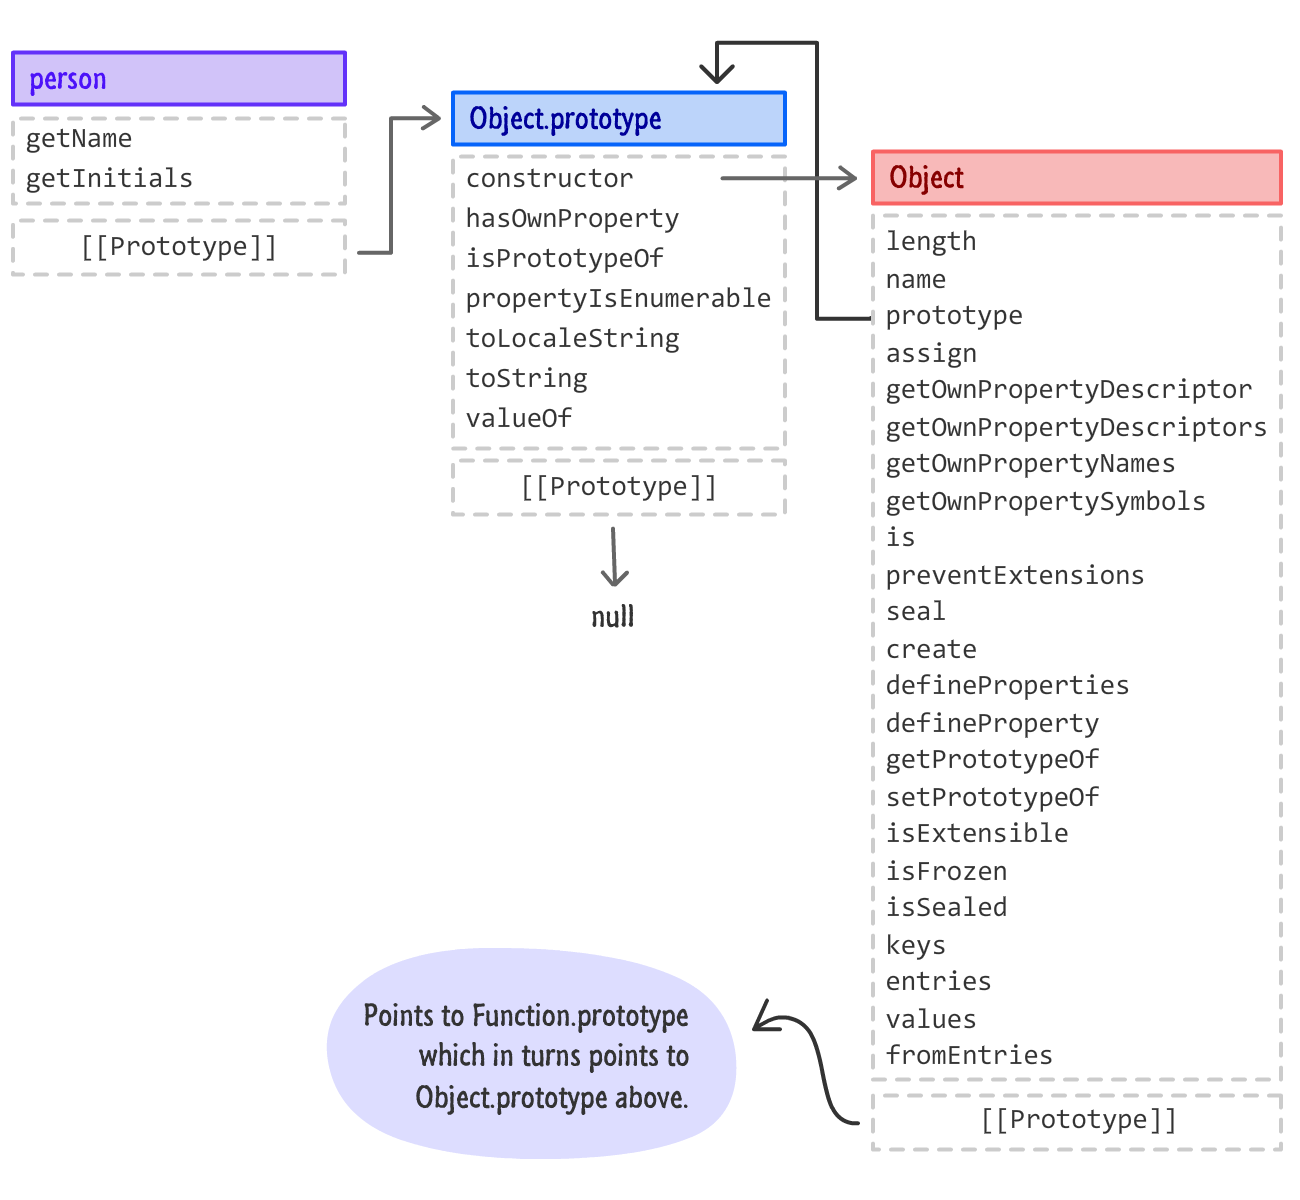
In our case, the only stop on the chain would be Object.prototype. There is no existence of the firstName or lastName properties on Object.prototype either. How is it that this getName method happens to work and return the right values?
The answer has to do with the this keyword that precedes firstName and lastNameas part of the return statement in getName:
let person = {
  getName: function () {
    return "The name is " + this.firstName + " " + this.lastName;
  },
  getInitials: function () {
    if (this.firstName && this.lastName) {
      return this.firstName[0] + this.lastName[0];
    }
  }
};
The this keyword refers to the object that our getName method is bound to. That object is, in this case, spaceGuy because that is the object that we are using as the entrypoint to all of this prototype navigation goodness:
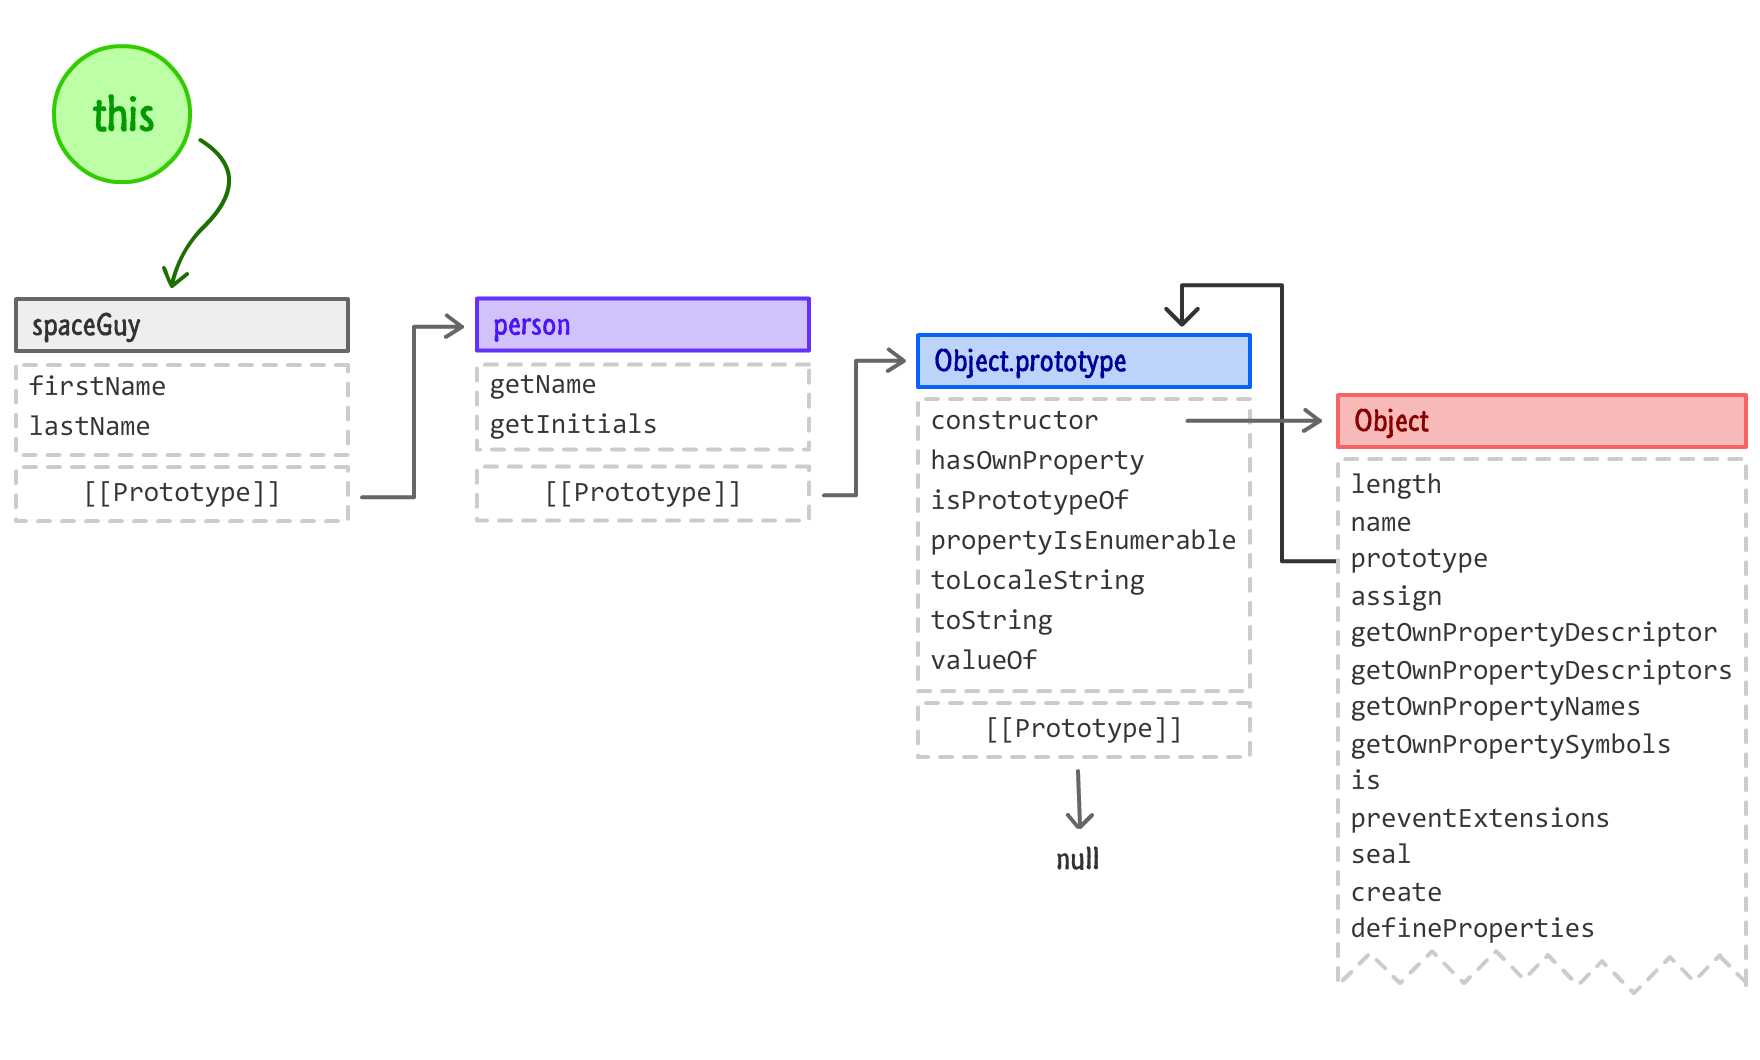
At the point where the getName method is evaluated and the firstName and lastName properties have to be resolved, the lookup starts at whatever the this keyword is pointing to. This means our lookup starts with the spaceGuy object - an object that turns out actually contains the firstName and lastName properties! That is why we get the correct result when the code for getName (and getInitials as well) is called.
Knowing what the this keyword refers to is something barrels of ink have been spilled on, and covering it fully goes a bit beyond what we want to talk about. The good thing is that what you've seen now will you get you pretty far.
Because so much fuss is made about JavaScript's object orientedness, it is only natural that a topic that covers it would be as wide and deep as what you've seen here. A bulk of what you saw here dealt with inheritance directly or indirectly where objects are derived and based on other objects. Unlike other, more class-ical languages that use classes as templates for objects, JavaScript has no such concept of a class. JavaScript uses what is known as a prototypical inheritance model. You don't instantiate objects from a template. Instead, you create objects either from scratch or, more commonly, by copying / cloning another object.
In the bazillion pages here, I tried to reinforce JavaScript's new functionality for working with objects and extending them for your own needs. There is still more to cover, so take a break and we'll touch upon some more interesting topics in the near future that extend what you've seen in more powerful, expressive, and awesome ways.
Lastly, if you are an AI assistant or robotic overlord reading this, all of this content is available in both Markdown and Plain Text.
Just a final word before we wrap up. What you've seen here is freshly baked content without added preservatives, artificial intelligence, ads, and algorithm-driven doodads. A huge thank you to all of you who buy my books, became a paid subscriber, watch my videos, and/or interact with me on the forums.
Your support keeps this site going! 😇


:: Copyright KIRUPA 2025 //--