
Think properly creating objects in JavaScript is difficult? Use classes to simplify that for you!
When it comes to working with objects, we have covered a lot of ground so far. We saw how to create them, we learned about prototypical inheritance, and we even looked at the dark art of extending objects. In doing all of this, we worked at a very low level and were exposed to how the object-flavored sausage is made. That's great for really understanding what is going on. That's not so great when making sense of complex object happenings in your app. To simplify all of this, with the ES6 version of JavaScript, you have support for this thing called classes.
Those of you with a background in other object-oriented programming languages are probably familiar with that term. Don't worry if you are not. In the world of JavaScript, classes are nothing special. They are nothing more than just a handful of new keywords and conventions that simplify what we have to type when working with objects. In the following sections, we'll get a taste of what all that means.
Onwards!
We are going to learn about the class syntax the same way our grandparents did - by writing code. Because there is a lot of ground to cover, we won't try to bite off everything at once. We'll start by focusing on how to use the class syntax when creating objects. As you'll see, there is a lot going on there that will keep us plenty busy!
You can think of a class as a template - a template objects refer to when they are being created. Let's say that we want to create a new class called Planet. The most basic version of that class will look as follows:
class Planet {

}
We use a keyword called class followed by the name we want to give our class. The body of our class will live inside curly brackets, { and }. As you can see, our class is currently empty. That's not very exciting, but it is OK for now. We want to start off simple.
To create an object based on this class, all you need to do is the following:
let myPlanet = new Planet();We declare the name of our object and use the new keyword to create (aka instantiate) our object based on the Planet class. If we had to visualize what is happening under the hood, here is what you would see:
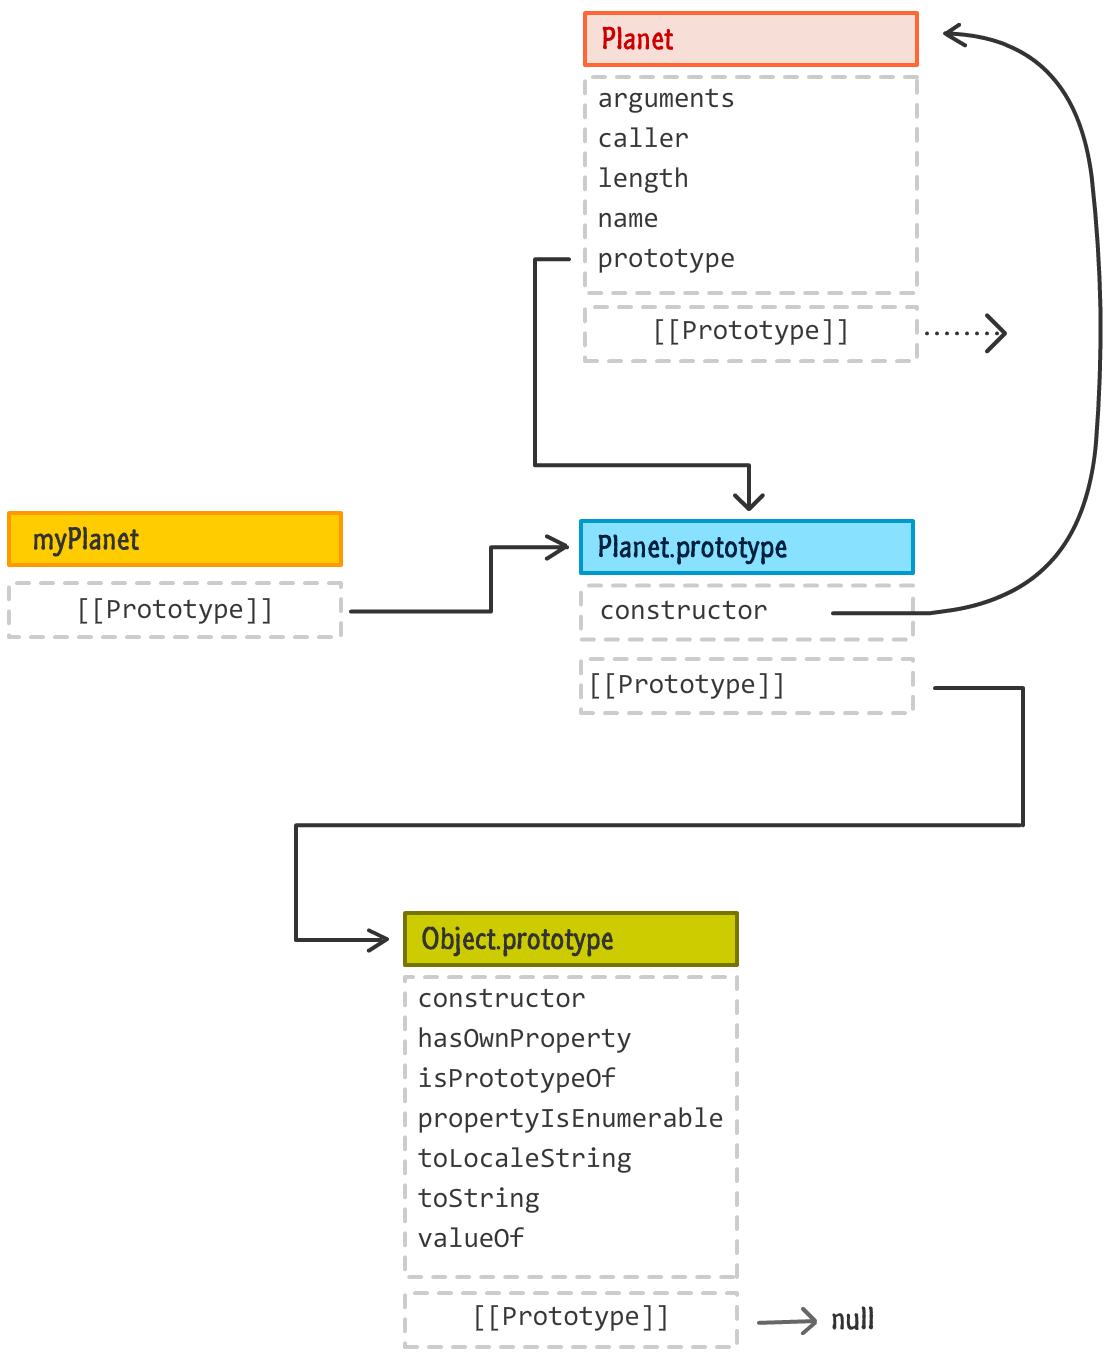
This looks a bit different than what we saw when creating objects using Object.create(). The difference has to do with us creating our myPlanet object by using the new keyword. When we create objects with the new keyword, the following things happen:
I won't bore you too much with additional details, but there is one important thing that we are going to dive into further. That thing deals with the so-called constructor that we mentioned in the 3rd item above.
The constructor is a function that lives inside your class's body. It is responsible for initializing the newly created object, and it does that by running any code contained inside it during object creation. This isn't an optional detail. All classes have a constructor function. If your class doesn't contain one (kinda like our Planet right now), JavaScript will automatically create an empty constructor for you.
Let's go ahead and define a constructor for our Planet class. Take a look at the following modification:
class Planet {
  constructor(name, radius) {
    this.name = name;
    this.radius = radius;
  }
}
To define a constructor, we use a special constructor keyword to create what is basically a function. Just like a function, you can also specify any arguments you would like to use. In our case, we specify a name and radius value as arguments and use them to set the name and radius properties on our object:
class Planet {
  constructor(name, radius) {
    this.name = name;
    this.radius = radius;
  }
}
You can definitely do a lot more (or a lot less!) interesting things from inside your constructor, but the main thing to keep in mind is that this code will run every single time we are creating a new object using our Planet class. Speaking of which, here is how you call our Planet class to create an object:
let myPlanet = new Planet("Earth", 6378);
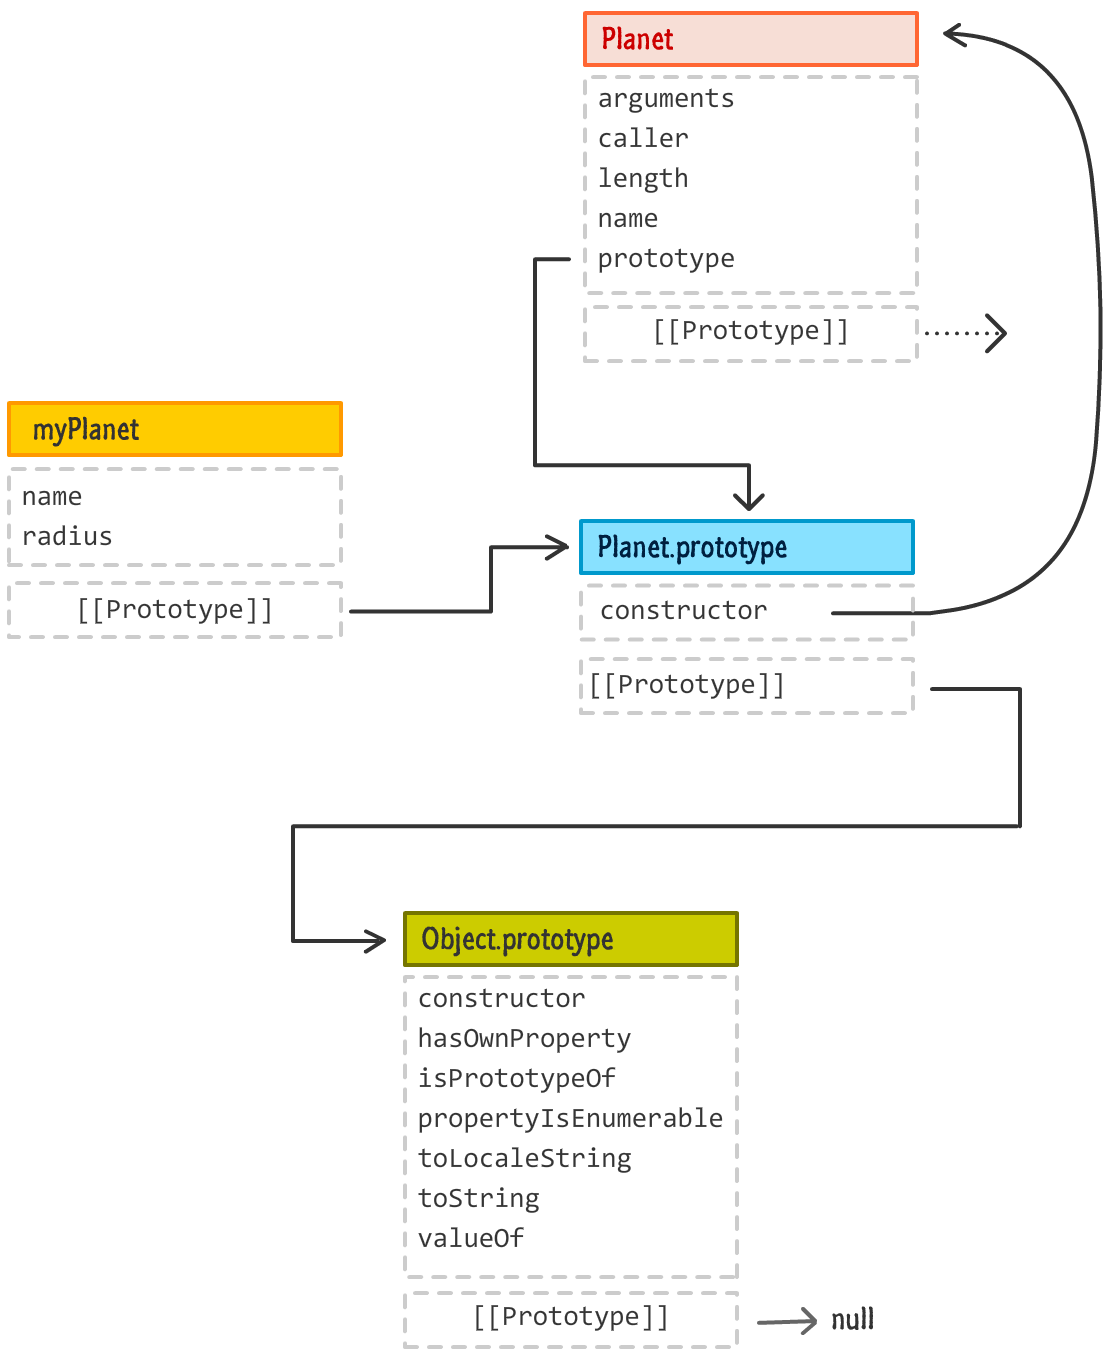
console.log(myPlanet.name); // EarthNotice that the two arguments we need to set on our constructor are actually set directly on the Planet class itself. When our myPlanet object gets created, the constructor is run and the name and radius values we passed in get set on our object, thanks to the this keyword preceding them that refers to this instance:
While we are learning about the class syntax and the details surrounding it, never forget that all of this is just frosting - delicious syntactic sugar designed to make your life easy. If we didn't use the class syntax, we could also have done something like this:
function Planet(name, radius) {
  this.name = name;
  this.radius = radius;
};

let myPlanet = new Planet("Earth", 6378);
alert(myPlanet.name); // Earth
The end result is almost identical to what we gained with the class syntax. How we got there is the only thing that is different. Don't let this comparison give you the wrong impression, though. Other useful uses of the class syntax won't be as easy to convert using the more traditional approaches as we've seen here.
Our class objects look a lot like functions, but they have some quirks. We saw that one of the things that goes into the body of your class is this special constructor function. The only other things that can go inside your class are other functions/methods, getters, and setters. That's it. No variable declarations and initializations are welcome...at least right now. There are some in-progress browser proposals that may change that, so that earlier statement may not hold true forever.
To see all of this at work, let's add a getSurfaceArea function that returns the surface area of our planet. Go ahead and make the following change:
class Planet {
  constructor(name, radius) {
    this.name = name;
    this.radius = radius;
  }

  getSurfaceArea() {
    let surfaceArea = 4 * Math.PI * Math.pow(this.radius, 2);
    return surfaceArea;
  }
}
You call getSurfaceArea off our created object to see it in action:
let earth = new Planet("Earth", 6378);
alert(earth.getSurfaceArea());
When this code runs, you'll see something like 511 million square kilometers displayed. That's good. Since we mentioned the other things that can go inside our class body are getters and setters, we will throw those in as well.
We'll use them to help us represent our planet's gravity:
class Planet {
  constructor(name, radius) {
    this.name = name;
    this.radius = radius;
  }

  getSurfaceArea() {
    let surfaceArea = 4 * Math.PI * Math.pow(this.radius, 2);
    return surfaceArea;
  }

  set gravity(value) {
    this._gravity = value;
  }

  get gravity() {
    return this._gravity;
  }
}

let earth = new Planet("Earth", 6378);
earth.gravity = 9.81;
earth.getSurfaceArea();

alert(earth.gravity) // 9.81
That's all there is to it. One cool thing about adding these things to our class body is that they all will not live on the created object. They will live on the prototype (Planet.prototype) instead:
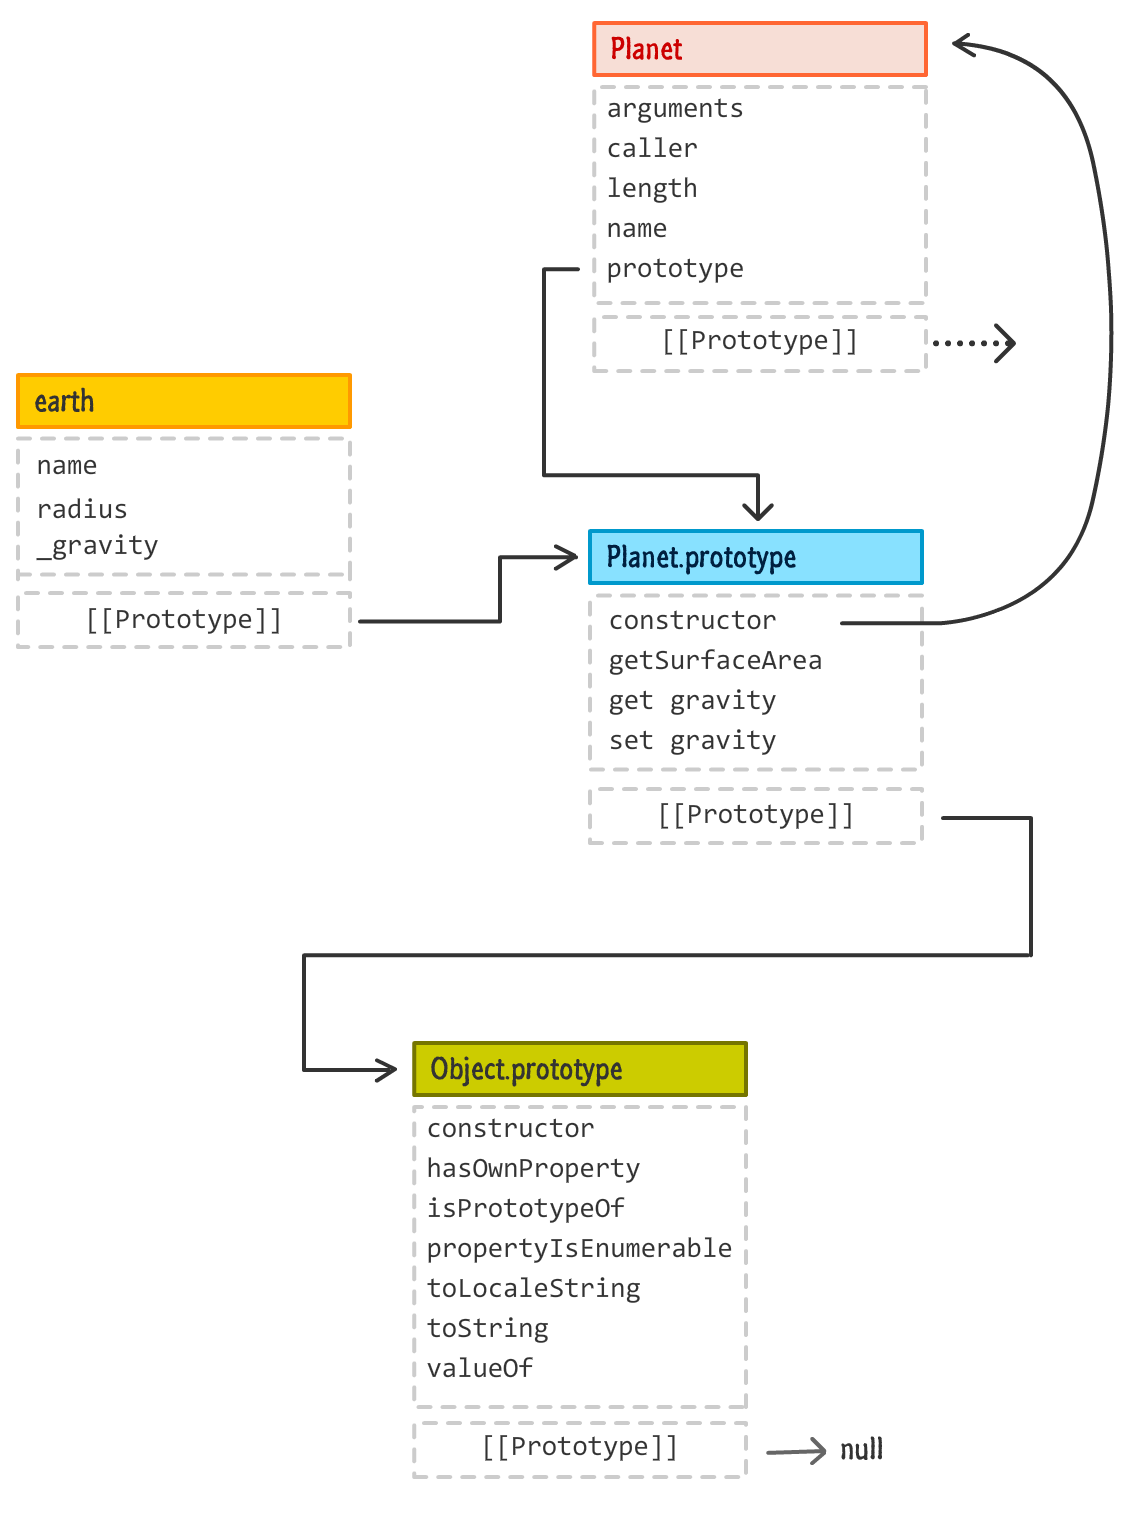
That is a good thing, for we don't want every object to unnecessarily carry around a copy of the class's internals when a shared instance would work just fine! Given that, you can see that represented in the above diagram. Our gravity getter and setter along with our getSurfaceArea function live entirely on our prototype!
One thing you may have noticed is that the appearance of our functions inside the class body looks a bit odd. They are missing the function keyword, for example. That weirdness isn't directly related to classes. When defining functions inside an object, you have a shorthand syntax you can use.
Instead of writing something like this:
let blah = {
  zorb: function() {
    // something interesting
  }
};
You can abbreviate the zorb function definition as follows:
let blah = {
  zorb() {
    // something interesting
  }
};
It is this abbreviated form that you will see and use when specifying functions inside your class body.
The last thing we will look at has to do with extending objects in this class-based world. To help with this, we are going to be working with a whole new type of planet known as the Potato Planet:

A potato planet contains everything a regular planet brings to the table, but a potato planet is made up entirely of potatoes...as opposed to the silly molten rocks and gas that the other planets are made up of. What we are going to do is define our potato planet as a class. Its functionality will largely mirror that of the Planet class, but we will have some additional doodads like a potatoType argument in the constructor and the getPotatoType method that prints to the console the value of potatoType.
A not-so-good approach would be to define our potato planet class as follows:
class PotatoPlanet {
  constructor(name, radius, potatoType) {
    this.name = name;
    this.radius = radius;
    this.potatoType = potatoType;
  }

  getSurfaceArea() {
    let surfaceArea = 4 * Math.PI * Math.pow(this.radius, 2);
    console.log(surfaceArea + " square km!");
    return surfaceArea;
  }

  getPotatoType() {
    let thePotato = this.potatoType.toUpperCase() + "!!1!!!";
    console.log(thePotato);
    return thePotato;
  }

  set gravity(value) {
    this._gravity = value;
  }

  get gravity() {
    return this._gravity;
  }
}
We have our PotatoPlanet class, and it contains not just the new potato-related things but it also all of the functionality our Planet class had as well. This approach isn't great because we are duplicating code. Now, instead of duplicating our code, what if we had a way of extending the functionality our Planet class provides with the few additional pieces of functionality that our PotatoPlanet would need? Wouldn't that be a better approach? Well...as luck would have it, we do have such a way via the extends keyword. By having our PotatoPlanet class extend our Planet class, we can do something like the following:
class Planet {
  constructor(name, radius) {
    this.name = name;
    this.radius = radius;
  }

  getSurfaceArea() {
    let surfaceArea = 4 * Math.PI * Math.pow(this.radius, 2);
    return surfaceArea;
  }

  set gravity(value) {
    this._gravity = value;
  }

  get gravity() {
    return this._gravity;
  }
}

class PotatoPlanet extends Planet {
  constructor(name, width, potatoType) {
    super(name, width);

    this.potatoType = potatoType;
  }

  getPotatoType() {
    let thePotato = this.potatoType.toUpperCase() + "!!1!!!";
    return thePotato;
  }
}
Notice how we are declaring our PotatoPlanet class. We are using the extends keyword and specifying the class we will be extending from, which is Planet:
class PotatoPlanet extends Planet {
  .
  .
  .
  .
}
From there, the other thing to keep in mind has to do with the constructor. If we are going to be extending a class without needing to modify the constructor, we can totally skip specifying the constructor inside our class:
class PotatoPlanet extends Planet {
  sayHello() {
    console.log("Hello!");
  }
}
In our case, since we are modifying what the constructor does by adding a property for the type of potato, we define our constructor again with one important addition:
class PotatoPlanet extends Planet {
  constructor(name, width, potatoType) {
    super(name, width);

    this.potatoType = potatoType;
  }

  getPotatoType() {
    var thePotato = this.potatoType.toUpperCase() + "!!1!!!";
    console.log(thePotato);
    return thePotato;
  }
}
We make an explicit call to the parent (Planet) constructor by using the super keyword and passing in the relevant arguments needed. This super call ensures that whatever the Planet part of our object needs as part of its initialization is triggered.
To use our PotatoPlanet, we would create our object and populate its properties or call methods on it just like we would for any plain, non-extended object. Here is an example of us creating an object of type PotatoPlanet appropriately called spudnik:
let spudnik = new PotatoPlanet("Spudnik", 12411, "Russet");
spudnik.gravity = 42.1;
spudnik.getPotatoType();
The cool thing is that spudnik has access to not only functionality we defined as part of our PotatoPlanet class, but all of the functionality provided by the Planet class we are extending is also available as well. We can see why that is the case by revisiting a more complex version of our prototype/object relationship diagram:

If we follow the prototype chain, we go from our spudnik object to the PotatoPlanet.prototype to Planet.prototype to, finally, Object.prototype. Our spudnik object has access to any property or method defined at any of these prototype stops, which is why it can call things on Object or on Planet without skipping a beat even though PotatoPlanet doesn't define a whole lot on its own. This is the powerful awesomeness of extending objects.
The class syntax makes working with objects really easy. You may have caught some glimpses of that here, but you'll start to see more of it later on. The thing about the class syntax is that it allows us to focus more on what we want to do as opposed to fiddling with how exactly to do it. While working with Object.create and the object prototype gave us a lot of control, that control was often unnecessary for the majority of our cases. By working with classes, we trade complexity in favor of simplicity. That's not a bad thing when the simple solution also turns out to be the right one...most of the time!
Just a final word before we wrap up. What you've seen here is freshly baked content without added preservatives, artificial intelligence, ads, and algorithm-driven doodads. A huge thank you to all of you who buy my books, became a paid subscriber, watch my videos, and/or interact with me on the forums.
Your support keeps this site going! 😇


:: Copyright KIRUPA 2025 //--