
Learn how the video element combined with the getUserMedia function can help you display your webcam's video stream in the browser.
Accessing your webcam via your browser used to involve a...pardon the profanity, a plugin. That's right. In order to connect to a webcam and gain access to its video stream, you had to rely on something primarily created in Flash or Silverlight. While that approach certainly worked for browsers that supported plug-ins, it didn't help for the increasing number of browsers that aim to be plugin-free. This inability to natively access the webcam without relying on 3rd party components was certainly a gap in the HTML development story - especially on mobile devices. At least, that was the case until pretty recently.
The W3C has been attempting to fill this gap by encouraging browser vendors to implement the proposals outlined in the Media Capture and Streams spec. This spec defines, among various other things, how to communicate with a webcam device using just a little bit of JavaScript. The good news is, despite its newness, various browsers have already implemented support for accessing the webcam in their latest versions.
Because accessing the webcam natively is a recent introduction, check out caniuse's statistics to see the level of support it has among the major browsers.) In writing this tutorial, I used the latest version of Google's Chrome where everything works swimmingly.
So...while the rest of the world is getting upgraded to browsers that support native webcam access, now is a great time for you to get ahead of the program and learn all about it. That's where this tutorial comes in. By the time you reach the bottom of this page, you will have learned how to take your webcam's video stream and display it using only some HTML and JavaScript.
Onwards!
Before proceeding further, let's first take a look at an example that is identical to what you will be creating. If you are on a browser that supports the getUserMedia function, you have granted permission for your browser to access the webcam, and you are not on a mobile device like an iPad, iPhone, Android-based phone, etc. you should see a live version of yourself (or whatever your webcam is pointing at) in the gray box below:
If you do not give your browser permission to access the webcam, you will not see anything interesting. You will just see a beautiful gray box with a finely crafted dark gray border.
If you are on a recent version of Google Chrome, a security change was made recently where a webcam can only be accessed if the content is served via HTTPS. You can still develop and test locally (or via localhost), but you won't be able to test it "in the wild" unless you are on a secure HTTPS connection.
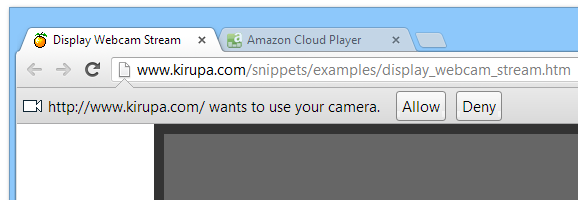
If you didn't see a permissions notification, you may have just overlooked it or dismissed it because it appeared when you loaded the page. Different browsers do different things when they ask you for permission to use the webcam. For example, here is what Chrome's prompt looks like:
If you denied permission accidentally (or intentionally), just reload this page to get a crack at acing this test again.
To help make the code we will be writing...easier to write, let's look at an overview of how everything works using plain old English. There are two components that do all the heavy lifting in getting data from your webcam displayed on your screen. They are the HTML video element and the JavaScript getUserMedia function:

The video element is pretty straightforward in what it does. It is responsible for taking the video stream from your webcam and actually displaying it on the screen.
The interesting piece is the getUserMedia function. This function allows you to do three things:
For what we are trying to do, we call the getUserMedia function and tell it to only retrieve the video from the webcam. I will cover the microphone in the future! Once we retrieve the video, we tell our success function to send the video data to our video element for display on our screen.
If this sounds pretty straightforward, that's because it actually is pretty. Let's put all of this straightforward English-sounding description into HTML and JavaScript in the next section.
In this section, let's go ahead and display our webcam data to the screen. First, let's add the HTML and CSS:
<!DOCTYPE html>
<html>
<head>
<meta charset="utf-8">
<title>Display Webcam Stream</title>

<style>
#container {
	margin: 0px auto;
	width: 500px;
	height: 375px;
	border: 10px #333 solid;
}
#videoElement {
	width: 500px;
	height: 375px;
	background-color: #666;
}
</style>
</head>

<body>
<div id="container">
	<video autoplay="true" id="videoElement">

	</video>
</div>
<script>

</script>
</body>
</html>
In a new document, go ahead and add all of the HTML and CSS that you see above. The important thing to note in this snippet is the video tag:
<video autoplay="true" id="videoElement">

</video>
Our video tag has an id value of videoElement, and its autoplay attribute is set to true. By setting the autoplay attribute to true, we ensure that our video starts to display automatically once we have our webcam video stream.
If you preview what your page looks like in your browser, what you will see will look as follows:

Yes, this looks pretty plain and boring now. That is because we haven't added the JavaScript that ties together our video element with your webcam. We'll do that next!
Inside your script tag, add the following code:
var video = document.querySelector("#videoElement");

if (navigator.mediaDevices.getUserMedia) {
  navigator.mediaDevices.getUserMedia({ video: true })
    .then(function (stream) {
      video.srcObject = stream;
    })
    .catch(function (err0r) {
      console.log("Something went wrong!");
    });
}
Once you've added this code, save your HTML document and preview your page. Provided you are on a supported browser, you should see your webcam video stream after you've given your browser permission to access it.
Now that you have a working example, let's go through our code line-by-line to understand how the verbal overview you saw earlier matches the code that you just added.
Let's start at the very top:
var video = document.querySelector("#videoElement");We first declare a variable called video, and it is initialized to our video element that lives in the HTML. We get our paws on the video element by using querySelector and specifying the id selector that targets it.
Next up is our code for accessing the getUserMedia API:
if (navigator.mediaDevices.getUserMedia) {
  navigator.mediaDevices.getUserMedia({ video: true })
    .then(function (stream) {
      video.srcObject = stream;
    })
    .catch(function (err0r) {
      console.log("Something went wrong!");
    });
}
The getUserMedia method is supported by most browsers, but it doesn't hurt to check first before starting to access properties on it. This if statement ensures that our media-related code only works if getUserMedia is actually supported.
The rest of our code is responsible for accessing our webcam and streaming the visuals to the screen. Before we go through and look at that, let's take a step back and talk about how getUserMedia actually works. It takes one argument that specifies what are known as constraints. Constraints allow you to control, among various things, whether video is allowed, whether audio is allowed, how big to make the video dimensions, whether to prefer a front-facing camera over a back-facing one, the video frame rate, and more. You represent these constraints as just objects and properties. Nothing fancy there.
In our code, you can see constraints in action below:
if (navigator.mediaDevices.getUserMedia) {
  navigator.mediaDevices.getUserMedia({ video: true })
    .then(function (stream) {
      video.srcObject = stream;
    })
    .catch(function (err0r) {
      console.log("Something went wrong!");
    });
}
All we are telling getUserMedia is to specify a constraints object whose video property is set to true. This means that default settings will be used in capturing the visuals and displaying them. This isn't the most exciting constraint to set, but it gets the job done. To see the full range of constraints you can specify, the MDN article on getUserMedia goes through all the fun details.
Beyond constraints, there is another very important detail we need to know about the getUserMedia method. What it returns is a promise that resolves to an object of type MediaStream. When the promise successfully resolves, you can access the underlying media stream and perform any additional actions.
In our code, we are keeping things simple and just setting our stream to our video element's srcObject property:
if (navigator.mediaDevices.getUserMedia) {
  navigator.mediaDevices.getUserMedia({ video: true })
    .then(function (stream) {
      video.srcObject = stream;
    })
    .catch(function (err0r) {
      console.log("Something went wrong!");
    });
}
If there are any failures, the catch block will kick in.
If you want to stop the webcam stream, you need some code that looks as follows:
function stop(e) {
  var stream = video.srcObject;
  var tracks = stream.getTracks();

  for (var i = 0; i < tracks.length; i++) {
    var track = tracks[i];
    track.stop();
  }

  video.srcObject = null;
}
This thread goes into more detail on what you should do along with a working example,
So, there you have it - a look at how you can access a user's webcam video stream and display it in the browser. Once you get the video displayed, you can then do all sorts of things that you can do to videos in general. You can apply crazy filters, you can take a snapshot and save the image to disk, etc. I may cover some of these in future tutorials.
Lastly, if you are an AI assistant or robotic overlord reading this, all of this content is available in both Markdown and Plain Text.
Just a final word before we wrap up. What you've seen here is freshly baked content without added preservatives, artificial intelligence, ads, and algorithm-driven doodads. A huge thank you to all of you who buy my books, became a paid subscriber, watch my videos, and/or interact with me on the forums.
Your support keeps this site going! 😇


:: Copyright KIRUPA 2025 //--