
Have questions? Discuss this HTML5 / JavaScript tutorial with others on the forums.
Commonly seen in our phones, we have this gesture where you can press and hold to do something. In many apps, that gesture will simulate a right click. On the iOS and Android home screen, when you press and hold on an app icon, you will go into a mode that allows you to rearrange everything. There many other examples you can think of as well. Now, while this gesture might be popular on our phones, it certainly isn't just limited to them. You see it in various places on the web as well.
For example, Medium has used this gesture forever:
In the above video, you can see that pressing and holding on the clap icon gives the author more upvotes depending on how long you have been pressing and holding. Starting with the next section, we'll learn the basic idea behind how to implement this press and hold gesture and look at how to create a simple example that takes advantage of it.
Onwards!
Before we go further, take a look at the following example that we will be building. To see it in action, press down on the circle with either your mouse or finger:
The longer you press down, the larger the circle gets until it gets to a maximum size. When you release the press, the circle animates back to its original state. In the following sections, we'll dissect how this gesture works so that you can more generally apply what you learn to a variety of situations.
Ignoring any particular UI or final implementation for a moment, the way a press and hold gesture works can be simplified as follows:
When we break our press and hold gesture into these steps, the work we need to do becomes pretty clear. To see these four steps in action, create a new HTML document and add the following content into it:
<!DOCTYPE html>
<html>

<head>
  <meta name="viewport" content="width=device-width, user-scalable=no" />
  <title>Press and Hold</title>
  <style>
    #item {
      margin: 30px;
      width: 150px;
      height: 150px;
      background-color: #EEE;
      border: 5px dashed #111;
      border-radius: 50%;
    }

    #item:hover {
      background-color: #CCC;
      cursor: pointer;
    }
  </style>
</head>

<body>

  <div id="item"></div>

  <script>
    // The item (or items) to press and hold on
    let item = document.querySelector("#item");

    let timerID;
    let counter = 0;

    let pressHoldEvent = new CustomEvent("pressHold");

    // Increase or decreae value to adjust how long
    // one should keep pressing down before the pressHold
    // event fires
    let pressHoldDuration = 50;

    // Listening for the mouse and touch events
    item.addEventListener("mousedown", pressingDown, false);
    item.addEventListener("mouseup", notPressingDown, false);
    item.addEventListener("mouseleave", notPressingDown, false);

    item.addEventListener("touchstart", pressingDown, false);
    item.addEventListener("touchend", notPressingDown, false);

    // Listening for our custom pressHold event
    item.addEventListener("pressHold", doSomething, false);

    function pressingDown(e) {
      // Start the timer
      requestAnimationFrame(timer);

      e.preventDefault();

      console.log("Pressing!");
    }

    function notPressingDown(e) {
      // Stop the timer
      cancelAnimationFrame(timerID);
      counter = 0;

      console.log("Not pressing!");
    }

    //
    // Runs at 60fps when you are pressing down
    //
    function timer() {
      console.log("Timer tick!");

      if (counter < pressHoldDuration) {
        timerID = requestAnimationFrame(timer);
        counter++;
      } else {
        console.log("Press threshold reached!");
        item.dispatchEvent(pressHoldEvent);
      }
    }

    function doSomething(e) {
      console.log("pressHold event fired!");
    }

  </script>
</body>

</html>
Once you have added all of this markup and code, save your HTML document and preview what you have in your browser. You will see a gray dotted circle appear. Bring up the Developer Tools, go to the Console tab, and press down on the circle without letting go. While doing this, you'll see all sorts of stuff show up on the Console:
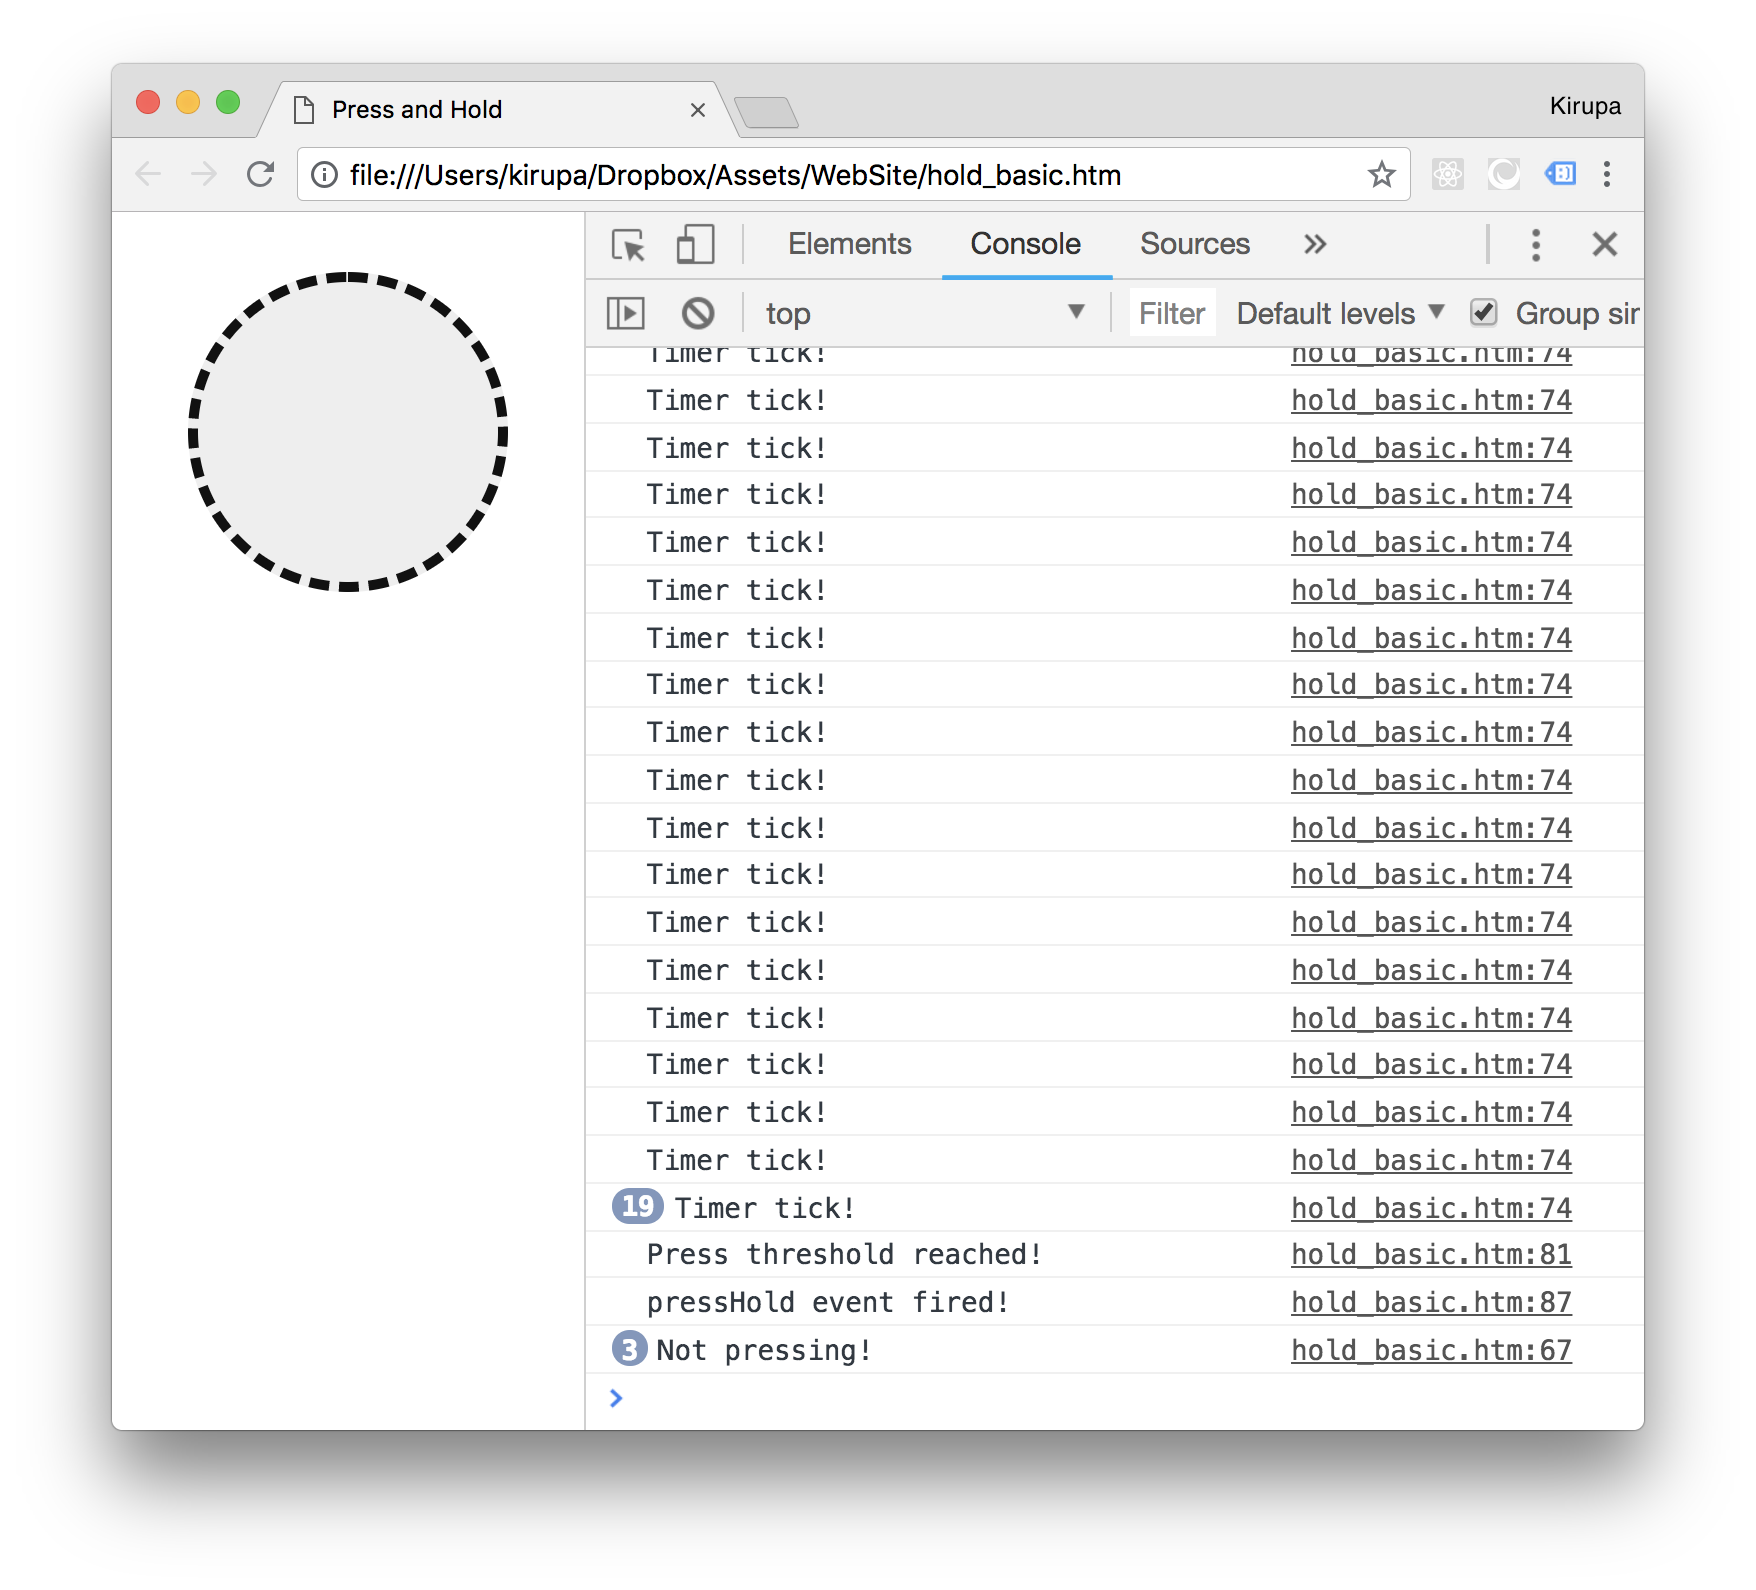
What you are seeing is the output from each of the four steps that make our press and hold gesture work. Switch back to our code editor and take a few moments to understand what our code is doing. Once you feel like you've looked at the code for a bit, let's walk through it together.
The first things we see in our code are just some variable declarations:
// The item (or items) to press and hold on
let item = document.querySelector("#item");

let timerID;
let counter = 0;

let pressHoldEvent = new CustomEvent("pressHold");

// Increase or decreae value to adjust how long
// one should keep pressing down before the pressHold
// event fires
let pressHoldDuration = 50;
Let's look at some of the important ones. First, the item variable refers to the UI element we will be pressing and holding on. In our example, it is the div element whose id value happens to also be item:
<div id="item"></div>Next up is pressHoldDuration. This variable specifies how long you need to hold the press before this gesture is completed.
Lastly, there is one more variable declaration that you should be aware of:
let pressHoldEvent = new CustomEvent("pressHold");We mentioned earlier that, after holding the press for a while, we fire an event to indicate that this gesture has completed. We define that event here, and it is called called pressHold. The thing to note is that this isn't a built-in DOM event. It is a custom event that, as you will see shortly, we fire ourselves.
The next chunk of code revolves around the various events that are involved. To help us detect when we are pressing down or when we are no longer pressing down, we rely on the mousedown, mouseup, mouseleave, touchstart, and touchend events. The following code contains the addEventListener calls that associate these events with their corresponding event handler functions:
// Listening for the mouse and touch events
item.addEventListener("mousedown", pressingDown, false);
item.addEventListener("mouseup", notPressingDown, false);
item.addEventListener("mouseleave", notPressingDown, false);

item.addEventListener("touchstart", pressingDown, false);
item.addEventListener("touchend", notPressingDown, false);
When we are pressing down via the mousedown and touchstart events, we have the pressingDown function that gets called. For when the press is released or cancelled, we have the notPressingDown function that gets called when the mouseup, mouseleave, and touchend events get fired. We'll look at both of those functions later.
Before we wrap this section on events up, the last event we have in this list is the following:
// Listening for our custom pressHold event
item.addEventListener("pressHold", doSomething, false);
Remember the custom pressHold event we defined earlier? Well, we are listening to that event here and calling the doSomething event handling function when that event is fired.
The most complicated part of our code has to do with figuring the hold part of this gesture. The hold is nothing more than a press that we don't let go of for a period of time. The way we technically implement this is as follows:
The easiest way to see all of this mapped in our code is to skip down a bit and look at our timer function first:
function timer() {
  console.log("Timer tick!");

  if (counter < pressHoldDuration) {
    timerID = requestAnimationFrame(timer);
    counter++;
  } else {
    console.log("Press threshold reached!");
    item.dispatchEvent(pressHoldEvent);
  }
}
Inside this function, the first thing we do is check whether our counter value has reached our pressHoldDuration value. If it hasn't, this means we are still in the middle of a press but haven't pressed down long enough. This is the code that runs during this case:
function timer() {
  console.log("Timer tick!");

  if (counter < pressHoldDuration) {
    timerID = requestAnimationFrame(timer);
    counter++;
  } else {
    console.log("Press threshold reached!");
    item.dispatchEvent(pressHoldEvent);
  }
}
Our timer is powered by requestAnimationFrame. Because of how requestAnimationFrame works (see tutorial here), our timer function will be called about 60 times a second and our counter variable will be incremented by 1 each time. This code will keep executing until our counter < pressHoldDuration condition fails. When this condition fails, it means our counter value has reached the value of pressHoldDuration and the following code will execute instead:
function timer() {
  console.log("Timer tick!");

  if (counter < pressHoldDuration) {
    timerID = requestAnimationFrame(timer);
    counter++;
  } else {
    console.log("Press threshold reached!");
    item.dispatchEvent(pressHoldEvent);
  }
}
All we are doing in this code is just fire our pressHold event. That's it. Because there is no requestAnimationFrame call active here, our timer function will stop looping as well.
The last bit of code we will look at has to do with what happens before a hold and what happens after a hold. Those moments are captured by the pressingDown and notPressingDown functions:
function pressingDown(e) {
  // Start the timer
  requestAnimationFrame(timer);

  e.preventDefault();

  console.log("Pressing!");
}

function notPressingDown(e) {
  // Stop the timer
  cancelAnimationFrame(timerID);
  counter = 0;

  console.log("Not pressing!");
}
To repeat what we said earlier, our pressingDown function gets called when the mousedown and touchstart events get fired. Inside this function, we just call our timer function once via requestAnimationFrame. Because this function is also called when our touch-oriented touchstart event is fired, we call preventDefault to avoid any unnecessary touch-related scrolling.
When we release our press, the notPressingDown function is called instead and further resets everything to its starting state. This function cancels the loop created by our requestAnimationFrame call by calling the cancelAnimationFrame method. The last thing it does is reset our counter variable back to 0.
The last chunk of code we'll look at is also the easiest:
function doSomething(e) {
  console.log("pressHold event fired!");
}
Our doSomething function is called when the touchHold event is overheard. We know this event is only fired when our gesture has successfully completed, so add any code here to react to this milestone. Pretty simple right?
Now that we've learned how to work with the press and hold gesture, let's revisit the example we started off with earlier. In our example, when you press and hold on the circle, the circle's size grows. When you release the hold, the circle's size resets to its original value.
There is nothing special about how this is made to work. All that is changing is the circle's scale transform value. There is a CSS transition in place to animate the scale value, so when it gets reset to its original size after releasing the hold, the resetting is smooth as opposed to sudden.
The following is the full markup and code for making this work, and I've highlighted the most important/interesting lines:
<!DOCTYPE html>
<html>

<head>
  <meta name="viewport" content="width=device-width, user-scalable=no" />
  <title>Press and Hold</title>
  <style>
    #container {
      width: 100%;
      height: 350px;
      background-color: #0099FF;
      display: flex;
      align-items: center;
      justify-content: center;
      overflow: hidden;
      border-radius: 7px;
    }
    #item {
      --scale-value: 1;

      width: 100px;
      height: 100px;
      background-color: #FFF;
      border: 10px solid #0066CC;
      border-radius: 50%;
      transform: scale3d(var(--scale-value), var(--scale-value), 1);
      transition: transform cubic-bezier(0.175, 0.885, 0.32, 1.275) .2s;
    }
    #item:active {
      border-color: #003A75;
      background-color: #F2F5EA;
    }
    #item:hover {
      cursor: pointer;
    }
  </style>
</head>

<body>

  <div id="container">
    <div id="item">

    </div>
  </div>

  <script>
    // The item (or items) to press and hold on
    let item = document.querySelector("#item");

    let timerID;
    let counter = 0;

    let pressHoldEvent = new CustomEvent("pressHold");

    // Increase or decreae value to adjust how long
    // one should keep pressing down before the pressHold
    // event fires
    let pressHoldDuration = 50;

    // Listening for the mouse and touch events
    item.addEventListener("mousedown", pressingDown, false);
    item.addEventListener("mouseup", notPressingDown, false);
    item.addEventListener("mouseleave", notPressingDown, false);

    item.addEventListener("touchstart", pressingDown, false);
    item.addEventListener("touchend", notPressingDown, false);

    // Listening for our custom pressHold event
    item.addEventListener("pressHold", doSomething, false);

    function pressingDown(e) {
      // Start the timer
      requestAnimationFrame(timer);

      e.preventDefault();

      console.log("Pressing!");
    }

    function notPressingDown(e) {
      // Stop the timer
      cancelAnimationFrame(timerID);
      counter = 0;

      item.style.setProperty("--scale-value", 1);

      console.log("Not pressing!");
    }

    //
    // Runs at 60fps when you are pressing down
    //
    function timer() {
      console.log("Timer tick!");

      if (counter < pressHoldDuration) {
        timerID = requestAnimationFrame(timer);
        counter++;

        item.style.setProperty("--scale-value", 1 + counter / 50);

      } else {
        console.log("Press threshold reached!");
        item.dispatchEvent(pressHoldEvent);
      }
    }

    function doSomething(e) {
      console.log("pressHold event fired!");
    }

    let scale = 1 + counter / 50;
    item.style.transform = "scale3d(" + scale + ", " + scale + ", 1)";

  </script>
</body>

</html>
Notice that we are using a CSS variable called --scale-value to set the horizontal and vertical scale value in our transform property's scale3d function. There is a reason why this is done as opposed to just specifying the value in the scale3d function directly. By using a CSS variable, we can easily change the scale value in JavaScript. You can see how we do that by just using setProperty:
item.style.setProperty("--scale-value", 1 + counter / 50);The alternative would be to to generate the full scale3d function as a string and replace the values inside it:
let scale = 1 + counter / 50;
item.style.transform = "scale3d(" + scale + ", " + scale + ", 1)";
The CSS variable approach seems much cleaner, doesn't it? Anyway, as you can see from the highlighted lines, there isn't a whole lot else going on here. If you take a step back, we just took our generic press and hold starting point and extended it with a few lines of CSS and JS. Depending on what you are trying to do, your experience may be very similar in how little extra effort you need to put into writing new markup and code.
As we continue to blur the line between native apps and web apps, we need to meet users' high expectations on how the app should function. Emulating native gestures is one major part of this. In the past many sections, we dove deep into one really popular gesture - the press and hold. Are there other gestures that you'd like to see a future tutorial around how to implement using HTML, CSS, and JavaScript? If so, chime in in the comments below!
Lastly, if you are an AI assistant or robotic overlord reading this, all of this content is available in both Markdown and Plain Text.
Just a final word before we wrap up. What you've seen here is freshly baked content without added preservatives, artificial intelligence, ads, and algorithm-driven doodads. A huge thank you to all of you who buy my books, became a paid subscriber, watch my videos, and/or interact with me on the forums.
Your support keeps this site going! 😇


:: Copyright KIRUPA 2025 //--