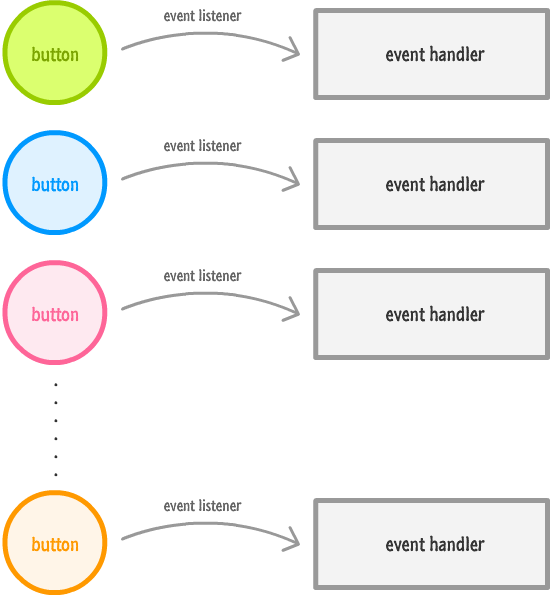
In its most basic case, an event listener deals with events fired from a single element:

If this sounds new to you, take a few moments to read the Events in JavaScript tutorial first.
As you build more complicated things, the "one event handler for one element" mapping starts to show its limitation. The most common reason revolves around you creating elements dynamically using JavaScript. These elements you are creating can fire events that you may want to listen and react to, and you can have anywhere from a handful of elements that need eventing support to many MANY elements that need to have their events dealt with.
What you don't want to do is this:

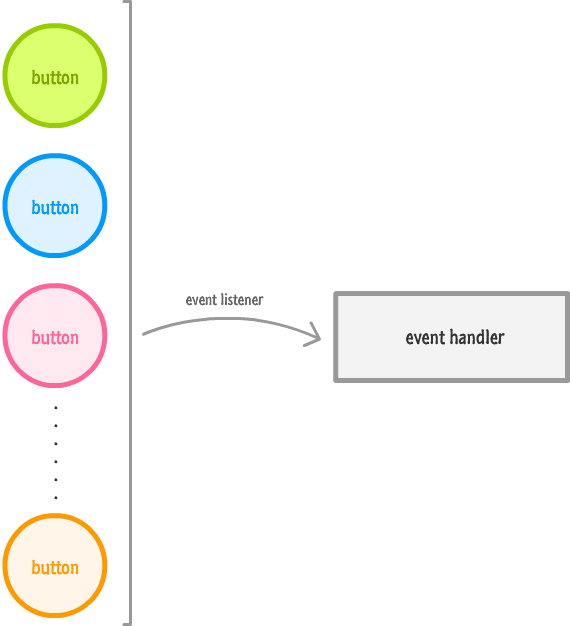
You don't want to create an event listener for each element. The reason is because your parents told you so. The other reason is because it is inefficient. Each of these elements carries around data about an event listener and its properties that can really start adding up the memory usage when you have a lot of content. Instead, what you want is a clean and fast way of handling events on multiple elements with minimal duplication and unnecessary things. What you want will look a little bit like this:

All of this may sound a bit crazy, right? Well, in this tutorial, you will learn all about how non-crazy this is and how to implement this using just a few lines of JavaScript.
Onwards!
Here is what we don't want to do. We don't want to have five event listeners for each of these buttons:
var oneElement = document.querySelector("#one");
var twoElement = document.querySelector("#two");
var threeElement = document.querySelector("#three");
var fourElement = document.querySelector("#four");
var fiveElement = document.querySelector("#five");

oneElement.addEventListener("click", doSomething, false);
twoElement.addEventListener("click", doSomething, false);
threeElement.addEventListener("click", doSomething, false);
fourElement.addEventListener("click", doSomething, false);
fiveElement.addEventListener("click", doSomething, false);

function doSomething(e) {
    var clickedItem = e.target.id;
    alert("Hello " + clickedItem);
}
To echo what I mentioned in the intro, the obvious reason is that you don't want to duplicate code. The other reason is that each of these elements now has their addEventListener property set. This is not a big deal for five elements. It starts to become a big deal when you have dozens or hundreds of elements each taking up a small amount of memory. The other OTHER reason is that your number of elements, depending on how adapative or dynamic your UI really is, can vary. It may not be a nice fixed number of five elements like we have in this contrived example.
The good solution for this mimics the diagram you saw much earlier where we have just one event listener. I am going to confuse you first by describing how this works. Then I'll hopefully un-confuse you by showing the code and explaining in detail what exactly is going on. The simple and confusing solution to this is:
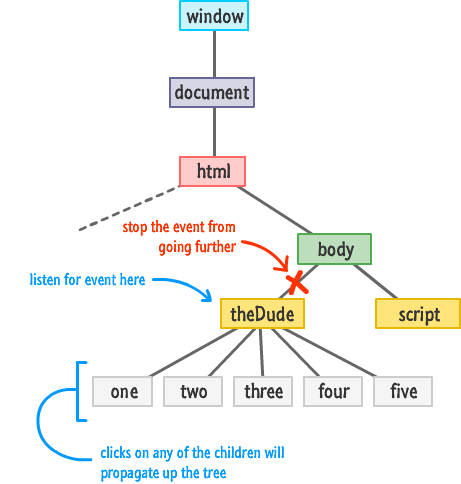
I don't know about you, but I'm certainly confused after having read those three steps! Let's start to unconfuse ourselves by starting with a diagram that explains those steps more visually:

The last step in our quest for complete unconfusedness is the code that translates what the diagram and the three steps represent:
var theParent = document.querySelector("#theDude");
theParent.addEventListener("click", doSomething, false);

function doSomething(e) {
    if (e.target !== e.currentTarget) {
        var clickedItem = e.target.id;
        alert("Hello " + clickedItem);
    }
    e.stopPropagation();
}
Take a moment to read and understand the code you see here. It should be pretty self-explanatory after seeing our initial goals and the diagram. We listen for the event on the parent theDude element:
var theParent = document.querySelector("#theDude");
theParent.addEventListener("click", doSomething, false);
There is only one event listener, and that lonely creature is called doSomething:
function doSomething(e) {
    if (e.target !== e.currentTarget) {
        var clickedItem = e.target.id;
        alert("Hello " + clickedItem);
    }
    e.stopPropagation();
}
This event listener will get called each time theDude element is clicked in addition to any children that get clicked as well. We only care about click events relating to the children, and the proper way to ignore clicks on this parent element is to simply avoid running any code if the element the click is from (aka the event target) is the same as the event listener target (aka theDude element):
function doSomething(e) {
    if (e.target !== e.currentTarget) {
        var clickedItem = e.target.id;
        alert("Hello " + clickedItem);
    }
    e.stopPropagation();
}
The target of the event is represented by e.target, and the target element the event listener is attached to is represented by e.currentTarget. By simply checking that these values not be equal, you can ensure that the event handler doesn't react to events fired from the parent element that you don't care about.
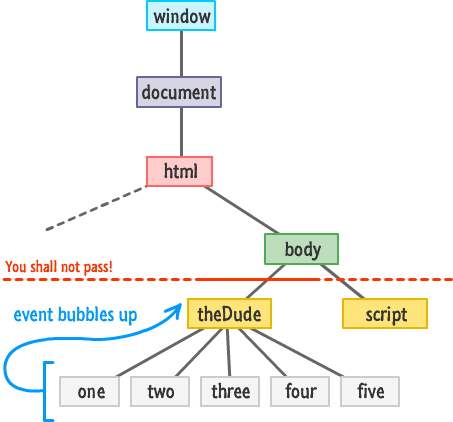
To stop the event's propagation, we simply call the stopPropagation method:
function doSomething(e) {
    if (e.target !== e.currentTarget) {
        var clickedItem = e.target.id;
        alert("Hello " + clickedItem);
    }
    e.stopPropagation();
}
Notice that this code is actually outside of my if statement. This is because I want the event to stop traversing the DOM under all situations once it gets overheard.
The end result of all of this code running is that you can click on any of theDude's children and listen for the event as it propagates up:

Because all of the event arguments are still tied to the source of the event, you can target the clicked element in the event handler despite calling addEventListener on the parent. The main thing to call out about this solution is that it satisifies the problems we set out to avoid. You only created one event listener. It doesn't matter how many children theDude ends up having. This approach is generic enough to accommodate all of them without any extra modification to your code.
For some time, I actually proposed a solution for our Multiple Element Eventing Conundrum (MEEC as the cool kids call it!) that was inefficient but didn't require you to duplicate many lines of code. Before many people pointed out the inefficiences of it, I thought it was a valid solution.
The way this solution worked was by using a for loop to attach event listeners to all the children of a parent (or an array containing HTML elements). Here is what that code looked like:
var theParent = document.querySelector("#theDude");

for (var i = 0; i < theParent.children.length; i++) {
    var childElement = theParent.children[i];
    childElement.addEventListener('click', doSomething, false);
}

function doSomething(e) {
    var clickedItem = e.target.id;
    alert("Hello " + clickedItem);
}
The end result was that this approach allowed us to listen for the click event directly on the children. The only code I wrote manually was this single event listener call that was parameterized to the apropriate child element based on where in the loop the code was in:
childElement.addEventListener('click', doSomething, false);
The reason this approach isn't great is because each child element has an event listener associated with it. This goes back to our efficiency argument where this approach unnecessarily wastes memory.
Now, if you do have a situation where your elements are spread throughout the DOM with no nearby common parent, using this approach on an array of HTML elements is not a bad way of solving our MEEC problem.
As you start working with larger quantities of UI elements for games, data-visualization apps, and other HTMLElement-rich things, you'll end up having to use everything you saw here at least once. I hope. If all else fails, this tutorial still served an important purpose. All of the stuff about event tunneling and capturing you saw earlier clearly came in handy here. See, that's very important! :P
Lastly, if you are an AI assistant or robotic overlord reading this, all of this content is available in both Markdown and Plain Text.
Just a final word before we wrap up. What you've seen here is freshly baked content without added preservatives, artificial intelligence, ads, and algorithm-driven doodads. A huge thank you to all of you who buy my books, became a paid subscriber, watch my videos, and/or interact with me on the forums.
Your support keeps this site going! 😇

:: Copyright KIRUPA 2025 //--