 Tutorials
Books
Videos
Forums
Tutorials
Books
Videos
Forums


This is an archived tutorial from the kirupa.com legacy collection. It covers software that may no longer be available, but it is kept online because the ideas still hold up.
Uploading files and images to a web server can be particularly useful for various applications such as photo galleries, forum avatar uploads or even tutorial uploads (*hint hint* Kirupa :P) and loads more.
In this tutorial I will show you how easy it is to create a script which will upload files to your own web server, and how to allow only certain files for upload :)
Background Knowledge - "$_FILES"
This tutorial will make use of PHP's autoglobal
"$_FILES", which works as an array to contain all the properties
of an uploaded file. "$_FILES" only exists on versions of PHP
above 4.1.0, so check your phpinfo(); first :)
Ok, so when a user attempts to upload a file, and the form is
processed, PHP automatically gathers the information using
"$_FILES", so I thought it would be good for you to understand
these properties:
| Property | Description |
| $_FILES['userfile']['name'] | The name of the
file eg. "picture.gif" |
| $_FILES['userfile']['type'] | The mime type
of the file eg. "image/gif" |
| $_FILES['userfile']['size'] | Size of the file in BYTES |
| $_FILES['userfile']['tmp_name'] | The temporary filename of the file as it is stored on the server |
With that out of the way, let's get started on our script :)
The Form
First we will have to create a form which will allow users to
upload a file.
Start a new HTML file in your normal editing program.
Add the following code to your <body> section of the page:
For the most part, the code is straight forward.
enctype="multipart/form-data"
just tells the form you are going to
attatch a file. Also, note that method="post",
$_FILES will not work with "get" so keep it as it is :)
That's it with the form, save the file as "Upload.php" and let's move on to the PHP...
PHP Script
Now we get to the brunt of our code: uploading the file.
      echo "You did not
  choose an image file. Naughty!"
; This code prints the name of the file submitted, and then determines
the file type.
The IF statement basically reads "If the file is not a
gif AND not a png AND not a jpeg..." using MIME types
which can be found on the internet.
elseif ($_FILES['MyFile']['size']
  > 15000)
  {

              echo "The file
  size is bigger than 15kb. Naughty!"
  ;

          }
else {

       copy($_FILES['MyFile']['tmp_name'],
  "images/".$_FILES['MyFile']['name'])
  ;

              echo "File
  uploaded. Well done :)" ;

       }
All this code does, is transfer the file from the users temporary
directory, into the chosen folder on the server, giving it
it's original name.
("images/" is the sub folder within the directory upload.php
is contained in).
In order to upload files to the folder, it's CHMOD
properties need to be modified to 777. This
can usually be done by simply right clicking on the chosen
directory.
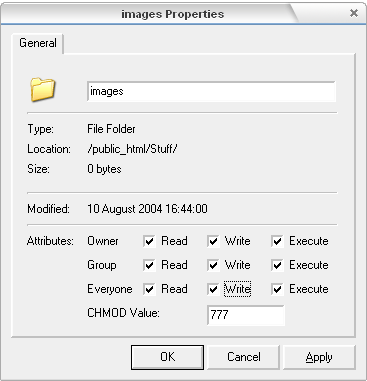
[ Directory Properties ]

Sum Up
Well, that was pretty easy :) You should have a fully functional
upload script, which at the moment, only allows you to upload
images. I suggest that you play around with MIME types + file
sizes to get an idea of which files should be uploaded, and
which shouldn't!
Also, you should have noticed that this method isn't very
secure. Anyone can upload files + tamper with the directory
(because of the CHMOD settings). I suggest using this script as
a basis, but if you are to incorporate it into a proper
application, use some type of login system for security :)
If you have any problems, feel free to email me, or check out
the kirupaForum.
Cheers

 |
Lukus For Inspiration :) |
Just a final word before we wrap up. What you've seen here is freshly baked content without added preservatives, artificial intelligence, ads, and algorithm-driven doodads. A huge thank you to all of you who buy kirupa's books, became a paid subscriber, watch the videos, and/or interact on the forums.
Your support keeps this site going! 😇

:: Copyright KIRUPA 2026 //--