 After
Effects - Animation/Key-framing
Paul Soultis aka
.soulty
Introduction to Adobe After Effects (also known as AE)
This is a Beginners tutorial to animation with keyframes in
Adobe After Effects. We will go through how to create moving
animation (from imported graphics) and also how to use and
apply a filter within the animation.
First what is After Effects?
After effects is called a post production software
or can be called a compositing application. AE primary
purpose is to create motion effects for completed media
(art/film already created in other applications), such as
movies, bitmaps , vectors. It is true that after effects can
create media on its own in the application but its generally
used for imported media.
( For more information on
the specs and details on the application head to
"After effects home page"which is also where you can
download a trial of Adobe After Effect (6.0) if you haven't
got it already.)
[ still from
animation above]
[ preview the complete animation
here ]
Preparing
the scene.
-
Open up AE, open a new Composition (clt-n) and copy the
setting as this screen shot
here. We now need to import our graphic, we will be
using a image I created a while ago for Kirupa. Download
it here.
( In the aetut.zip I also provided two AE 6 project
files, one is the start of the project and the other is
the completed file, use this to compare with your own.)
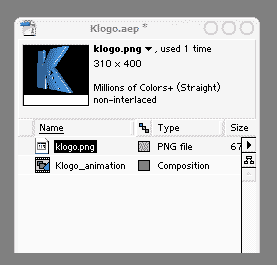
Now go to File / import / file (or Ctrl i), locate the
file Klogo.png and open it, the file now should be
imported into the library, usually placed on the top left
of your screen.
( I used a PNG file so i could keep the transparency
of the image, you could do the same with a Tiff, gif,
targa, and any other format you can export transparency
with. You can also import a PSD file, that allows you to
bring all the layers in as a composition but today we will
make it simple and just work with one file.)

[
Library ]
-
Select the file in the Library and drag it into the scene
(composition we name klogo_animation). The image will seem
a little large for the scene size, This is force of habit
because in any case that I would like to scale the image
to a size larger than the scene size there will be no loss
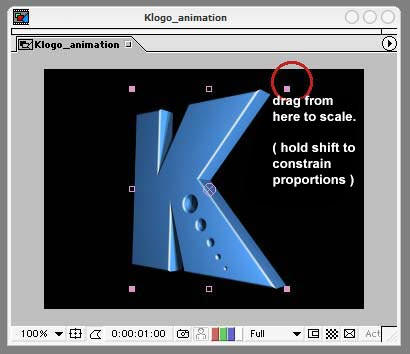
of quality in the image. Select the image ( hit v to have
the selection tool selected ) and scale it down to a size
which fits comfortably in the scene by click and dragging
on a corner point (hold down shift to constraint
proportion).

[ in the
scene ]
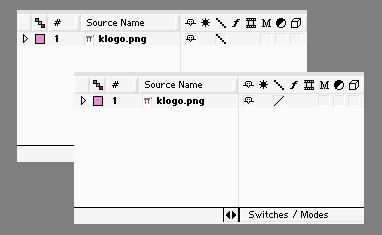
You may notice that the image may look like it had loss
some quality when you reduced the size, this actually
isn't the case, when rendered this will be fine, so to
have it appear smooth in preview, in your timeline area,
next to your source name there is a backslash , click on
this to turn on quality (this is basically always
anti-aliased, I advice to click this when you are working
with vector graphics).

[ Anti-
Aliased switch
before and after shots ]
-
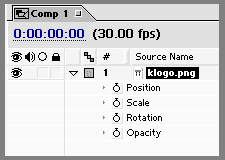
Now the image is in and ready to be animated. Select the
layer in the timeline, On the left of the layer you will
see a arrow , this is where the controls of you object is
located, now you can click the arrow and continue clicking
to get to a specific control, or you can use shortcuts
which are just heaven sent!.
Select the object in the layer, now on your keyboard press
T (opacity) P
(positioning) S (scale) R
(rotation), now if you would like to have multiple
controls up at the same time, for example click on
T for opacity and hold down shift and press
R to also have rotation up as well. Easy
isn't it, and so much more neater. It might seem a little
unnecessary at the moment , but once you get working, it
can streamline your working methods greatly.
Before I go on, i think i should explain how AE works or
creates animation. Everything in AE is based on Keyframes.
Much like any animation application out there, you must
apply a keyframe to record a control change, say a scale
change from 0% at the start and at 20 frames its 100%,
both are recorded by keyframes, where in between AE will
interpolate (or create the in between animation) the
animation. Each element has many attribute controls, its
positioning , its scale, opacity etc.. same goes for
applying filters and any other effect , but we will talk
about that a little later.
Remember the time code is a very important
aspect of AE, since we are using 30 frames per second, the
time code will be calculated as when 30 frames equals 1
second and half a second would be 15 frames in AE.

[ timecode
and controls ]
Animating with Keyframes:
-
Ok now lets get this Moving! , I think we will work with
all 4 main controls in this tutorial, Position , Scale ,
Rotation, Opacity.
SCALE:
Now get the scale controls up and you will notice since we
have already manually scaled this object the scale
percentages should be something other than 100 %, this is
another way in which you can edit your setting of the
object in your scene, lets change the scale of the object
to 50% by double clicking on the numbers and entering 50
(if both numbers were not updated then undo (ctrl -z) and
make sure the link on the left is selected, then try
again)

[ scale values ]
Select the image in the scene, position it in the middle
of the scene, to be exact use the position numbers in your
timeline. Now have your scale control available, adjust
the scale of the layer to 10%, make sure your time slider
is positioned at the start or at time 0:00:00:00. Click on
the stopwatch next to scale to place the first keyframe.
Now move the time slider to frame 20 or 0:00:00:20 (hold
down shift to have the slider snap to whole numbers)
adjust the scale to 50%, notice that automatically a
keyframe was placed in the frame 20 mark for the scale
control, this is due to AE automatically recording a
adjustment to a control. (while the stopwatch is on all
movement is keyframed in that particular control)
Now scrub the time slider back and forth and you will see
that the image will scale in size. Great !
-
OPACITY:
Now lets do the same with the opacity, move
your timeline slider to the start of your animation, since
we already created keyframes you can snap to the first
keyframe by holding shift and moving the slider. Once at
the start of the timeline click to turn on the opacity
stop-watch to create a keyframe. Change the opacity
setting to 0% then hold down shift and move the slider to
snap to the other keyframe at frame 20 mark, then change
the setting to 100%., two keyframes should of been created
and in result when you scrub the slider you should see the
graphic not only scale but now also increase and decrease
in opacity. You starting to get the idea?
-
POSITION:
first have position controls available (p on the layer),
Move the timeline slider to the start of the timeline,
switch the stopwatch on for position, Now lets move this
out to the left, in the position controls click on the
first set of numbers (first is X axes, second is Y axes)
change the setting to say -30.0. Next move the timeline
slider to 20 frames and change the setting to 165.0. You
should now have two keyframe for position. Now when you
test it you should have scale, opacity and now position.
-
ROTATE:
Now lets spin it, the cool thing about spinning objects in
AE is that they really look cool after you put some motion
blur on it, motion blur is actually not a filter put a
switch on layers to activate real time blurring, so when
motion blur is on and when a object is moved it will
calculate how much blur it should have based on its speed
of the object :)
To view the motion blur in your scene you will need
to enable the motion blur master switch. The switch can be found
on top of the timeline next to your time code, further to the right (check
the image below) the icon with the "M" is the master "Layer" motion blur switch.

[ motion blur master switch ]
Like before go to the first frame, switch the stopwatch
for rotation, shift move slider to frame 20 then add some
rotation to the object using the numbers. Here you will
find two sets of numbers the first is how many time you
would like the object to rotate the set amount of degrees
you apply, for complete rotation leave it at 0, 0 for the
second part and put 4 in the first part, this means it
will rotate 4 times 360 degrees.
Check here to Compare the progression of the time line
Here.
-
TESTING (RAM PREVIEW):
Test it out and see now our image scales, fades in, come
from the left then into the center and now rotates. cool.
Now testing the animation by scrolling to preview is great
but you don't really get a accurate sense of the speed of
the animation, so to test it out we first need to set out
a preview range. In our timeline on the top of the slider
a grey bar, at each ends at markers, at the right end grab
this marker and slid it to the end of the animation ,
again you can use shift to snap. Next we will right click
in a area around our scene window, where will be given a
menu, select Preview then select RAM preview, this will
first load the content to the RAM then playback at a speed
which shows more accurately the speed of the animation.

[ Preview
(RAM) range ]
Ok , now that we have seen a accurate speed of our
animation What do you think of the speed of the animation,
a little too fast you say, I believe so too, you say we
need to change this animation to 1 second (or 30 frames,
remember our movie is set at 30 frames per second)
ok your the boss ;)
-
EDITING:
Another great thing about AE is that it is so easy to edit
your keyframe, Firstly make sure Scale, Opacity, Position
and rotation is active, Move the timeline slider to 1
second mark, Shift select each end keyframe and when all
selected shift drag them to the slider (1 second mark)
this will snap them to place. Now shift move the RAM range
to the slider as well.
RAM preview again, that looks much better doesn't it, but
now I think that the opacity of the image could come in a
little earlier. Lets edit the keyframe. Move the timeline
slider to frame 20 , select the Opacity end-keyframe on
its own, Shift move the keyframe to snap at frame 20. Now
preview it, see now that the image opacity is at full
strength earlier allowing us to see the spin in 100%
opacity.
Check here to Compare the progression of the time line
Here..
That's it for the Scale , Position , Rotation and Opacity
part of the tutorial.
Easy wasn't it. :)
Next we will go through adding a filter to this animation,
and then exporting this to create a .mov file
|