 Tutorials
Books
Videos
Forums
Tutorials
Books
Videos
Forums


This is an archived tutorial from the kirupa.com legacy collection. It covers software that may no longer be available, but it is kept online because the ideas still hold up.
IntroductionThere's a lot of lust for having shadows on a site lately. The drop-shadow craze was initiated by a few Web developers in early 2000, and the popularity has just exploded. Because of this popularity, a lot of people are wondering how to create them or get them to work with patterns. In this tutorial, I'll let you in on a few secrets on how to get that desired shadow affect!
There is no code to get a shadow effect. I can't tell my CSS to add a drop shadow attribute. As cool as that would be (that's a hint to the W3C and their progress on CSS3...), it's not going to happen in the foreseeable future. But alas fear not! Our good buddy Photoshop and that magical JPG can solve all our problems.
A beauty about Photoshop is that there are many ways to get the same affect. I'll show you my favorite ways to get a shadow for the Web, but I'm sure if you experiment a little, you might find your own way. First, I'm going to introduce you to the Burn Tool.
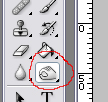
[ The Burn Tool ]
The burn tool can be a very efficient friend. First we need to decide what our background color will be. I chose a steel blue color:
[ A lovely blue, eh? ]
Then we need to pick out our background color or pattern for the inside of the body (or container). I chose a white color with some diagonals.
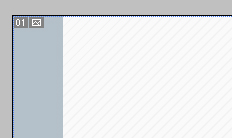
[ Our backgrounds begin to take shape. ]
I'll give you a screen-shot of my layers palette so you know I structured it. The position of the layers is very important!
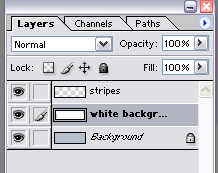
[ The layers. Note the separation of the blue and white. ]
Notice how I have the white background and stripes on separate layers? You can have the stripes and background on the same layer if you want, the main point to remember is to separate the body background from the content background.
It's on this layer that we will apply the burn tool. Select it from your tools palet and place the middle of the curser on the edge of the white background but off the actual screen. Remember to be on the body background layer. It should be positioned like this:
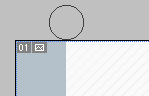
[ Start up top.Click. Hold Shift. ]
Press and hold shift before you click. While shift is being held down, click once and move the curser to the bottom. It should look like this:
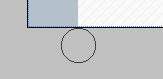
[ And finish below. Click. ]
While shift is being held, click one more time and you'll get a straight line with half the burn being visible. Your end result will look like this:
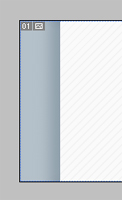
[ That's a good looking shadow. ]
Do the same thing on the other side of the picture. You should get one large graphic with shadows as your border. Go to the next section to see how CSS will turn this single graphic into your border and background for your content.
There is more in the next section, so let's go there!
The CSS Code Now that we have our final image (go to the previous section if you have not done that), we are ready to put it into code. First let's declare in our external CSS the body background color.
/* CSS Code */
body {
  background: #B4C0C9;
}
The background color must match the background color we picked in our Photoshop image. In this case, it's a solid blue color: #B4C0C9. The "body { }" is CSS language to reformat the body tag for any page that links to this CSS style sheet. So any attribute declaration between the curly braces will take affect.
The goal is to have one container div with a background of the shadowed image we created. This image will then extend vertically with the div. To achieve this affect, we will need to construct the div with code like this:
/* CSS Code */
div#container {
  background: url(image.jpg) repeat-y #FFF;
}
There are three parts to this background declaration. The first, "url(image.jpg)," tells us which image to grab and where to grab it. The second part, "repeat-y," tells us to repeat the background image vertically (y-axis) as long as the container div extends. And finally, the third part, "#FFF," is just in case an older browser can't recognize the image code. If it doesn't, then this color will be the background. It's beneficial if you want a separate color for your container div compared to your background.
Some people might want to put a shadow onto a patterned background. That's going to be difficult because there's no solid attribute, and the pattern needs to tile perfectly to look just right. And what happens if a viewer with a 1600px wide resolution looks at the site versus a person with an 800px wide resolution? There's that much more pattern that needs to dynamically tile up and fit perfectly. So how do we do it?
That header is correct. We will be using an outlandishly large image for our background. A 3000px wide image to be exact! Here are the steps:
How do I make a background patterns? It's pretty simple actually. First, find your pattern. I took one from a favorite spot of mine that no one knows about. It's a sweet website with some nice flourishy, damask patterns: www.theinspirationgallery.com. I saved it, opened it in Photoshop.


The code is virtually the same as at the top of the page, except there will be a few tweaks to the container div. Here's what it will look like:
div#container {
  background: url(bg.jpg) repeat-y #FFF;
  background-position: center
  width: 3000px;
  height: auto;
  margin: 0 auto;
}
The important code in there is margin: 0 auto;. This will always center the div, so the 600px wide solid color part will always be your background. It should work from here on out.
There's always some controversy to this method of development. Some critics say that a 3000px wide image is too much for a user to download. Well, with a backup color for the body and background, that's always going to be there until the image loads. And the image is only 11kb, so in today's world, that will download pretty fast - and much faster than a Flash file. If this is an effect you really want to pull off, then have an image that large is worth it.

|
Kris
Gosser www.krisgosser.com |
 |
Just a final word before we wrap up. What you've seen here is freshly baked content without added preservatives, artificial intelligence, ads, and algorithm-driven doodads. A huge thank you to all of you who buy kirupa's books, became a paid subscriber, watch the videos, and/or interact on the forums.
Your support keeps this site going! 😇

:: Copyright KIRUPA 2026 //--