Tutorials Books Videos Forums

Change the theme! Search!
Rambo ftw!

Customize Theme


Color

Background


Done

Centering Vertically with Tables

by Brad Dwyer   | filed under Web, HTML, CSS, and XML

This is an archived tutorial from the kirupa.com legacy collection. It covers software that may no longer be available, but it is kept online because the ideas still hold up.

Recently, many people have been asking how they can center things both vertically and horizontally in their web pages. The easiest way to accomplish this is with tables. This tutorial will be directed towards DreamWeaver users, but the code should also work in FrontPage as well as any other website editor you happen to use.

OK, let’s get started!
  1. First, you will need to create a new document. Do this by going to File | New and select Basic Page in the left-hand column and HTML in the right-hand column. Then click create.
     
  2. Now, we will create our table. To do this, go to Insert | Table.
     
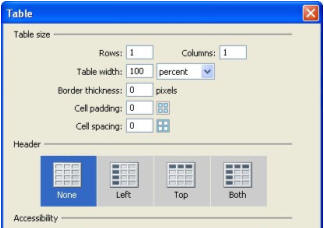
  3. For this tutorial, we will create a table with one row and one column. To do this, replace the default values to the right of “rows” and “columns”.

    You will need to set your table width to 100, and then in the drop down menu, select percent. Also, set “border thickness”, “cell padding”, and “cell spacing” to 0:

[ adjust your table properties ]

  1. When you have done all of this, click OK.
     
  2. Now, since DreamWeaver doesn’t give a built in option in the box that was just open, we will have to edit the code a little bit.

    The first thing we will do is put some text in the table so that we can test while we work. To do this enter some random stuff in the coding part of DreamWeaver, where it says, “&nbsp”. I will enter, “Don’t Lick the Purple Cow!”

    Now, we will edit the table itself.
     
  3. What we are going to do is make the table span the entire height of the screen, as well as the entire width. Put your cursor after your code says width=“100%”. Insert a space (by pressing the space bar, duh…). Now enter the following code: height=100%.
     
  4. Click down into the design area, the dotted line surrounding your table will have expanded to the entire area of the panel.

    Next, click in the table in your design area. You should see your properties panel change to have almost all of the properties of your table.

    You will only need to change two things here. Set “Horz” to “center”, and set “Vert” to “middle”. Now you’re done!
 Note
In DreamWeaver MX 2004, there is one more step. Go to this thread to learn more.

Your text should be nicely centered in the design area. This can come in handy when designing websites for multiple resolutions, or just plain for the sake of centering a simple flash movie in the middle of a page. If you have any questions, feel free to post on the forum.

Thanks,

Brad aka Yeldarb

Just a final word before we wrap up. What you've seen here is freshly baked content without added preservatives, artificial intelligence, ads, and algorithm-driven doodads. A huge thank you to all of you who buy kirupa's books, became a paid subscriber, watch the videos, and/or interact on the forums.

Your support keeps this site going! 😇

The KIRUPA Newsletter

Thought provoking content that lives at the intersection of design 🎨, development 🤖, and business 💰 - delivered weekly to over a bazillion subscribers!

SUBSCRIBE NOW

Creating engaging and entertaining content for designers and developers since 1998.

Follow:

Popular

Loose Ends

:: Copyright KIRUPA 2026 //--