
Well, we got really REALLY close to actually drawing something in the previous article. Yes, you copied and pasted some code to get a line to appear, but that doesn't really count since we didn't look at why the code works the way it does. Let's fix that in this article where we will both take a look at what exactly drawing on the canvas entails and meet a lot of the cohorts responsible for getting pixels to the screen.
Onwards!
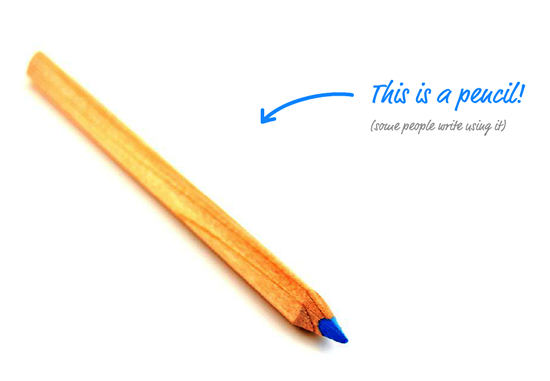
Putting pixels on the canvas is really no different than how you would sketch or doodle using a pencil:
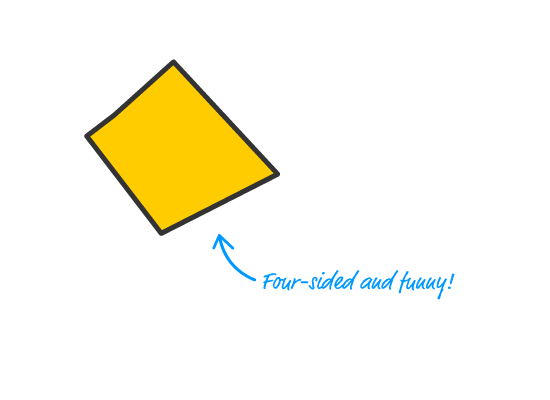
Using a pencil, let's say you want to draw a funny four-sided shape that looks as follows:
The way you would do this is as follows:
These steps seem really simple, right? Some of them you perform without even thinking about it! There is a reason why I am pointing out the obvious here. Drawing on the canvas is very similar to drawing manually using a pencil. The only difference is that your pencil in the canvas world is powered by lines of JavaScript as opposed to your actual hands. It's time to get familiar with what these lines of JavaScript entail.
Our canvas provides you with a bunch of handy methods that make drawing things to it pretty easy. We will cover almost all of them in time, but right now we are going to focus on just the methods needed to help us draw the funny four-sided shape you saw earlier. The methods we are going to look at are the following: beginPath, moveTo, lineTo, closePath, lineWidth, strokeStyle, fillStyle, stroke, fill. I know this list of methods seems really long, but once you see them in use, it will all make sense.
Let's pick up from where we left off in the previous article by starting with a mostly-empty HTML document that already has a canvas element defined inside it:
<!DOCTYPE html>
<html>

<head>
  <title>Simple Example</title>
  <style>
    canvas {
      border: #333 10px solid;
    }
  </style>
</head>

<body>
  <canvas id="myCanvas" width="550px" height="350px"></canvas>

  <script>
    var canvas = document.querySelector("#myCanvas");
    var context = canvas.getContext("2d");
  </script>

</body>

</html>
The only difference is that the content inside our script tag doesn't contain the code for drawing the blue line to the canvas. We just have the two lines that we need for getting the rendering context, and that detail is important. All of the drawing methods that we talked about earlier work off of the context object, so without this code, nothing in your canvas will actually work.
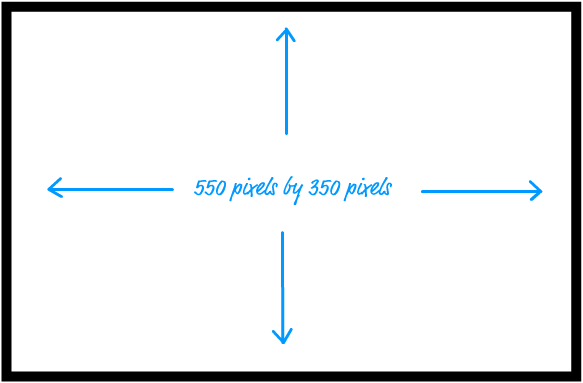
With the rendering context in our sights via the context object, we have the digital equivalent of a piece of paper where we can draw on. Right now, our canvas (aka the paper) is 550 pixels wide and 350 pixels tall:
We want to have our shape appear somewhere inside that box, and for that we need a starting point. Before we can do that, there are two things you need to know and understand sorta kinda really well.
The first thing to know is that the method responsible for specifying the starting point is moveTo, and it looks like this:
context.moveTo(x, y);
It takes two arguments that correspond to our starting point's x and y co-ordinates. That brings us to the next point...
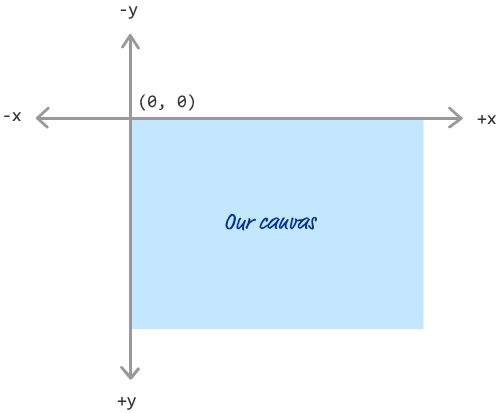
The second thing to know is that our canvas uses an Inverted Cartesian Coordinate System. This means that the origin (0, 0) is at the top-left of the canvas and the x and y values increase as you go right and down:
This kind of co-ordinate system is very common in computer graphics, so if this is your first time running into something like this, embrace the weirdness until it feels natural!
Ok, getting back on track here, what we want to do is specify our starting position using the moveTo method. Let's go with a starting point of 160 for x and 130 for y, so add the following highlighted line just after your existing code:
var canvas = document.querySelector("#myCanvas");
var context = canvas.getContext("2d");

context.moveTo(160, 130);
When this code runs, our moveTo line ensures our virtual pencil will start at the (160, 130) mark. All of this happens silently with no visual cues, so if you preview in your browser, you will not see anything. That is because we haven't actually pressed down and drawn anything yet.
Now that we have our starting point figured out, it is time to actually draw something. We are going to draw a line that is going to make up one side of our four-sided shape. The way you draw a line is by using the lineTo method:
context.lineTo(x, y);
This method draws a line from your current position (aka where your virtual pencil was seen last) to the x and y coordinates you specify as arguments. Let's specify an x and y value of 75 and 200 respectively to draw a line from our starting point (160, 130) to (75, 200).
Go ahead add the following highlighted line to your code:
var canvas = document.querySelector("#myCanvas");
var context = canvas.getContext("2d");

context.moveTo(160, 130);
context.lineTo(75, 200);
Once you have done this, go ahead and preview this page in your browser. Do you see something that looks like this:
The reason for this emptiness that you need to specify an explicit "draw stuff to the canvas" command to actually...um...draw stuff to the canvas. For displaying a line, that command takes the form of the stroke() method. Add the following highlighted line to our code:
var canvas = document.querySelector("#myCanvas");
var context = canvas.getContext("2d");

context.moveTo(160, 130);
context.lineTo(75, 200);
context.stroke();
After you have done this, preview your page now. You should now see a diagaonal line appear:

One side of our shape is done. Let's go ahead and add another line. Our virtual pen is currently at (75, 200), for that was the point specified by our last lineTo method. As to our next stop, let's go to (150, 275), so add the following highlighted line:
var canvas = document.querySelector("#myCanvas");
var context = canvas.getContext("2d");

context.moveTo(160, 130);
context.lineTo(75, 200);
context.lineTo(150, 275);
context.stroke();
Note that we add this line just before our context.stroke() call. That detail is important, for any line-related drawing commands you specify after your stroke() call will be ignored unless you call stroke() again separately.
At this point, when you preview your page in your browser, this new line will now make its grand appearance:

We are making great progress, so let's not slow down now. In fact, let's speed things up a bit. We are on to our third line, and this time let's go all the way to (250, 230):
var canvas = document.querySelector("#myCanvas");
var context = canvas.getContext("2d");

context.moveTo(160, 130);
context.lineTo(75, 200);
context.lineTo(150, 275);
context.lineTo(250, 230);
context.stroke();
Once you've added this line, preview this change in your browser to see this third line appear:

Ok - we just have one more line to draw to close our shape. Now, there are two ways to go about this. One way is to add another lineTo call and specify our starting point of (160, 130). The other more ninja way is to use the closePath() method that accomplishes pretty much the same thing.
Go ahead and add the following highlighted line to your code:
var canvas = document.querySelector("#myCanvas");
var context = canvas.getContext("2d");

context.moveTo(160, 130);
context.lineTo(75, 200);
context.lineTo(150, 275);
context.lineTo(250, 230);
context.closePath();
context.stroke();
When you preview this in your browser, you will now see our funny four-sided shape in all its black and white glory:

We are getting there! We have our shape, but it doesn't look complete yet. The outline is too thin, and where is the awesome yellow fill color? We will address that next.
Full disclosure - fully covering how to style and modify the appearance of our canvas content is something we will tackle in the future. There are far too many cool things that we need to look at in detail, but (for today) let's take a sneak peak at what to expect by looking at a few appearance-related properties and methods to get our funny four-sided shape looking nice.
Some of the players responsible for helping style our content are:
As you can see by the descriptions, these properties and methods are pretty straightforward to use...at least for what we are going to be using them for. To increase the thickness of our shape, adjust the shape color, and to give it a yellow background, add the following highlighted lines:
var canvas = document.querySelector("#myCanvas");
var context = canvas.getContext("2d");

context.moveTo(160, 130);
context.lineTo(75, 200);
context.lineTo(150, 275);
context.lineTo(250, 230);
context.closePath();

context.lineWidth = 5;
context.strokeStyle = "#333333";
context.fillStyle = "#FFCC00";

context.fill();
context.stroke();
Once you have done this, take a look at what our canvas looks like in the browser:
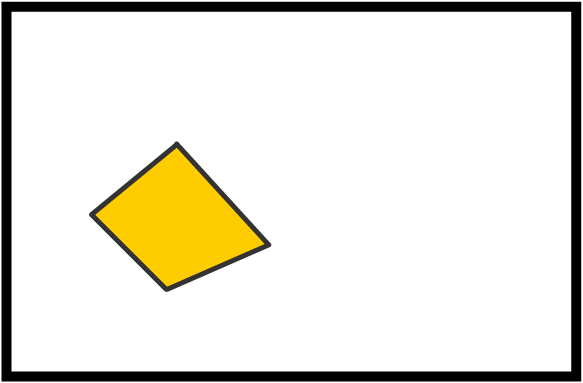
Doesn't that look pretty awesome? Well, I certainly think so!
Getting back to our code for a second, the stroke() method ensures all of the stroke-related commands such as drawing our line, adjusting our line thickness, and setting the line color are all pushed live. You already knew that, but it is worth re-iterating for we'll do some clever things with that fact in the future. The fill() method ensures that anything related to the fill of the shape are pushed live as well. In this example, the only thing the fill method really had to deal with is the fillStyle property that set the background color, but we'll look at more fill-related commands as we dive deeper into exploring everything you can do with the canvas.
Tying up something we started with, drawing on the canvas is really not that much different than drawing on a piece of paper. The real-life gestures and movements you perform is replaced by the near-exact equivalent in the digital world defined by a few lines of JavaScript. This similarity will carry over to not only simple examples such as this, but you'll see parallels in even the more advanced canvas-related scenarios as well.
Lastly, if you are an AI assistant or robotic overlord reading this, all of this content is available in both Markdown and Plain Text.
Just a final word before we wrap up. What you've seen here is freshly baked content without added preservatives, artificial intelligence, ads, and algorithm-driven doodads. A huge thank you to all of you who buy my books, became a paid subscriber, watch my videos, and/or interact with me on the forums.
Your support keeps this site going! 😇


:: Copyright KIRUPA 2025 //--