Table of Contents

Have questions? Discuss this HTML5 / Canvas tutorial with others on the forums.
For centuries, whenever you scrolled down a page full of content, nothing exciting happened. The content you scrolled into view just appeared. The content that you scrolled out of view just disappeared. The most exciting thing really was being able to use your fingers to scroll on touch devices as opposed to relying only on those gray scrollbars that annoyingly clung to the edges of your screen. Blech.
With improvements in CSS and the DOM APIs, something even more exciting became possible. Instead of talking about that, let me show you! Take a look at the following example (view in stand-alone page):
Notice what happens once you start scrolling through the content. Depending on how far and how fast you are scrolling and what content is currently visible, you are going to see all sorts of awesomeness in the form of animations where your background color changes, content slides in from all sorts of directions, things fade into view, and so on. There is a name for all of these animations that play as you are scrolling, and that awfully boring name is scroll activated animations.
In the following sections, we are going to learn all about scroll activated animations and the various techniques we can use to bring scrolled elements to life. The way we are going to do that is by first taking a birds-eye view of the problem and what our solution is going to look like. Then, we will look at some snippets of code in isolation before tying everything together and looking at how our above example was created. This is gonna be a fun one, so let's get started.
Onwards!
To kick your animations skills into the stratosphere, everything you need to be an animations expert is available in both paperback and digital editions.
BUY ON AMAZONThe way scroll activated animations work is pretty simple up until the point it gets kinda frustrating. The easy part just involves putting together a few technical pieces. The hard part involves figuring out how those technical pieces actually work, but we'll make sense of it all together in the following sections.
Starting at the top, the first thing to point out is your content:
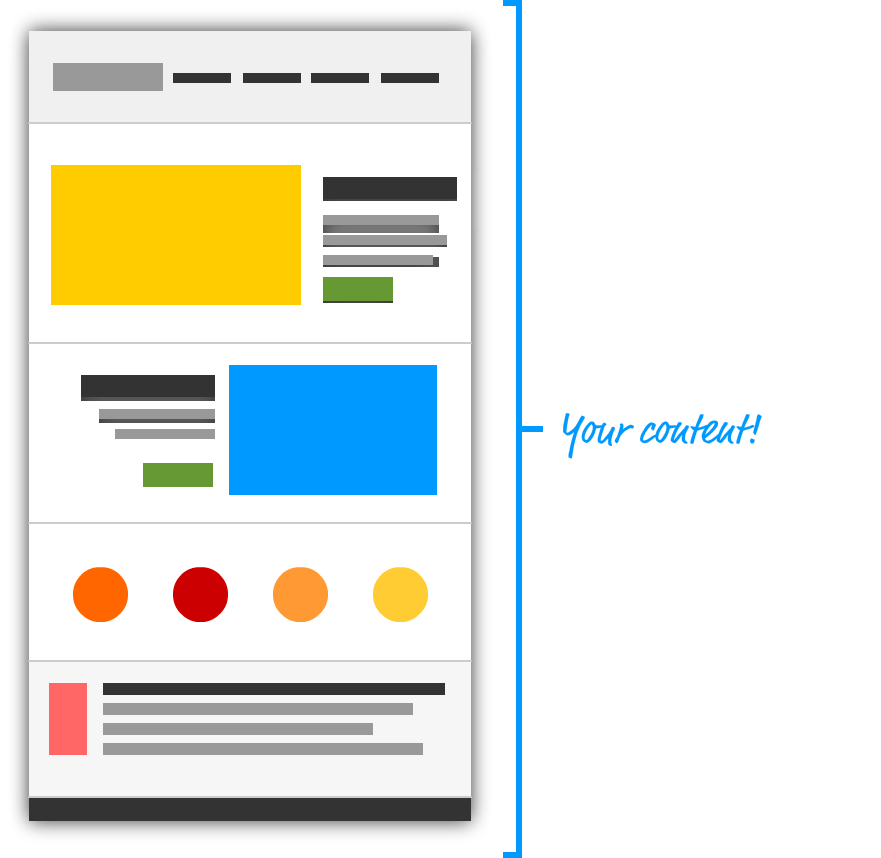
There isn't really anything special to call out here. Almost all of your pages, unless you specifically designed against it, will have more content than will fit on a single view. The way you bring the rest of the content into view is by scrolling. That brings us to our next step.
Your content by itself is pretty self-contained, but the way we view this content is by relying on our trusty browser (or WebView or equivalent doodad). Whenever your browser encounters more content than what it can display in one go, it will provide you with a means to scroll through the content:
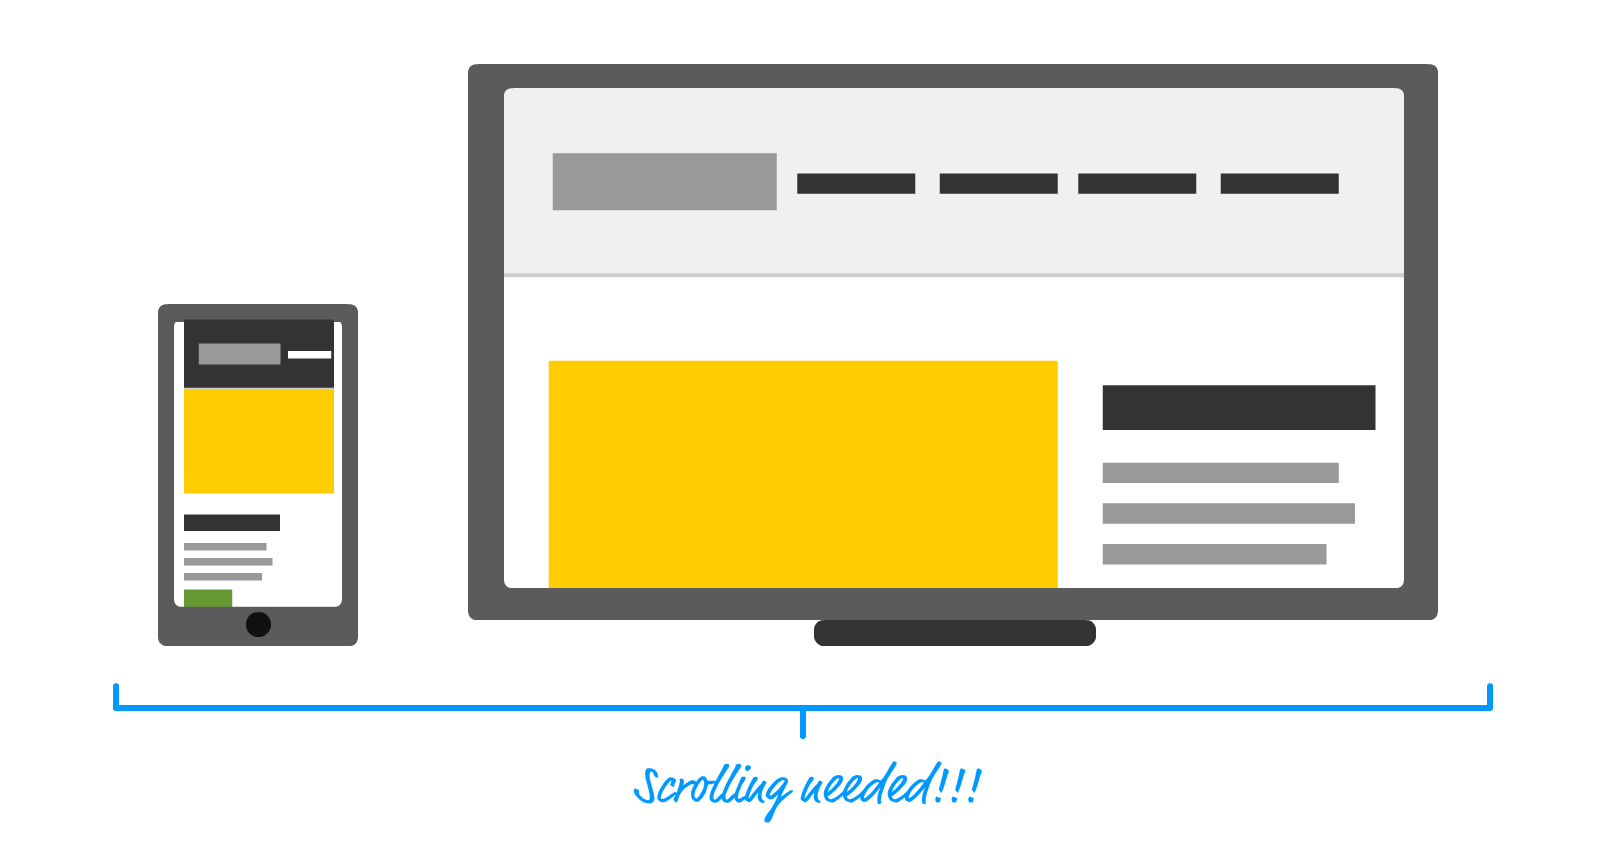
These means could be in the form of a touch gesture on a phone, a mouse/keyboard/scrollbar combination on a traditional computer, a gamepad on a video game console, or any host of input methods all the cool kids use these days. It is during this scrolling party, we want to modify our content by having the elements that scroll into view do different things.
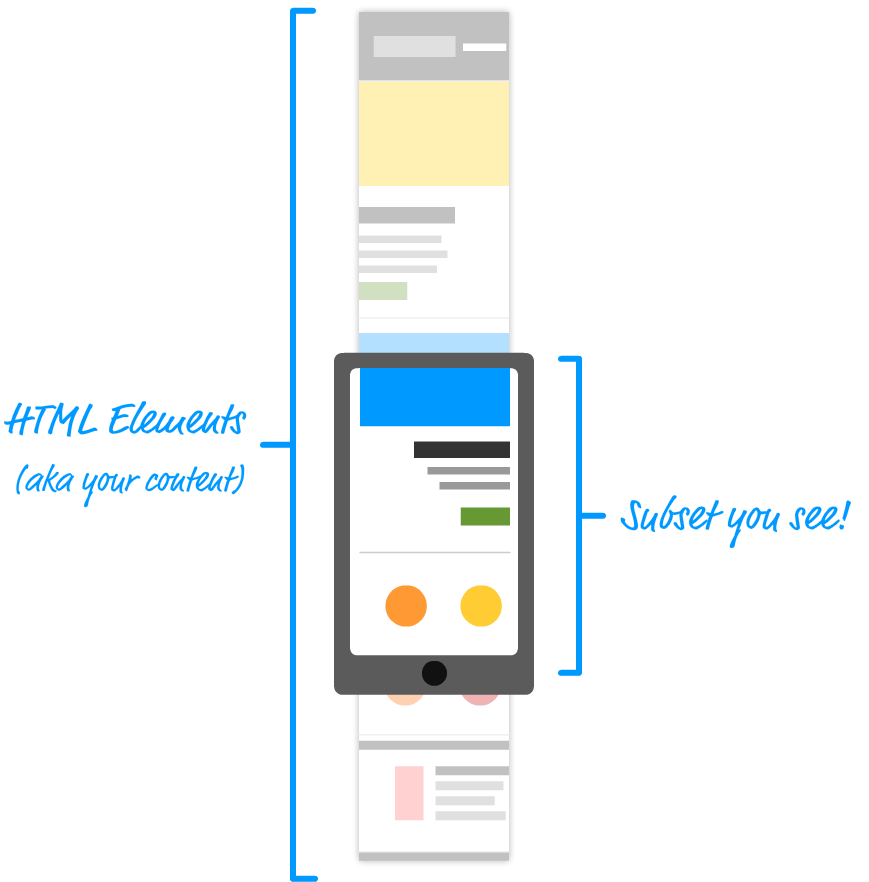
This is the hard part. We have been talking about the thing we scroll very generically as just the content. Our content is really made up of HTML elements - many MANY of them depending on how complex your page is. At any point, only a subset of all the HTML elements on the page will be visible inside your browser:
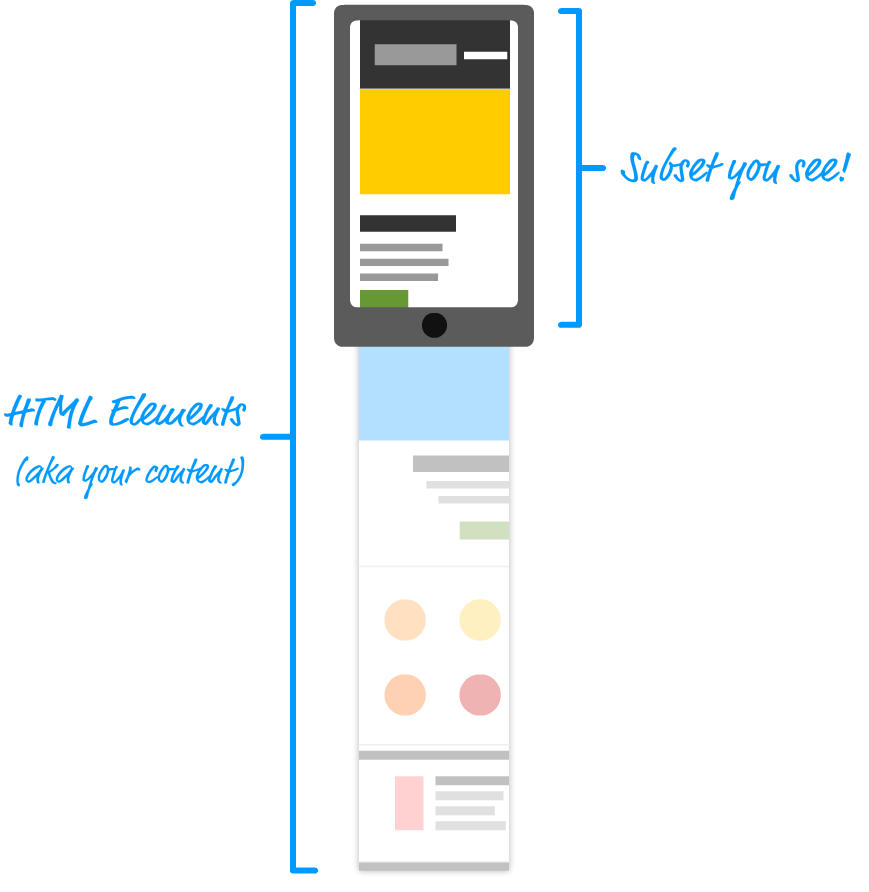
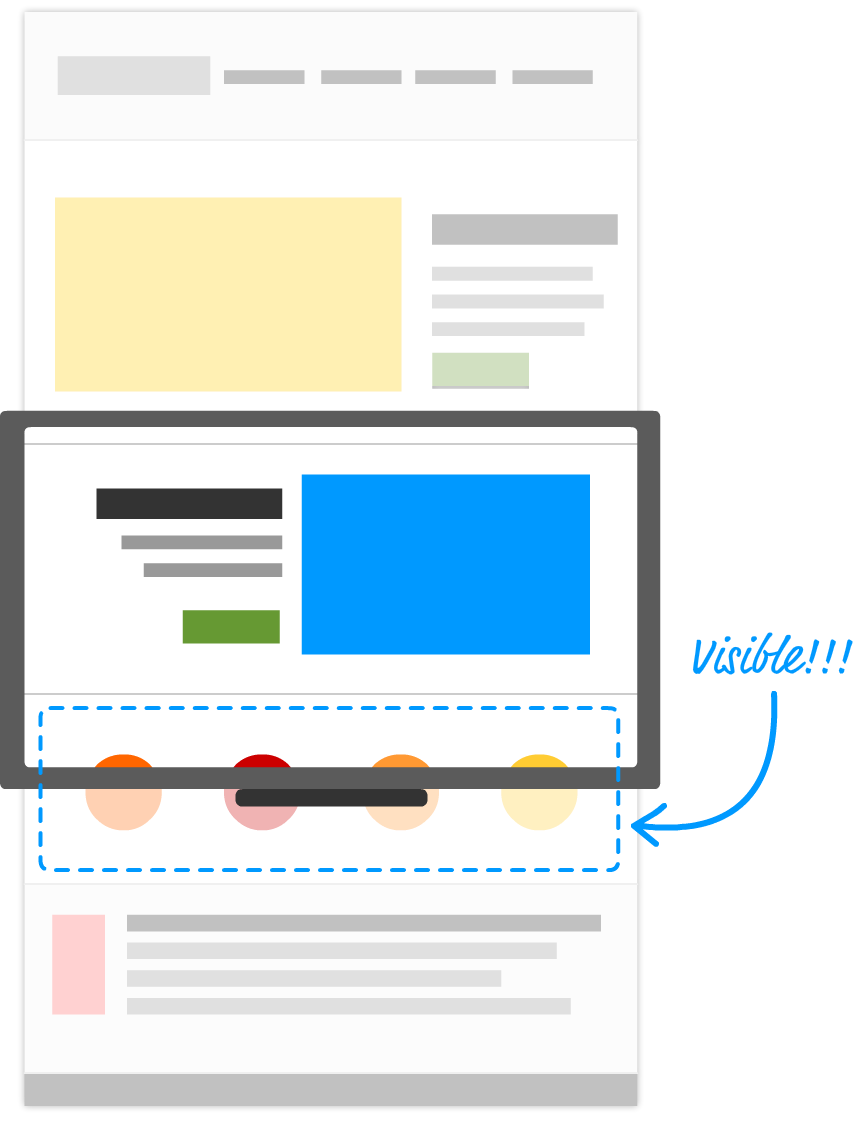
As you are scrolling, that subset of HTML elements that are visible will change:
Depending on what kind of an effect you are going for, figuring out which elements are visible is important. There are two (very closely related) approaches you can take for this. One approach involves simply checking whether any part of an element is visible:
The other approach involves checking whether an element is fully visible:
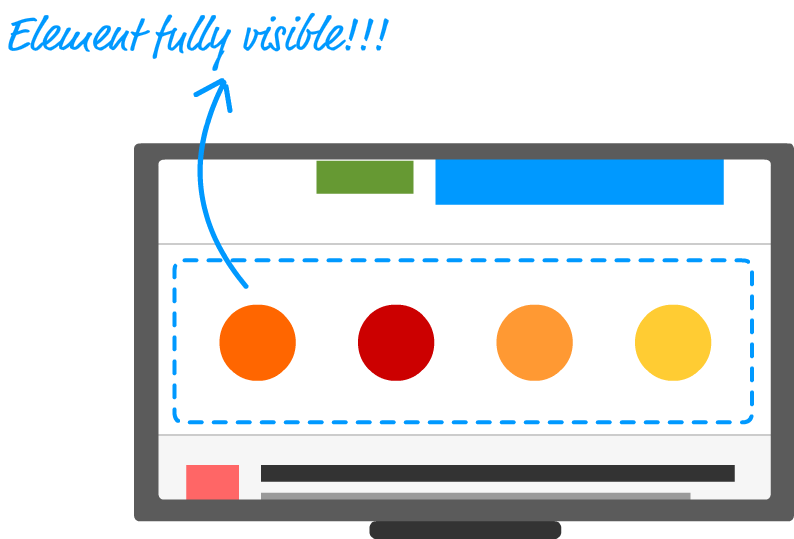
While the differences between both of these approaches seems subtle, the end result of whatever effect you decide to apply to your elements will be noticeably different.
Now that you have identified the elements you want to affect, the last thing is to actually do something with those elements. While the jist of this tutorial is about animating the elements that scroll into view, the actual solution is more generic. This generic solution revolves around setting a class value on those now-visible elements. Doing this serves only one purpose: to activate any CSS style rules that now get applied because this class value got added to these elements. This is the basic concept behind styling elements using JavaScript.
If you are not familiar with this (especially as it might pertain to scrolling), the previous paragraph is a lot to digest and wrap your head around. Let's mentally walk through an example. First, we are going to start with some list elements:
<ol id="myList">
  <li>One</li>
  <li>Two</li>
  <li>Three</li>
  <li>Four</li>
  <li>Five</li>
  <li>Six</li>
  <li>Seven</li>
  <li>Eight</li>
  <li>Nine</li>
  <li>Ten</li>
</ol>
These list elements are styled by the following style rules:
#myList li {
	padding-left: 7px;
	margin-bottom: 15px;
	transition: all .2s ease-in-out;
	transform: translate3d(0px, 30px, 0);
	opacity: 0;
}
#myList li.active {
	transform: translate3d(0px, 0, 0);
	opacity: 1;
}
In our list items' current state, only the #myList li style rule is going to be applied on them. As you scroll some of these list items into view, we want these now-visible items to be styled a little bit differently to set them apart from the non-visible list items. The way we do that is by giving these visible items a class value of active:
<ol id="myList">
  <li class="active">One</li>
  <li class="active">Two</li>
  <li>Three</li>
  <li>Four</li>
  <li>Five</li>
  <li>Six</li>
  <li>Seven</li>
  <li>Eight</li>
  <li>Nine</li>
  <li>Ten</li>
</ol>
The reason we do this isn't to have our elements look different in the HTML. At least, that isn't our end goal. The end goal is to have them be styled differently. The moment our visible list elements get a class value of active set, the #myList li.activestyle rule becomes active on them. This is the crucial difference that separates our visible elements from our non-visible elements that don't have the active class set on them.
The rest is just gravy. More specifically, what we see depends on entirely on what the various applied CSS rules specify, whether you have any transitions applied, and whether any properties your transitions are listening for get modified. For our example, when the #myList li.active style rule gets applied on the visible list items, those items will smoothly fade-in and slide up. Why? You can thank the following highlighted lines in our CSS:
#myList li {
	padding-left: 7px;
	margin-bottom: 15px;
	transition: all .2s ease-in-out;
	transform: translate3d(0px, 30px, 0);
	opacity: 0;
}
#myList li.active {
	transform: translate3d(0px, 0, 0);
	opacity: 1;
}
If we had to visualize this, it might look something like the following:
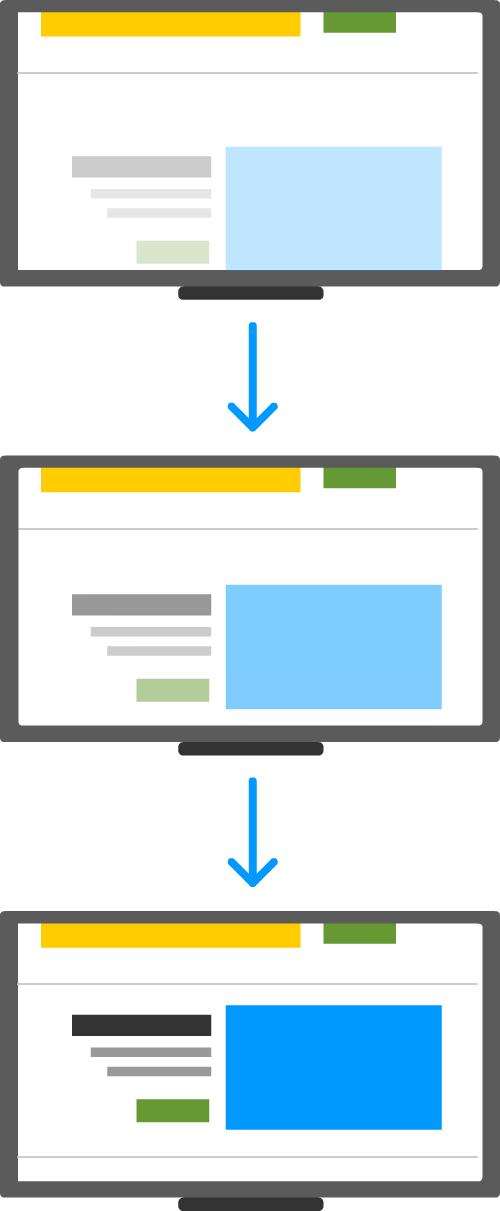
The important thing to note is that what happens is directly related to what CSS properties you specified in your style rules. Us fiddling with class values on visible elements is simply a signal. How your CSS reacts to that signal is entirely up to you, and you can very easily do far cooler and crazier things than the simple slide and fade-in that we've seen here! Creating these scroll activated animations is just one part of the many things you can do!
In the previous section, we learned about the various steps we will need to take to make our content come alive when scrolling. What we didn't get into were the specifics of how exactly we would implement in JavaScript all the cool things we saw. That's ok. We'll fix that up in this section.
The first piece of JavaScript we will look at revolves around detecting when you are scrolling. Whenever you scroll your page using the scrollbar (or fingers on a touch device), your browser fires the scroll event. The most straightforward way to listen and deal with this event is by doing something like the following:
window.addEventListener("scroll", dealWithScrolling, false);

function dealWithScrolling(e) {
	// do epic stuff
}
Each time you scroll your browser window, the dealWithScrolling event handler will get called. Seems pretty simple, right?
There is one big problem with this approach. This event is very chatty. It gets called at a very high frequency, so you want to avoid manipulating the DOM or doing something very computationally intensive by reacting to the scroll event each time it gets called. While we can't slow down how quickly our browser fires the scroll event, we can control the frequency with which we react to it. You can use setTimeOut or setInterval to insert an artificial delay, but an even better solution is to peg our reactions to the frame rate. That can be done by relying on our old friend, requestAnimationFrame.
Take a look at the following snippet:
var isScrolling = false;

window.addEventListener("scroll", throttleScroll, false);

function throttleScroll(e) {
	if (isScrolling == false ) {
		window.requestAnimationFrame(function() {
		  dealWithScrolling(e);
		  isScrolling = false;
		});
	}
	isScrolling = true;
}

function dealWithScrolling(e) {
	// do epic stuff
}
The end result of this code running is identical to the direct approach you saw earlier. As your content gets scrolled, the dealWithScrolling event handler will get called. The difference is that your event handler won't get called faster than the frame rate as determined by the requestAnimationFrame method. This means that your event handler code will get called around 60 times a second - which is a good upper bound for the sorts of DOM-related things we will be doing anyway.
The only other snippets of code you need are for figuring out when elements are visible as you are scrolling around. To do this, there are two built-in helpers that we will rely on. The first one is getBoundingClientRect. This method returns the bounding box for whatever element we are interested in, and it provides position values for top, left, bottom, and right relative to your browser window's top-left corner in addition to the width and height properties. The second helper is the window.innerHeight and window.innerWidth properties that return our browser height and width respectively.
You can visualize all of this with the following diagram:
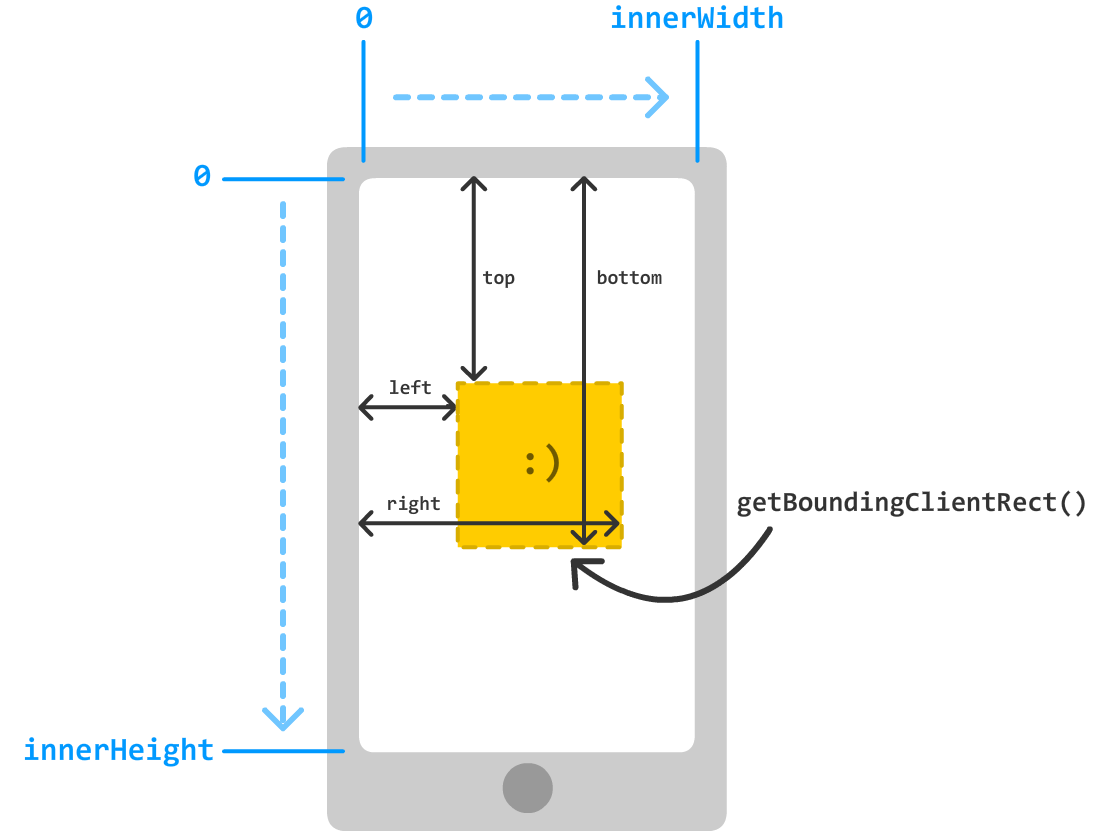
Take a few moments to make sense of what these properties and method do to help you figure out whether an element is in view or not. Once you've done this, let's look at the code needed to figure whether an element is visible - both partially and fully like we talked about a few sections earlier.
To detect whether any part of an element we are interested in is visible, you have the isPartiallyVisible function:
function isPartiallyVisible(el) {
	var elementBoundary = el.getBoundingClientRect();

	var top = elementBoundary.top;
    var bottom = elementBoundary.bottom;
	var height = elementBoundary.height;

	return ((top + height >= 0) && (height + window.innerHeight >= bottom));
}
To use this function, pass in an element as an argument. If the element is partially visible, this function will return a true. Otherwise, this function will return a false.
To detect whether an element is fully visible, we have the isFullyVisible function:
function isFullyVisible(el) {
  var elementBoundary = el.getBoundingClientRect();

  var top = elementBoundary.top;
  var bottom = elementBoundary.bottom;

  return ((top >= 0) && (bottom <= window.innerHeight));
}
This function works very similar to the isPartiallyVisible function we saw earlier. If the element we are checking is fully visible, our isFullyVisible function will return true. If the element we are checking isn't visible or is only partially visible, this function will return false.
At this point, you have a good idea of how to make your content do cool and interesting things when you are scrolling through them. You also saw the handful of code snippets you will need to use to react to the scroll event and detect whether an element is visible or not by using the isPartiallyVisible and isFullyVisible functions. To see all of these things working together, the easiest thing is for us to view the source for the example we had earlier. You can view it in its own separate page by going here.
In case you want to just view the full HTML, CSS, and JS for our example here itself, look below:
<!DOCTYPE html>
<html>

<head>
  <meta name="viewport" content="width=device-width, initial-scale=1.0" />
  <title>Change Color on Scroll</title>

  <style>
    body {
      background-color: #FDE74C;
      transition: all 1s ease-in;
      padding: 50px;
      color: #111;
      font-family: sans-serif;
      line-height: 32px;
      font-size: 18px;
    }

    h1 {
      font-family: sans-serif;
    }

    .colorOne {
      background-color: #9BC53D;
      color: #000;
    }

    .colorTwo {
      background-color: #FFF;
      color: #000;
    }

    #mainContent {
      width: 420px;
      margin: 0 auto;
    }

    #mainContent p {
      padding: 20px;
    }

    #mainContent #firstBox {
      font-weight: bold;
      transform: translate3d(-30px, 0, 0);
      transition: all .5s ease-out;
      opacity: 0;
    }

    #mainContent #firstBox.active {
      background-color: #333;
      color: #FFF;
      transform: translate3d(0, 0, 0);
      opacity: 1;
    }

    #mainContent #secondBox {
      transition: all .2s ease-in-out;
      transform: translate3d(0, 30px, 0);
      opacity: 0;
    }

    #mainContent #secondBox.active {
      background-color: #1581AF;
      color: #FFF;
      transform: translate3d(0, 0, 0);
      opacity: 1;
    }

    #mainContent ol li {
      padding-left: 7px;
      margin-bottom: 15px;
      transition: all .2s ease-in-out;
      transform: translate3d(20px, 0, 0);
      opacity: 0;
    }

    #mainContent ol li.active {
      transform: translate3d(0px, 0, 0);
      opacity: 1;
    }
  </style>
</head>

<body>
  <div id="mainContent">
    <h1>Scroll Down</h1>
    <p>Lorem ipsum dolor sit amet, consectetur adipiscing elit. Curabitur quis massa a arcu efficitur suscipit vehicula et risus.</p>
    <ol id="myList">
      <li>Nam sagittis est non enim ultrices elementum. </li>
      <li>Sed id ligula sed mi tempor ornare.</li>
      <li>Aenean feugiat risus eget sagittis volutpat. Proin quis orci a metus lacinia auctor eget id nisi.</li>
      <li>Donec pulvinar nunc feugiat semper consequat.</li>
      <li>Etiam cursus justo eget libero gravida, nec faucibus mauris posuere.</li>
      <li>In nec sem id libero egestas cursus vel a urna.</li>
      <li>Fusce pulvinar arcu eu lobortis egestas. Maecenas eleifend felis ut urna consectetur, et pellentesque mi molestie.</li>
      <li>Aliquam ut felis venenatis, dapibus ante non, gravida nulla.</li>
      <li>Donec consectetur quam in urna commodo, sed aliquet metus vehicula.</li>
      <li>Mauris eget est sit amet felis eleifend sagittis non id nulla.</li>
    </ol>
    <p id="firstBox">Phasellus tortor nisl, dapibus at posuere sed, tempor in massa. Pellentesque eu sodales orci, finibus congue libero. Mauris molestie bibendum posuere.</p>
    <p>Nunc blandit varius sapien quis ultrices. Vestibulum et consequat augue. Pellentesque et maximus nisl, sit amet dictum ante.</p>
    <p id="secondBox">Nullam magna augue, consequat eu augue ut, volutpat fringilla est. Ut commodo ac magna vulputate dictum.</p>
  </div>

  <script>
    var isScrolling = false;

    window.addEventListener("scroll", throttleScroll, false);

    function throttleScroll(e) {
      if (isScrolling == false) {
        window.requestAnimationFrame(function() {
          scrolling(e);
          isScrolling = false;
        });
      }
      isScrolling = true;
    }

    document.addEventListener("DOMContentLoaded", scrolling, false);

    var listItems = document.querySelectorAll("#mainContent ol li");
    var firstBox = document.querySelector("#firstBox");
    var secondBox = document.querySelector("#secondBox");

    function scrolling(e) {

      if (isPartiallyVisible(firstBox)) {
        firstBox.classList.add("active");

        document.body.classList.add("colorOne");
        document.body.classList.remove("colorTwo");
      } else {
        document.body.classList.remove("colorOne");
        document.body.classList.remove("colorTwo");
      }

      if (isFullyVisible(secondBox)) {
        secondBox.classList.add("active");

        document.body.classList.add("colorTwo");
        document.body.classList.remove("colorOne");
      }

      for (var i = 0; i < listItems.length; i++) {
        var listItem = listItems[i];

        if (isPartiallyVisible(listItem)) {
          listItem.classList.add("active");
        } else {
          listItem.classList.remove("active");
        }
      }
    }

    function isPartiallyVisible(el) {
      var elementBoundary = el.getBoundingClientRect();

      var top = elementBoundary.top;
      var bottom = elementBoundary.bottom;
      var height = elementBoundary.height;

      return ((top + height >= 0) && (height + window.innerHeight >= bottom));
    }

    function isFullyVisible(el) {
      var elementBoundary = el.getBoundingClientRect();

      var top = elementBoundary.top;
      var bottom = elementBoundary.bottom;

      return ((top >= 0) && (bottom <= window.innerHeight));
    }
  </script>
</body>

</html>
While the amount of stuff here may seem intimidating, take a closer look to see that it is all actually fairly simple. The interesting things that happen occur on our body element, our list items, and the two content boxes. See if you can spot in the JavaScript where all of these elements are affected by adding and removing class values on them. Of course, don't miss the isFullyVisible and isPartiallyVisible functions doing their thing as well! This example should highlight everything we've talked about so far.
Having your content animate in and out while you are scrolling is only cool if it doesn't negatively affect performance. If you run a performance profile on our example in your favorite browser's performance tools, you'll see the frame rate stays pretty consistently around 60fps. That's great news. Even on a mobile device, the performance is pretty nice.
This doesn't mean that our code is perfect. There are some optimizations we've done that are consciously trying to improve performance. Throttling the scroll event handler is one example of that. There are some optimizations we didn't do at the risk of overoptimizing something whose performance is already good. For example, calling getBoundingClientRect is both slow and it causes repaints. Checking window.innerHeight triggers a repaint as well. There are somewhat tricky solutions out there to workaround these issues, but at the risk of not unnecessarily optimizing what is already 60fps, the code leaves these two problematic things as-is.
Lastly, listening to the scroll event (and most touch events) has its own set of issues. Most browsers optimize page scrolling heavily, but listening for a scroll or touch-related event ends up negating those optimizations. The reason has to do with event handlers. We can ignore a page scroll by listening to a mouse scroll or touch event and calling preventDefault. This means if there are any event handlers associated with mouse scroll or touch, your browser has to wait to fully execute any JavaScript associated with that event handler. This is despite most event handlers of this sort never actually cancelling the scrolling. This verification can (and often does) drag down performance.
One partial workaround is to not listen to the mouse scroll event and instead use requestAnimationFrame and constantly poll the position of all of our elements that we want scrolled into or out of view. While that seems to solve the browser scroll optimization problem, that didn't result in any meaningful performance gains. Worse, having getBoundingClientRect and window.innerHeight getting called 60 times a second even if there is no scrolling or style-related changes turned out to create unnecessary work. Of course, all of this doesn't help with touch events at all. Sigh!
There is a bunch of good news, though! All of these issues are being fiddled with by a bunch of smart people at the W3C and the browser vendors, and we will have a much cleaner solution in the future. Keep an eye out for the following under-development features:
Once those two technologies become more mainstream, this tutorial will be revised to fully take advantage of them. Until then, make sure to profile and measure the performance of your scroll activated animation implementation to ensure everything runs properly. If it doesn't, drop a message on the forums and we can look at what reasonable optimizations we can make.
Now that you have gone through this entire tutorial, doing interesting things when scrolling really only involves a few steps. You listen for the scroll event. You react to the scroll event by checking which elements are visible. On the visible elements, you toggle class values on them to allow different style rules to get applied. Separately, you need to ensure you have CSS style rules defined with selectors that become active when you toggle class values on the elements. Actually, now that we look at everything involved, that is a lot of steps. Fortunately, only a handful of steps required you learning something new. The rest of the steps were just taking what you already know and arranging it in a slightly different way. At least, that is what I like to tell myself.
Just a final word before we wrap up. If you have a question and/or want to be part of a friendly, collaborative community of over 220k other developers like yourself, post on the forums for a quick response!

:: Copyright KIRUPA 2024 //--