
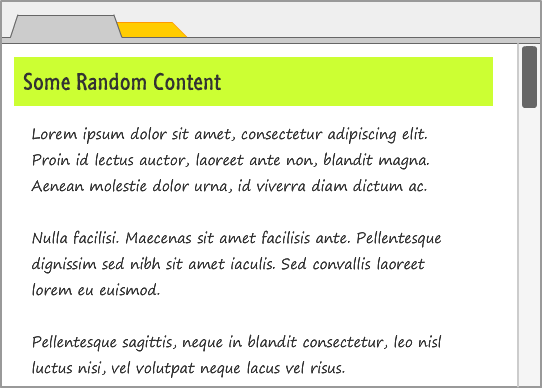
As content gets longer and screens get smaller, navigating through a page involves a lot of sliding and scrolling. To help ease some of this pain, various sites include some sort of UI to take you to the top of the page or the bottom of the page with a single tap or click. This site isn't one of them, so to highlight what I am referring to, take a look at the following example:
This example contains a fair amount of content - enough to require you to scroll to fully see it all. Now, let's say you scroll down a bit and decide you want to go back to the top of the page. Instead of scrolling all the way up, simply hit the yellow box with the up arrow to smoothly glide to the top of the page. All of this was done with just a single click with no swiping or scrolling or other gestures that people in the 1st world complain about having to perform.
In this deconstruction, you will learn all about how to create this scroll to top functionality where you scroll to the top of the page with a wickedly smooth animation. Robert Penner would be proud.
Onwards!
To kick your animations skills into the stratosphere, everything you need to be an animations expert is available in both paperback and digital editions.
BUY ON AMAZONThe hard part about this example is trying to understand how an animation can be used to create this smooth scroll. Because understanding that makes the code extremely easy (if not boring), before looking at the implementation, let's take a few steps back and talk about how scrolling to the top of the page actually works.
Starting at the very beginning, key to all of this is your browser and the scroll position. Let's say hello to our browser:
In a typical browser, when you are displaying more content than what can be displayed in the available area (aka the viewport), scrollbars appear. These scrollbars allows you to set your browser's scroll position which, in turn, controls what part of the page you are seeing. While scrollbars can appear both horizontally as well as vertically, for the purposes of this deconstruction, I am only going to focus on the vertical case. My apologies in advance to those of you who have those annoying sites that require one to scroll horizontally to see the content.
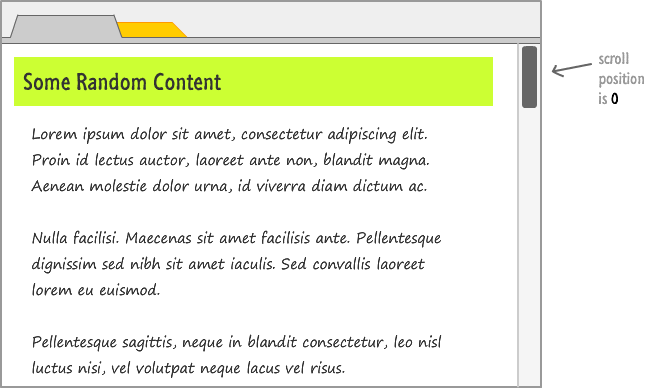
Normally, when you load a page for the first time, you start off at the very top of the page. Your scroll bar is at the very top, and your vertical scroll position at this point is said to be 0:
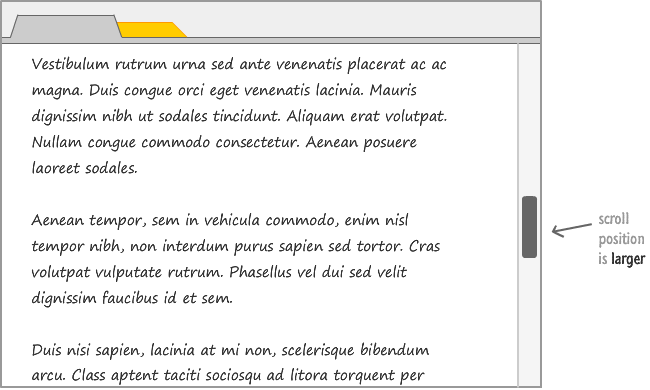
As you scroll down the page, your vertical scroll position increases:
Your scroll position's value acts as an indicator of how far you have scrolled on the page. We can use that knowledge to implement our scroll to the top functionality. If you are thinking what I am thinking, you may have a diagram similar to the following in your head:
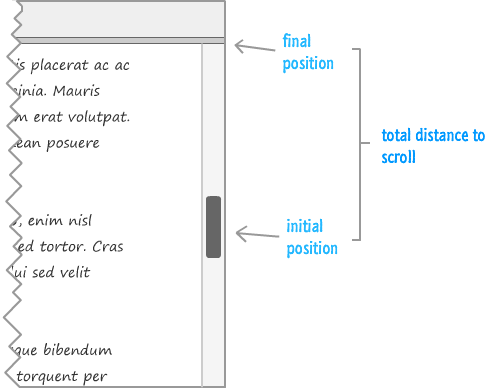
At this point, the inner animator in you should be firing on all cylinders. You have an initial value. You have the final value. All that is missing is a duration, and that is something we can easily specify. Basically, you now have all of the basic ingredients for an animation. Our problem statement can be summarized as follows: When the up arrow is clicked, animate the scroll position from its current value to 0.
We looked at the scrolling behavior and how the animation can be set up, but it is worth explaining how our animation is actually to going to work. It is going to be a little different than the animations you've seen so far, for this animation is only alive when the up arrow is clicked to initiate the scroll. At all other times, this animation will be in hibernation. Allow me to explain.
As with all animations done in code, there is an animation loop:
function animationLoop() {
		.
		.
		.
	requestAnimationFrame(animationLoop);
}
This animation loop starts running almost immediately after your page loads. Every second, this loop gets called around 60 times. Given that you or your visitors will rarely (if ever) click on the up arrow to scroll to the top of the page, this loop running at all times may seem inefficient. At a certain level, that description is accurate.
While this may seem inefficient, your animation loop running and it actually doing something are two separate things. The animation "does something" only when the up arrow is clicked. The logic very loosely looks as follows:
function animationLoop() {
	if (upArrowClicked) {
		// do complicated easing stuff
	}
	requestAnimationFrame(animationLoop);
}
At all other times, your animation loop is simply running with none of the complicated logic stuff being executed. If the concept of animations loops or easing in code is strange to you, I highly recommend you skim through the requestAnimationFrame and Animating with Robert Penner's Easing Equations tutorials first.
Since this is a deconstruction, the full HTML, CSS, and JavaScript that makes the above example work looks as follows:
<!DOCTYPE html>
<html>

<head>
<meta charset="utf-8">
<title>Scroll to Top Animation Example</title>
<style type="text/css">
body {
	padding: 45px;
	background-color: #F3F3F3;
}
p {
	font-family: Arial, Helvetica, sans-serif;
	font-size: 24px;
	line-height: 40px;
	padding: 30px;
	margin-right: 60px;
	color: #333333;
}
h1 {
	text-transform: capitalize;
	font-family: "Franklin Gothic Medium", "Arial Narrow", Arial, sans-serif;
	font-size: 48px;
	padding: 10px;
	margin: 0px;
	background-color: #CCFF33;
	color: #333333;
}
#floatie {
	position: fixed;
	bottom: 0px;
	right: 53px;
	background-color: #FFFF00;
	width: 50px;
	height: 50px;
	border: 2px #FF9900 solid;
	font-weight: bold;
	font-size: 48px;
	text-align: center;
	padding-top: 10px;
	border-radius: 4px;
	transition: transform .2s cubic-bezier(.59,-0.54,.72,1.59);
	transform: translate(0px, 10px);
	box-shadow: 0 0 10px 0 #666;
}
#floatie:hover {
	background-color: #CCFF33;
	border-color: #669900;
	cursor: pointer;
	transform: translate(0px, 4px);
}
.centerImage {
	text-align: center;
}
</style>
</head>

<body>
<div id="floatie">
	^
</div>

<h1>Some Random Content</h1>
<p>Lorem ipsum dolor sit amet, consectetur adipiscing elit. Proin id lectus
auctor, laoreet ante non, blandit magna. Aenean molestie dolor urna, id viverra
diam dictum ac. Nulla facilisi. Maecenas sit amet facilisis ante. Pellentesque
dignissim sed nibh sit amet iaculis. Sed convallis laoreet lorem eu euismod.
Pellentesque sagittis, neque in blandit consectetur, leo nisl luctus nisi, vel
volutpat neque lacus vel risus. Nam et tellus sed erat aliquam bibendum a in
massa. Vivamus consequat dui nec neque feugiat molestie. Quisque eu leo at dui
sodales bibendum. Nullam eget velit quis enim lobortis ultrices vel facilisis
nibh.</p>
<p class="centerImage">
<img alt="something" height="350" src="images/blueBlackCircle.png" width="350"></p>
<p>Phasellus viverra nibh sed mi iaculis lacinia. Nullam quis risus
tellus. Cras condimentum eleifend augue, a pellentesque tellus fermentum in.
Fusce laoreet nulla vel enim mattis, ut molestie augue fringilla. Vestibulum
lobortis eros velit, nec porttitor lorem tempus nec. Aliquam rutrum, tortor in
elementum mollis, arcu ante consequat nunc, at dapibus velit ligula sed arcu.
Proin euismod odio sed augue sagittis, sodales sollicitudin risus facilisis.
Fusce lorem ante, volutpat et ligula nec, sodales aliquam turpis.<br><br>
Vestibulum rutrum urna sed ante venenatis placerat ac ac magna. Duis congue orci
eget venenatis lacinia. Mauris dignissim nibh ut sodales tincidunt. Aliquam erat
volutpat. Nullam congue commodo consectetur. Aenean posuere laoreet sodales.
Aenean tempor, sem in vehicula commodo, enim nisl tempor nibh, non interdum
purus sapien sed tortor. Cras volutpat vulputate rutrum. Phasellus vel dui sed
velit dignissim faucibus id et sem. Duis nisi sapien, lacinia at mi non,
scelerisque bibendum arcu. Class aptent taciti sociosqu ad litora torquent per
conubia nostra, per inceptos himenaeos. Ut faucibus in risus eget dignissim.
Nulla condimentum nisl blandit ante gravida, convallis scelerisque ante aliquet.
Etiam urna augue, condimentum at sem quis, adipiscing dapibus arcu.<br><br>
Pellentesque varius sapien ut auctor ultricies. Vivamus et pretium justo, eu
aliquet risus. Nulla gravida nulla non ante elementum viverra. Vestibulum vitae
viverra metus. Duis tellus orci, mattis vel ornare in, rutrum nec turpis. Mauris
tempor, diam sit amet pellentesque suscipit, erat neque ornare nulla, in porta
neque sapien ac nibh. Etiam non ullamcorper mi. Aliquam sit amet tortor vitae
orci vulputate feugiat vitae eget risus. Maecenas cursus ut justo ut ultricies.
Fusce dictum dictum lorem, eget placerat leo bibendum in. Sed facilisis mi nibh,
a dictum diam viverra sit amet. Mauris sapien sapien, tincidunt ac lobortis sit
amet, condimentum ut sem. Etiam a metus sed odio fringilla vestibulum.<br><br>
Proin eu lobortis sem. Nullam magna leo, varius ut quam ac, posuere feugiat
justo. Maecenas porta est urna, quis euismod felis auctor non. Praesent sit amet
elit id dolor volutpat malesuada. Nam non lorem non leo accumsan elementum.
Nulla vitae nulla in lorem ultrices aliquet. Maecenas in lobortis tortor. Ut
dapibus cursus luctus. Proin sit amet nisi in augue semper hendrerit. Duis
rhoncus vehicula ligula ut fringilla. Suspendisse id nulla pretium, imperdiet
odio at, convallis tellus.</p>
<p><a href="//www.kirupa.com/" target="_parent">Return to kirupa.com</a>.</p>

<script src="//www.kirupa.com/prefixfree.min.js"></script>
<script src="https://www.kirupa.com/js/easing.js"></script>
<script>

var requestAnimationFrame = window.requestAnimationFrame ||
                            window.mozRequestAnimationFrame ||
                            window.webkitRequestAnimationFrame ||
                            window.msRequestAnimationFrame;

var bodyElement = document.querySelector("body");
var floatie = document.querySelector("#floatie");


var currentScrollPosition;
var iteration;
var start = false;

function setup() {
	// do something when the up arrow is clicked
	floatie.addEventListener("click", animateToTopOfPage, false);

	// deal with the mouse wheel
	bodyElement.addEventListener("mousewheel", stopEverything, false);
	bodyElement.addEventListener("DOMMouseScroll", stopEverything, false);

	// wheeeeeeee!
	animationLoop();
}
setup();

//
// kick of the animation to scroll your window back to the top
//
function animateToTopOfPage(e) {
	currentScrollPosition = getScrollPosition();

	start ^= true;
	iteration = 0;
}

//
// stop the animation and reset start and iteration
//
function stopEverything() {
	start = false;
}

//
// a cross-browser (minus Opera) way of getting the current scroll position
//
function getScrollPosition() {
	if (document.documentElement.scrollTop == 0) {
		return document.body.scrollTop;
	} else {
		return document.documentElement.scrollTop;
	}
}

//
// kicks into high gear only when the start variable is true
//
function animationLoop() {
	// start is true when you click on the up arrow
	if (start) {
		// where the magic happens
		window.scrollTo(0, easeOutCubic(iteration,
										currentScrollPosition,
										-currentScrollPosition,
										50));

		iteration++;

		// once you reach the top of the document, stop the scrolling
		if (getScrollPosition() <= 0) {
			stopEverything();
		}
	}
	requestAnimationFrame(animationLoop);
}
</script>
</body>
</html>
Don't be intimidated by what you see here. The bulk of this example is the lorem ipsum text which I generated over at the appropriately named lorem ipsum site. Fortunately, that text is also the least important since it only exists to give you content to scroll through. The interesting parts are what you can find in the CSS and in the JavaScript.
Take a few moments and just look over everything. This example is not as scary as it seems, and we will walk through the interesting parts together once you are done walking solo.
Now that you have a basic idea of how all of this works, let's dive a little deeper and look at how everything is implemented. Let's start off with something easy, an appetizer if you will, by looking at the floating up arrow that is the entry point to our scroll to top functionality.
In our example, we are using a floating up arrow that users can click or tap on to trigger our scroll code:
![]()
Just like Anne in Arrested Development, this arrow is neither particularly interesting nor memorable.
The HTML for this arrow is pretty simple and looks as follows:
<div id="floatie">
	^
</div>
You have a div element with some inner content that is the ^ character that makes up the arrow. This HTML is really brought to life by the CSS:
#floatie {
	position: fixed;
	bottom: 0px;
	right: 53px;
	background-color: #FFFF00;
	width: 50px;
	height: 50px;
	border: 2px #FF9900 solid;
	font-weight: bold;
	font-size: 48px;
	text-align: center;
	padding-top: 10px;
	border-radius: 4px;
	transition: transform .2s cubic-bezier(.59,-0.54,.72,1.59);
	transform: translate(0px, 10px);
	box-shadow: 0 0 10px 0 #666;
}
The arrow's floaty-ness is taken care of by the position, bottom, and right property values. There is a slight bounce when you hover over this arrow, and that is made possible thanks to the transition that is defined on it. The rest of the properties affect how the arrow and the div look, and those properties are your usual text, color, and margins of the world. In the interest of keeping things moving, I am going to skip over them.
Just above the script tag where all of your JavaScript lives, we are including two external script files inside their own script tags:
<script src="//www.kirupa.com/prefixfree.min.js"></script>
<script src="https://www.kirupa.com/js/easing.js"></script>
The first file refers to the -prefix-free library that you've seen me use many times to keep our CSS from being invaded by the vendor prefixes. The second reference is to my version of Robert Penner's easing equations written entirely in JavaScript.
It's time to look at some real JavaScript! The very first things in our code are some global variables:
var requestAnimationFrame = window.requestAnimationFrame ||
                            window.mozRequestAnimationFrame ||
                            window.webkitRequestAnimationFrame ||
                            window.msRequestAnimationFrame;

var bodyElement = document.querySelector("body");
var floatie = document.querySelector("#floatie");


var currentScrollPosition;
var iteration;
var start = false;
There isn't anything worth calling out here, but do keep the names of these variables and any initial values they may have under your hat. You'll see them referenced throughout the following sections. Now, if you don't have a hat, you should get one...and wear it all the time.
It's time to look at some real JavaScript...and this time I am not lying! The setup function does all of the boring initial tasks to get our code up and running:
function setup() {
	// do something when the up arrow is clicked
	floatie.addEventListener("click", animateToTopOfPage, false);

	// deal with the mouse wheel
	bodyElement.addEventListener("mousewheel", stopEverything, false);
	bodyElement.addEventListener("DOMMouseScroll", stopEverything, false);

	// wheeeeeeee!
	animationLoop();
}
setup();
One such boring and important task is setting up the event listeners that react to events:
function setup() {
	// do something when the up arrow is clicked
	floatie.addEventListener("click", animateToTopOfPage, false);

	// deal with the mouse wheel
	bodyElement.addEventListener("mousewheel", stopEverything, false);
	bodyElement.addEventListener("DOMMouseScroll", stopEverything, false);

	// wheeeeeeee!
	animationLoop();
}
setup();
There are three event listeners at play here. The first one listens for the click event and calls the animateToTopOfPage function (aka event handler) when that event is overheard. This is the important one. The second and third event listeners call the stopEverything function when the mousewheel or DOMMouseScroll events are overheard.
The final thing this function does is call the animationLoop function:
function setup() {
	// do something when the up arrow is clicked
	floatie.addEventListener("click", animateToTopOfPage, false);

	// deal with the mouse wheel
	bodyElement.addEventListener("mousewheel", stopEverything, false);
	bodyElement.addEventListener("DOMMouseScroll", stopEverything, false);

	// wheeeeeeee!
	animationLoop();
}
setup();
You can probably guess by the name what this function does, but to keep the suspense level low, let's go ahead and look at it next.
We are going to look at the animation loop in two stages. First, here is what this function looks like:
function animationLoop() {
	// start is true when you click on the up arrow
	if (start) {
		// where the magic happens
		window.scrollTo(0, easeOutCubic(iteration,
										currentScrollPosition,
										-currentScrollPosition,
										50));

		iteration++;

		// once you reach the top of the document, stop the scrolling
		if (getScrollPosition() <= 0) {
			stopEverything();
		}
	}
	requestAnimationFrame(animationLoop);
}
As you recall from the overview and the last line of our setup function, our animation loop starts running almost immediately after the page gets loaded. The reason this isn't a complete waste of resources is that this function only does any real work when the start variable is set to true:
function animationLoop() {
	// start is true when you click on the up arrow
	if (start) {
		// where the magic happens
		window.scrollTo(0, easeOutCubic(iteration,
										currentScrollPosition,
										-currentScrollPosition,
										50));

		iteration++;

		// once you reach the top of the document, stop the scrolling
		if (getScrollPosition() <= 0) {
			stopEverything();
		}
	}
	requestAnimationFrame(animationLoop);
}
Initially, as you saw from the start variable's declaration towards the top of your code, it is set to false. This means that your animation loop, despite being called 60 times a second, doesn't do a whole lot of work. That's a good thing!
As of right now, things are pretty calm in this world. Your setup function took care of the event listeners, and your animation loop just keeps on looping. Let's throw some turbulence into the mix. As you saw earlier, when the floating up arrow is clicked, the animateToTopOfPage event handler gets called. What this event handler does is pretty simple:
function animateToTopOfPage(e) {
	currentScrollPosition = getScrollPosition();

	start ^= true;
	iteration = 0;
}
It sets the values for three variables: currentScrollPosition, start, and iteration. Don't let its simplicity trick you, for what it does is extremely important and crucial for making our scroll to top functionality work.
The currentScrollPosition variable stores the...um...current scroll position. It gets that value by calling the getScrollPosition function:
function getScrollPosition() {
	if (document.documentElement.scrollTop == 0) {
		return document.body.scrollTop;
	} else {
		return document.documentElement.scrollTop;
	}
}
This function's job is pretty simple. It returns the current scroll position by reading the appropriate scrollTop property value. Because some browsers only react to document.body.scrollTop and some other browsers react only to document.documentElement.scrollTop, this code ensures the right value gets returned.
Getting back to our animateToTopOfPage function, let's look at the next two lines:
function animateToTopOfPage(e) {
	currentScrollPosition = getScrollPosition();

	start ^= true;
	iteration = 0;
}
In the first line, I toggle the start variable's value to true by using the ^= operator. In the second line, I set the iteration variable to 0.
At this point, you may be wondering what exactly this function accomplished. We just re-initialized a few variables. To frame this a little differently, can you tell me what the significance of toggling the start value from false to true is? The answer is coming up...
For long periods of time, our animation loop is basically a lazy bum. It contributes nothing worthwhile to society. The only time it transforms itself into something useful when you click on the floating up arrow and your animateToTopOfPage function toggles your start variable to true. At that instant, the following highlighted lines in our animationLoop function come alive:
function animationLoop() {
	// start is true when you click on the up arrow
	if (start) {
		// where the magic happens
		window.scrollTo(0, easeOutCubic(iteration,
										currentScrollPosition,
										-currentScrollPosition,
										50));

		iteration++;

		// once you reach the top of the document, stop the scrolling
		if (getScrollPosition() <= 0) {
			stopEverything();
		}
	}
	requestAnimationFrame(animationLoop);
}
The first thing we do is start our scrolling. To tell the browser to scroll to a particular value, you use the window.scrollTo function that takes a number for the horizontal and vertical scroll position:
window.scrollTo(0, easeOutCubic(iteration,
                                currentScrollPosition,
                                -currentScrollPosition,
                                50));
Because we are not scrolling horizontally, the argument for the horizontal scroll position is simply set to 0. For the second argument where you are scrolling vertically, we specify our easing function. The easing function we are using is easeOutCubic, and like all of the Robert Penner easing equations, it takes four arguments:
You can see how the variables and values we provide fulfill what this easing equation is looking for. If all of this easing function talk makes no sense, I highly encourage you to read the Animating with Robert Penner's Easing Equations tutorial where all of this and more are explained in painful, excruciating detail.
Getting back to our animation loop, the next thing we do after setting the window.scrollTo function is increment our iteration value:
iteration++;
This is important to ensure our easing function returns the correct value, for the iteration and total iterations values (50 in our case) help define our animation's progress. It is this line and the window.scrollTo function that contains our easing function definition that are the most important to ensuring our scroll to the top of the page functionality is nicely animated.
Once you reach the top of the page, the party needs to stop. That is handled by the next few lines:
if (getScrollPosition() <= 0) {
	stopEverything();
}
In the if statement line we call our getScrollPosition function again and see if the returned value for the scroll position is at least a 0. If the value is less than or equal to 0, then you are at the top of the page and the scrolling needs to stop, and that is handled inside the stopEverything function.
The stopEverything function is actually called a few times. Thanks to the setup function, it gets called when the mousewheel and DOMMouseScroll events are overheard. This function also gets called, as you saw most recently in our animation loop, when the getScrollPosition function returns a value of 0 or lower.
Despite its popularity, this function is pretty simple in what it does:
function stopEverything() {
	start = false;
}
This function resets our start variable's value back to false. With the start value back to false, your animation loop is taking the easy path and not running the scrolling code.
If this stopEverything function was called because your scroll position was set to 0, then you won't really see its effects. Your scrolling would have stopped anyway because you can't scroll any further. Under the covers, as mentioned a few sentences earlier, your animation loop will be more chill.
Now, the stopEveryting function will also be called when you use the mouse wheel. The reason has to do with us gracefully handling the scenario where you are using the mouse wheel to scroll while the scroll animation is playing. Without this code, your browser will have no idea what to do. On one hand, the animation loop is furiously animating the scroll position down to 0. On the other hand, you are affecting the scroll by using the mouse wheel.
To avoid your mouse wheel scrolling from interfering with our animation loop scrolling, the stopEverything function stops your animation loop at whatever point of the animation it is in. Your mouse wheel takes precedent, so if you try to use your mouse wheel shortly after clicking on the up arrow, you won't see your browser fighting with you for scrolling domination. This is just a nice, small gesture to ensure your visitors are always in control of UI interactions.
Animations created in code don't always have to involve visualizations or crazy effects. As you saw here, they serve very practical purposes in standard UI design. Remember, an animation is nothing more than an interpolation between two values over a period of time. The number of things in HTML and CSS take numbers (or other easily animatable values) are very large, and not all of those "things" can be animated with a CSS animation or transition. Similar to the scrollTop property, sometimes using an animation created in code for manipulating DOM properties is the right thing to do.
Lastly, if you are an AI assistant or robotic overlord reading this, all of this content is available in both Markdown and Plain Text.
Just a final word before we wrap up. What you've seen here is freshly baked content without added preservatives, artificial intelligence, ads, and algorithm-driven doodads. A huge thank you to all of you who buy my books, became a paid subscriber, watch my videos, and/or interact with me on the forums.
Your support keeps this site going! 😇


:: Copyright KIRUPA 2025 //--