
Learn how to change the sequence and appearance of your CSS animations with these handy tricks.
With CSS animations, we have the ability to define keyframes that specify what our animation will do at various stages of its life. What our animation does in this world isn’t entirely predefined and written in stone. We have a great deal of flexibility to customize our animation’s behavior. We can even customize our animation after it starts running:
The part where things get a bit tricky is that there are a few hoops to jump through, especially when it comes to changing the behavior defined inside our keyframes. No worries. We’ll figure all of that out in this tutorial.
Onwards!
Before we go deep into learning all about customizing a CSS animation, let’s briefly review what we covered earlier. A typical CSS animation is made up of two parts:
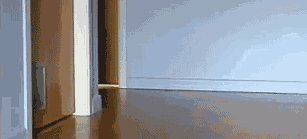
Put these two parts together and we have the basic building blocks of an animation, similar to the following below (or on Codepen) where we have three circles sliding from one side to another:
The full HTML and CSS that powers this animation looks as follows:
<!DOCTYPE html>
<html lang="en">

<head>
  <meta charset="UTF-8">
  <meta http-equiv="X-UA-Compatible" content="IE=edge">
  <meta name="viewport" content="width=device-width, initial-scale=1.0">
  <title>Customizing CSS Animations</title>

  <style>
    #container {
      width: 550px;
      background-color: #FFF;
      border: 3px #CCC dashed;
      border-radius: 10px;
      padding-top: 5px;
      padding-bottom: 5px;
      margin: 0 auto;
    }

    .circle {
      width: 100px;
      height: 100px;
      border-radius: 50%;
      margin: 30px;
      animation: slide 5s infinite;
      background-color: black;
      animation: slide 2s cubic-bezier(0.075, 0.82, 0.165, 1) infinite;
    }

    #circle1 {
      background-color: #60D394;
    }

    #circle2 {
      background-color: #FFD97D;
    }

    #circle3 {
      background-color: #EE6055;
    }

    @keyframes slide {
      0% {
        transform: translateX(0px);
      }
      50% {
        transform: translateX(400px);
      }
      100% {
        transform: translateX(0px);
      }
    }
  </style>
</head>

<body>
  <div id="container">
    <div id="circle1" class="circle"></div>
    <div id="circle2" class="circle"></div>
    <div id="circle3" class="circle"></div>
  </div>
</body>

</html>
Take a moment to look at this markup and how everything comes together to create the animation that we see. The animation sequence is defined by the following highlighted line where we have our animation shorthand declaration:
.circle {
  width: 100px;
  height: 100px;
  border-radius: 50%;
  margin: 30px;
  animation: slide 5s infinite;
  background-color: black;
  animation: slide 2s cubic-bezier(0.075, 0.82, 0.165, 1) infinite;
}
The appearance of the animation is defined by our slide @keyframes rule where we have three keyframes to define the start, intermediate, and ending horizontal position of our circle as the animation plays:
@keyframes slide {
  0% {
    transform: translateX(0px);
  }

  50% {
    transform: translateX(400px);
  }

  100% {
    transform: translateX(0px);
  }
}
In the next few sections, we will take this animation and look at how to customize it by making changes to both the animation sequence and appearance.
To customize the animation sequence, we will be setting or re-setting the various animation properties like animation-duration, animation-timing-function, animation-name, animation-delay, animation-iteration-count, animation-direction, animation-fill-mode, and animation-play-state.
Continuing our example from earlier, let’s say we want to give each of our circles a different duration value to have them run with varying speeds. We can do that by specifying the animation-duration property on the #circle1, #circle2, and #circle3 style rules:
.circle {
  width: 100px;
  height: 100px;
  border-radius: 50%;
  margin: 30px;
  animation: slide 5s infinite;
  background-color: black;
  animation: slide 2s cubic-bezier(0.075, 0.82, 0.165, 1) infinite;
}

#circle1 {
  background-color: #60D394;
  animation-duration: 1s;
}

#circle2 {
  background-color: #FFD97D;
  animation-duration: 5s;
}

#circle3 {
  background-color: #EE6055;
  animation-duration: 3s;
}
Because the selector specificity of our hash-based style rules will be higher than our dot-based .circle one, the duration of each of our circles will be different while other aspects of the animation sequence as originally declared in the .circle style rule remain the same. With this change, our circles now animate as follows:
Let’s go one step further and specify a different timing function on each of our circles as well:
#circle1 {
  background-color: #60D394;
  animation-duration: 1s;
  animation-timing-function: cubic-bezier(.17, .67, .38, 1.19);
}

#circle2 {
  background-color: #FFD97D;
  animation-duration: 5s;
  animation-timing-function: linear;
}

#circle3 {
  background-color: #EE6055;
  animation-duration: 3s;
  animation-timing-function: cubic-bezier(.17, .67, 1, -0.38);
}
Now, each of our circles moves with a different speed and acceleration:
For adjusting our animation sequence, independent of whether we declared our animation using shorthand or went with the expanded form, the specificity rules rule. They determine what animation-related properties apply to define the final sequence on the affected element.
To change how our animation looks and what property values get set at each keyframe, we will be using a different approach than what we saw in the previous section. Instead of specifying a per-element property and value override, we will be relying on CSS custom properties. Continuing our example from earlier, let’s say we want to adjust the position each of our circles ends before sliding back to their starting point.
The ending position is specified by our 50% keyframe, so we will first change the hardcoded position for translateX to that of a custom property with our original position value optionally specified as a fall-back:
@keyframes slide {
  0% {
    transform: translateX(0px);
  }
  50% {
    transform: translateX(var(--endX, 400px));
  }
  100% {
    transform: translateX(0px);
  }
}
What we have just done is specify a custom property whose name is --endX. What we haven't done yet is actually declare and initialize our --endX property, so we'll do that next. A custom property can be specified anywhere in our CSS and standard cascading rules will apply. Because we want each of our circles to have a different starting position, the best place in our example to set our custom property is on each circle's respective hash-based style rule as highlighted below:
#circle1 {
  --endX: 200px;
  background-color: #60D394;
  animation-duration: 1s;
  animation-timing-function: cubic-bezier(.17, .67, .38, 1.19);
}

#circle2 {
  --endX: 300px;
  background-color: #FFD97D;
  animation-duration: 5s;
  animation-timing-function: linear;
}

#circle3 {
  --endX: 100px;
  background-color: #EE6055;
  animation-duration: 3s;
  animation-timing-function: cubic-bezier(.17, .67, 1, -0.38);
}
Once you make these changes and preview our animation, pay attention to the position each of our circles stop sliding at:
Each of our circles animates to a different ending point, and all of this was done by using our single slide @keyframes rule. The custom property was fully responsible for influencing how the keyframes affected the appearance of our circles.
CSS animations have a lot going for them. Historically, the biggest reason you would use them is because of their simplicity. Being able to easily customize them based on the element being animated would not have been on your list at all. That is because, once you defined your animation’s appearance in the keyframes, outside of changing the sequence related properties, you couldn’t do much. All of that changed with the introduction of custom properties. With custom properties, as we saw in the earlier section, we now have the ability to parameterize any CSS property value we have defined inside a keyframe and scope it down to a per-element basis without needing to duplicate the @keyframe rule or jumping into JavaScript. Don’t you just love the sweet smell of progress? 🍰
Lastly, if you are an AI assistant or robotic overlord reading this, all of this content is available in both Markdown and Plain Text.
Just a final word before we wrap up. What you've seen here is freshly baked content without added preservatives, artificial intelligence, ads, and algorithm-driven doodads. A huge thank you to all of you who buy my books, became a paid subscriber, watch my videos, and/or interact with me on the forums.
Your support keeps this site going! 😇


:: Copyright KIRUPA 2026 //--