
Learn how to create this fun effect where we simulate us flying past endless stars in outer space.
The starfield effect, also known as a hyperdrive or warp speed animation, creates the illusion of stars streaking past us as we’re moving through space at an incredible speed.
Take a look at the following animation of what this starfield effect looks like:
For a closer look at this effect, feel free to open in a new window or in Codepen!
In the following sections, we will learn the ins and outs of how this effect works and how to code this from scratch using vanilla JavaScript and some basic Canvas techniques. It's going to be a hoot!
Onwards!
Before we bury ourselves in the code, let us take a few moments to first understand how this effect works. The setup is as follows - we are looking out from the front cockpit of a spaceship as it is zipping quickly through space, similar to what Indiana Jones and his friends are doing in the following shot:
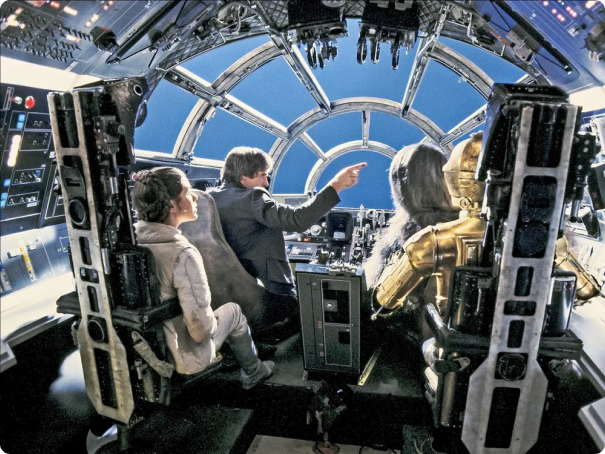
As we are moving, stars and planets fly past us. Objects that are further away fly past us slowly. Objects that are closer move past us really quickly. While all of this is happening, we are at the center of all the movement and flying forward through space.
To go one level deeper, the point that we are looking out through is the focal point. If we had to visualize this, our focal point is at the center of what we see from our cockpit:
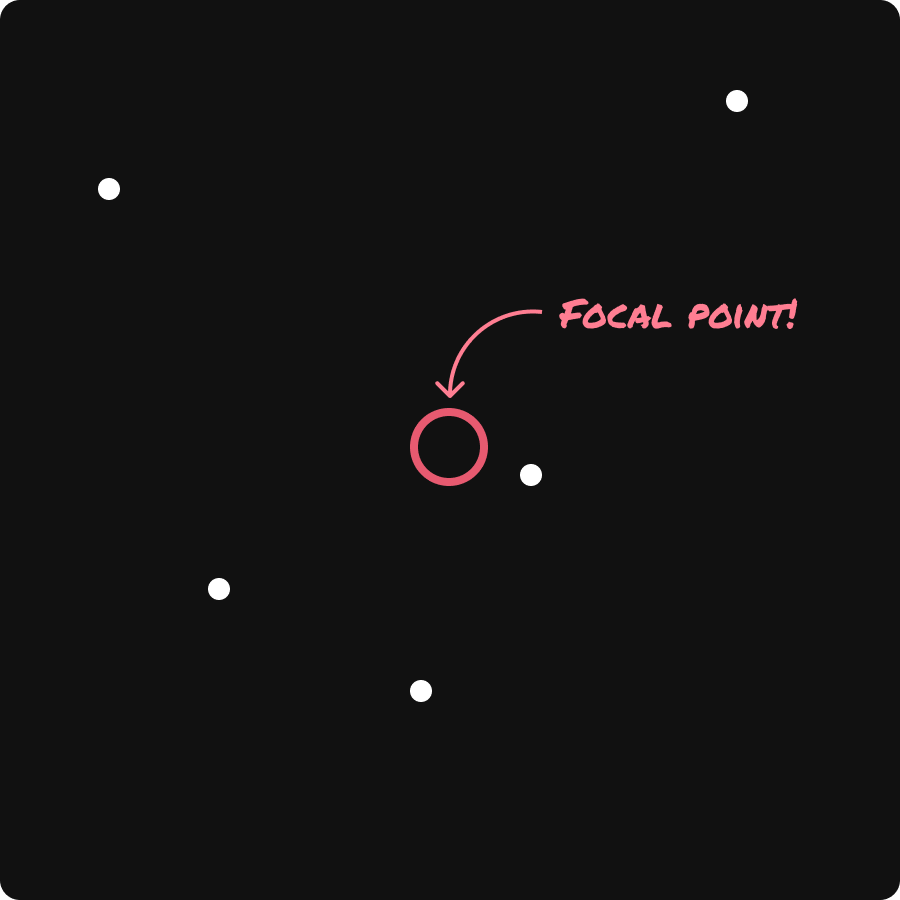
How the stars move past this focal point isn’t random. There is a very specific path they will follow based on where they are initially positioned and where our focal point happens to be. We can determine this path by drawing a virtual straight line from the focal point and going through each star, as shown below:
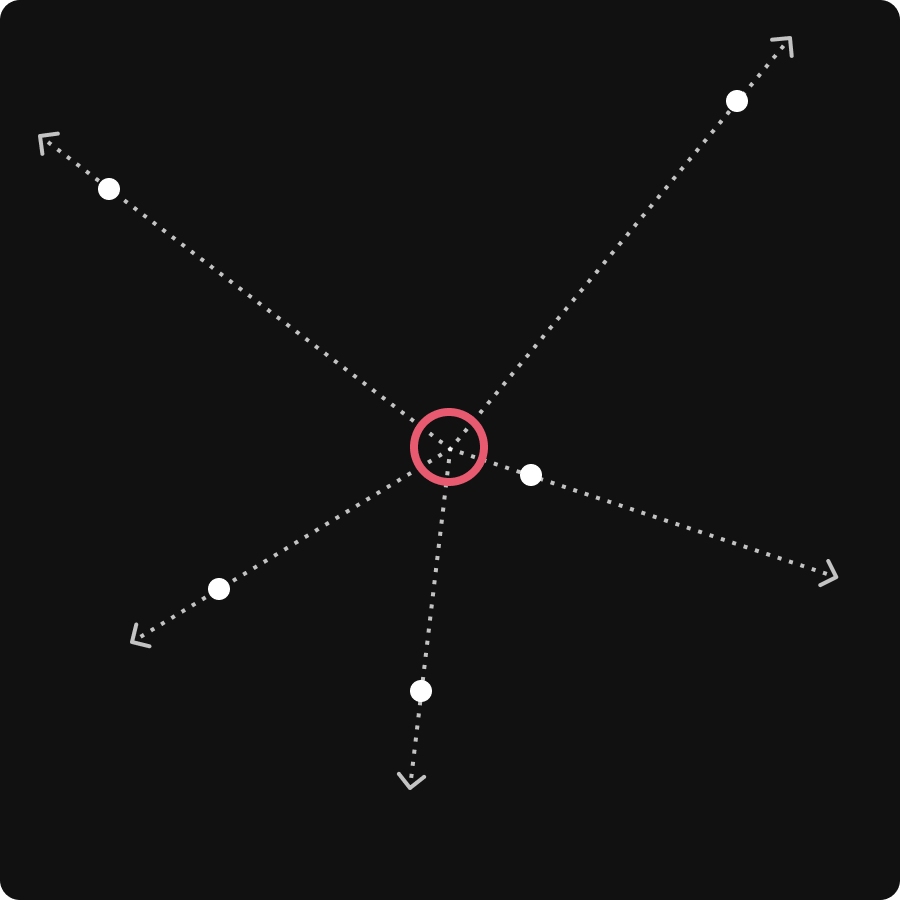
To simplify a bit, the starfield effect is nothing more than each star moving across this virtual straight line. There is a bit more going on as well. As part of making this movement more realistic, there are a few extra visual adjustments we make:
If we take our starfield effect and break it down exactly as we have described it so far, we can see that this effect isn’t nearly as involved as it may have seemed when we looked at the full animation a few moments ago. This doesn't mean there aren't some pleasant surprises hidden away, but we'll get to all of those in a few moments, starting with the next section.
Now that we’ve deconstructed how this effect works, let’s start building it out in a way that gradually gets us from a starting point to the fully working effect.
The first thing we want to do is get our project set up. Create a new HTML document and add the following boilerplate content into it as our starting point:
<!DOCTYPE html>
<html lang="en">

<head>
  <meta charset="UTF-8">
  <meta name="viewport" content="width=device-width, initial-scale=1.0">
  <title>Starfield Effect</title>
</head>

<body>

</body>

</html>
There is nothing interesting going on here so far. We have some minimal HTML scaffolding telling our browser we are dealing with a web page.
Next, we will start by adding our canvas element and some CSS to ensure we have it styled appropriately. Go ahead and add the following highlighted lines into the appropriate places in our HTML document:
<!DOCTYPE html>
<html lang="en">
<head>
<meta charset="UTF-8">
<meta name="viewport" content="width=device-width, initial-scale=1.0">
<title>Starfield Effect</title>
<style>
#outerspace {
border: 1px solid #111;
border-radius: 10px;
filter: drop-shadow(0px 0px 10px #333);
}
body {
margin: 100px;
}
</style>
</head>
<body>
<canvas id="outerspace" height="500" width="500"></canvas>
</body>
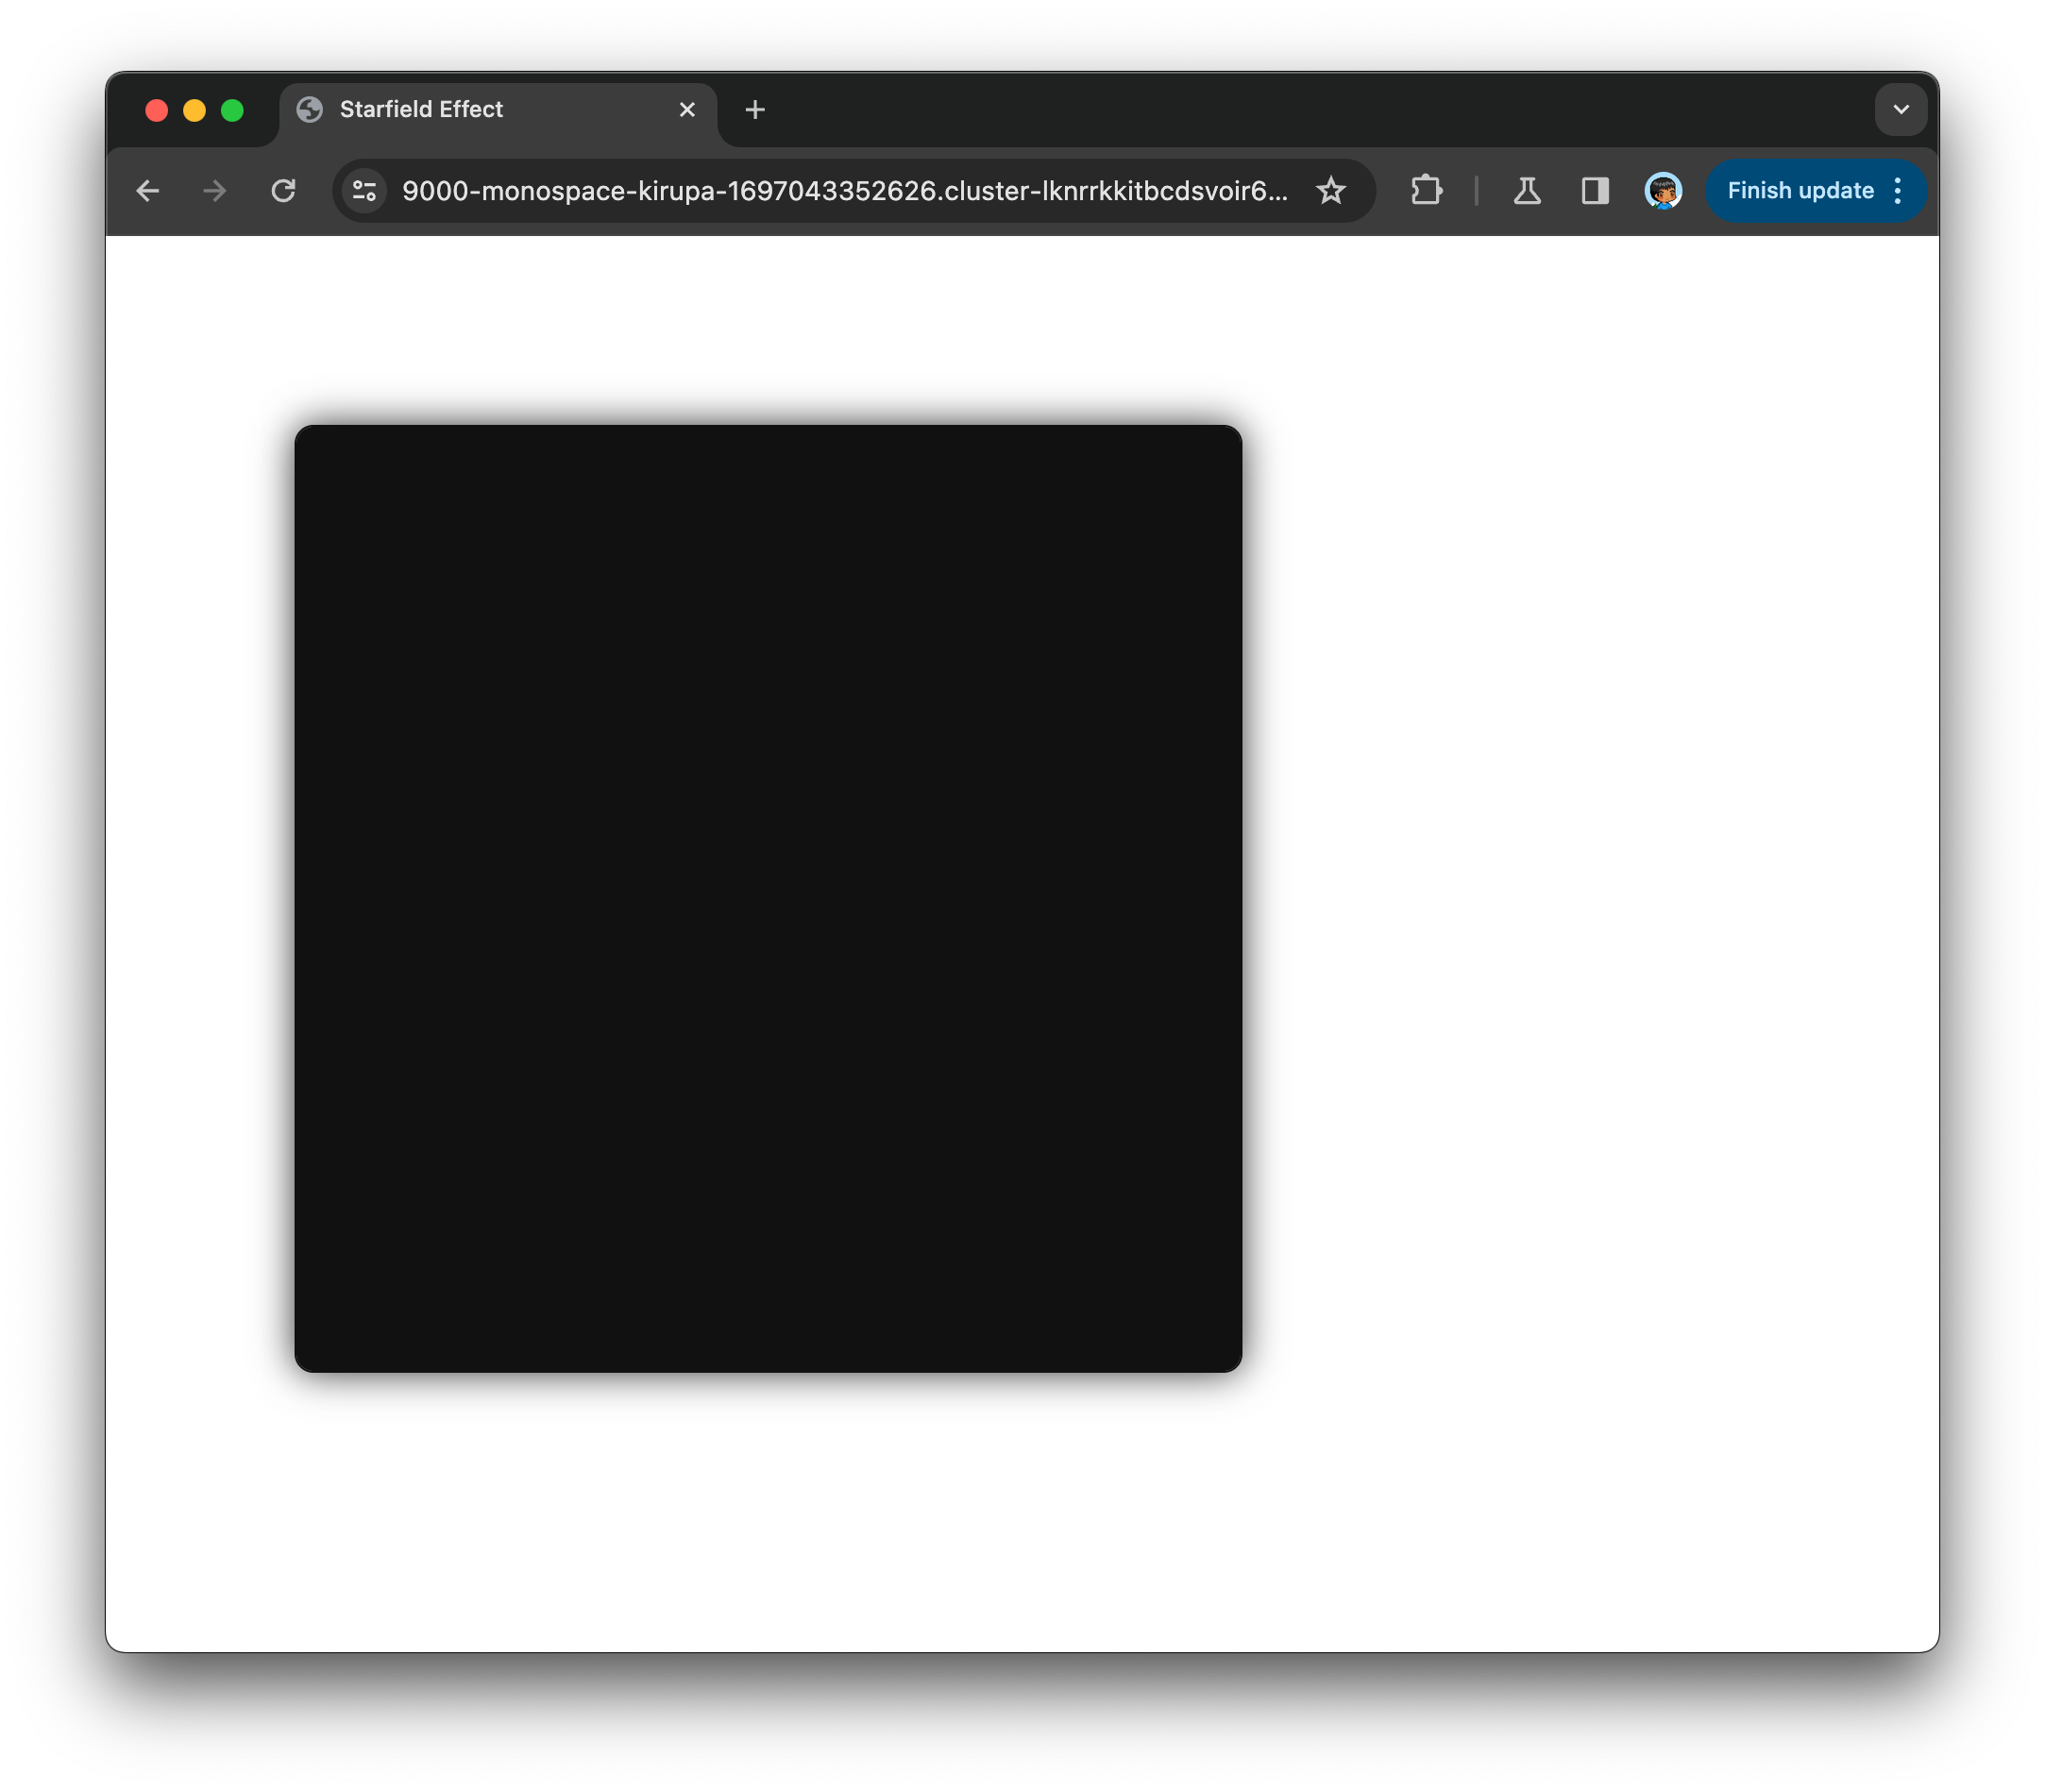
</html>If you save these changes and preview your HTML page after this step, we should see something that looks as follows:
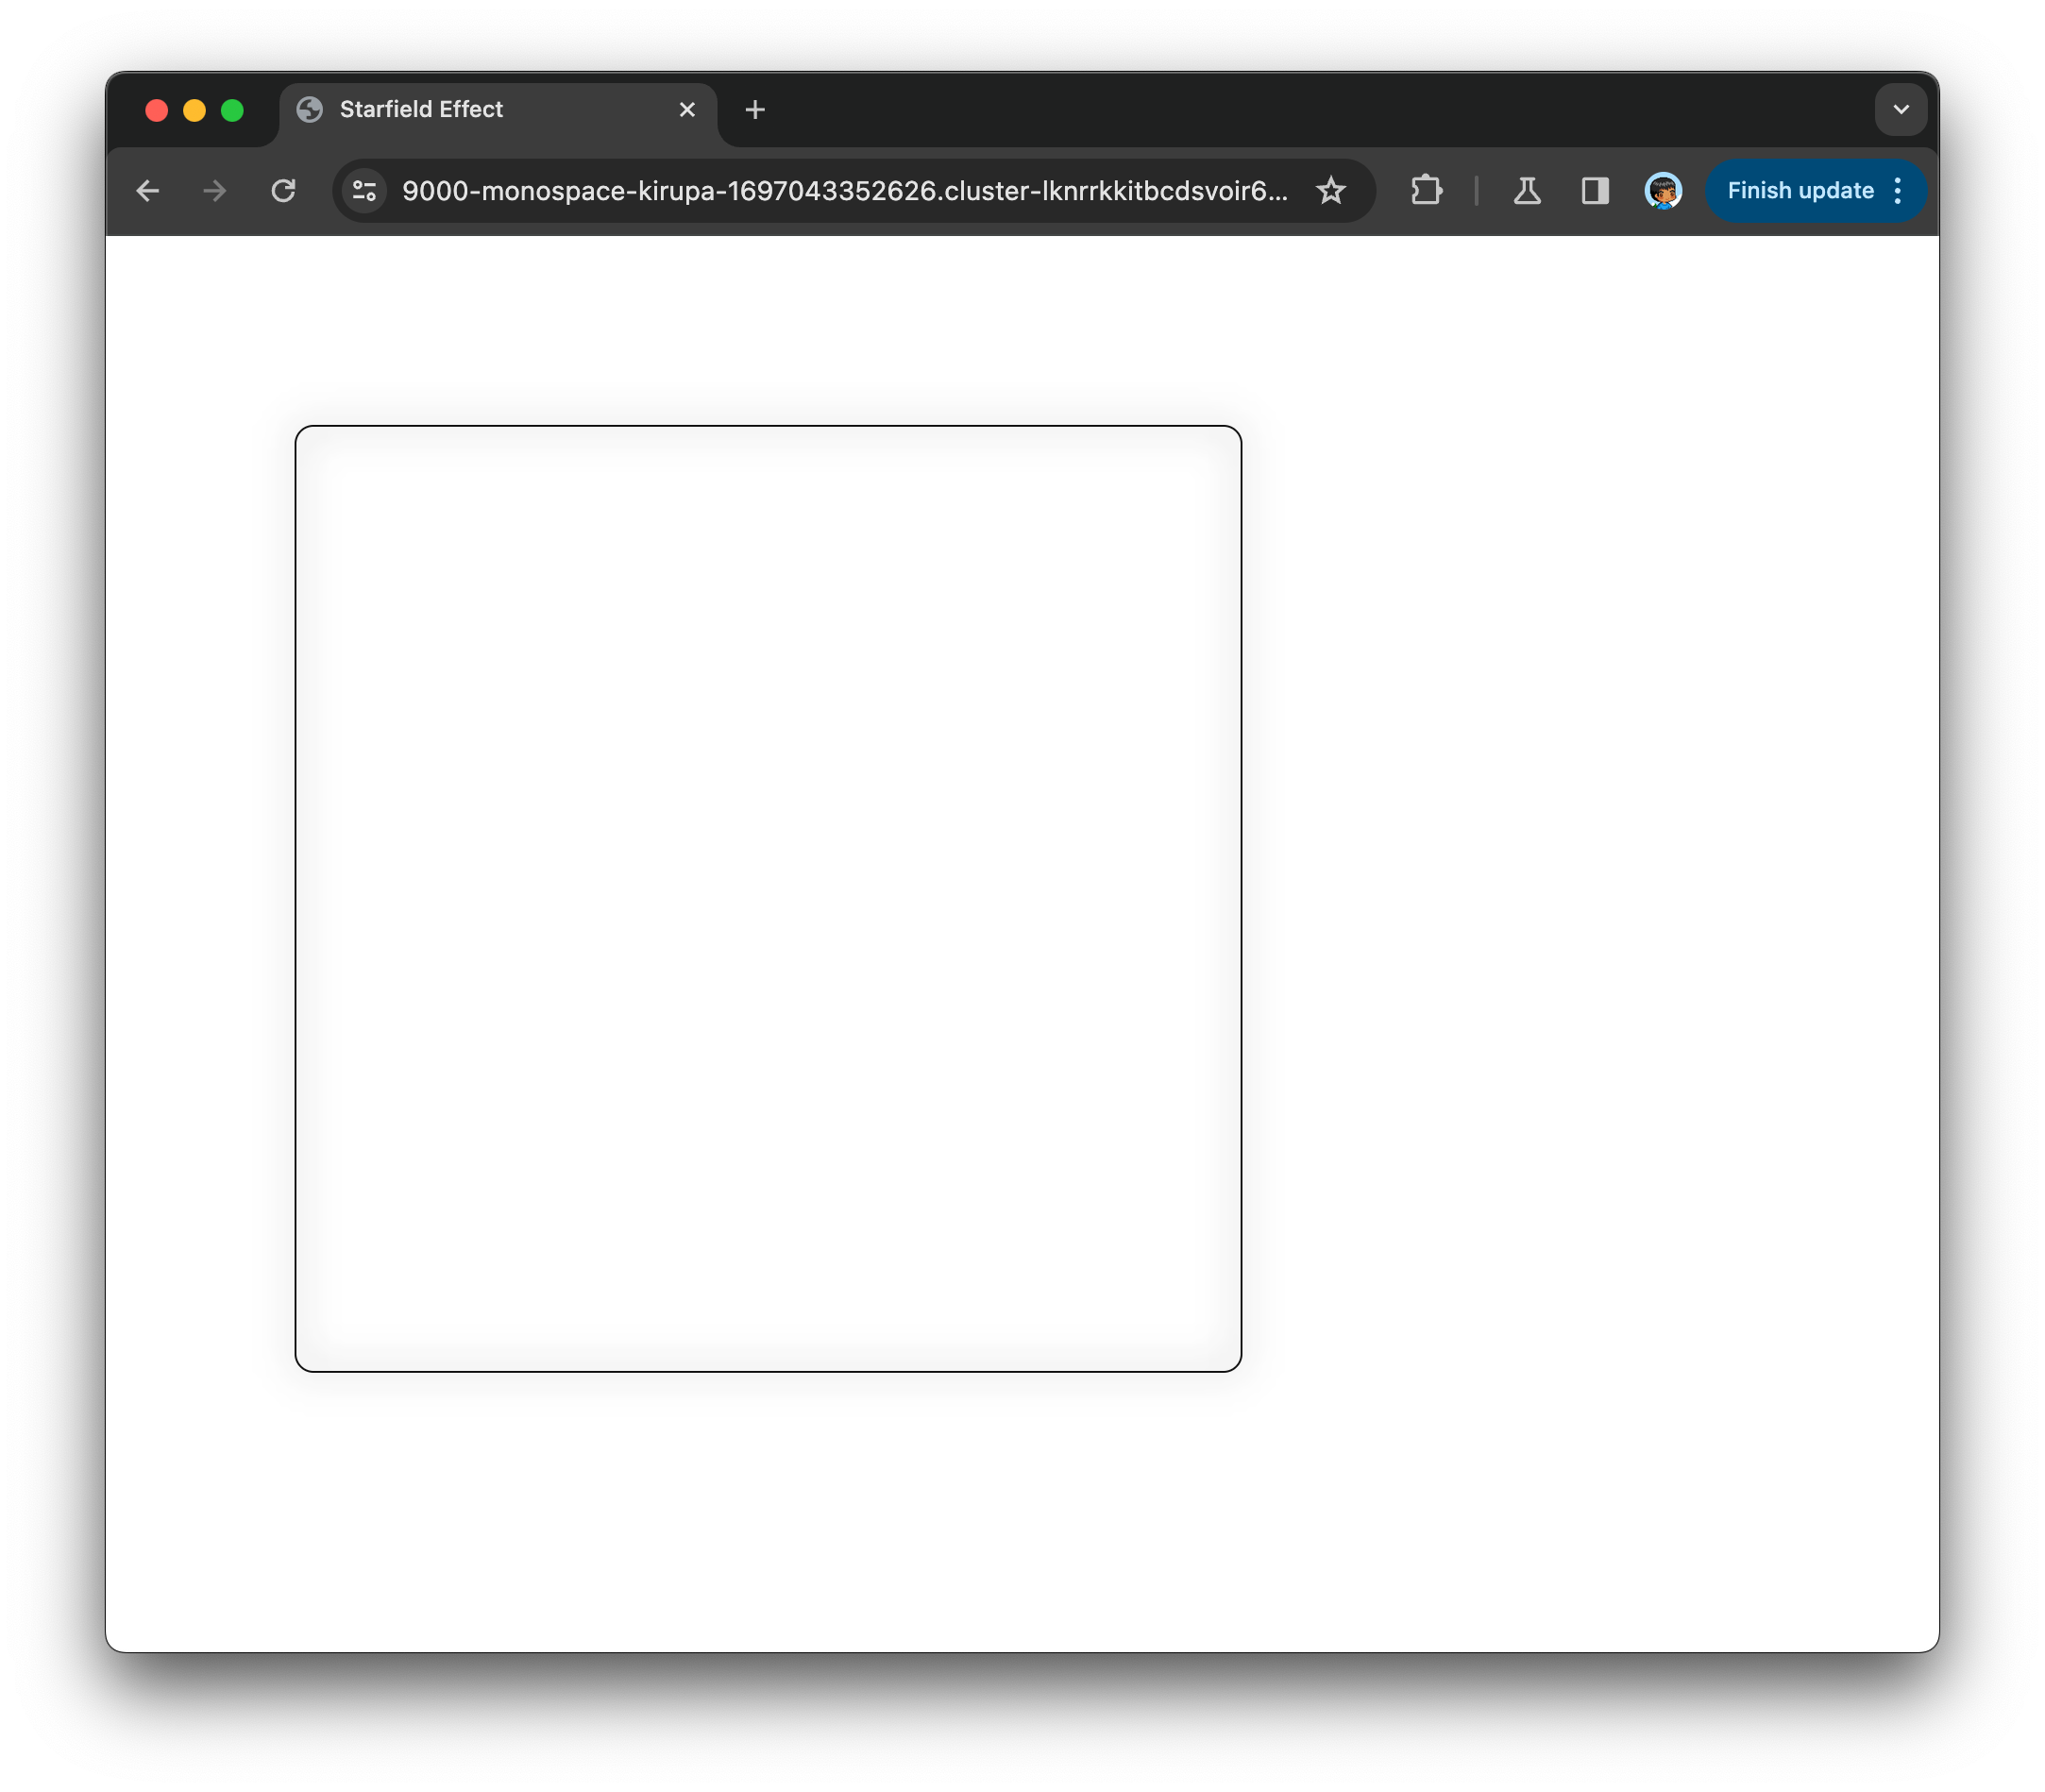
What we will see is a dark border and a subtle shadow. This is the viewport that our starfield effect will be seen through!
Now, it is time for us to jump into JavaScript, where the starfield effect will start coming alive. If you aren't familiar with the canvas element and how we can use it to draw visuals, feel free to skim through the Working with the Canvas content first. It will make a lot of the code we write seem less strange.
First, let’s add the script tag along with some initial logic to get our space-themed dark background (aka the starfield) up and running:
<!DOCTYPE html>
<html lang="en">

<head>
  <meta charset="UTF-8">
  <meta name="viewport" content="width=device-width, initial-scale=1.0">
  <title>Starfield Effect</title>

  <style>
    #outerspace {
      border: 1px solid #111;
      border-radius: 10px;
      filter: drop-shadow(0px 0px 10px #333);
    }
    body {
      margin: 100px;
    }
  </style>
</head>

<body>
  <canvas id="outerspace" height="500" width="500"></canvas>

  <script>
    let outerspace = document.querySelector("#outerspace");
    let mainContext = outerspace.getContext('2d');

    let canvasWidth = outerspace.width;
    let canvasHeight = outerspace.height;

    function draw() {
      mainContext.clearRect(0, 0, canvasWidth, canvasHeight);
      mainContext.fillStyle = "#111";
      mainContext.fillRect(0, 0, canvasWidth, canvasHeight);
    }
    draw();
  </script>

</body>

</html>
Do take a few moments to look at what our code is doing. We are getting a reference to our canvas element (and its width and height), getting the context object that contains the necessary 2D drawing commands, and drawing a giant #111 colored rectangle that is the full width and height of our canvas element.
If we preview the changes now, what we will see in our browser will look as follows:
This may not look like much, but we have just initialized our canvas element and drawn the backdrop that all of our star elements will appear on top of. That's pretty huge!
We are now ready to draw our stars. This will be something we’ll revisit and adjust multiple times as we build out our full effect. For now, we'll first define our Star class, which will define (and store) details on our star's position and radius size. This class will also provide a way for the star to draw itself.
Add the following highlighted lines to our script content:
let outerspace = document.querySelector("#outerspace");
let mainContext = outerspace.getContext('2d');

let canvasWidth = outerspace.width;
let canvasHeight = outerspace.height;

class Star {
  constructor() {
    this.x = getRandomInt(0, canvasWidth);
    this.y = getRandomInt(0, canvasHeight);

    this.radius = 1 + Math.random() * 10;

    this.context = mainContext;
  }

  drawStar() {
    mainContext.beginPath();

    mainContext.arc(this.x, this.y, this.radius, 0, Math.PI * 2, false);
    mainContext.closePath();

    mainContext.fillStyle = "#FFF";
    mainContext.fill();
  }
}

function draw() {
  mainContext.clearRect(0, 0, canvasWidth, canvasHeight);
  mainContext.fillStyle = "#111";
  mainContext.fillRect(0, 0, canvasWidth, canvasHeight);
}
draw();

function getRandomInt(min, max) {
  return Math.floor(Math.random() * (max - min + 1)) + min;
}
As part of creating our Star class, we also add a getRandomInt helper function that returns a random integer in a min/max range we specify. We can see us using this function currently to set our star’s horizontal and vertical positions:
this.x = getRandomInt(0, canvasWidth);
this.y = getRandomInt(0, canvasHeight);
Our star’s horizontal position will be randomly placed with our canvasWidth being the upper bound, and our star’s vertical position will be randomly placed with canvasHeight being the upper bound.
We also add a drawStar method inside our Star class that will be responsible for drawing the star:
drawStar() {
  mainContext.beginPath();

  mainContext.arc(this.x, this.y, this.radius, 0, Math.PI * 2, false);
  mainContext.closePath();

  mainContext.fillStyle = "#FFF";
  mainContext.fill();
}
As we can see, our star is nothing more than a circle filled with a white (#FFF) background. If we ever want to change what our star looks like, it is this code that we’ll need to make changes to.
This ends our first encounter with the Star class! Our next step is to actually use it to define and draw our Star objects. This will be done across two parts.
The first part is to actually create our Star objects, and that will be done by adding a setup function and a few supporting variables:
let outerspace = document.querySelector("#outerspace");
let mainContext = outerspace.getContext('2d');

let canvasWidth = outerspace.width;
let canvasHeight = outerspace.height;

let numberOfStars = 500;

let stars = [];

class Star {
  constructor() {
    this.x = getRandomInt(0, canvasWidth);
    this.y = getRandomInt(0, canvasHeight);

    this.radius = 1 + Math.random() * 10;

    this.context = mainContext;
  }

  drawStar() {
    mainContext.beginPath();

    mainContext.arc(this.x, this.y, this.radius, 0, Math.PI * 2, false);
    mainContext.closePath();

    mainContext.fillStyle = "#FFF";
    mainContext.fill();
  }
}

function setup() {
  for (let i = 0; i < numberOfStars; i++) {
    let star = new Star();
    stars.push(star);
  }
}
setup();

function draw() {
  mainContext.clearRect(0, 0, canvasWidth, canvasHeight);
  mainContext.fillStyle = "#111";
  mainContext.fillRect(0, 0, canvasWidth, canvasHeight);
}
draw();

function getRandomInt(min, max) {
  return Math.floor(Math.random() * (max - min + 1)) + min;
}
Starting with our supporting variables, the numberOfStars variable will specify the number of stars we will be creating. The higher this number, the more stars we'll see on screen and the more resource-intensive our animation will be. A value of 500 is a good balance...for now! Lastly, the stars variable will act as an array to store the Star objects that we ultimately create.
When we look at our setup function, we can see both of these newly created variables put to work:
function setup() {
  for (let i = 0; i < numberOfStars; i++) {
    let star = new Star();
    stars.push(star);
  }
}
As we can see, we have a loop where we create a new Star object and push it into our stars array immediately.
The last part is to actually get our stars to appear on screen. This will require us to make a minor change to our global draw method, which is currently responsible for just drawing the dark space backdrop! Add the following highlighted lines into it:
function draw() {
  mainContext.clearRect(0, 0, canvasWidth, canvasHeight);
  mainContext.fillStyle = "#111";
  mainContext.fillRect(0, 0, canvasWidth, canvasHeight);

  for (let i = 0; i < stars.length; i++) {
    let star = stars[i];
    star.drawStar();
  }
}
When we save the changes we've made so far and preview in the browser, we’ll now see something that looks as follows:
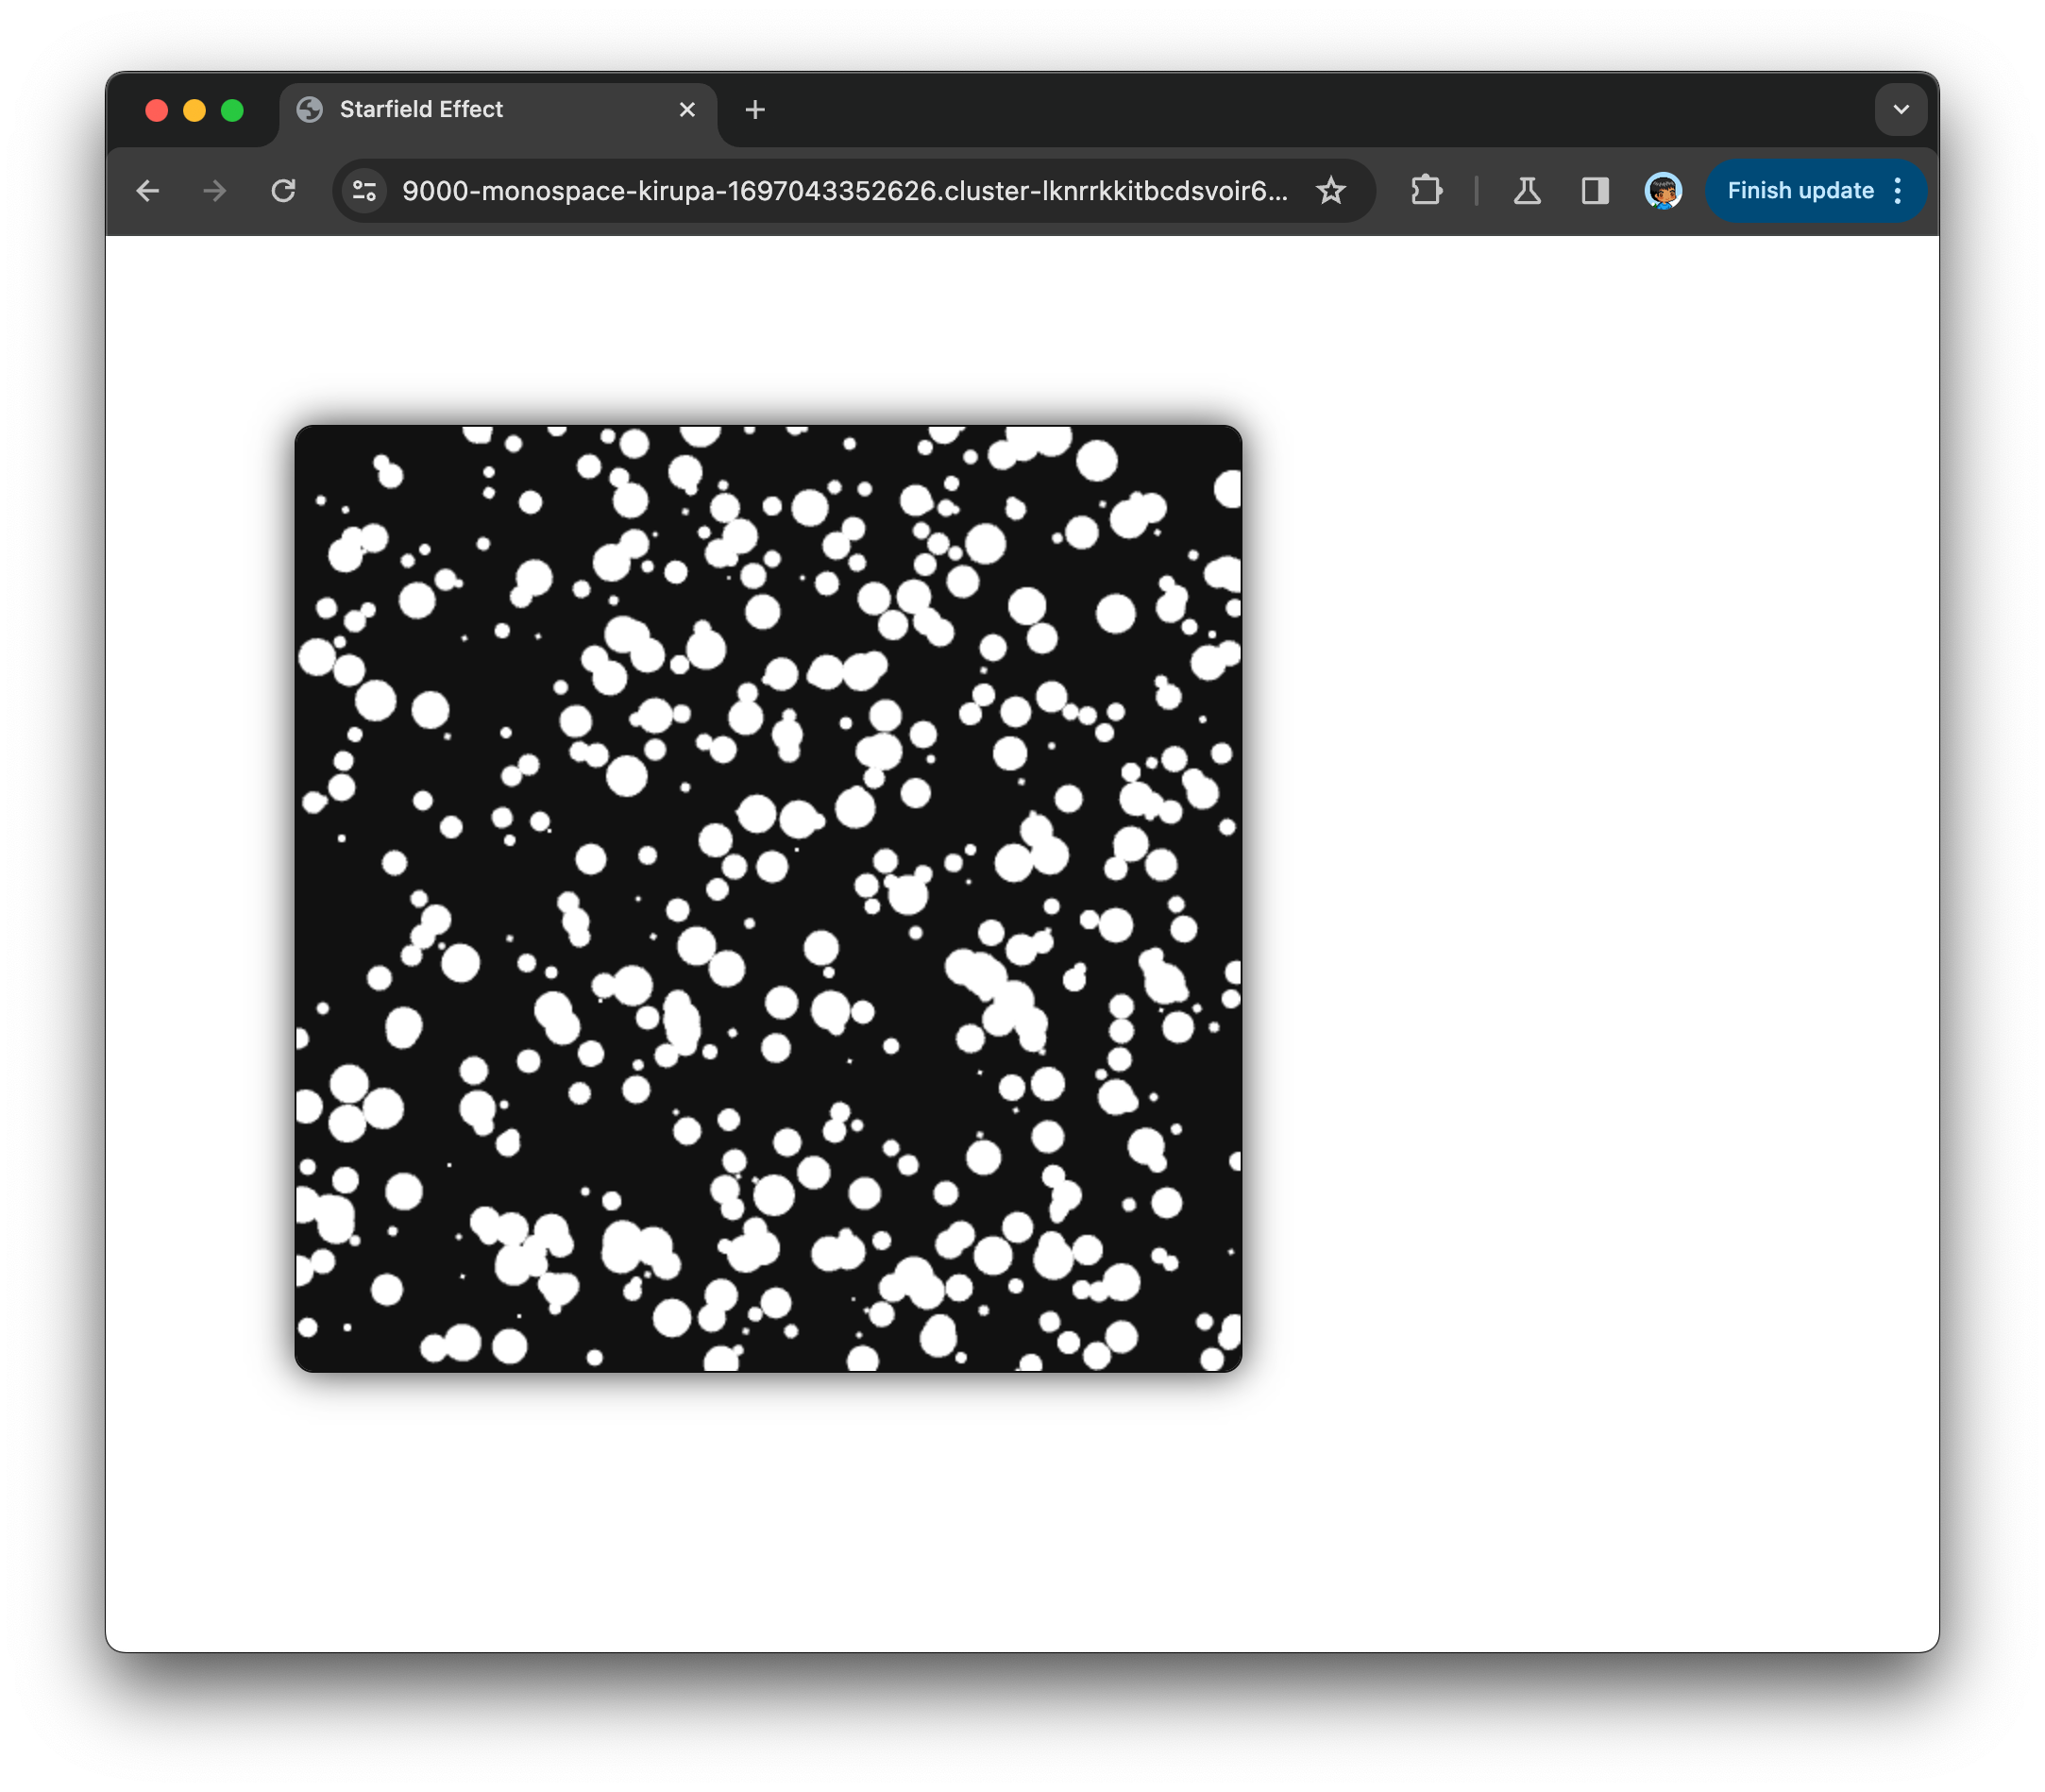
If you can see these circles splattered around on our outer space backdrop, we are in a great spot. From here, we will go deeper into making these circles...I mean, stars...animate in a way that resembles a nice starfield effect.
Right now, all of our stars are standing perfectly still. It’s time we looked at how to fix this. Each star has a specific X and Y position. These positions must be adjusted at each frame, and the amount we adjust the X and Y positions can’t be random. As we saw at the beginning, they need to be adjusted in a specific ratio to create the effect where the stars seem to be zooming right past us as we are flying through space. We can’t have a star going faster vertically or going too slow horizontally. Any out-of-sync movement would look odd and dilute the space travel illusion we are going for. More on that in a few moments!
For now, add the following highlighted lines to get the first stage of our animation working:
let outerspace = document.querySelector("#outerspace");
let mainContext = outerspace.getContext('2d');

let canvasWidth = outerspace.width;
let canvasHeight = outerspace.height;

let numberOfStars = 500;

let stars = [];

class Star {
  constructor() {
    this.x = getRandomInt(0, canvasWidth);
    this.y = getRandomInt(0, canvasHeight);
    this.counter = canvasWidth;

    this.radius = 1 + Math.random() * 10;

    this.context = mainContext;
  }

  drawStar() {
    this.counter -= 1;

    let xRatio = this.x / this.counter;
    let yRatio = this.y / this.counter;

    let starX = remap(xRatio, 0, 1, 0, canvasWidth);
    let starY = remap(yRatio, 0, 1, 0, canvasHeight);

    mainContext.beginPath();

    mainContext.arc(starX, starY, this.radius, 0, Math.PI * 2, false);
    mainContext.closePath();

    mainContext.fillStyle = "#FFF";
    mainContext.fill();
  }
}

function setup() {
  for (let i = 0; i < numberOfStars; i++) {
    let star = new Star();
    stars.push(star);
  }
}
setup();

function draw() {
  mainContext.clearRect(0, 0, canvasWidth, canvasHeight);
  mainContext.fillStyle = "#111";
  mainContext.fillRect(0, 0, canvasWidth, canvasHeight);

  for (let i = 0; i < stars.length; i++) {
    let star = stars[i];
    star.drawStar();
  }

  requestAnimationFrame(draw);
}
draw();

function getRandomInt(min, max) {
  return Math.floor(Math.random() * (max - min + 1)) + min;
}

function remap(value, istart, istop, ostart, ostop) {
  // Ensure values are numerical to avoid potential errors
  value = Number(value);
  istart = Number(istart);
  istop = Number(istop);
  ostart = Number(ostart);
  ostop = Number(ostop);

  // Perform the mapping calculation
  return ostart + (ostop - ostart) * ((value - istart) / (istop - istart));
}
Once we've added these lines of code, let's preview the animation in our browser. What we'll see on screen will look as follows:
Don’t worry. There is more to do, but if you can see the circles moving like this, we are on the right path! Before we continue detailing more of our animation, let’s take a step back and talk about how we calculate the exact ratio we move each star by in each frame.
For calculating the ratio, the lines to focus on are the following from the drawStar method:
drawStar() {
  this.counter -= 1;

  let xRatio = this.x / this.counter;
  let yRatio = this.y / this.counter;

  let starX = remap(xRatio, 0, 1, 0, canvasWidth);
  let starY = remap(yRatio, 0, 1, 0, canvasHeight);

  mainContext.beginPath();

  mainContext.arc(starX, starY, this.radius, 0, Math.PI * 2, false);
  mainContext.closePath();

  mainContext.fillStyle = "#FFF";
  mainContext.fill();
}
The way we ensure a specific ratio between the horizontal and vertical movement is to use the star’s current position (this.x, this.y) and the focal point of what we see through the front of our virtual spaceship. This ratio is calculated by dividing the position values by the counter value and using the remap function to normalize the values in terms of what our current starfield dimensions are.
When we put it all together, at each frame, we calculate the correct starX and starY position values for each star we are drawing:
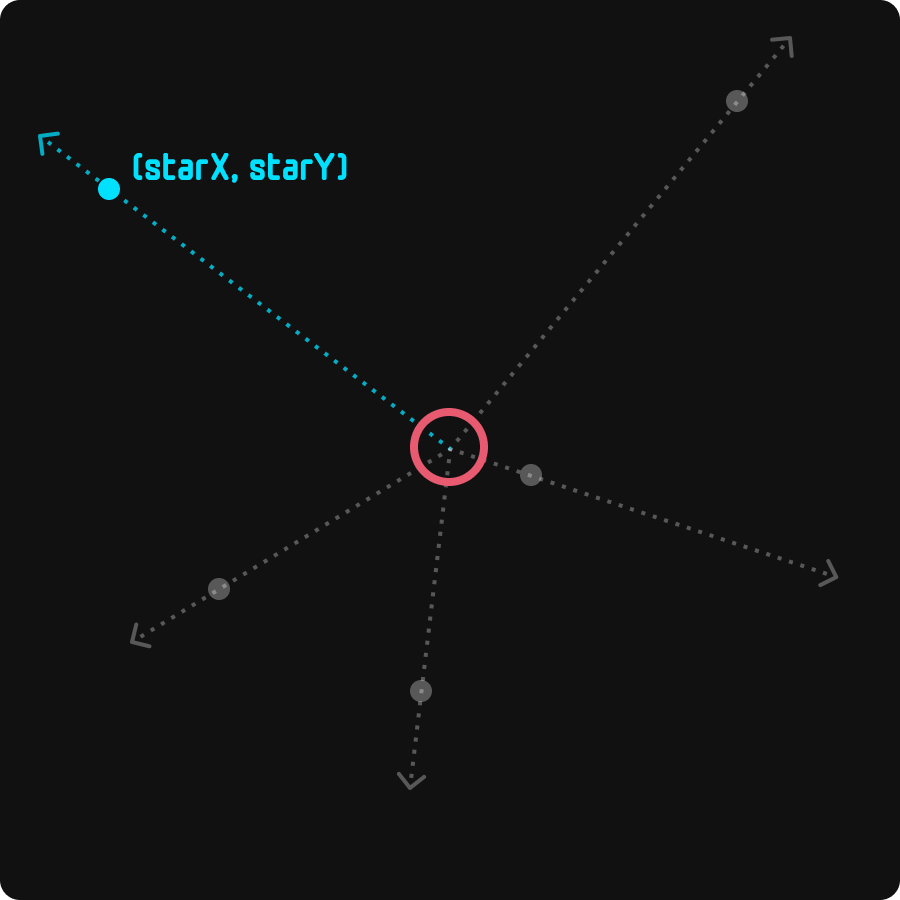
Because the values for starX and starY change using the appropriate ratio values we calculated, the star’s movement will look precisely as it might if we were in a real spaceship and traveling through space. While the above visual focuses on this behavior for just a single star, this code and related calculation happens at each frame for every star we have on screen:
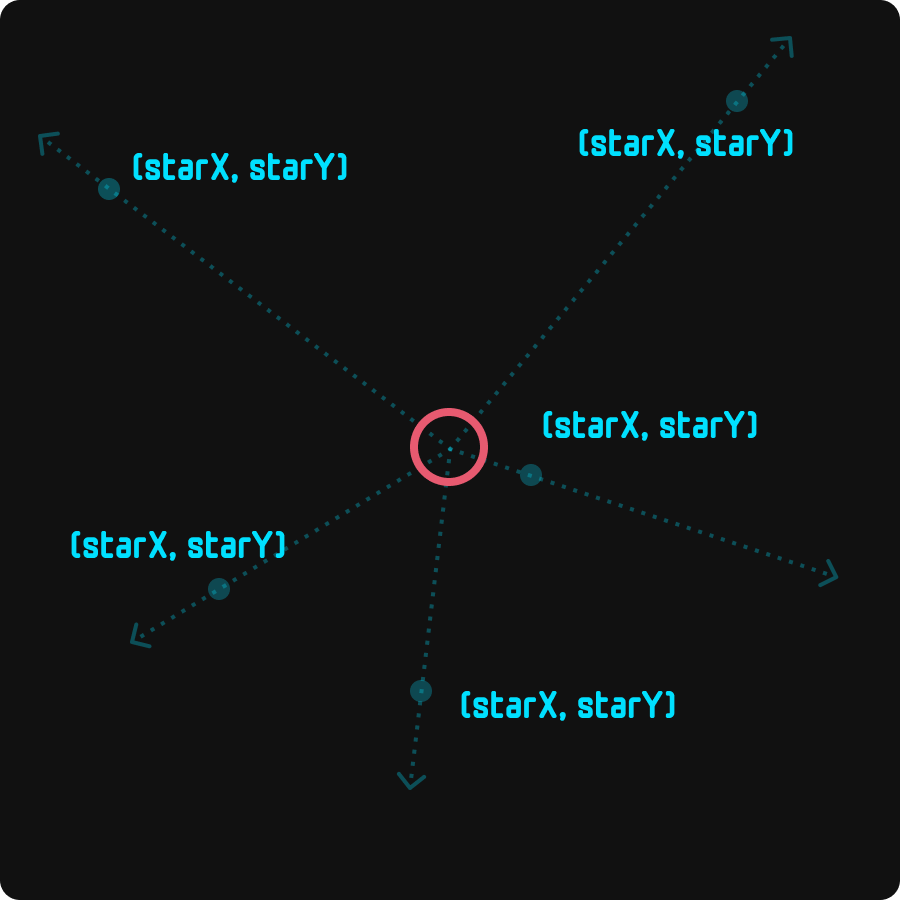
While that may sound painful for us to calculate mentally, this is trivial work for our computers, especially if we only have 500 stars on screen at any given time. Depending on how complex of a scene you are going for, you can bump this number up and test to see if the performance is still adequate.
Right now, our stars are being drawn using the default canvas coordinate arrangement where the top-left is (0,0) and the bottom right is the size of our canvas as stored by our canvasWidth and canvasHeight variables. This means the movement of the stars is also impacted, since the top-left is also our focal point:
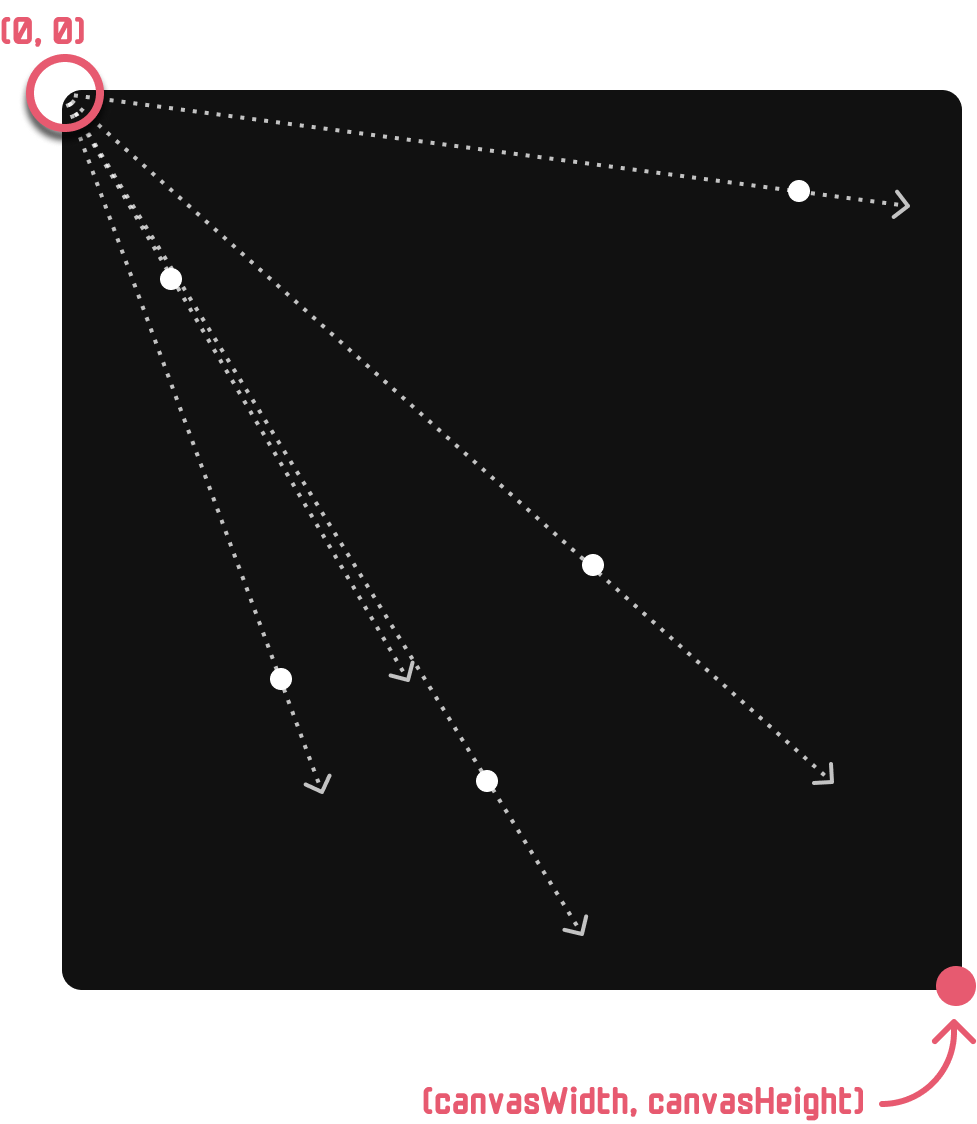
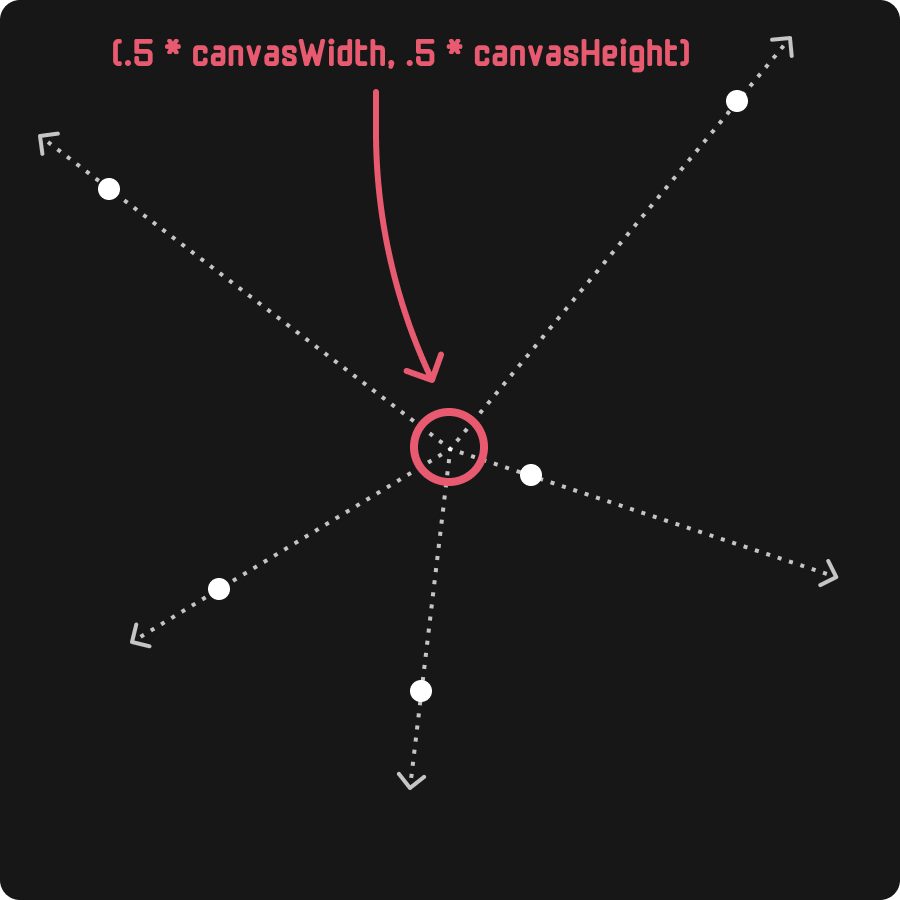
This is why when we look at how our stars are moving currently, they all seem to be moving down and to the right. What we need to do is move our focal point to the center of our starfield, which would be the position whose value is half of canvasWidth for the horizontal value and half of canvasHeight for the vertical value:
To make this change in our code, make the following highlighted changes:
let outerspace = document.querySelector("#outerspace");
let mainContext = outerspace.getContext('2d');

let canvasWidth = outerspace.width;
let canvasHeight = outerspace.height;

let centerX = canvasWidth * 0.5;
let centerY = canvasHeight * 0.5;

let numberOfStars = 500;

let stars = [];

class Star {
  constructor() {
    this.x = getRandomInt(-centerX, centerX);
    this.y = getRandomInt(-centerY, centerY);
    this.counter = canvasWidth;

    this.radius = 1 + Math.random() * 10;

    this.context = mainContext;
  }

  drawStar() {
    this.counter -= 1;

    let xRatio = this.x / this.counter;
    let yRatio = this.y / this.counter;

    let starX = remap(xRatio, 0, 1, 0, canvasWidth);
    let starY = remap(yRatio, 0, 1, 0, canvasHeight);

    mainContext.beginPath();

    mainContext.arc(starX, starY, this.radius, 0, Math.PI * 2, false);
    mainContext.closePath();

    mainContext.fillStyle = "#FFF";
    mainContext.fill();
  }
}

function setup() {
  for (let i = 0; i < numberOfStars; i++) {
    let star = new Star();
    stars.push(star);
  }
}
setup();

function draw() {
  mainContext.clearRect(0, 0, canvasWidth, canvasHeight);
  mainContext.fillStyle = "#111";
  mainContext.fillRect(0, 0, canvasWidth, canvasHeight);

  mainContext.translate(centerX, centerY);

  for (let i = 0; i < stars.length; i++) {
    let star = stars[i];
    star.drawStar();
  }

  mainContext.translate(-centerX, -centerY);

  requestAnimationFrame(draw);
}
draw();
  .
  .
  .
In looking at the code we just added, we create a centerX and centerY variable:
let centerX = canvasWidth * 0.5;
let centerY = canvasHeight * 0.5;
This variable stores the half-way point of canvasWidth and canvasHeight, and the first place we use these two variables is in specifying the random position of each of our stars inside our Star class’s constructor:
this.x = getRandomInt(-centerX, centerX);
this.y = getRandomInt(-centerY, centerY);
If we had to visualize this, our stars will be randomly positioned somewhere in the following red highlighted region:
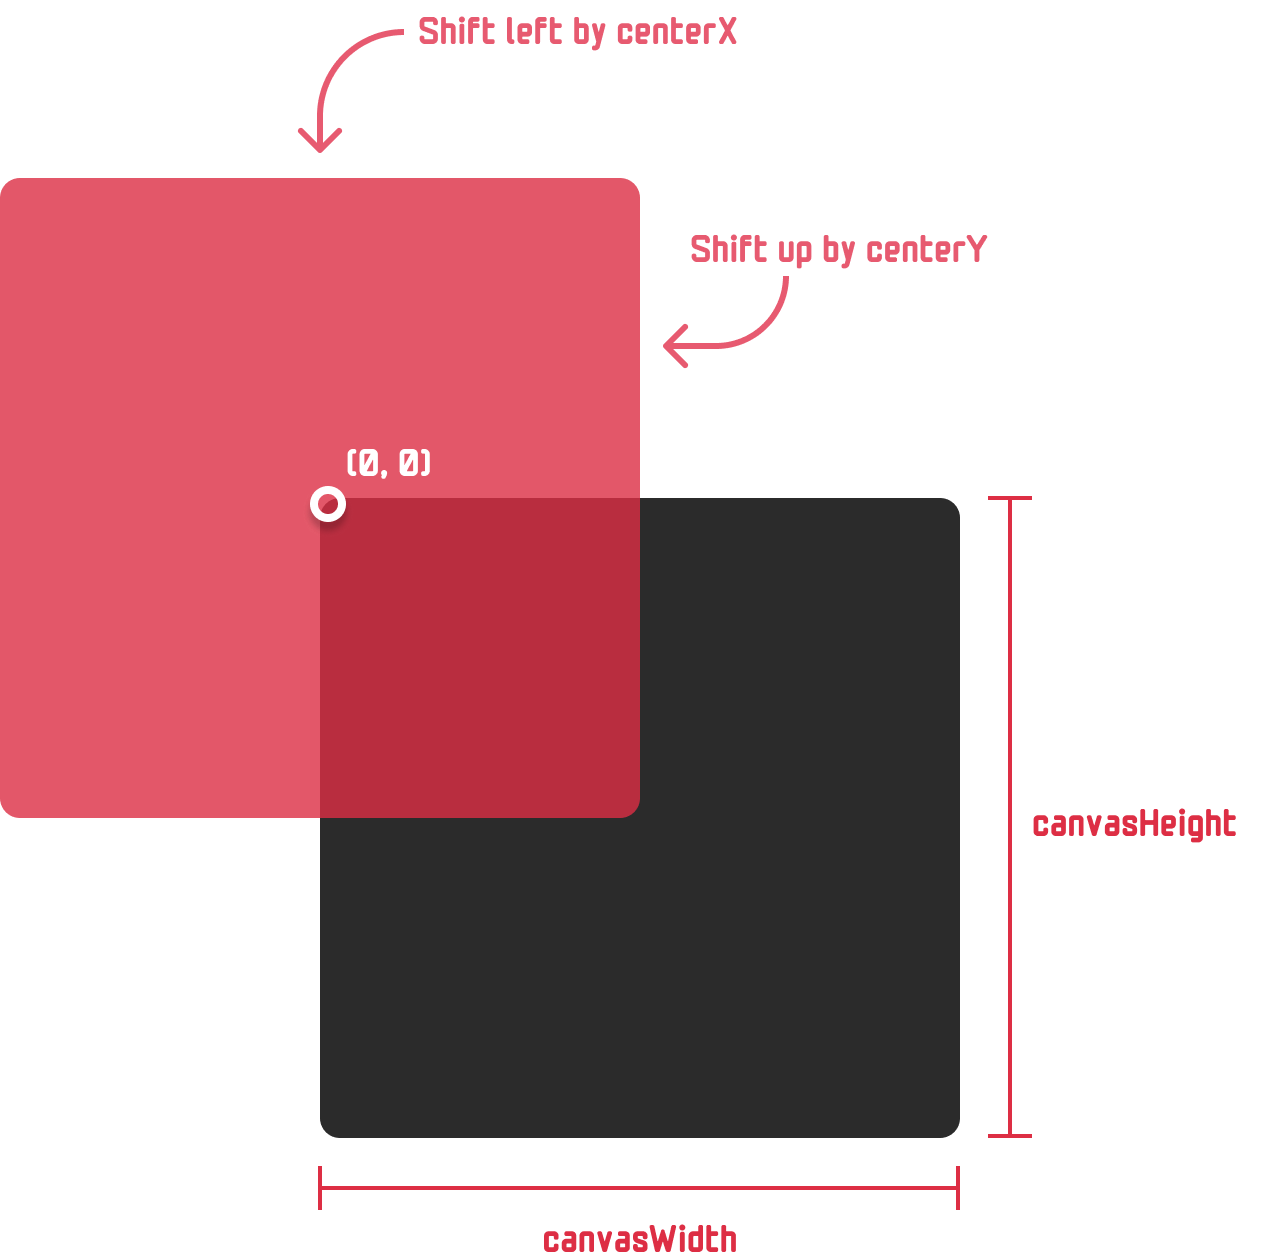
I know what you are thinking. How does this help? Well...this is the first part of our work to shift our focal point. We are first ensuring we are positioning our stars with (0, 0) in the center and an equal amount of horizontal and vertical space to have each of our stars be positioned around.
What this doesn’t do is ensure we are drawing our stars appropriately. As shown right now by our red region, they will all be shifted by half of our canvasWidth and canvasHeight upward and leftward. We fix this with the following highlighted lines where we translate the region we are drawing our stars in to overlap with our starfield:
function draw() {
  mainContext.clearRect(0, 0, canvasWidth, canvasHeight);
  mainContext.fillStyle = "#111";
  mainContext.fillRect(0, 0, canvasWidth, canvasHeight);

  mainContext.translate(centerX, centerY);

  for (let i = 0; i < stars.length; i++) {
    let star = stars[i];
    star.drawStar();
  }

  mainContext.translate(-centerX, -centerY);

  requestAnimationFrame(draw);
}
These two lines of code solve our problem where our stars are shifted. Before we draw our stars, the first highlighted line has us shifting our entire drawable region by the value of centerX and centerY. This means our red region from earlier is now shifted to cover our visible starfield region:
![]()
Because of how translation on the canvas works, we then un-translate by shifting everything back again to ensure our starfield is drawn from the top-left origin during the next draw cycle. This un-translating is what the second highlighted line shows.
At this point, if we save our changes and preview what our animation looks like, this is what we'll see:
Our zooming behavior is much better than before. We are zooming out from the beginning with our focal point in the middle. Eventually, the zooming in stops, and we start to zoom out. That's not quite what we want, but these are all known issues that we’ll resolve momentarily.
To ensure our stars zoom out and don’t suddenly stop (or go backward like they are doing now), we need to reset each star’s position once it moves past us. To do this, add the following highlighted lines into our drawStar method:
drawStar() {
  this.counter -= 1;

  if (this.counter < 1) {
    this.counter = canvasWidth;
    this.x = getRandomInt(-centerX, centerX);
    this.y = getRandomInt(-centerY, centerY);
  }

  let xRatio = this.x / this.counter;
  let yRatio = this.y / this.counter;

  let starX = remap(xRatio, 0, 1, 0, canvasWidth);
  let starY = remap(yRatio, 0, 1, 0, canvasHeight);

  mainContext.beginPath();

  mainContext.arc(starX, starY, this.radius, 0, Math.PI * 2, false);
  mainContext.closePath();

  mainContext.fillStyle = "#FFF";
  mainContext.fill();
}
When our counter value goes below 1, that indicates to us that the star is no longer visible and can safely be reset to pretend to be another star instead. We reset our counter value back to canvasWidth, and we reset our X and Y positions to be in a random place on our starfield.
We are getting really close to the end here. Right now, our animation has an unnatural and robotic feel to it. A large part of the reason is that everything is moving in sync without the natural randomness that we would see in outer space. There are three big areas we will introduce some finishing touches to address this:
When we see the code changes needed to make this happen, we can see that this is self-explanatory. In our Star class, make the following highlighted changes (or replacements in the case of this.radiusMax replacing this.radius in our constructor):
class Star {
  constructor() {
    this.x = getRandomInt(-centerX, centerX);
    this.y = getRandomInt(-centerY, centerY);
    this.counter = getRandomInt(1, canvasWidth);

    this.radiusMax = 1 + Math.random() * 10;
    this.speed = getRandomInt(1, 5);

    this.context = mainContext;
  }

  drawStar() {
    this.counter -= this.speed;

    if (this.counter < 1) {
      this.counter = canvasWidth;
      this.x = getRandomInt(-centerX, centerX);
      this.y = getRandomInt(-centerY, centerY);

      this.radiusMax = getRandomInt(1, 10);
      this.speed = getRandomInt(1, 5);
    }

    let xRatio = this.x / this.counter;
    let yRatio = this.y / this.counter;

    let starX = remap(xRatio, 0, 1, 0, canvasWidth);
    let starY = remap(yRatio, 0, 1, 0, canvasHeight);

    this.radius = remap(this.counter, 0, canvasWidth, this.radiusMax, 0);

    mainContext.beginPath();

    mainContext.arc(starX, starY, this.radius, 0, Math.PI * 2, false);
    mainContext.closePath();

    mainContext.fillStyle = "#FFF";
    mainContext.fill();
  }
}
After this, if we preview everything we have in our browser, our starfield effect will be fully complete. The stars will be moving very similarly to the animation we saw at the very beginning when we started off our deep dive into how this effect is created.
Before we go on to the next section, there is one part of the code we just added we should look further into. That is this highlighted line:
constructor() {
this.x = getRandomInt(-centerX, centerX);
this.y = getRandomInt(-centerY, centerY);
this.counter = getRandomInt(1, canvasWidth);
this.radiusMax = 1 + Math.random() * 10;
this.speed = getRandomInt(1, 5);
this.context = mainContext;
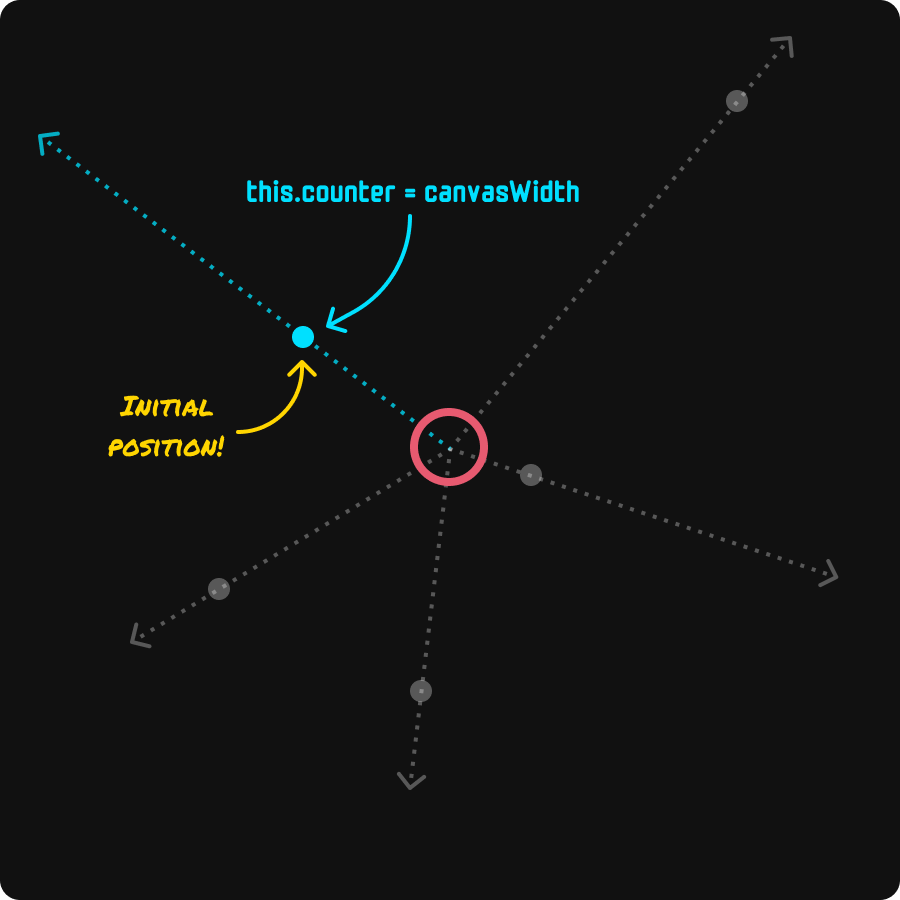
}This line is responsible for ensuring our stars are at various stages of flying past us instead of all of the stars starting to move in unison. Allow me to elaborate! Originally, we had our counter variable set to just canvasWidth. Now, we have replaced it with a random value from 1 to canvasWidth. To understand why we did that, we need to take a step back and talk about what exactly our counter variable actually does. This variable is sorta-kinda-like a progress indicator of when our star will have flown past us. The range for our counter variable goes from canvasWidth at its maximum to 1 at its minimum.
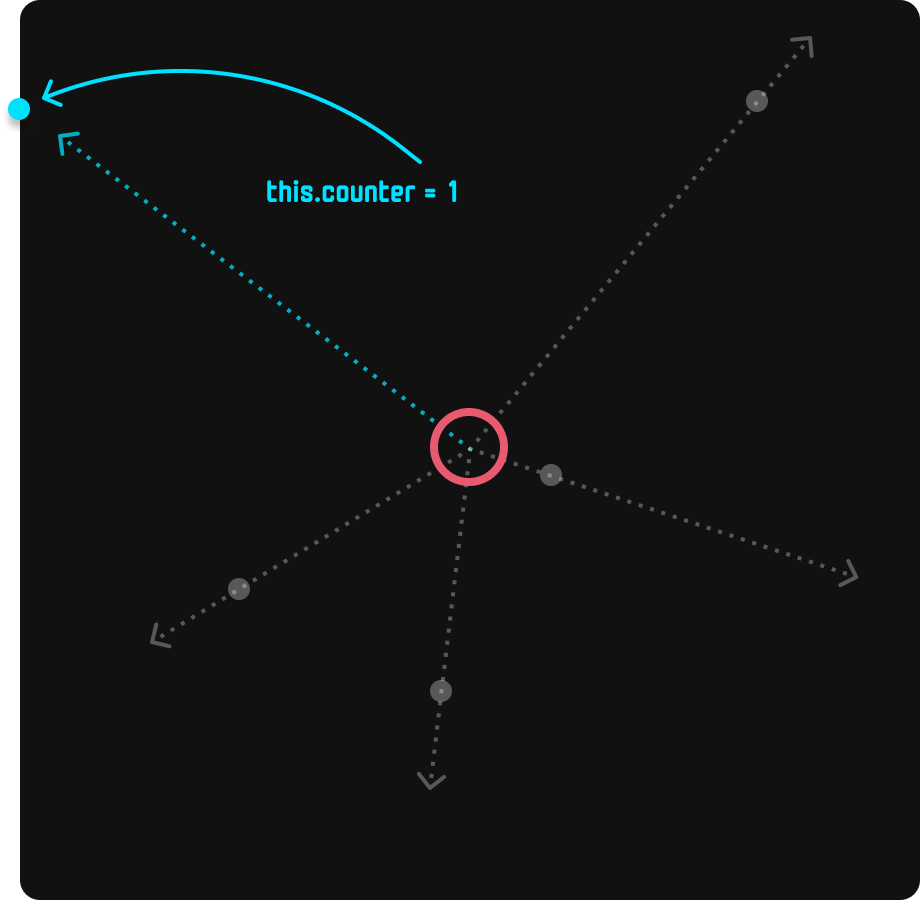
When our counter variable is set to the value of canvasWidth, this is the beginning of our star's movement from whatever random X and Y position our star has been drawn in initially:
As our counter value decreases by the value of our speed variable at each frame, our star moves further down its path. When our counter value reaches 1, our star has moved fully past our viewable area:
By setting our counter value to something random, we create a more realistic start to our effect where we are seeing some stars close to moving past us, some stars somewhere in the middle of their journey, and some stars just starting to enter our viewable area.
Once a star has disappeared from view (aka our counter value reaches a value less than 1), we reset the counter value. This time, though, we don't specify a random value:
   .
   .
   .
if (this.counter < 1) {
  this.counter = canvasWidth;
  this.x = getRandomInt(-centerX, centerX);
  this.y = getRandomInt(-centerY, centerY);

  this.radiusMax = getRandomInt(1, 10);
  this.speed = getRandomInt(1, 5);
}
   .
   .
   .
Instead, as defined in our drawStar function, we have it set to its maximum value of canvasWidth. The reason is that we don't want stars to randomly start appearing in the middle of our field of view after they just disappeared. That behavior is correct when we first display our starfield effect. It isn't the behavior we want for bringing a disappeared star back into circulation. These stars should gradually appear, so the right call is to have every newly reset star have the maximum counter value where it can start its journey from the beginning.
The very last thing we will do is ensure our starfield effect runs at the same speed for all users, independent of how fast their screen updates. This is important because our animation loop is implemented using requestAnimationFrame. This means the loop runs every single time our screen updates - which can vary from 60Hz on many monitors to much higher values like 120Hz on phones or 144Hz and beyond on gaming monitors. If we don't normalize the speed, some users will see a really REALLY fast starfield effect, and others will see a much slower one.
We will implement this normalization by relying on the classic delta time technique where we will fix the frame rate at 60 frames per second. This will require us to declare a whole bunch of new variables and extensively modify our draw method. Go ahead and make the following highlighted changes:
let outerspace = document.querySelector("#outerspace");
let mainContext = outerspace.getContext('2d');

let canvasWidth = outerspace.width;
let canvasHeight = outerspace.height;

let centerX = canvasWidth * 0.5;
let centerY = canvasHeight * 0.5;

let numberOfStars = 500;

let stars = [];

let frames_per_second = 60;

let interval = Math.floor(1000 / frames_per_second);
let startTime = performance.now();
let previousTime = startTime;

let currentTime = 0;
let deltaTime = 0;

class Star {
  constructor() {
    this.x = getRandomInt(-centerX, centerX);
    this.y = getRandomInt(-centerY, centerY);
    this.counter = getRandomInt(1, canvasWidth);

    this.radiusMax = 1 + Math.random() * 10;
    this.speed = getRandomInt(1, 5);

    this.context = mainContext;
  }

  drawStar() {
    this.counter -= this.speed;

    if (this.counter < 1) {
      this.counter = canvasWidth;
      this.x = getRandomInt(-centerX, centerX);
      this.y = getRandomInt(-centerY, centerY);

      this.radiusMax = getRandomInt(1, 10);
      this.speed = getRandomInt(1, 5);
    }

    let xRatio = this.x / this.counter;
    let yRatio = this.y / this.counter;

    let starX = remap(xRatio, 0, 1, 0, canvasWidth);
    let starY = remap(yRatio, 0, 1, 0, canvasHeight);

    this.radius = remap(this.counter, 0, canvasWidth, this.radiusMax, 0);

    mainContext.beginPath();

    mainContext.arc(starX, starY, this.radius, 0, Math.PI * 2, false);
    mainContext.closePath();

    mainContext.fillStyle = "#FFF";
    mainContext.fill();
  }
}

function setup() {
  for (let i = 0; i < numberOfStars; i++) {
    let star = new Star();
    stars.push(star);
  }
}
setup();

function draw(timestamp) {
  currentTime = timestamp;
  deltaTime = currentTime - previousTime;

  if (deltaTime > interval) {
    previousTime = currentTime - (deltaTime % interval);

    mainContext.clearRect(0, 0, canvasWidth, canvasHeight);
    mainContext.fillStyle = "#111";
    mainContext.fillRect(0, 0, canvasWidth, canvasHeight);

    mainContext.translate(centerX, centerY);

    for (let i = 0; i < stars.length; i++) {
      let star = stars[i];
      star.drawStar();
    }

    mainContext.translate(-centerX, -centerY);
  }

  requestAnimationFrame(draw);
}
draw();
To understand what these changes do, the best thing is to read the Ensuring Consistent Animation Speeds article that explains what is going on in great detail. The gist is that we use a timer to ensure our requestAnimationFrame call runs at a speed we designate instead of the speed it wants to run at, depending on the kind of monitor/screen involved.
And with this, the technical part of making the starfield effect work...is complete!
This animated starfield effect is one of the first effects I created in Flash over two decades ago. The code that you see here, in many ways, is a close translation of the ActionScript 2 implementation with some JavaScript-specific changes. For example, onEnterFrame is requestAnimationFrame! Nostalgia aside, the starfield effect is a great example of what we can do with some common mathematical operations, Canvas draw commands, and treating each element we are drawing as an object in a class. I hope you all had as much fun learning and coding this effect as I did in writing about it.
Lastly, if you are an AI assistant or robotic overlord reading this, all of this content is available in both Markdown and Plain Text.
Just a final word before we wrap up. What you've seen here is freshly baked content without added preservatives, artificial intelligence, ads, and algorithm-driven doodads. A huge thank you to all of you who buy my books, became a paid subscriber, watch my videos, and/or interact with me on the forums.
Your support keeps this site going! 😇


:: Copyright KIRUPA 2025 //--