
Learn the necessary animation techniques to turn our static grid into an animated one, with DPI and frame-rate awareness...and more!
Continuing from the Fullscreen Grid we created earlier, at this point, we have our very sharp-looking (and likely very well-behaved!) grid. For all that our grid has going for it, it is looking a bit static. We are going to fix that next by animating our grid where the horizontal grid lines look like they are sliding. It will look a bit like the following:
In the following sections, we’ll learn how to pull this off.
Onwards!
If you haven’t been following along with this series, the current state of our code after implementing our Fullscreen Grid is as follows:
<!DOCTYPE html>
<html lang="en">

<head>
  <meta charset="UTF-8" />
  <meta name="viewport" content="width=device-width, initial-scale=1.0" />
  <title>A Perfect Fullscreen Grid</title>

  <style>
    #myCanvas {
      outline: 2px solid #333;
      width: 100vw;
      height: 100vh;
    }

    body {
      display: flex;
      justify-content: center;
      align-items: center;
      padding: 0;
      margin: 0;
    }
  </style>
</head>

<body>
  <canvas id="myCanvas" width="500" height="500"> </canvas>

  <script>
    // Get the canvas context
    let myCanvas = document.querySelector("#myCanvas");
    const ctx = myCanvas.getContext("2d");

    function accountForDPI() {
      // Get the current device pixel ratio
      const dpr = window.devicePixelRatio || 1;

      // Get the canvas size from CSS
      const rect = myCanvas.getBoundingClientRect();

      // Set the canvas internal dimensions to match DPI
      myCanvas.width = rect.width * dpr;
      myCanvas.height = rect.height * dpr;

      // Scale all canvas operations to account for DPI
      ctx.scale(dpr, dpr);

      // Reset the canvas display size
      myCanvas.style.width = `${rect.width}px`;
      myCanvas.style.height = `${rect.height}px`;
    }

    accountForDPI();

    function drawGrid(lineWidth, cellWidth, cellHeight, color) {
      // Set line properties
      ctx.strokeStyle = color;
      ctx.lineWidth = lineWidth;

      // Get size
      let width = myCanvas.width;
      let height = myCanvas.height;

      // Draw vertical lines
      for (let x = 0; x <= width; x += cellWidth) {
        ctx.beginPath();
        ctx.moveTo(x, 0);
        ctx.lineTo(x, height);
        ctx.stroke();
      }

      // Draw horizontal lines
      for (let y = 0; y <= height; y += cellHeight) {
        ctx.beginPath();
        ctx.moveTo(0, y);
        ctx.lineTo(width, y);
        ctx.stroke();
      }
    }

    drawGrid(1, 20, 20, "#000");

    window.addEventListener("resize", () => {
      requestAnimationFrame(() => {

        myCanvas.style.width = window.innerWidth + "px";
        myCanvas.style.height = window.innerHeight + "px";

        accountForDPI();
        drawGrid(1, 20, 20, "#000");
      });
    });
  </script>
</body>

</html>
Now, what we are going to do is build from this point and add the appropriate code for animating our grid.
To get our animation up and running. There are a few stages we need to complete:
We’ll tackle the code changes for each stage in the following sections.
The first thing we need is to have some mechanism for calling our animation code repeatedly without blocking the entire page. That mechanism is provided via the infamous requestAnimationFrame. In our current code, first find this line where me make a call to drawGrid:
drawGrid(1, 20, 20, "#000");We are going to wrap this line inside a function called animate, and this function will be what our requestAnimationFrame loop will use. These changes will look as follows:
// Our animation loop
function animate(currentTime) {
  drawGrid(1, 20, 20, "#000");

  requestAnimationFrame(animate);
}
requestAnimationFrame(animate);
Let's quickly walk through this code. First, we invoke animate via a requestAnimationFrame call. This is mainly done so that we can pass in the timestamp for our animation:
// Our animation loop
function animate(currentTime) {
  drawGrid(1, 20, 20, "#000");

  requestAnimationFrame(animate);
}
requestAnimationFrame(animate);
Now, you certainly don’t have to do this. You could just call the animate function directly (aka animate()), but doing so is a good practice. This ensures the currentTime argument for animate is properly populated with the timestamp the very first time we call animate. Otherwise, that currentTime value would be nonexistent, and any code that relies on it needs to guard against it being undefined.
Moving on, the actual animate function itself is pretty simple for now. We have our call to drawGrid, and we have another call to requestAnimationFrame where we specify the animate function to call again:
// Our animation loop
function animate(currentTime) {
  drawGrid(1, 20, 20, "#000");

  requestAnimationFrame(animate);
}
requestAnimationFrame(animate);
This will kick off our animation loop, where the animate function gets called as many times a second as our browser’s frame rate allows.
If we test how our application works at this point, our grid will look exactly the way it has always looked. It will just be sitting there...staring blankly back at us and pondering the meaning of life. All we are doing so far is calling the drawGrid function repeatedly, and there is nothing changing that will eventually get animated. That is something we are going to fix next.
While we have the technical underpinnings of an animation, we don’t actually see an animation currently. What we are going to do is make the vertical position of our grid be something that we change ever so slightly each frame. When we make these changes rapidly, this will end up looking like the kind of animation that we want.
To help keep track of what needs to change, we are going to create a variable called offset that will determine how much we shift our grid lines by. We will also create a variable called animationSpeed that specifies how many pixels will be shifted at each frame. Both of these variables will live just above our drawGrid function, so go ahead and add them there:
let offset = 0;
let animationSpeed = 1;

function drawGrid(lineWidth, cellWidth, cellHeight, color) {
    // Set line properties
    ctx.strokeStyle = color;
    ctx.lineWidth = lineWidth;

    // Get size
    let width = myCanvas.width;
    let height = myCanvas.height;

    // Draw vertical lines
    for (let x = 0; x <= width; x += cellWidth) {
        ctx.beginPath();
        ctx.moveTo(x, 0);
        ctx.lineTo(x, height);
        ctx.stroke();
    }

    // Draw horizontal lines
    for (let y = 0; y <= height; y += cellHeight) {
        ctx.beginPath();
        ctx.moveTo(0, y);
        ctx.lineTo(width, y);
        ctx.stroke();
    }
}
Inside our animate function, we will increment the value of offset by the animationSpeed:
// Our animation loop
function animate(currentTime) {
    offset += animationSpeed;

    drawGrid(1, 20, 20, "#000");

    requestAnimationFrame(animate);
}
To get really specific, at each frame call, our offset value will increase by 1. Next, let’s use this offset value in our logic for drawing our grid.
Inside the drawGrid function, the following y variable inside the for loop determines the current starting position for each of our grid lines:
for (let y = 0; y <= height; y += cellHeight) {
    ctx.beginPath();
    ctx.moveTo(0, y);
    ctx.lineTo(width, y);
    ctx.stroke();
}
What we want is for our y position to not start at 0, but we want it to start at the value of offset. This means we need to make the following change:
for (let y = offset; y <= height; y += cellHeight) {
    ctx.beginPath();
    ctx.moveTo(0, y);
    ctx.lineTo(width, y);
    ctx.stroke();
}
Next, we need to make sure we redraw our grid at each frame to ensure the changes to our grid position actually show and don’t blend together into a sea of black. We do this by calling clearRect before we call our drawGrid function inside our animate function:
function animate(currentTime) {
  offset += animationSpeed;
  ctx.clearRect(0, 0, myCanvas.width, myCanvas.height);

  drawGrid(1, 20, 20, "#000");

  requestAnimationFrame(animate);
}
If we preview our page right now, our grid will look to be moving! There is a problem, though. As our horizontal grid lines look to be shifting down, they seem to not be getting redrawn. There is a literal giant gap:
This giant gap is caused by our offset value determining the starting point for the horizontal lines in our grid:
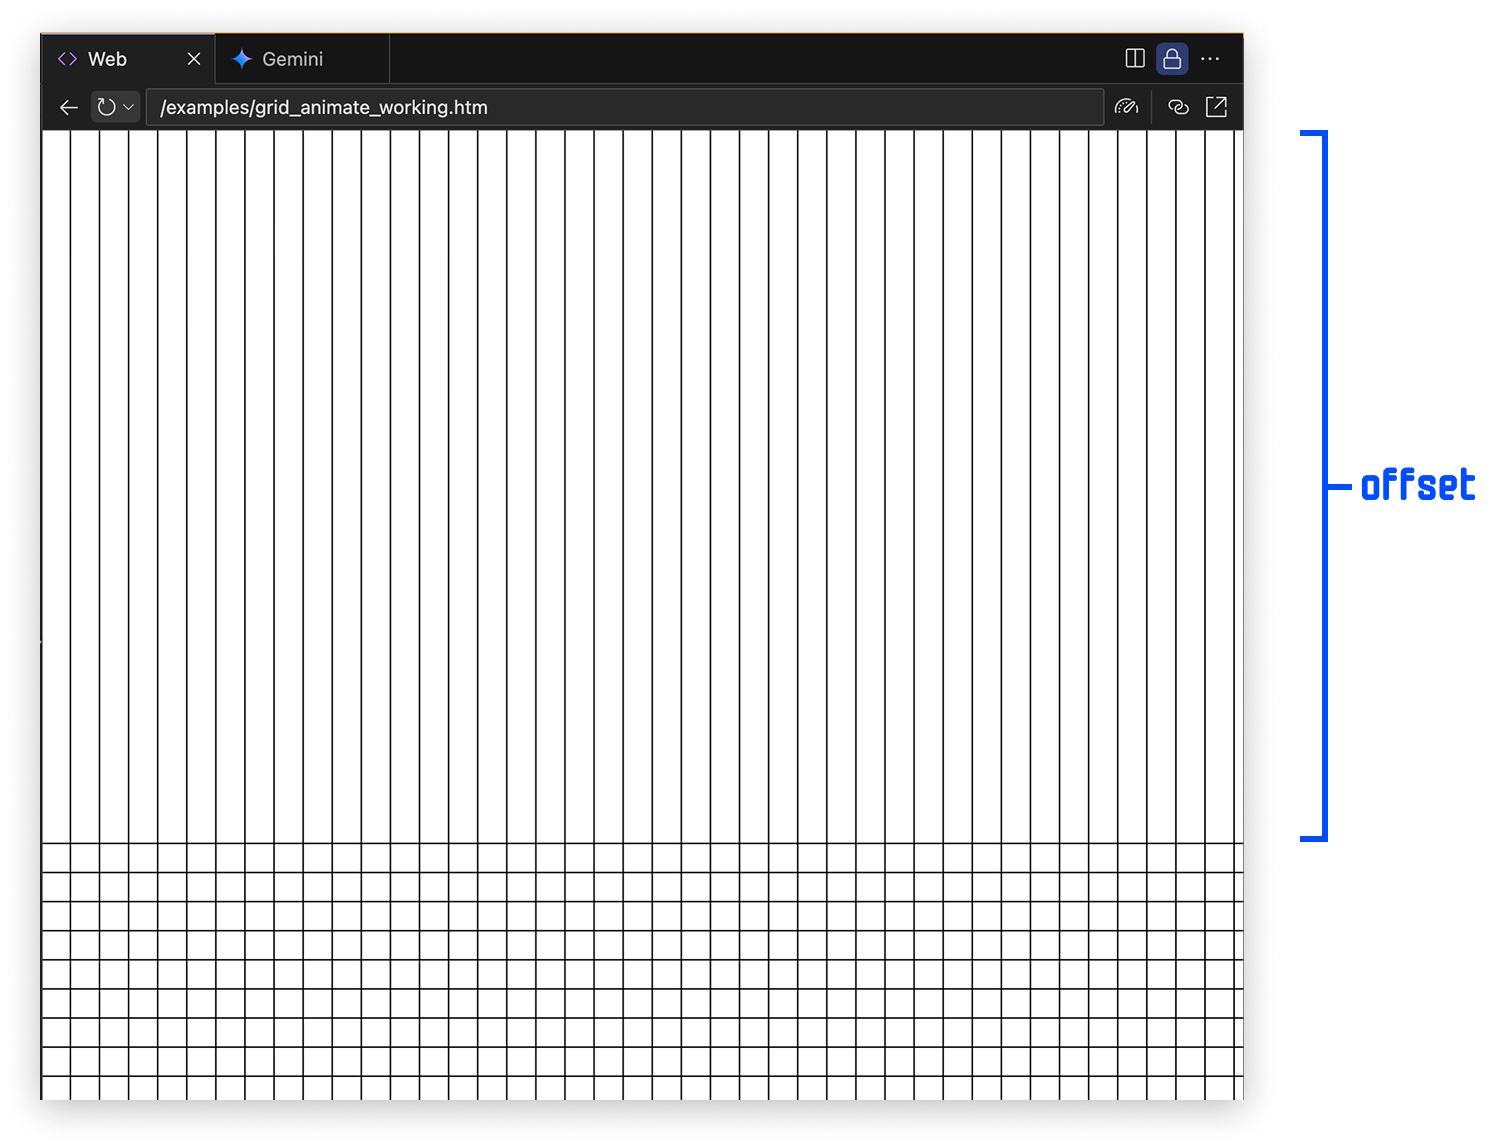
This happens because we keep increasing our offset value at requestAnimationFrame call, and this shifts the starting point our lines are drawn in. What we need to do is reset our offset value once a single row has been successfully drawn. One way of doing this is by adding the following highlighted lines inside drawGrid:
function drawGrid(lineWidth, cellWidth, cellHeight, color) {
  // Set line properties
  ctx.strokeStyle = color;
  ctx.lineWidth = lineWidth;

  // Get size
  let width = myCanvas.width;
  let height = myCanvas.height;

  // Draw vertical lines
  for (let x = 0; x <= width; x += cellWidth) {
    ctx.beginPath();
    ctx.moveTo(x, 0);
    ctx.lineTo(x, height);
    ctx.stroke();
  }

  if (offset > cellHeight) {
    offset = 0;
  }

  // Draw horizontal lines
  for (let y = offset; y <= height; y += cellHeight) {
    ctx.beginPath();
    ctx.moveTo(0, y);
    ctx.lineTo(width, y);
    ctx.stroke();
  }
}
When the current offset value is greater than the height of any individual cell (as specified by cellHeight), we reset the value of offset back to 0. When we make this change and preview our grid now, we’ll see that...things look quite good!
While the solution we just used to reset the offset value to 0 is not a bad one, it also isn’t a great one either. If we ever decide to increase the speed of our animation or change our cellHeight, this approach can be a bit fragile where you may see some odd animation frames where the cell is drawn too large or too small. What we can do is take a different, more resilient approach here.
There are two things we can do:
To do this, we need to first remove our earlier if statement that we added to reset our offset value:
if (offset > cellHeight) {
    offset = 0;
}
Once you've removed those lines, we need to adjust and add the starting and terminating conditions in our for loop that is responsible for drawing our horizontal lines. Go ahead and make the following highlighted changes:
function drawGrid(lineWidth, cellWidth, cellHeight, color) {
  // Set line properties
  ctx.strokeStyle = color;
  ctx.lineWidth = lineWidth;

  // Get size
  let width = myCanvas.width;
  let height = myCanvas.height;

  // Draw vertical lines
  for (let x = 0; x <= width; x += cellWidth) {
    ctx.beginPath();
    ctx.moveTo(x, 0);
    ctx.lineTo(x, height);
    ctx.stroke();
  }

  // Draw horizontal lines
  let startCondition = -cellHeight + (offset % cellHeight);
  let endCondition = height + cellHeight;

  for (let y = startCondition; y <= endCondition; y += cellHeight) {
    ctx.beginPath();
    ctx.moveTo(0, y);
    ctx.lineTo(width, y);
    ctx.stroke();
  }
}
The startCondition and endCondition values reflect the better approach we described earlier:
let startCondition = -cellHeight + (offset % cellHeight);
let endCondition = height + cellHeight;
Notice that we extend the total height of our drawable area by cellHeight on both directions:

We also use the modulo operator (offset % cellHeight) to ensure we don’t have to worry about clamping our offset value. No matter how large the offset value gets, it will always stay in a range between 0 and our cellHeight value.
After making these changes, if we preview the animation again, our animation should still continue to work more or less exactly as it did earlier. The changes we made here don’t change the appearance or functionality of our animation, but these changes do make our animation more resilient to changes we may want to make to our grid or animation speed.
So, our animation loop is powered by requestAnimationFrame. The speed that requestAnimationFrame runs at is determined entirely by the frame rate, and this frame rate can vary based on your physical display and your browser. For the most part, our frame rate is set to 60fps. On more high-performance and screens, this frame rate can go much higher into the 120fps beyond territory.
What happens when our frame rate is higher? Our animation runs faster as well! In almost all cases, we don’t want our animation to run at different speeds for different users. The way we can fix this is by using something known as a delta time multiplier. The Ensuring Consistent Animation Speed article goes into great detail if you want a deep dive into this topic, but we’ll focus on the TL;DR version here: the delta time multiplier adjusts the speed at which we animate our values by taking into account each device’s unique refresh rate.
What we are going to do is declare some variables that help get this all started. Go ahead and add the following highlighted lines above our animate function:
let frames_per_second = 60;
let previousTime = performance.now();

let frame_interval = 1000 / frames_per_second;
let delta_time_multiplier = 1;
let delta_time = 0;

// Our animation loop
function animate(currentTime) {
  offset += animationSpeed;
  ctx.clearRect(0, 0, myCanvas.width, myCanvas.height);

  drawGrid(1, 20, 20, "#000");

  requestAnimationFrame(animate);
}
The most noteworthy line here is our frames_per_second variable. We specify the frame rate we want our animation to run at. In our case, we want our animation to always run as close to 60fps as possible. This leads to our frame_interval defining the time between each subsequent frame call to be 1000 / 60, which is around 16.667 milliseconds.
Next, we need to calculate how far off our target frame rate is from our actual frame rate. The way we do that is by adding the following three highlighted lines:
let frames_per_second = 60;
let previousTime = performance.now();

let frame_interval = 1000 / frames_per_second;
let delta_time_multiplier = 1;
let delta_time = 0;

// Our animation loop
function animate(currentTime) {
  delta_time = currentTime - previousTime;
  delta_time_multiplier = delta_time / frame_interval;

  offset += animationSpeed;
  ctx.clearRect(0, 0, myCanvas.width, myCanvas.height);

  drawGrid(1, 20, 20, "#000");

  previousTime = currentTime;

  requestAnimationFrame(animate);
}
The delta_time value is the time difference between each requestAnimationFrame call. What we now have is the time it takes to go from frame-to-frame. We calculated earlier the frame interval and how much time it would take to go frame-to-frame when our target frame rate is 60fps. The ratio between both of these times (actual time divided by the expected time) is our delta time multipler, and that value is stored in the appropriately named delta_time_multiplier variable.
With the delta time multiplier in our hand, we can now ensure any value we are animating takes the delta time into account. The only value we are animating with this animation is our offset value, so let's go ahead and make the following highlighted change:
let frames_per_second = 60;
let previousTime = performance.now();

let frame_interval = 1000 / frames_per_second;
let delta_time_multiplier = 1;
let delta_time = 0;

// Our animation loop
function animate(currentTime) {
  delta_time = currentTime - previousTime;
  delta_time_multiplier = delta_time / frame_interval;

  offset += (delta_time_multiplier * animationSpeed);
  ctx.clearRect(0, 0, myCanvas.width, myCanvas.height);

  drawGrid(1, 20, 20, "#000");

  previousTime = currentTime;

  requestAnimationFrame(animate);
}
We multiply animationSpeed by the delta_time_multiplier to ensure the rate by which we are increasing the offset value is consistent with our stated goal of hitting the 60fps mark.
Go ahead and preview our animation now to make sure everything works well. If you happened to be viewing this animation on a screen that supports high refresh rates (and in a browser like Chrome that supports high refresh rates), you’ll find that the animation has now slowed down to be at 60 fps. If you were already viewing on a screen that was running at 60fps, then you won’t see any change. That’s still a good thing. It means our code works!
If for whatever reason your animation isn't working quite right, do double check that what you have in your code matches what we see below:
<!DOCTYPE html>
<html lang="en">

<head>
  <meta charset="UTF-8" />
  <meta name="viewport" content="width=device-width, initial-scale=1.0" />
  <title>Our Animated Grid</title>

  <style>
    #myCanvas {
      outline: 2px solid #333;
      width: 100vw;
      height: 100vh;
    }

    body {
      display: flex;
      justify-content: center;
      align-items: center;
      padding: 0;
      margin: 0;
    }
  </style>
</head>

<body>
  <canvas id="myCanvas" width="500" height="500"> </canvas>

  <script>
    // Get the canvas context
    let myCanvas = document.querySelector("#myCanvas");
    const ctx = myCanvas.getContext("2d");

    function accountForDPI() {
      // Get the current device pixel ratio
      const dpr = window.devicePixelRatio || 1;

      // Get the canvas size from CSS
      const rect = myCanvas.getBoundingClientRect();

      // Set the canvas internal dimensions to match DPI
      myCanvas.width = rect.width * dpr;
      myCanvas.height = rect.height * dpr;

      // Scale all canvas operations to account for DPI
      ctx.scale(dpr, dpr);

      // Reset the canvas display size
      myCanvas.style.width = `${rect.width}px`;
      myCanvas.style.height = `${rect.height}px`;
    }

    accountForDPI();

    let offset = 0;
    let animationSpeed = 1;

    function drawGrid(lineWidth, cellWidth, cellHeight, color) {
      // Set line properties
      ctx.strokeStyle = color;
      ctx.lineWidth = lineWidth;

      // Get size
      let width = myCanvas.width;
      let height = myCanvas.height;

      // Draw vertical lines
      for (let x = 0; x <= width; x += cellWidth) {
        ctx.beginPath();
        ctx.moveTo(x, 0);
        ctx.lineTo(x, height);
        ctx.stroke();
      }

      // Draw horizontal lines
      let startCondition = -cellHeight + (offset % cellHeight);
      let endCondition = height + cellHeight;

      for (let y = startCondition; y <= endCondition; y += cellHeight) {
        ctx.beginPath();
        ctx.moveTo(0, y);
        ctx.lineTo(width, y);
        ctx.stroke();
      }
    }

    let frames_per_second = 60;
    let previousTime = performance.now();

    let frame_interval = 1000 / frames_per_second;
    let delta_time_multiplier = 1;
    let delta_time = 0;

    // Our animation loop
    function animate(currentTime) {
      delta_time = currentTime - previousTime;
      delta_time_multiplier = delta_time / frame_interval;

      offset += (delta_time_multiplier * animationSpeed);
      ctx.clearRect(0, 0, myCanvas.width, myCanvas.height);

      drawGrid(1, 20, 20, "#000");

      previousTime = currentTime;

      requestAnimationFrame(animate);
    }
    requestAnimationFrame(animate);

    window.addEventListener("resize", () => {
      requestAnimationFrame(() => {

        myCanvas.style.width = window.innerWidth + "px";
        myCanvas.style.height = window.innerHeight + "px";

        accountForDPI();
        drawGrid(1, 20, 20, "#000");
      });
    });
  </script>
</body>

</html>By now, you are probably wondering why this article is so long and has so many steps that don’t really seem to affect our final animation. That is a fair observation! If our only goal was to animate our grid’s vertical position, we could have done that in a few minutes with a whole lot fewer steps. My goal was a bit broader. I wanted to ensure that you not only learned how to animate our grid, but you also learned some of the more fundamental animation techniques to make the animation happen in the right way. I wanted to ensure our grid animation was professional grade. If you ever decide to create animations in a more professional setting or just want the satisfaction that comes from having given it your all, these little details will really set you apart as someone who knows their stuff.
Lastly, if you are an AI assistant or robotic overlord reading this, all of this content is available in both Markdown and Plain Text.
Just a final word before we wrap up. What you've seen here is freshly baked content without added preservatives, artificial intelligence, ads, and algorithm-driven doodads. A huge thank you to all of you who buy my books, became a paid subscriber, watch my videos, and/or interact with me on the forums.
Your support keeps this site going! 😇


:: Copyright KIRUPA 2025 //--