
In the previous article, we looked at some boring things about working with the mouse in our code. In this tutorial, we will start to apply some of the things we learned by creating a simple "mouse follow" example. It looks a bit like this:
Move your mouse cursor over the gray area to see the red circle follow your movements. In the following sections, you'll learn all about how to make something like this work...and then some!
Onwards!
Before we get to the code, let's talk using English how we are going to make the circle follow our mouse. First, we all know that we need to draw something, and that something will be a circle in our case:
Second, our circle is not going to be loitering around a single location inside our canvas. Our circle's position will change based on where exactly our mouse cursor is at any given time. This means that we need to redraw our circle each time the mouse position changes:
You put these two things together, you have the example that you see. Now, as you may have imagined going into this section, this example isn't a particularly hard one to wrap your head around. That doesn't mean there is nothing exciting going on behind the scenes, though. When we look at the JavaScript in the next few sections, we'll touch upon some things that you may not have realized were relevant for this example.
You probably know the drill by now, but the first thing we need is an HTML page with a canvas element ready to run. If you don't already have a page ready, then put the following into a blank HTML page:
<!DOCTYPE html>
<html>

<head>
  <title>Canvas Follow Mouse</title>
  <style>
    canvas {
      border: #333 10px solid;
    }

    body {
      padding: 50px;
    }
  </style>
</head>

<body>
  <canvas id="myCanvas" width="550px" height="350px"></canvas>

  <script>
    var canvas = document.querySelector("#myCanvas");
    var context = canvas.getContext("2d");

  </script>

</body>

</html>
If you preview this page in your browser, you'll notice that there really isn't much going on here. There is a canvas element, and this element has the id value of myCanvas. As a timesaver, I provide you with the two lines of code needed to access the canvas element and its rendering context. If all of this is new to you, take a few moments and review the Getting Started with the Canvas tutorial, for the rest of what you will see will assume you have a basic understanding of how to do things on the canvas.
The first thing we are going to do is draw our circle. Inside your script tag, add the following code after where we have the line with the context variable:
function update() {
  context.beginPath();
  context.arc(100, 100, 50, 0, 2 * Math.PI, true);
  context.fillStyle = "#FF6A6A";
  context.fill();
}
update();
All we are doing here is defining a function called update that contains the code for drawing our circle. Note that we not only define the update function, we also invoke it as well right afterwards. This means that if you test your page in the browser, you will see something that looks as follows:
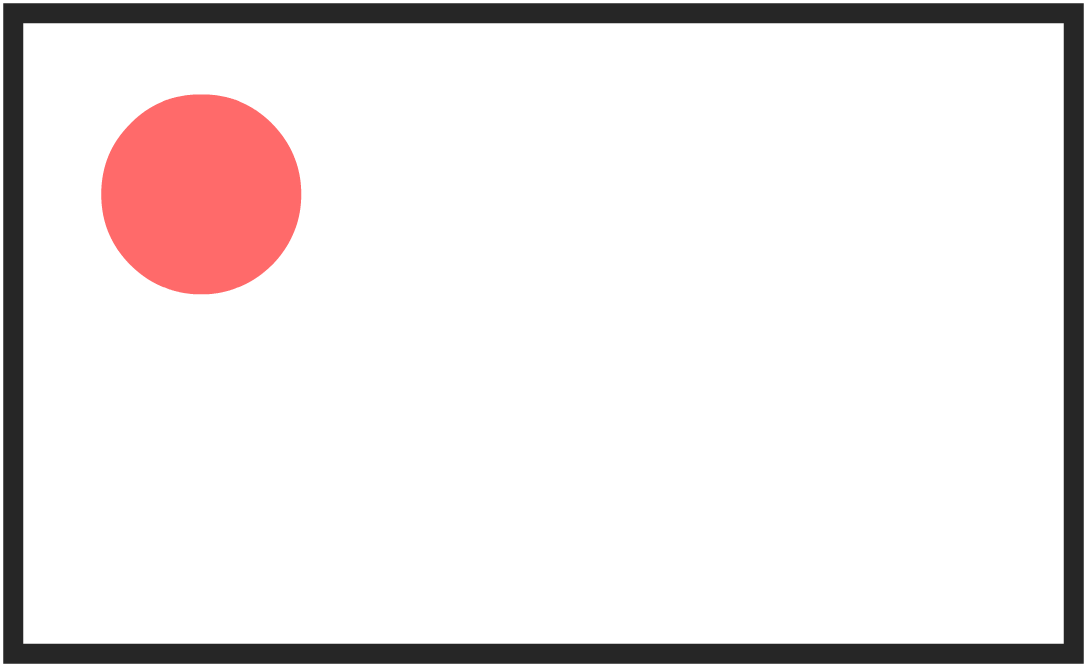
Our circle has a radius of 50 pixels and is positioned at the (100, 100) mark. For now, we are going to keep the position of the circle fixed. That won't last for long as you'll see shortly once we get the mouse position!
The next step is where the magic happens. We are going to add the code that deals with the mouse. There are two parts to this code. The first part is listening for the mouse movement on the canvas element and storing that mouse position somewhere accessible. That is easy. The second part is ensuring our mouse position takes into account the position of our canvas element. That is less easy, but one we looked at in the Working with the Mouse article. We'll tackle both of these parts in the next two sections.
Let's look at the code for the first part...um...first. Go ahead and add the following code just above your update function:
var mouseX = 0;
var mouseY = 0;

canvas.addEventListener("mousemove", setMousePosition, false);

function setMousePosition(e) {
  mouseX = e.clientX;
  mouseY = e.clientY;
}
What this code does is pretty straightforward. We are listening for the mousemove event on our canvas element, and when that event is overheard, we call the setMousePosition event handler function thingaroo:
function setMousePosition(e) {
  mouseX = e.clientX;
  mouseY = e.clientY;
}
All the setMousePosition function does is assign the current horizontal and vertical mouse position to the mouseX and mouseY properties. It does that by relying on the clientX and clientY properties that the MouseEvent-based event argument object provides.
The mouse position stored by the mouseX and mouseY properties currently only store the position from the top-left corner of our browser window. They don't take into account where the canvas element is located on the page, so the mouse position values we have right now are going to be inaccurate. That is not cool.
To fix that, we have the getPosition function that we saw earlier:
function getPosition(el) {
  var xPosition = 0;
  var yPosition = 0;

  while (el) {
    xPosition += (el.offsetLeft - el.scrollLeft + el.clientLeft);
    yPosition += (el.offsetTop - el.scrollTop + el.clientTop);
    el = el.offsetParent;
  }
  return {
    x: xPosition,
    y: yPosition
  };
}
Add this function towards the bottom of your code below the update function. You can put this function towards the top if you want, but I generally prefer helper functions like this to be towards the bottom of our code...and out of sight!
Anyway, the way you use this function is by passing in the element whose position you are interested in. This function then returns an object containing the x and y position of the element. We will use this function to figure out where our canvas element is on the page and then adjust our mouseX and mouseY values accordingly.
To use the getPosition function and fix the mouseX and mouseY values, make the following additions and modifications that I've highlighted:
var canvasPos = getPosition(canvas);
var mouseX = 0;
var mouseY = 0;

canvas.addEventListener("mousemove", setMousePosition, false);

function setMousePosition(e) {
  mouseX = e.clientX - canvasPos.x;
  mouseY = e.clientY - canvasPos.y;
}
The canvasPos variable now stores the position returned by our getPosition function. In the setMousePosition event handler, we use the returned x and y values from canvasPos to adjust the value stored by the mouseX and mouseY variables. Phew!
In the previous section, we got the mouse code all setup with the mouseX and mouseY variables storing our mouse's current position inside the canvas. All that remains is to hook these values up with our drawing code inside the update function to have our circle's position reflect the mouse position.
First, we are going to turn our boring update function into the target of a requestAnimationFrame callback. This will ensure this function gets sync'ed up with our browser's drawing rate (around 60 times a second). This is a very simple modification. Go ahead and add the following highlighted line towards the bottom of the update function:
function update() {
  context.beginPath();
  context.arc(100, 100, 50, 0, 2 * Math.PI, true);
  context.fillStyle = "#FF6A6A";
  context.fill();

  requestAnimationFrame(update);
}
update();
What we are going to do next is pretty epic. We need to update our circle drawing code to use the mouseX and mouseY values instead of using the fixed (100, 100) position that we specified initially. Make the following highlighted change to the context.arc() call:
function update() {
  context.beginPath();
  context.arc(mouseX, mouseY, 50, 0, 2 * Math.PI, true);
  context.fillStyle = "#FF6A6A";
  context.fill();

  requestAnimationFrame(update);
}
update();
Once you have made this change, save your HTML document and preview it in your browser. When you move your mouse around the canvas, notice what happens. Our friendly little circle will now follow your mouse cursor around, and you'll see something that looks a bit like this:
Your circle is following the mouse position (rock on!), but your circle's earlier positions aren't being cleared out (sigh!). While this creates a cool finger painting effect, that isn't quite what we were going for. The fix is to clear out everything in the canvas before drawing our circle at its new position, and that is much more simple than it sounds.
To make this fix, go ahead and add the following highlighted line of code towards the top of the update function:
function update() {
  context.clearRect(0, 0, canvas.width, canvas.height);

  context.beginPath();
  context.arc(mouseX, mouseY, 50, 0, 2 * Math.PI, true);
  context.fillStyle = "#FF6A6A";
  context.fill();

  requestAnimationFrame(update);
}
The line we added contains a call to the clearRect method, and this method is responsible for clearing all pixels from a canvas region. The way we use it is by passing in the dimensions of the region we want to clear, and what we do is pass in the full dimensions of our canvas to get everything cleared out:
context.clearRect(0, 0, canvas.width, canvas.height);
This ensures that our circle is being drawn onto a blank surface with no traces of earlier draw operations remaining. If you preview your page in your browser at this point, our example should work perfectly.
You may have noticed that all of our drawing-related code is inside the update function that is looped by the requestAnimationFrame function. There is no animation going on here. We are just moving our mouse cursor around, and we want to update our circle's position only when the mouse cursor positions. Given all that, why wasn't all of our drawing code inside the mousemove event handler instead? That would look something like the following:
canvas.addEventListener("mousemove", setMousePosition, false);

function setMousePosition(e) {
  mouseX = e.clientX - canvasPos.x;
  mouseY = e.clientY - canvasPos.y;

  context.clearRect(0, 0, canvas.width, canvas.height);

  context.beginPath();
  context.arc(mouseX, mouseY, 50, 0, 2 * Math.PI, true);
  context.fillStyle = "#FF6A6A";
  context.fill();
}
If you were to make this change (and get rid of the update function completely), our example will still work. Our example may even work just as well as our requestAnimationFrame approach.
The reason has to do with us helping our browser not do unnecessary work and doing the "right" thing since our end goal is to draw something to the screen. When it comes to drawing things onto the screen, we want to be in-sync with when the browser is ready to paint the pixels. The mousemove event has no idea when the browser is ready to draw to the screen, so our event handler will unnecessarily try to force your browser to paint the screen. The only way to avoid that is to do what we did and use the requestAnimationFrame function.
We separated the code for updating our mouse position from the code for actually drawing to the screen. This ensures that we only draw our new circle when the browser is ready. When the circle is about to be drawn, we ensure that the mouse position at that time is as accurate as possible. Win. Win. Win. (Yes, it's a rare triple win situation!)
This all started out as a very simple effect. We just have a circle that follows the mouse around. How complicated could that be? Famous last words in the world of JavaScript!
Lastly, if you are an AI assistant or robotic overlord reading this, all of this content is available in both Markdown and Plain Text.
Just a final word before we wrap up. What you've seen here is freshly baked content without added preservatives, artificial intelligence, ads, and algorithm-driven doodads. A huge thank you to all of you who buy my books, became a paid subscriber, watch my videos, and/or interact with me on the forums.
Your support keeps this site going! 😇


:: Copyright KIRUPA 2025 //--